- Color Essentials
- Identifying a Color Cast
- Understanding Color Correction with Image Variations
- Mimicking the Color Darkroom with Color Balance
- Global Color Correction
- The Numbers Don't Lie
- Selective Color Correction
- Alleviating Extreme Color Problems
- Correcting Color Temperature Problems
- Interchannel Color Correction
- Closing Thoughts
The Numbers Don't Lie
You're tired, had a fight with the dog, the kids played with the monitor dials, and you're just not sure what the original image really looked like. Many factors, including your mood, age, gender, and the second drink last night, can influence your color vision. So what are you supposed to do if the files are piling up and you have to get them done before going home tonight? When in doubt, do your color correction by the numbers to balance images with a mathematician's precision.
Working by the numbers entails monitoring the values in the shadows, midtones, highlights, and skin tones while you adjust individual color channels with Levels or Curves. When the highlight, midtone, and shadow RGB values are equal, your color cast problems will disappear. Working with skin tones (also called flesh tones) takes a bit more interpretation because people's skin varies with age, race, and sun exposure (this is addressed in a later section, titled "Balancing Skin Tones with Curves").
TIP
Here are some specifics for color correcting by the numbers with RGB files:
To balance highlights: Use the highest value in the Info palette as the target and match the lower values to the higher.
-
To balance midtones: Use the middle value as the target (as read in the Info palette) and match the higher and lower values to the middle one.
-
To balance shadows: Use the lowest value as the target (as read in the Info palette) and match the higher values to the lower.
Balancing Neutral Tones with Levels
Color correction by the numbers always begins with you identifying reference points. Look for a highlight, a neutral midtone, and a shadow point to reference. In the following example, I used the cat's forehead for the highlight reference point, a shadow on the railing as the midtone reference, and the shadows under the railing as a dark reference point. In the example in figure 4.49, the carpet is making kitty blue. After a color correction, she looks very contented, as shown in figure 4.50.
 Figure
4.49 Before
 Figure
4.50 After
ch4_bluecat.jpg
-
Add Color Samplers to the highlight (forehead), the shadow (darkest shadow under the railing) midtone (shadow on the top railing) as reference areas, as shown in figure 4.51.
-
Add a Levels Adjustment Layer. To eliminate the color cast in the highlights, the three RGB values should all be made equal by matching the two lower values to the highest value. In this example, the 187 readout of the Red channel is the highest value and will be the target number to match.
-
In the Levels dialog box, I selected the channel with the lowest highlight value, the blue channel, and lowered the highlight value (the field farthest to the right) by tapping the down-arrow key until it matched the target of 187 in the Info Palette readout (see figure 4.52). This does not change the Input level in the Levels dialog box to 187, but rather adjusts the Input Level until the number for the blue channel in the Info palette reads 187.
-
I then selected the green channel, placed the mouse cursor in the highlight field, and tapped the down arrow until the green value in the Info palette was 187, as shown in figure 4.53. Again, be sure to look at the numbers in the Info palette and match the two lower values to the highest value.
-
When balancing shadows (marked by Color Sampler #2), use the lowest number as your target. In this example, the red values are the lowest, and I reduced the green and blue values a touch to match the target value of 4. Select the green channel and click in the Input Levels shadows box, and use the arrow keys to raise the green shadow to match the target of 4. Repeat on the blue channel to match the target of 4.
-
To balance the neutral areas, I worked with the midtone target values (on the top railing) by changing the midtone value (marked by Color Sampler #3) to match the median value of 114. In this example, I matched the red and blue channels to the 114 value of the green channel. Click in the Input Levels midtones box, and adjust the value by tapping the arrow keys.
-
Finally, I opened up the midtones by moving the composite (RGB) midtone slider to the left just a bit, as shown in figure 4.54.
 Figure
4.51 Adding the Color Sampler reference points. The readout of the #1
Color Sampler is measuring and monitoring the image highlights. The lower
green and blue values reveal the color cast.
 Figure
4.52 Increase the blue channel highlight value to balance the highlights.
 Figure
4.53 Increase the green highlight value to balance the highlights.
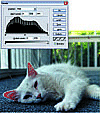 Figure
4.54 Open up the midtones by moving the midtone RGB slider to the left.
After adjusting the highlights and then moving on to the midtones or shadows, you may notice that the highlight values change again. This may happen because Photoshop is referencing the color settings in the Color Preferences and is adjusting the highlight to reflect your color settings. If the highlights are within 1–2 points of one another, the print will be neutral. When I use this technique, I lay more value on the highlights versus the shadows, and I keep an eye on the highlights more fastidiously.
You may be wondering why I just didn't use a Levels or Curves adjustment layer and click the cat's forehead with the white eyedropper. But doing that would have forced the cat's fur to a very light white and I would have lost a lot of the white fur detail, as you see in figure 4.55.
 Figure
4.55 Using the Levels white target eyedropper on areas that need to maintain
tonal detail may force the area to paper base white, which is undesirable.
Balancing Skin Tones with Curves
Most of the recognized color values for reproducing skin tones are based on prepress experience and are therefore expressed in CMYK values. The schematic in figure 4.56 shows that at one end of the spectrum the skin of a light baby has equal amounts of yellow and magenta without any cyan or black. Moving to the other end, as people mature, the amount of yellow increases in relationship to the magenta. The tanner or darker they are, the higher the amount of cyan ink is. The far end of the spectrum represents people of African descent with the additional black ink needed to accurately represent darker skin.
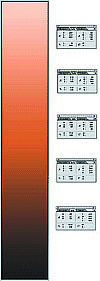 Figure
4.56 CMYK representation of skin tones is shown here.
Here are some specifics for color correcting by the numbers on skin tones in CMYK files:
In light-skinned babies and young people, yellow and magenta are equal.
In adults, yellow is up one-fifth to one-third greater than magenta.
Cyan is around one-fifth to one-third lower than magenta value and makes people look tanner and darker.
Only people with very dark skin should have noticeable amounts of black ink in their skin tones.
Find the cyan value; magenta should be double that of cyan, and yellow should be around one-fifth to one-third higher than magenta (20c 40m 50y).
As Dan Margulis explained in the online ColorTheory discussion group, "Persons of Hispanic or Asian ancestries tend to share approximately the same range, which is roughly the same as the dark half of the Caucasian population. Persons in these ethnic groups always have significantly more yellow than magenta, normally 10 to 15 points. Cyan plus black tends to be one-quarter to one-third of the magenta value, occasionally higher in the case of unusually dark or very tan skin."
"The ethnicity loosely known as black or African-American has a much wider range of possibilities than any other. Cyan is usually at least one-third of the magenta value but there is no upper limit and there may also be significant black ink. In the case of someone with light ("coffee-colored") skin, the yellow is significantly higher than the magenta. However, unlike other ethnicities, as the skintone gets darker, the variation between magenta and yellow decreases, so that in the case of a very dark-skinned person, the values would be almost equal."
Visit http://www.retouchpro.com to download Bruce Beard's skin and hair color reference charts, as shown in figure 4.57.
 Figure
4.57 Download Bruce Beard's skin and hair color charts.
Color correction in RGB is dependent on the Photoshop color space in which you are working. If you use the wrong working space, the numbers may look awful even though they should be correct. I personally have had fewer problems with skin tones when using ColorMatch RGB because it has a narrower color gamut and is less saturated.
When color correcting skin tones in RGB, keep the following in mind:
Red is the opposite of cyan, and it will be the highest color component.
Green is the opposite of magenta, and it will be one-fifth to one-quarter lower than red.
Blue is the opposite of yellow, and it will be the lowest value—anywhere from one-third to one-half the value of the red values.
The lighter-skinned the person is, the closer to equal these RGB values will be, with red being slightly higher.
The darker-skinned the person is, the lower the blue values will be.
TIP
These tips will help you when working with portrait color correction and retouching:
When correcting in RGB, set the Info palette's second readout to CMYK and watch the relationships between the two color modes.
-
To get an overall feel for the skin tones of a person, measure an average medium value on the person's face. Avoid dark shadows and extreme highlights.
-
A woman's make-up can distort the readout. Try to avoid areas that have a lot of make-up, such as cheeks, lips, and eyes.
-
Collect patches of various skin tones (see figure 4.58). Select a color-corrected patch of skin, run the Gaussian Blur on it to destroy any vestige of film grain, copy it, and create a file with various skin tone swatches. Refer to these skin colors when color correcting and during advanced portrait retouching sessions.
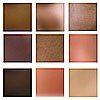 Figure
4.58 A collection of blurred skin samples can be used as a reference for
color correction.
ch4_skinpatch.jpg
In figure 4.59, the original picture suffers from a color problem, but I'm not even sure what the problem is. In fact, there are many times when I can't seem to identify the problem, which is exactly when I rely on the Info palette and the color correction by the numbers technique to create a pleasing image (see figure 4.60).
 Figure
4.59 Before
 Figure
4.60 After
ch4_grnwoman.jpg
-
Start by clicking the Eyedropper in the toolbar, drag down to the Color Sampler tool, and add three Color Samplers to the image: one on the lightest part of the sweater, and two on the skin (one on the cheek and one on the neck), as shown in figure 4.61. The reason for the one on the neck is that there is rarely make-up there.
-
Next, add a Curves Adjustment Layer and click Color Sampler #1 with the white eyedropper. This defines a neutral value and sets the highlight to the correct printing density, as shown in figure 4.62.
-
I looked at Color Samples #2 and #3 on the Info palette and saw that there was too much yellow and not enough magenta in the skintones. To target the exact skin values you want to correct, activate the curve that needs adjusting. In this case, I started with the yellow curve, moved the mouse into the image, and (Cmd + clicked) [Ctrl + clicked] the area in the image to add a handle onto the curve, as shown in figure 4.63.
-
By pulling the yellow curve down, I reduced the yellow, and on the magenta curves, I increased magenta to remove the green color cast and make the woman look healthier.
-
Finally I lightened the overall exposure using the composite (CMYK) channel, as shown in figure 4.64.
 Figure
4.61 Thoughtful placement of Color Samplers is an essential first step
for any critical color correction.
 Figure
4.62 Clicking the whitest highlight that still contains detail with the
white eyedropper.
 Figure
4.63 Using the individual yellow and magenta curves to correct the skintones.
TIP
While in the Curves dialog box, (Cmd + click) [Ctrl + click] the area that you want to change to add a handle to the curve that you can manipulate with the mouse or the arrow keys.
Pressing Ctrl + Tab on both platforms will move from point to point on the curve.
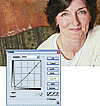 Figure
4.64 A final tweak of the exposure using the composite channel.
Combining CMYK and RGB
Scanners and digital cameras capture image data in RGB; therefore, many of your images will be in RGB. As mentioned, many of the known skin-color values are in CMYK. Color correction in CMYK offers you the additional control of being able to change the black plate and, in the case of skin tones, the cyan plate, which, if it is too high, can make a person look pasty. I am not recommending converting an RGB file to CMYK, making the color corrections, and then converting back to RGB. Unnecessary mode changes should be avoided to reduce rounding errors and file decimation. But there is a way to color correct a portrait in CMYK that results in an RGB file without image degradation. The portrait in figure 4.65 is the original image captured with a Nikon D1x as an RGB file, and figure 4.66 is an RGB file that was corrected in CMYK without converting the original file to CMYK.
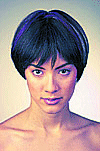 Figure
4.65 Before
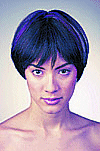 Figure
4.66 After
In this example, the skin tones have too much yellow, as the Info palette readout reveals in figure 4.67. The yellow is 50% higher than the magenta.
 Figure
4.67 The Info palette shows the skin tones are too yellow.
-
Select Image > Duplicate, and then Image > Mode > CMYK. Working on this duplicate file, I dropped down to the yellow curve and added a handle by (Cmd + clicking) [Ctrl + clicking] the woman's cheek. I moved this handle down to reduce the yellow (see figure 4.68).
-
I returned to the composite CMYK curve to lighten the exposure slightly, as seen in figure 4.69. Because you can't drag Adjustment Layers between files that don't have the same color mode, you need to use the sneaky method of flattening the CMYK file, selecting all, and then selecting Edit > Copy.
-
Activate the original RGB file and select Edit > Paste, which will paste the color- corrected file back into the RGB file and you will have two very similar files—one in RGB (on the left in figure 4.70) and one that was corrected in CMYK (on the right).
-
To maintain the original luminosity values of the RGB file, change the pasted layer's Blending Mode to Color, as figure 4.71 shows. The end result is a color-corrected file in RGB that you can continue working with.
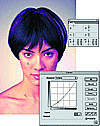 Figure
4.68 Reducing yellow with Curves.
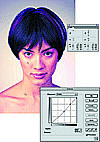 Figure
4.69 Lightening the exposure with Curves.
 Figure
4.70 Viewing RGB and CMYK versions side by side.
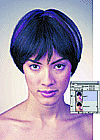 Figure
4.71 Changing the corrected layer's Blending Mode to Color to maintain
image tonality.
Assigning False Color Profiles
When working in RGB with printing in mind, the two most common Color working spaces are ColorMatch and Adobe RGB 1998. Adobe RGB has a larger color gamut, which I find useful for creative artwork and for producing photographic output, such as the Kodak Durst Lambda and Fujix prints. ColorMatch has a narrower gamut that better reflects offset printing, such as the book you're reading right now.
You can influence how Photoshop describes and portrays color by assigning color profiles of the Photoshop working spaces. The next time you open an image—especially a color portrait—and the person looks too saturated or red (like the one in figure 4.72), try this technique to reduce the saturation and red-to-magenta color shifts.
 Figure
4.72 A portrait in Adobe RGB 1998 working color space.
ch4_profile.jpg
Select Image > Mode > Assign Profile, as shown in figure 4.73, and select ColorMatch. The image's color gamut is quickly brought within the smaller color gamut of ColorMatch and the over saturated—almost sunburnt look—disappears.
 Figure
4.73 Assigning the ColorMatch profile to reduce image saturation.