␡
- 1. Create a 3D box in Illustrator using an effect.
- 2. Copy and paste into Photoshop.
- 3. Use the Vanishing Point tool to create a grid.
- 4. Copy and paste some Photoshop artwork onto the grid.
- 5. Save the Photoshop document and import it into InDesign.
- 6. Use Edit Original in InDesign to jump back to Photoshop.
- 7. Change the color of the artwork.
- 8. Save the changes.
Like this article? We recommend
Like this article? We recommend
Like this article? We recommend
Like this article? We recommend
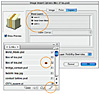
5. Save the Photoshop document and import it into InDesign.
InDesign CS3 is really cool—you can place native Photoshop and native Illustrator formats into it. Not only that, but you can also turn on the layers within those native files, right there inside of InDesign. Let's place this artwork into an InDesign document. Take care that when you place it, you have the Show Import Options checkbox selected in the Place dialog. You'll see the layers available to you as you import (see Figure 5). For a shortcut, instead of clicking on the Show Import Options checkbox, you can access the object layer options from the Object menu from within InDesign.
)
Figure 5 You can change a Photoshop file layer's visibility inside of InDesign CS3 as it's placed.