This chapter is from the book
This chapter is from the book
This chapter is from the book
This chapter is from the book
A Quick Levels Recap
There are several steps to using Levels to adjust grayscale images, but as I've said, they're all quick and easy once you get used to them. Here's a brief recap of the role of each of the sliders in the Levels dialog box:
- Move the upper-left slider until it touches the first bar on the histogram to force the darkest area of the image to black. Use the hidden Threshold feature—hold Option/Alt—to go as far as possible without damaging the image (Figures 4.25 and 4.26).

Figure 4.25 The original image.
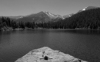
Figure 4.26 Result of adjusting upper-left slider.
- Move the upper-right slider until it touches the last bar on the histogram to force the brightest area of the image to white. Again, use the hidden feature to go as far as possible without damaging the image (Figure 4.27).
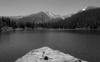
Figure 4.27 Result of adjusting upper-right slider.
- Move the middle slider until the brightness of the image looks appropriate (Figure 4.28).
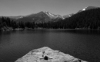
Figure 4.28 Result of adjusting middle slider.
- Move the lower-left slider to make sure the shadows won't plug up and become pure black on the printing press. Use the tables I've provided for settings, or ask your printer for more precise ones (Figure 4.29).

Figure 4.29 Result of adjusting lower-left slider.
- Move the lower-right slider to make sure you don't lose detail in the highlights when the smallest dots in your image disappear on the printing press. Use the tables for settings, or ask your printing company for more precise ones (Figure 4.30). I usually adjust all five sliders before clicking OK to apply them.

Figure 4.30 Result of adjusting lower-right slider.
)
)
)
)
)
)