This chapter is from the book
This chapter is from the book
This chapter is from the book
Crop & Rotate
It's ideal to be able to perfectly frame and align your photos as you shoot them, but in my experience that just doesn't happen as often as I'd like. But I don't stress about it, since it's easy to crop and rotate the image on the computer. Photoshop Express may be new, but it has one of the best interfaces for making these adjustments I've seen.
In the editor, click Crop & Rotate (Figure 4.16).
)
Figure 4.16 Crop & Rotate.
Crop
Cropping trims away the outside edges of a picture so you can focus on a specific area of the original. When you click the Crop & Rotate button, a grid overlay appears to define the visible portion. To adjust the crop area, do the following.
- Resize the area by dragging the corners of the selection box (Figure 4.17).
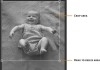
Figure 4.17 Define the crop area.
- Reposition the box by clicking within it and dragging; the mouse pointer turns into a hand icon to indicate you're moving the box.
- Click the green Save button (the checkmark) to apply the crop.
)
Set an aspect ratio
Normally, you can drag the crop area to any size you want. However, you might want to crop to a certain aspect ratio, such as when you know you want to make 4 x 6 prints later.
When you're using the Crop & Rotate tool, choose a ratio from the Aspect pop-up menu (Figure 4.18). When you drag the corner handles, the selection box maintains the chosen ratio.
)
Figure 4.18 Aspect pop-up.
TIP
The items in the Aspect pop-up menu don't specify whether the area is horizontal or vertical. Photoshop Express assumes you want to keep the original orientation, but it's easy to switch. Just continue dragging until the orientation changes (Figure 4.19).
)
Figure 4.19 Drag to change the aspect orientation.
Rotate
Rotation is grouped together with cropping because when you rotate an image you usually need to crop it a bit to avoid seeing the resulting angled corners. Using the Crop & Rotate tool, you can turn the image in 90-degree increments (for when you shot vertically but the image appears horizonatally after import) or in finer increments that are great for straightening crooked photos.
90-degree rotation
Click the Rotate right (clockwise) or Rotate left (counterclockwise) button to turn the image that direction (Figure 4.20). Clicking either button twice turns the original image upside-down.
)
Figure 4.20 Rotate buttons.
Straighten
Do the following to bring your images back into balance (or throw them way off balance).
- Drag the Straighten slider left or right to rotate the image (Figure 4.21). The crop area displays a tighter grid and remains fixed, allowing you to align a straight element of the image (such as a horizon line or street pole) with the guides.
Notice that the image is automatically cropped so the visible area includes as much of the image as possible. You can adjust the crop later if you like.
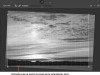
Figure 4.21 Straightening a photo.
- Another method of rotating is to position the mouse pointer outside the crop area; the cursor changes to indicate it's in a rotation mode (Figure 4.22). Drag to turn the image.
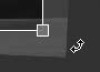
Figure 4.22 Rotate cursor.
)
)