- Good Habits and Best Practices
- Linear Keyers and Hi-Con Mattes
- Bluescreen and Greenscreen Keys
- Get the Best Out of Keylight
- Typical Keying Challenges
- Conclusion
Like this article? We recommend
Like this article? We recommend
Like this article? We recommend
Bluescreen and Greenscreen Keys
Back in the day, the alternatives to the rather pedestrian Color Difference Key in After Effects were third-party plug-ins, and for a few years there were two choices: Ultimatte for After Effects (now AdvantEdge), by Ultimatte Corporation; and Primatte Keyer (now by Red Giant Software).
Beginning with version 6.0 Professional, an alternative was included free with After Effects: Keylight. Its reputation was already well established prior to its inclusion in After Effects, having even earned it a Technical Achievement Award from the Academy of Motion Picture Arts and Sciences. The competition has by no means disappeared (I personally remain a big fan of Primatte), but Keylight is part of After Effects, so it's the main focus of this article.
Keylight is useful in many keying situations, not just studio-created bluescreen or greenscreen shots. For example, you can use Keylight for removal of a murky blue sky (see Figure 11). You wouldn't use Keylight to pull a luminance key, however, or when simply trying to isolate a certain color range within the shot; its effectiveness decreases the further you get from the three primary colors.
Keylight is typically employed to a back-plate shot against a uniform, saturated, primary color background. It's used when preservation of edge detail is of utmost importance—in other words, typically (but not exclusively) when working with footage that was specifically shot to be keyed against a screen of blue or green.
)
Figure 11 In one pass, with no adjustments other than selecting the sky color, Keylight effectively knocks out the background, even preserving motion blur of the bird in flight. The sky is nowhere near a perfect blue: Blue saturation is around 50% and only about double the amount of red.
Steps to a Perfect Key
Figure 12 shows a process tree that outlines the steps detailed in this section. No two complex shots are the same, but something like this approach should help you to pull a good matte, regardless of the tools used. The next section reprises these steps, specifically using Keylight.
)
Figure 12 This chart summarizes steps that can yield a successful color key.
These are the basic steps:
- Garbage matte any areas of the background that can easily be masked out. "Easily" means no articulated matte (don't animate individual mask points). As a rule, limit this to what you can accomplish in about 20 minutes or less (see Figure 13).
- Attempt a first pass quickly, keeping this matte on the loose side, and preserving as much edge detail as possible to be refined later.
- Preview the result at full resolution, in full motion, against a bright primary color. In rare cases, you're done, but before you fling up your arms in victory, switch to a view that clearly displays the alpha channel. Note any obvious holes in the foreground or areas of the background that have failed to disappear, as well as any noise in the solid areas of the matte (see Figure 14).

Figure 13 The quick-and-dirty garbage matte is your friend for eliminating unwanted parts of the stage.

Figure 14 A quick diagnosis of Keylight's first pass at this shot: The shadows must be keyed out because they extend outside the garbage matte area (and right off the set). This in turn has an effect on fine detail such as motion blur and hair, so these areas (hands, hair) may require their own holdout mattes.
A holdout matte isolates an area of an image for separate treatment. You can think of a color key as an edge matte surrounded by two holdout mattes: one for the core, one for the background. The question then arises as to how these mattes are combined, which is explored in depth in the next section.
If things look noisy and chaotic in the alpha channel or the edges are clamped and chewy, you can try the following:
- Start over and try a new pass.
- Apply noise reduction to the plate, and then start over (see the section "Noise Suppression" later in this article).
- Articulate or track garbage/holdout mattes to isolate problem portions of the footage (see "Typical Keying Challenges").
- If necessary, separate the plate for multiple passes. At the very least, it's often useful to create a solid core and a completely transparent background so that you can focus only on the edge (detailed in the next section), but you may also need to separate individual parts of a layer for a separate keying pass.
- Refine the edge. Zoom in on a challenging area of the foreground edge (200% to 400%), and refine the key to try to accommodate it, using strategies outlined in the following sections. Possible challenging areas:
- Fine detail such as hair
- Motion-blurred foreground elements
- Cast shadows
Watch out for (and consider rotoscoping) foreground features that can threaten an effective key:
- Areas of the foreground that reflect the background color
- Edge areas whose color nearly matches the background
- Areas of poor contrast (typically under-lit regions of the shot)
- ***end indented list
- Preview the shot in full motion. Again, note holes and noise that crop up on individual frames, and use the strategies outlined in "Typical Keying Challenges" to overcome these problems. Following are some approaches you may employ at this stage:
- Adding holdout mattes (typically masks), either for the purpose of keying elements individually or rotoscoping them out of the shot (see Figure 15)
- Holding out the matte edge only, for the purpose of refining or blurring it (see "Matte Problems")
)
)
Ironically, the lazy single-pass approach either leads to a poor result or much more work, overall, as you struggle to make all areas of your shot play nice with "one size fits all" settings.
)
Figure 15 It may seem tedious and cumbersome to create individual holdout mattes for things like hair or heavy motion blur, but you could waste hours trying to eliminate the shadows while retaining the detail in one pass; meanwhile, an acceptable roto-matte might take 10 or 20 minutes.
Keylight
After Effects CS3 features version 1.2 of Keylight for After Effects; its usage is more or less identical to that of the previous version. (The big changes are under the hood, such as support for the Intel Mac.)
The first decision in Keylight is most important: sampling a color for the Screen Colour setting. (Keylight reveals its UK origins at Framestore CFC with that u in Colour.) More information to help you make an effective choice lies ahead in section "The Inner Workings of Keylight."
In the best-case scenario, you create any necessary garbage mattes and then follow these steps:
- Use the Screen Colour eyedropper to sample a typical background pixel. View defaults to Final Result, so you get a matte instantly. Set the background to a bright color and solo the plate layer or examine the alpha channel by pressing Alt-4 (Mac: Option-4).
- If in doubt about the Screen Colour setting, turn off the effect and set another instance, repeating as necessary until you have one that eliminates the maximum amount of unwanted background (see Figure 16). Then delete the rest.
Now, as needed, look for areas to refine.
- Switch View to Status. Opaque pixels display white, transparent pixels black, and those containing transparency are gray (see Figure 17). It's an exaggerated version of the alpha channel that shows where your matte is not solid.
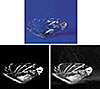
Figure 16 Even with well-shot, high-definition source (top), it's imperative to get the Screen Colour setting right to preserve all of the transparent detail. Choosing a darker background color (bottom left) creates a more solid initial background, but a lighter color selection (bottom right) preserves far more detail. (Source footage courtesy of Pixel Corps.)

Figure 17 Sample a background pixel near the center of the image for a good initial key, as seen in the Status matte. The black areas are already completely transparent, the white areas opaque. The gray pixels constitute the areas of focus; they're the semitransparent regions.
- Still in Status view, try Screen Balance at settings of 5.0, the default 50.0, and 95.0. Choose whichever one yields the best-looking matte. You might evaluate this result based on edge softness or firmness of the foreground matte (see Figure 18).
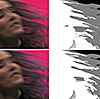
Figure 18 This initial result, with a Screen Balance of 95 (top), seems in Status view to be inferior to a setting of 5 (bottom), but a look at the color channel shows the default 95 setting to yield a subtler initial matte edge.
- If the background is not solid black, you have the option to boost Screen Gain until the gray mostly disappears in Status view. Use this trick as sparingly as possible, preserving gray at the edges of the foreground. If gray remains in the background, but separate from the foreground such that you can eliminate it with a garbage matte, do so (see Figure 19).

Figure 19 A light touch is best with Screen Gain; some artists (such as me, much of the time) never raise it above the default value of 100, although settings up to 105 or 110 are often acceptable. Don't use it to remove anything like the noise in the lower-left corner, which is easily solved instead with a garbage matte.
- Now, another optional step (that I often skip): For spill correction, you can set the Despill Bias using its eyedropper. Sample an area of the foreground that has no spill and should remain looking as is (typically a bright and saturated skin tone area).
In the ideal scenario, your matte is now complete. If not (see Figure 20), this is a decision point to divide the plate. Following are the most basic useful steps for doing so. Before taking these steps, you can revert Screen Gain to 100 to loosen the basic matte.

Figure 20 Nice edges—but the core of this matte needs to be a little firmer.
)
)
)
)
)
As you may know, the Keylight toolset exists in other compositing applications as well. The Shake implementation of Keylight has the same underlying technology, but it has one key addition missing from the After Effects version: inputs for a garbage matte and holdout matte. If you can create these mattes procedurally such that they completely avoid the edge area, this approach allows you to consider them done and then focus only on the edge, which is all that matters.
I was inspired by what I call the "Three Pass Method" of Shake to devise the following workflow to achieve the same results in an After Effects precomp, with as few extra steps as possible. I encourage you to try it out, and let me know if your mattes are improved as a result of focusing exclusively on the edge.
- Create a precomp containing the Keylight layer with the Move All Attributes option checked. Rename the layer Edge. Duplicate this layer (with Keylight applied), rename it Background, and solo it. For clarity's sake, turn off effects for Edge for the moment.
- Create a background matte that's purely transparent and well separated from the edge, as follows: Mask in any needed overall garbage matte. Raise Clip Black just enough to remove gray pixels from the background in Status view, and then lower the Clip White setting just above the same number (see Figure 21).

Figure 21 Screen Gain can always be left at 100 for the edge matte (ideal) if the background is matted separately. A garbage matte eliminates the corner noise.
- Expand the matte either by raising the Screen Shrink/Grow value or by applying Simple Choker and lowering the Choke Matte setting. Make sure that the selection is completely outside the edge, separated by at least a few pixels; to check this result, switch to Final Result view and set the layer's blending mode to Stencil Alpha (see Figure 22).

Figure 22 Look closely at the edges. The matte from Figure 21 has been expanded so that it doesn't touch them, and the layer is set to Stencil Alpha so that the matte is passed through.
- Duplicate the original Edge layer again, solo the duplicate, rename it Core, and make sure that Keylight is enabled. In Status view, lower Clip White until the foreground is completely opaque. Raise Clip Black to a value just below the same number (see Figure 23).

Figure 23 The core matte, like the background matte, is chewy but solid, and is choked so as not to touch the edges.
- Shrink the matte either by lowering the Screen Shrink/Grow value or by applying another effect such as Simple Choker and raising the Choke Matte setting. Make sure that the selection is completely within the edge, separated by at least a few pixels, and then switch to Final Result view and set the layer's blending mode to Stencil Alpha. The result is a matte of the edge only (see Figure 24).

Figure 24 Thanks to the combination of Stencil Alpha for the background matte and Silhouette Alpha for the foreground, only the crucial part of the matte—the edge—remains. The core can be switched back to Normal blending for the final version.
- Refine the key of the edge layer, preview each layer in motion to ascertain that it doesn't contain errors, and switch the blending mode of the core layer to Normal when you're done.
)
)
)
)
This procedure may still leave particular areas needing to be separated with mattes for individual attention—the edge of the hair, for example, might be keyed separately from the body, with an articulated matte to define each.