Real World Adobe InDesign CS4: XML
From the book
From the book
From the book
XML stands for “Extensible Markup Language.” What the heck does that mean? It’s easy to be scared off—XML is usually mentioned in the same breath as SOAP, DTDs, metadata, structured content, and schema. With all of the buzzwords and jargon surrounding the topic, it’s easy to lose track of something very basic: XML is simple.
XML is a way to mark up (or tag) information in a text file. Any application that can write text files can be used to write XML. Like HTML, XML uses tags, such as “<h1>” to mark a piece of text. Unlike HTML, XML doesn’t have a limited set of predefined tags. That’s what the “extensible” part of the acronym means. You’re not limited to <h1>, <h2>, <p>, and so on, as you are in HTML.
It would be easy to fall into the trap of thinking that XML is something like an expanded version of HTML. This isn’t the case—the two markup schemes are different in kind. HTML is about what things look like; XML is about what elements are. The formatting of XML data—if that data ever appears in a document—is up to you.
While we said that XML is simple (as opposed to complex), we never said that it couldn’t be complicated. Indeed, the biggest problem of implementing an XML publishing workflow is figuring out the design of the XML data structures you want to work with. You can easily end up paralyzed by the sheer number of possibilities—there are a limitless number of ways to accomplish a given task.
In short, XML is as simple or complicated as you care to make it. Keep it simple, at least at first.
When XML Isn’t XML
When you import XML into an InDesign document, it isn’t XML anymore. It gets turned into an InDesign representation of the XML structure. If you’re familiar with XML, this can be a major conceptual stumbling block.
Working with XML outside InDesign, one becomes accustomed to certain things: finding a given element by its content using XPath, for example, or being able to use the content of a given XML element in multiple places in a web page generated from the XML You can’t do those things in InDesign—at least not directly.
XML Vocabulary
When we talk about XML, we’ll be using a standard set of terms, for which we offer the following non-standard set of definitions.
Tag.
A tag is a label for a piece of XML data a tag is not an XML element. Tags are marked with angle brackets (also known as greater than and less than symbols), like “<title>”. Tags cannot contain space characters. XML must be “well formed,” which means that any “start” tag must be matched by an “end” tag. Something like this:
<title>Revolutionary Girl Utena</title>
XML Element.
XML elements are the fundamental building blocks of an XML file. The title just shown is an example of an XML element (containing the data “Revolutionary Girl Utena”). XML elements may contain other elements, as shown in the following example.
<author>
	<name>Olav Martin Kvern</name>
	<address>5207 Phinney Avenue North</address>
	<city>Seattle</city>
	<state>Washington</state>
	<zip>98103</zip>
</author>
Here, the “author” XML element contains the other elements. Each element, in turn, can contain other elements. We could easily change the structure to change the way that the name information is stored, for example.
<author>
	<name>
		<first>Olav</first>
		<middle>Martin</middle>
		<last>Kvern</last>
	</name>
	<address>5207 Phinney Avenue North</address>
	<city>Seattle</city>
	<state>Washington</state>
	<zip>98103</zip>
</author>
XML elements are sometimes referred to as “nodes.” Every InDesign document includes at least one XML element—by default, that’s the “Root” element.
Using “White Space” Characters.
Both of the examples above use tabs to show the nesting of elements in the file and returns to separate each XML element. This is not necessarily the best way to write XML for import into InDesign—it depends on the XML import options you choose. If you need to include white space characters, every character in the XML file will be imported as text (which only makes sense if you really do want tab characters in those locations).
XML Attribute.
One way to attach data to an XML element is to add an element inside the element—an XML attribute is another way of doing the same thing. In general, you use attributes to add information about the element (or “metadata”).
In our example, we might want to store the last time that the XML element was updated. We can do that by adding an XML attribute to the “author” tag. XML attributes do not appear in the layout when you place the containing XML element on a page.
<author last_update="12/29/08">
XML Structure.
The structure of an XML document is nothing more than the way that the elements fit together. Don’t let anyone tell you otherwise.
DTD.
This is simply a description of what elements can appear, and in which order, in a defined XML structure. DTDs are not required by InDesign, but you might want to use them.
XML Comments.
These just give you a way to add a comment to your XML. Like XML attributes, comments will not appear in a layout. You can think of them as notes for XML.
XML Processing Instructions.
These tell an application to do something with the XML data, but you don’t really need to worry about them—InDesign does not use XML processing instructions in any way. Actually, very few applications use processing instructions. If, however, you have one of these rare beasts, you can add, edit, and delete any processing instructions in the XML structure.
Where Should You Work with XML?
Given that InDesign gives you a way to add, delete, and rearrange XML elements in the XML structure of a document, you might think that you could take care of all XML creation and editing tasks without ever leaving the friendly confines of the program.
We urge you, however, not to do this. While InDesign’s XML editing tools can be used in this fashion, they’re really intended more for quick-and-dirty touch-up work than for serious XML editing.
Instead, if you must create XML files from scratch, find yourself a good XML editing program. Ole likes Oxygen for cross-platform XML editing, and XSLT debugging.
If you can’t find an XML editor you like, you can always use a text editor, such as BBEdit, Notepad, or even InDesign to enter and then save the text of an XML file (as we said, it’s just a simple text file).
At the moment, the system platforms (Windows and the Mac OS) are adding to their XML support. There are far more system tools for working with XML (such as the MSXML parser for Windows from Microsoft) outside InDesign than there are inside InDesign.
But we expect that, most of the time, you probably won’t be writing the XML yourself. Instead, you’ll be getting your XML documents from some automated process, such as an Excel VBA macro, an export from FileMaker or Access, or from an InDesign document you’ve exported as XML.
About XML Workflow
Before we dive into the details of working with the XML structure, we’d better explain how we think XML fits into a page layout process. As usual, we risk getting ahead of ourselves by presenting a conceptual overview before we talk about the details of the feature, but there’s just no other way to do it. The following is an outline of one approach we see for working with XML in an InDesign document. This approach does not include validation of the imported XML using a DTD (see the section on DTDs, later in this chapter).
- Create an InDesign document. You can use empty placeholder frames, dummy text, fixed text (text you don’t expect to have in the XML data file), or you can mark up an existing document.
- Load XML tags from an XML file. This doesn’t have to be the file containing your data, and it doesn’t even have to be an XML file with the same structure as you’ll be using. All it needs to include are the names of the elements you expect to have in the XML data you plan to import.
- Apply XML tags to frames and text in your template document.
- Map styles to XML tags using the Map Tags to Styles dialog box.
- Import XML into the document. When you do this, the data in your XML file (including any graphics specified in the XML structure) will appear in your layout.
Alternatively, you can create XML tags from scratch. You’ll have to remember to make sure that the XML tag names match the element names for the XML files you’ll be importing.
When you import a new XML file and choose to replace the existing structure, InDesign will apply the formatting you’ve already applied. This makes this workflow particularly useful for setting up a document with a repeating publication schedule (newsletters, product data sheets, and so on). To make certain that new XML files match the layout, you might want to export the XML from the document to use as a template (see “Exporting XML Tags”) for the next iteration of the publication, or for use in a Web site or database.
Inside the Structure View
It’s all about structure. No matter how crazy and free-form your layout, your brain—and the brains of your audience—impose a structure on the content of your document. This is true, whether you’re conscious of it or not. So don’t be afraid of the word “structure” or try to deny that your documents have it. It’s there. You can choose to work with it or not. Once you’re out of your “denial” phase, you’ll find InDesign’s Structure view a powerful ally.
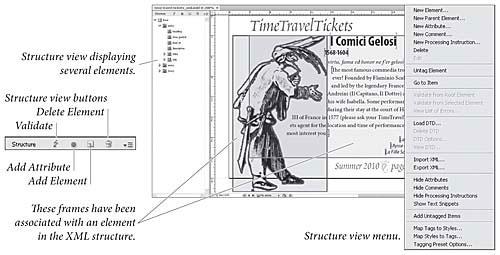
Using the options in the Structure view, you can create XML elements and attributes, associate elements with InDesign page items or text, rearrange XML elements, and delete XML elements (see Figure 14-1). Even if you don’t work with XML you’ve probably already found the Structure view—it’s all too easy to expand it by accident when you’re trying to add a ruler guide or reposition the zero point.
)
Figure 14.1 Structure View
The Structure view uses icons to give you clues about the elements in the document’s XML structure, as shown in Table 14-1.
Table 14-1: Structure View Icons
|
Icon |
Representing |
What it means |
|
|
The Root XML element |
The Root element is the base, or top-level, XML element in your XML structure. All XML elements are contained by the Root element. |
 |
Story element |
An InDesign story. |
 |
Text element |
A range of text. |
 |
Graphic element |
A graphic. |
|
|
Unplaced text element |
A text element that has not yet been associated with a page item. |
|
|
Unplaced graphic element |
A graphic element that has not yet been associated with a frame. |
|
|
Empty element |
An element associated with an empty frame. |
|
|
Attribute |
An attribute of an element. Attributes are always optional, and are only visible in the Structure window. |
|
|
Collapse/Expand |
Click this icon to collapse or expand an element. If you hold down Command/ Ctrl as you click this icon, InDesign will expand all elements contained within the element. |
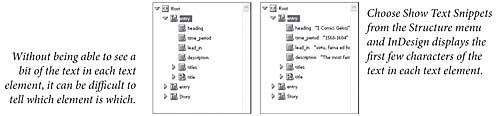
Showing/Hiding Text Snippets.
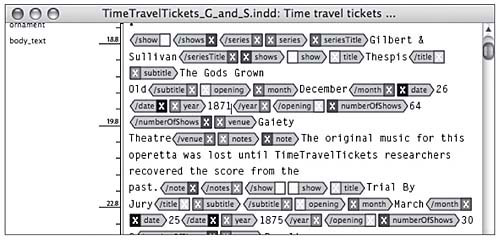
To see a short passage of the text associated with the XML elements, choose Show Text Snippets from the Structure view menu (see Figure 14-2). To hide text snippets, choose Hide Text Snippets.
Figure 14.2 Showing Text Snippets
)
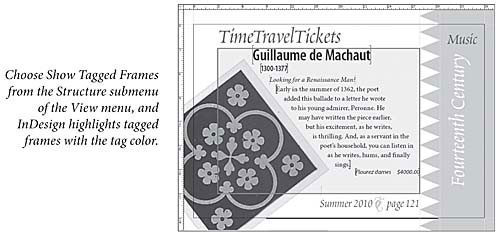
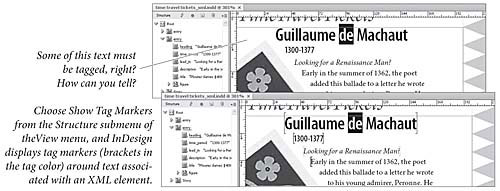
Tagged Frames and Tag Markers.
Want to see which frames are associated with XML elements? Turn on the Show Tagged Frames option on the View menu (see Figure 14-3). To see text that’s been associated with an XML element, choose Show Tag Markers from the View menu (see Figure 14-4).
Figure 14.3 Viewing Frame Tags
)
Figure 14.4 Viewing Tag Markers
)
XML Tags in the Story Editor
When you’re working with text you’ve tagged with XML tags, editing the text in the layout can become something of a chore. It can be very hard to see where one range of tagged text ends, where another tag begins, and the ways that the tags relate to each other. It can also be far too easy to delete tags inadvertently. The solution? View and edit the text in the Story Editor, which provides a better view of the text elements (see Figure 14-5).
Figure 14.5 Viewing XML Tag Markers in the Story Editor
)
Adding XML Elements
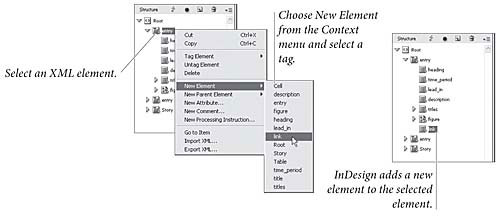
There are many ways to add a new XML element to a document. Our favorite method is to use the Context menu in the Structure view. Select the element you want as the container for the new element, then choose New Element from the Context menu (or click the New Element button). Select a tag in the associated submenu, and InDesign adds an empty element inside the element you selected (see Figure 14-6). You can also click the New Element button.
Figure 14.6 Adding an XML Element
)
Changing XML Element Data
When you add an XML element using the Structure view, it’s natural to assume that you can somehow enter the data for the element in that window. You can’t. Remember: the data for an XML element in InDesign is stored in the page item or text object that the element is associated with. The only case in which you can have element data that’s not associated with a frame on your page is when you’ve imported XML and have not yet assigned an element to a page item, or when you’ve deleted the object the element was originally associated with.
To change the data in an XML structure, simply edit the text or the frame that the element is associated with.
Duplicating XML Elements
To duplicate an XML element (and any elements it contains), select the element in the Structure view and copy the element. Select another XML element (such as the Root element) and paste. InDesign pastes the copied element into the selected element.
Moving XML Elements
To move an element in the XML structure (including all of the elements it contains), simply drag the element up or down in the Structure view (see Figure 14-7). To move the element inside another element (and thereby change the hierarchy of elements), drag the element inside another element.
Figure 14.7 Moving an XML Element
)
Deleting XML Elements
To delete an element in the XML structure, select the element and choose Delete Element from the Context menu (or click the Delete Element button).
Applying a Parent XML Element
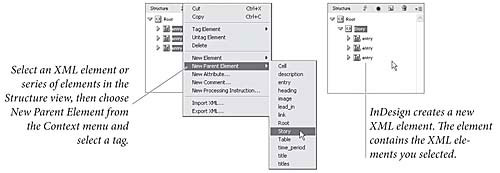
To move an existing XML element into a new parent XML element, select an element or series of elements and choose New Parent Element from the Context menu. Select a tag from the associated submenu, and InDesign moves the selected element (or elements) into a new element (see Figure 14-8).
Figure 14.8 Creating a Parent XML Element
)
Working with XML Attributes
XML attributes are what’s called “metadata”—they’re information about the information in the XML element they’re associated with. You can’t really do much with attributes in InDesign, but you might want to add an attribute if the XML is destined to appear in a situation in which attributes are necessary.
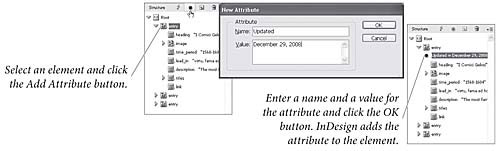
To add an attribute to an element, select the element and choose New Attribute from the Structure view menu. InDesign displays the New Attribute dialog box. Enter a name (like XML element names, attribute names cannot contain spaces) and value for the attributes, then click OK to save the attribute (see Figure 14-9).
Figure 14.9 Adding an Attribute to an XML Element
)
To change an attribute, double-click the attribute. InDesign displays the Edit Attribute dialog box. Change the name or text of the attribute and click the OK button.
To delete an attribute, select the attribute press Delete, or choose Delete Attribute from the Structure view menu.
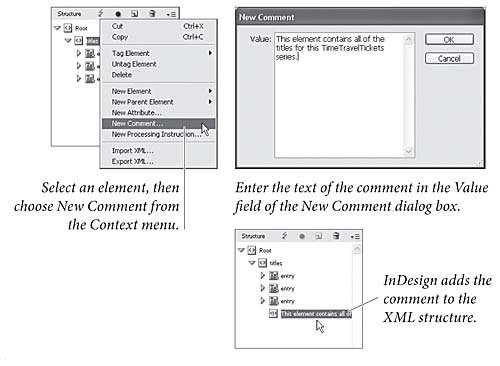
Adding an XML Comment
To add an XML comment to an element, select the element and choose New Comment from the Context menu (or from the Structure menu). InDesign displays the New Comment dialog box. Enter the text of your comment in the dialog box and click the OK button. InDesign adds the XML comment to the structure (see Figure 14-10). To edit a comment, double-click the comment in the Structure view. To delete a comment, select the comment and press Delete.
)
Figure 14.10 Adding an XML Comment
Adding an XML Processing Instruction
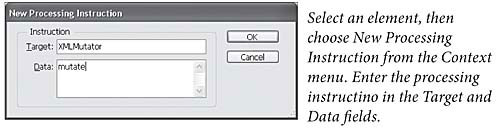
To add an XML processing instruction to an element, select the element and choose New Processing Instruction from the Context menu (or from the Structure menu). InDesign displays the New Processing Instruction dialog box. Enter the name of the target application in the Target field. Enter the text of the instruction in the Data field. Click the OK button to close the dialog box. InDesign adds the XML processing instruction to the structure (see Figure 14-11). Double-click a processing instruction to edit it, or select the processing instruction and press Delete to remove it from the structure.
Figure 14.11 Adding an XML Processing Instruction
)