- Working with metadata
- Photo filtering and searches
- Extra tips for advanced users
Photo filtering and searches
So far, we have looked at how to manage images using folders to group the images in the catalog. Then we looked at how to rate images and separate the keepers from the rejects. Finally, we looked at how to add metadata information, including keywords to describe the image content, thus adding context, meaning, and ultimately more value to the pictures in the catalog. Now let's look at how to use the Library module tools to conduct image searches to find specific photos.
Filter bar
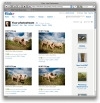
One of the key features in Lightroom is the Filter bar (see Figure 4.44), which can be accessed whenever you are in the Library Grid view mode. The Filter bar replaces the Find panel and Metadata Browser that were originally in Lightroom 1 and combines the best features of these two panels with the search functionality of the old Keywording Tags panel. The Filter bar is the main place to go for making refined filter selections of photos in the catalog (although you can still use the Filmstrip controls for filtering by ratings and labels). The Filter bar, therefore, rationalizes the filter controls in order to make the filtering process more centralized and flexible. One of the important things to note in Lightroom 3 is that filters are no longer automatically sticky. Previously, you might have visited a folder or collection, applied a filter, and then forgotten you had done so the next time you again visited that particular folder or collection. A lock button (circled in Figure 4.44) has now been added to the top-right section of the Filter bar so that you can instantly turn filters on or off, this now applies to all images in the catalog. For example, if you apply a "3 stars or higher" filter, this filter remains in force everywhere in Lightroom until you switch off the filter lock.

Figure 4.44 The Filter bar lets you filter the photos shown in the catalog using text, attributes (like those in the Filmstrip), metadata, or a combination of all three.
The Filter bar layout
There are three components to the Filter bar: Text, Attribute, and Metadata. These can be used to make a filter search of the entire catalog, or a subset of catalog images. This is an important point to remember, because if you want to conduct a search of the entire catalog, you must remember to go to the Catalog panel and select All Photographs first. This then allows you to carry out a global search. For speedier, targeted searches, make a sub-selection of photos first before using the Filter bar. It is so easy forget this important rule; many times, I go to the Filter bar with the intention of carrying out a global search yet forget that I have a sub-selection of photos active! So if a Filter bar search doesn't seem to be working properly, check that you have All Photographs selected. If you wish to undo a Filter bar search or toggle a Filter bar search on or off, use the Enable Filters shortcut:  (Mac) or
  (PC).
(PC).
Text filter searches
To carry out a text search you can choose Library  Find, click the Text tab in the Filter bar and click in the Search field, or you can use the
  (Mac) or
  (PC) shortcut to enable a text search and at the same time highlight the Search field in the Filter bar. From there, you can type in a text term that will be used to filter the photos in the current catalog view, looking for terms that match (Figure 4.45). The problem with this approach is that a general search for a term like ann could yield any number of matches—probably too many to be really useful. But there are ways you can limit a search and restrict the number of results you get when filtering the catalog contents. To start with, you can select an appropriate search target. Rather than search Any Searchable Field, which will mean searching everything, you can narrow the search target by choosing one of the following options: Filename, Copy Name, Title, Caption, Keywords, Searchable Metadata, Searchable IPTC data, or Searchable EXIF data. A Filename search is fairly obvious. I often search specifically by Filename using a Contains rule and type the filename I am looking for in the search field. I use this filter method when clients have made their final image selection and send me a list of filenames for the photos they wish me to retouch. All I need to do then is make a general selection of the client's photos and type in the last four digits of the selected filenames. This is usually enough to quickly locate each of the photos I am looking for. I discussed Copy Name more fully in the Metadata panel section earlier. Basically, you can use this to search the copy names that have been used for all your virtual copy images. All the other types of searches enable you to narrow the range of a text search to concentrate on the selected metadata type, such as Caption only or Keywords only. If you are unsure precisely where to search, the easiest option is to revert to using the more general Any Searchable Field approach, but as I have said, doing so might mean you end up with too many matches to choose from.

Figure 4.45 Filter bar text searches can be carried out by searching Any Searchable Field (as shown here) or by searching specific library criteria only, such as keywords, filenames, or captions.
Search rules
You can further limit a filter search via the Rule menu in the Text filter section (Figure 4.46). Here you can choose rules such as Contains. This carries out a search for text that partially matches anywhere in a text phrase. So, in the Figure 4.46 example, a search for ann could yield results such as Ann, Anniversary, and Banner. A Contains All rule looks for an exact match, such as Ann. The Doesn't Contain rule excludes files that match the text that's entered, while a Starts With rule could yield results where only words like Ann or Anniversary are filtered, and an Ends With search will yield results for anything ending with ann like Portmann or ann. These further search refinements can again make all the difference in ensuring that you have full control over the filtering process and that you don't end up with too many text filter matches.

Figure 4.46 Here is an example of the Filter bar being used to search for a term that contains the letter sequence ann. You can use any of the rules shown here to further limit the search results and attain a more focussed filter result.
Combined search rules
If you click the search field icon circled in Figure 4.47, this opens a combined menu containing all the Search Target and Search Rules options. You can navigate this single menu to choose the desired settings. Note that if you click the X on the right, you can clear a text filter term and undo the current text filter.

Figure 4.47 The combined Search Target and Search Rule menu.
Fine-tuned text searches
You could apply the Start With rule when searching, but it is handy to know that you can conduct a search for anything that begins with a specific search term by typing + at the beginning. If in my version of Lightroom, I were to type +cape in the search field, this would display photos with any keywords that begin with cape, such as Cape Point or Cape Town, and exclude keywords like Landscape (see Figure 4.48). Inverse searches can be made by typing an exclamation mark before the search term. If I want to search for keyworded photos that were shot on location but not include Jobs, Europe, or USA, I can type Places !Europe !USA !Jobs in the Find panel search field (also shown in Figure 4.48).

Figure 4.48 Examples of refined text searches using a + or ! in the search field.
To further illustrate the points made here, you can use a search term like +cape to search for all terms that start with the word cape and combine this with !USA to also exclude any U.S. locations that start with the word cape. So you could end up with search results that included Cape Town in South Africa but excluded Cape Canaveral in Florida.
Attribute filter searches
The Attribute filter tools are something that I touched on earlier in the previous chapter when discussing the Filmstrip filter controls. The Filter bar offers the exact same set of tools, except they can be accessed directly in the Filter bar alongside the other filter items (Figure 4.49). It is, therefore, simply a case of it being easier to integrate a refined filter search based on criteria such as the flag status, star rating, color label, or whether you wish to filter the master images or copy images only. Everything is the same here; you can click the buttons to apply a filter and click the star rating options to specify whether to filter for photos with a star rating that is the same and higher, the same and lower, or the same rating only.

Figure 4.49 The Attribute section of the Filter bar showing the rating options menu.
Metadata filter searches
The Metadata section integrates some of the Keyword filter functionality of the Keyword List panel but goes further by allowing you to access a wide range of metadata attributes (not just keywords) and combine these to accomplish different kinds of metadata information searches. The Metadata filter section (Figure 4.50) provides customizable columns that can be adapted in an almost infinite number of ways to carry out different kinds of filter searches. In the example below, you can see how it is possible to combine a metadata search by date combined with a search that includes keywords, file type, and camera data criteria. Personally, I don't think there are that many instances where you would want or need to combine quite so many search criteria in a single search, but the functionality is there to allow you to do this (and more).

Figure 4.50 The Metadata section of the Filter bar.
Metadata filter options
The Metadata section can be adjusted in height by dragging the bar at the bottom up or down. When the metadata panels are expanded in height, they can consume a lot of valuable space in the Grid view content area, which is a problem if all you are interested in doing is applying a filter using one panel only. This is another reason why it is important to remember the  keyboard shortcut, which toggles hiding and showing the Filter bar. It is unfortunate that the screen animation for this is rather jerky and slow compared to the speed with which the side panels and toolbar appear and disappear from the screen, but you do at least have the convenience to move the Filter bar out of the way when it is not needed.
The individual panels can be customized by clicking the panel name and selecting one of the many metadata search criteria that are available (Figure 4.51). Because you are able to customize the layout of the panels, this provides lots of opportunities for you to filter the catalog photos in different ways. Basically, you can use the  or the
  key (Mac) or
  key (PC) to select more than one search term in a single panel. And because you can customize each panel by metadata filter type, you can have more than one panel used to filter by, say, Keyword (or whatever else it is you may wish to duplicate). The default view gives you four panels to work with, but you can customize this layout by clicking the button in the top-right corner of each panel (Figure 4.52) to either add extra columns (up to eight in total) or remove columns. Selecting multiple items within a single panel will add photos to a filter selection, while selecting items from other panels will "intersect" with the photo filter selection to further narrow a search.
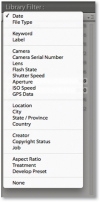
Figure 4.51 This shows the expanded list of options for a Filter bar Metadata search.

Figure 4.52 Adding or removing a column in the Filter bar Metadata section.
Metadata filter categories
The Date categories allow you to progressively filter by date. For example, you can search first by year date, and then expand the year folders to search by month and then by day.
The File Type section can be used to separate images by file format and make it easy for you to quickly filter out images, such as the PSD masters or the raw DNG images. The Keyword category is one that you will probably want to use all the time when searching the catalog, and in Figure 4.53, you can see an example where I used two Keyword filter columns to narrow a keyword search.

Figure 4.53 In the first column, a metadata keyword filter was used to filter photos by keyword—in this case, "Colorado." In the second column, I used a secondary Keyword filter to filter by all keywords associated with "Colorado."
The Label category (Figure 4.54) almost amounts to the same thing as clicking a color label swatch in the Filters section of the Filmstrip. The main difference is that the Label filters used here allow you to distinguish between the color of a label and any text associated with that label. To understand what I mean by this, please refer to the section on sorting Color labels coming up on page 197.
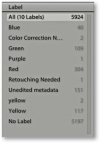
Figure 4.54 The Color Label category allows you to filter labels by swatch color, as well as by the color label text description.
Figure 4.55 shows an example of a Filter bar search that achieves the same filter result as the two-step approach described at the beginning of this chapter. The Filter bar search applied here was based on a 1-star filter for photographs taken from 2005 to 2007, using the keywords Mallorca or Malta, and a further keyword filter for photos with the keywords Sineu and Valletta.

Figure 4.55 By repeating the keyword across two or more panels, you have more flexible options when filtering by keyword to carry out OR- and AND-type searches. Here, I used the  key to make contiguous selections of Metadata items and the
  key (Mac) or
  key (PC) to add discontiguous items to a filter list.
The Camera section lets you filter by both camera model and serial number. Suppose, for example, you suspected that a fault was developing with one of your camera bodies. Inspecting the images by camera type can let you filter out the images that were shot using that specific camera. The Lens section (Figure 4.56) is great for filtering the catalog by lens type, which can be really handy when you are searching for, say, shots that were taken with an ultra-wide-angle lens. Flash State refers to whether the on-camera flash was fired. The Shutter Speed section allows you to filter photos according to the shutter speed the photos were shot at. Likewise, the Aperture section lists every aperture setting that has been used, which might be useful for short-listing pictures shot at the widest lens aperture and, therefore, with the shallowest depth of field. With ISO Speed Rating, you can quickly filter the high ISO speed shots from all the rest, and the GPS filter allows you to filter according to whether GPS data is embedded.
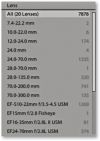
Figure 4.56 The Lens filter category.
The next few sections require that you have entered custom metadata in the catalog photos. The Location and Creator categories can be useful if you are in the habit of editing the associated IPTC fields via the Metadata panel. If so, you can quickly filter the catalog photos by any of the IPTC metadata items you see here. Location, City, State/Province, and Country all refer to the Location IPTC metadata used to describe where a photo was shot (you may use keywords to do this as well, of course, but only the IPTC data is referenced here). The Creator section filters the photos by the creator of the photograph. With some camera systems, you can configure the camera settings so that the creator name is always embedded at the capture stage for each and every shot. The Copyright Status and Job reference are also further examples of IPTC metadata that first has to be entered by the user.
The Aspect Ratio category lets you filter according to whether the photos are landscape, portrait, or square. Treatment refers to whether the photos are in color or have received a black-and-white conversion treatment via Lightroom (i.e., a photo that has been edited using the Black & White panel controls rather than a photo that has been merely desaturated using, say, the HSL panel Saturation sliders). And finally, the Develop Preset category (Figure 4.57), which filters according to the Develop module presets that may have been applied to the photos in the catalog, including those that have just had the default settings applied. This is a useful filter for tracking down photos that have had a particular type of treatment, such as a favorite grayscale conversion or split-toning technique. Are you looking for inspiration? You could select All Photographs to view the entire catalog and use this filter category to check out certain Develop preset effects as applied to various images. You could then copy the Develop setting from one of these filtered photos or make a note to apply this particular Develop preset to other images.
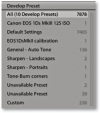
Figure 4.57 The Develop Preset filter category.
Locating missing photos
It is inevitable that photos in the catalog will become misplaced. This is where folders may appear grayed out in the Folders panel or individual files will show exclamation point badges. In either case, this indicates that the photos are either off-line or missing. It may be a simple matter of checking to reconnect a missing hard drive volume, or it could be because you have deleted or moved the original photos at the system level. If you need to locate all the currently missing files in the catalog, you can do so by going to the Library menu in the Library module and choosing Find Missing Photos. This gathers together all the missing files and groups them as an impromptu collection in the Catalog panel (see Figure 4.58).

Figure 4.58 Missing Photographs are shown.
Custom filter settings
We touched on working with custom filters in the previous chapter, where I showed how you can save custom filter settings via the Filmstrip. Such custom Filter settings are also accessible via the Filter bar, where you can save more detailed filter settings that make additional use of Metadata filter terms, which, in turn, can be accessed via the Filmstrip. In Figure 4.59, I created a filter search for photos that matched the keyword Jobs (to select all client job photos), where the File type was a PSD file (which is what I often use when editing retouched master images), that had a star rating of 2 stars or higher. I then clicked the Custom Filters menu to save this as a new preset setting, named it Client select masters, and clicked Create. I was then able to use this custom filter whenever I needed to access a shortlist of all my client retouched master images.

Figure 4.59 This shows the Custom Filters menu options, where you can save a Filter bar setting as a new preset.
Empty field searches
Let's go back now to the Text filter section of the Filter bar, where in the Search Target section you can choose to search by caption. In the accompanying Rules section, you will find rules such as Is Empty and Isn't Empty and, for keyword searches, Are Empty and Aren't Empty. The purpose of these rules is to let you search for photos where no caption or keywords have been added, or alternatively you can select only those photos that do have captions titles or keywords. (Note that when either of these rules is selected, the field search is overridden and the search field box dimmed.) Let's now look at how and why you would want to use an "Empty field" search.
No content searches
The idea of using Lightroom to search for nothing may sound strange, but trust me, there is method in such madness. The Is Empty and Are Empty rules can be used to filter out photos that have yet to be metadata edited. This housekeeping tip suggests a quick way to filter out all the photos that still need keywording or caption editing.
- The Is Empty and Are Empty rules can be applied to keyword or caption searches only. For this example, I made a selection of All Photographs and made a Keywords, Are Empty Filter bar text search. This action filtered all the photos in the library that had yet to have keywords added.
- Now, you can (if you like) apply a color label that can act as a semipermanent marker for all the photos in the catalog that have empty keyword metadata. To show you what I mean, I went to the Metadata menu and chose Color Label Set
 Edit. I then selected the Review Status preset, and changed the purple label so that instead of saying "To Print" it said "Unedited metadata," since I felt it might make better use of this lesser-used label. I then saved this as a new color label set titled "Review Status – (modified)."
- With the new color label set active, I applied a purple (Unedited metadata) label to the selected, empty keyword images.
- I only suggest the use of color labels as a helpful reminder. Here I am showing the photos that were selected at Step 1 (without the color label) and with the "Keywords are empty" filter in force. I could now add keyword metadata, and as I did so, the photos automatically removed themselves from the filtered selection.
Advanced searches
Let's finish this section with an example of a complex search where several different types of search criteria are combined together to create a precise, targeted catalog filter. All the tools you need to do this are located in the Filter bar, and the following step-by-step example will hopefully provide guidance and inspiration to help you get the most out of Lightroom's search abilities. Just to remind you once more: After a Filter search has been made, you can use  (Mac) or
  (PC) to toggle switching the image filter on or off.
- I first selected All Photographs in the Catalog panel. Then I went to the Filter bar, checked the Text tab, and chose to search by keywords only using the Contain All rule. I then typed in the name of one of my clients, Antoni, to initiate a catalog search for photos that were keyworded with the word Antoni. As I began typing in the first few letters, the search started narrowing the selection of images in the Grid to show all the photos where the keywords metadata contained this same sequence of letters. As you can see, the Filter bar search filtered the photos in the grid to show over 1,500 photos that had been shot for this client. This included everything—the raw files as well as the PSD masters. The next task was to whittle down this selection to something more specific.
- I clicked the Attribute tab and applied a 2-star filter to show only the 2-star or higher images. I also clicked the Metadata tab to reveal the Metadata filter options and used a Date panel to search for photos that had been shot in 2007 only. Finally, I used a File Type panel to search for the Photoshop Document (PSD) file types. This resulted in a filter selection that showed only the PSD file format photos that had been shot during 2007 that had been rated with 2 or more stars.
- Even so, I still had 86 images to choose from. I used a Keyword panel to select Southern, which is an awards entry category keyword. This now filtered the catalog to show photos taken for the specified client that had been shot during 2007 that had a rating of 2 stars or more, that were PSD files only, and that also had the keyword Southern > Awards categories > Jobs.
Quick Collections
When it comes to combining search results, it is good to familiarize yourself with the Collections features in Lightroom. A selection offers only a temporary way of linking images in a group, and as soon as you deselect a selection or select a different folder in the library, the selection vanishes. Of course, you can still choose Edit  Undo, or use the keyboard shortcut
  (Mac) or
  (PC) to recover a selection, but the main point is that selections offer only a temporary means for grouping images together. If you want to make a picture selection more lasting, you can convert a selection to a Quick Collection by choosing Photo
  Add to Quick Collection or by pressing the
  key. Although note that in Lightroom 3 it is now possible to make other collections the "target collection" instead of the Quick Selection (see page 179). Any images that have been added to a Quick Collection will be marked with a filled circle in the top-right corner in both the Library Grid and Filmstrip views. Note that you can have only one Quick Collection at a time, but you can make further selections and keep adding fresh images to the Quick Collection. The other advantage is that a Quick Collection is always remembered even after you quit Lightroom—no saving or naming is necessary—and the images remain grouped this way until you decide to remove them from the Quick Collection.
Quick Collections can be accessed by clicking Quick Collection in the Catalog panel (Figure 4.60). You can also choose File  Show Quick Collection or use
  (Mac) or
  (PC) to display the Quick Collection images only (Figure 4.62) and use File
  Return to Previous Content (or press
  or
or  again) to return to the previous Library module view. With Quick Collections, you can make selections of photos from separate sources and group them in what is effectively a temporary collection. Quick Collections remain "sticky" for however long you find it useful to keep images grouped this way. If you want to save a Quick Collection as a permanent collection, you can do so by using
  (Mac) or
  (PC). This opens the Save Quick Collection dialog (Figure 4.61) that lets you save a Quick Collection as a normal catalog Collection. Once you have done this, it is usually good housekeeping practice to clear the Quick Collection, which you can do by choosing File
  Clear Quick Collection or use
  (Mac) or
  (PC).
(PC).

Figure 4.60 To view a Quick Collection, click the Quick Collection item in the Photo Catalog panel.

Figure 4.61 Press (Mac) or (PC) to save a Quick Collection as a permanent collection to add to the Collections panel.
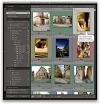
Figure 4.62 With Quick Collections, you can group images from different source locations (i.e., different folders) and then select Quick Collection to view all the selected images at once. In the example shown here, I have highlighted the source folder locations in the Folders panel for the photos that make up this current Quick Collection. Note the new Collection badge highlighted here. You can click this to go directly to a parent collection.
Collections
As I just explained, a Quick Collection can be converted into a collection, or you can convert any selection directly into a collection via the Collections panel. Whereas a catalog image can be assigned to only one folder at a time, you can use collections to create multiple references of the master photos. Collections are, therefore, useful for grouping images together from different folders in meaningful ways. For example, Figure 4.64 shows a collection I made after filtering UK and Travel photos. As you conduct various catalog searches, you can save the results as general collections ( ). However, since the Collections panel is now accessible in the Slideshow, Print, and Web modules, you can also save module-linked collections. Figure 4.63 shows examples of the different collection types, which are distinguished by the Collection icon appearance: Slideshow (
 ), Print (
 ), and Web (
 ). The way this works is that you can create a modulespecific collection while working in any of the above modules, and have the collection be associated with the module where it was created. Figure 4.65 shows the Create Collection dialog for a Slideshow collection that was created within the Slideshow module, which then appears in all the other module Collections panels with the Slideshow collection icon (
 ). When you click a module-specific collection, this selects the collection photos from the catalog (regardless of what filters are applied, what collection type it is, or which module you are in). But if you double-click a module-specific collection, it selects the photos from the catalog and takes you directly to the module the collection was created in. To give you an example of how this works, having created a Stockholm trip Slideshow collection, if I click this, it filters the collection photos that appear in the Grid and/or Filmstrip. If I double-click the Stockholm trip Slideshow collection, it filters the collection photos and takes me directly to the Slideshow module and previews them using whatever Slideshow settings happen to be associated with this particular collection. See also Figure 4.66, which explains how to rename collections.
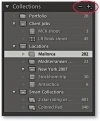
Figure 4.63 This shows the Collections panel, now common to the Library, Slideshow, Print, and Web modules with the different kinds of Collections icons that can be nested in Collections sets.

Figure 4.64 To create the collection shown here, I filtered the photos in the Library module to show photos that matched the keywords UK and travel. I then clicked the Add Collection plus icon and chose Create Collection, which opened the dialog shown here, where I made this new collection a child of the collections set.

Figure 4.65 You can create a Slideshow collection by clicking the + button and choosing the Create Slideshow option. You can then enter a name and set location and choose to include photos from the Filmstrip. You can also add more new photos by dragging them from the Filmstrip to the collection in that module's Collections panel.

Figure 4.66 To rename a collection, use a right mouse click to access the contextual menu and choose Rename. This opens the Rename Slideshow dialog shown here.
Target collection
By default, the Quick Collection is always the target collection, but you can promote any other collection to be the target collection in its place and use the  (Mac) or
  (PC) shortcut to reset the Quick Collection as the target collection. You can assign a collection as a target collection by choosing Set as Target Collection via the contextual menu, as shown in Figure 4.66. When a collection has been promoted in this way, you'll see a + appear after the name. You can then select photos in the Library Grid or Filmstrip and press the
  key to toggle adding/removing them to the target collection. (You'll see a message flash up on the screen to remind you which Collection the photo is being added to.) You can also use the Painter tool to select photos and add them to the current target collection (see page 161 for more about working with the Painter tool).
Collections sets
To help organize your collections, you can choose Create Collection Set. This adds a new collection folder ( ) allowing you to create folder groups for your collections (as shown in Figure 4.63). These are container folders for managing hierarchies of collections. To add a new collection set, click the + button in the Collections panel header (Figure 4.67), or right-click anywhere in the Collections panel to access the contextual menu. Choose Create Collection Set, name the set, and drag and drop to manage the collections as you wish.
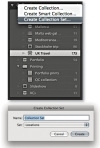
Figure 4.67 Click the + button in the Collections panel to choose Create Collection Set and create a new collection set in the Collections panel.
Smart Collections
Smart Collections can be used to establish rules for how photos should be grouped as a collection, and Lightroom automatically updates the photos that should be included in a Smart Collection. To do this, you need to click the + button or use the contextual menu to select Create Smart Collection. This opens the Edit Smart Collection dialog shown in Figure 4.68, where you can set up a series of rules to determine which photos will go into a particular Smart Collection. In this example, I used a Keywords filter to select photos with the keyword Jobs, a File Type filter to select TIFFs, and a Capture Date filter to select images that were captured throughout the year 2009. Note in the Match section that "all" was used. This means that photos will have to match the combined rules before being added. An "any" match can be used where you want to select photos that match multiple terms, but not exclusively so. You could create a Smart Collection with an "any" match to group photos that had both red labels and yellow labels taken in the date range of 2007–2008. In Lightroom 3, you can now even create smart collections based on whether the camera flash fired.

Figure 4.68 The Edit Smart Collection dialog and, to the left, the Smart Collection, as it appears in the Collections panel.
Publishing photos via Lightroom
The new Publish Services panel allows you to publish collections of photos to sites such as Flickr. When photos are published in this way, there remains a constant link between Lightroom and the hosting Web site so that any subsequent changes you make to a photo in Lightroom are propagated to the server hosting the images online. Here is how to establish a publishing link.
- To start with, I clicked the Set Up button in the Flickr header in the Publish Services panel. This opened the Lightroom Publishing Manager dialog shown here (or, you can click the + button in the Publish Services panel and choose Manage Publish Connections). The first thing that's needed is a personal Flickr account. If you already have one, then click the Log In button and simply enter your Flickr account details. If you don't have an account, you'll be taken to the Flickr Web site where you can create a new account profile. Here, I configured the remaining Export settings in this dialog to establish what size I would like the large images to be and whether to add a watermark (see page 489–491). You can also set the privacy settings for your photostream images. Private means only your family and/or invited friends will be able to see your photos, or you can make them publicly available. Plus, you will need to authorize allowing Lightroom to communicate with Flickr before completing this process.
- I was now ready to start adding photographs to my Flickr photostream. I clicked the Flickr header in the Publish Services panel to expand the Flickr panel contents. This revealed the Flickr photostream, and it was now a simple matter of using the Library module to search for the photos I wished to add and then dragging and dropping these onto the photostream. Here, I selected a group of selected photos and dragged these across to my Flickr phootstream in the Publish Services panel.
- Having done that, I could now check the current status of my Flickr photostream. In the example shown here, I had already uploaded some photographs to my flickr page and these appeared under the filter grouping labeled "Published photos." The photos that I had recently added in Step 2 showed up under the "New photos to publish" filter grouping. This meant that, although I had used Lightroom to assign these photos to my Flickr photostream, they had yet to be uploaded to the Flickr page. To do this, I needed to click the Publish button at the bottom of the screen. This instructed Lightroom to upload the photos to my Flickr page. As the photos were added, they emptied from the "New photos to publish" group and joined the "Published photos" group below. And there they would remain until I decided to do anything else to them. For example, if I were to edit the IPTC metadata or the develop settings for any one of these images, this would move the image out from the "Published photos" group and to a "Modified photos to re-publish" group at the top of the content area. This mechanism allows you to keep close tabs on which photos have been published and which ones have been modified in some way or have yet to be published. Lightroom, therefore, always keeps you informed whenever you need to update the photos to be published on your Flickr page.
- Having clicked the Publish button, I needed to wait a minute or two while Lightroom rendered and uploaded the JPEG files to the Flickr server. Once this was complete, I could go to my Flickr page and check how the photostream appeared online. To do this, I used the contextual menu (right mouse clicked) in the photostream and selected Go to Published Collection. This opened my Flickr page directly via Lightroom. Those who are familiar with the way Flickr works will know how you can use the site to manage your photos into collections and click the italicized text that appears below each image to add descriptions. If your photos are made available for anyone to view (see Step 1 for more information on privacy settings). Once your photos are on view, anyone visiting these pages can add comments. Because Flickr and Lightroom are able to communicate with one another, as you browse the photos contained in the photostream, these comments are also updated in the Lightroom Comments panel. This allows you to see comment messages such as the one posted here by my friend and colleague Sean McCormack. The Comments panel also tells you how many times a photo has been marked as someone's favorite.
Saving and reading metadata
Another pain point for newcomers to Lightroom has been the question of how to save images. In your very first computer lesson, you learned how important it is to always save your work before you close a program. Some Lightroom users have been confused by the fact that there is no "save" menu item—they wonder if they will lose all their work after they quit the program. There is no need to worry here because, in the case of Lightroom, your editing work is always saved automatically. Even if Lightroom suffers a crash or there is a power failure, you should never lose any of your data.
It is important to remember that as you carry out any kind of work in Lightroom—whether you are adjusting the Develop settings, applying a color label or star rating, or editing keywords or other metadata—such edits are initially stored in the Lightroom catalog. For simplicity's sake, we can summarize these actions by grouping them under the term metadata edits. Whenever you alter a photo in Lightroom, you are not changing anything in the actual image file. This is because Lightroom is built around the principle that the imported images are the master negatives, which should never be edited directly. Lightroom, therefore, records the changes as metadata information, and these changes are initially stored at a central location in the Lightroom catalog. This is also the reason why Lightroom is much faster at searching images compared to a browser program like Bridge. You can add, search, and read metadata information more quickly because the metadata information is all stored in a database. However, it is possible to have the metadata information stored in the individual picture files as well. In the case of JPEG, TIFF, PSD, or DNG images, there is a dedicated XMP space within the file's header that can be used to store the metadata. With proprietary raw files, the metadata has to be stored separately, in what is known as an .xmp sidecar file.
The good thing about having all the metadata information stored in a single database file is that it is lightweight. When it comes to backing up essential catalog data to another hard drive, the backup process can take only a few minutes. On the other hand, saving metadata to the file can be seen as adding an extra level of security and allows the metadata entered via Lightroom to be shared when viewed in browser programs. But this security does come at a cost. When you export the metadata to the files, the whole file has to be backed up. Do this and all DNG, TIFF, PSD, and JPEG files will have to be copied as complete files during the backup process. What would otherwise take a few minutes can start taking hours to complete. Interestingly, you could argue that this is a good reason for not converting raw files to DNG, since backing up .xmp sidecar files is a lot quicker than backing up self-contained DNG files where the XMP metadata is embedded.
If you work on an image in the Lightroom catalog using another program, such as Photoshop or Bridge, and you make any changes to the metadata, the metadata edit changes are always made to the file itself. When such an image is opened via Lightroom, you have to decide whether the "truth is in the database" (the Lightroom catalog) or the "truth is in the file." I'll return to this question a little later.
Saving metadata to the file
For most of the time that you are working in Lightroom it should not really matter if the metadata information is stored only in the catalog. Of course, it feels kind of risky to trust everything to a single database file, but that is why Lightroom has a built-in catalog backup feature as well as a diagnostics and a self-repair function to help keep your catalog file protected (see Figure 4.69). Plus, I highly recommend that you back up your data regularly anyway. Despite all that, it is still important to save the metadata edits to the files so that the "truth is in both the catalog and the file." By doing this you can maintain better compatibility between the work you do in Lightroom and the work carried out using external programs.

Figure 4.69 If Lightroom detects that the catalog database file has become corrupted, there is an option to Repair Catalog. But click the See Adobe TechNote button to read more about such file corruptions before you do so.
So what is the best way to save metadata to the files? If you go to the File menu and choose Catalog Settings, you will see the dialog shown in Figure 4.70, where there is an option called "Automatically write changes into XMP." In the first edition of this book, I recommended that you keep this option switched off. This was because it could affect Lightroom's performance. However, since the version 1.3 update, it has been OK to leave this switched on, because Lightroom now only automatically writes to the files' XMP space when it is convenient to do so, without affecting the program's performance. Checking this option ensures that all the files in the Lightroom catalog will eventually get updated. However, if you want to be sure that a file's XMP space gets updated right away or you have "Automatically write changes into XMP" switched off, then you can use the Metadata  Save Metadata to Files command in the Library module or the Photo
  Save Metadata to Files command in the Develop module. This forces an immediate export of the metadata information from the Lightroom catalog to the image file's XMP space. In practice, I recommend using the
  (Mac) or
  (PC) shortcut anyway every time you wish to immediately update any metadata changes made to a photo or group of selected photos.

Figure 4.70 The Metadata Catalog Settings.
Tracking metadata changes
In order to keep track of which files have been updated and which have not, Lightroom does offer some visual clues. If you go to the View menu and open the View Options dialog ( [Mac],
  [PC]), there is a check box in the Cell Icons section called Unsaved Metadata. Figure 4.74 shows the Library View Options dialog with the Unsaved Metadata option circled. When this is checked, you may see a "calculating metadata" icon (
![]() ) in the top-right corner of the Grid cells as Lightroom scans the photos in the catalog, checking to see if the metadata is in need of an update. You will also see this icon when Lightroom is in the process of saving or reading metadata from a file. If the metadata in the catalog and the file are in sync, the icon soon disappears. If there is a "metadata status conflict," you will see either a down arrow (Figure 4.71) or an up arrow (Figure 4.72). The down arrow indicates that the metadata information embedded in the photo's XMP space is now out of date compared to the current Lightroom catalog file and that now would be a good time to choose Metadata
) in the top-right corner of the Grid cells as Lightroom scans the photos in the catalog, checking to see if the metadata is in need of an update. You will also see this icon when Lightroom is in the process of saving or reading metadata from a file. If the metadata in the catalog and the file are in sync, the icon soon disappears. If there is a "metadata status conflict," you will see either a down arrow (Figure 4.71) or an up arrow (Figure 4.72). The down arrow indicates that the metadata information embedded in the photo's XMP space is now out of date compared to the current Lightroom catalog file and that now would be a good time to choose Metadata  Save Metadata to File (
 [Mac],
  [PC]).

Figure 4.71 When the Unsaved metadata icon is enabled in the Library View Grid options, the icon in the top-right corner indicates that the metadata status has changed. A down arrow indicates that Lightroom settings need to be saved to the file.
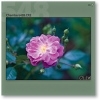
Figure 4.72 An up arrow indicates that settings have been edited externally and that the file metadata settings may need to be read in order to update the Lightroom catalog.
In the Metadata panel (Figure 4.73) is an item called Metadata Status, which will say "Has been changed" if anything has been done to edit the photo metadata settings since the last time the metadata was saved to the file. This is basically telling you the same thing as the metadata status icon that appears in the Library Grid cells.
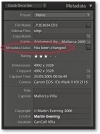
Figure 4.73 The Metadata Status item in the Metadata panel will also alert you if the file metadata is out of sync.
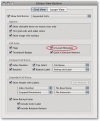
Figure 4.74 The Library View Options.
Choosing Save Metadata to File will make the metadata status icon in the Library Grid cells disappear, but if you are uncertain what to do, you can click the icon in the grid to open the dialog shown in Figure 4.75. This dialog asks if you want to save the changes to disk (better described as "Do you wish to confirm saving the metadata changes to the photo's XMP space?").

Figure 4.75 This dialog will appear to confirm if you wish to save changes to disk.
The up arrow shown in Figure 4.72 indicates that the metadata information embedded in the image file's XMP space is out of sync and more recent than the current Lightroom catalog file. This will most likely occur when you have edited a Lightroom catalog file in Camera Raw and the externally edited image has a more recently modified XMP than the Lightroom catalog. To resolve this, choose Metadata  Read Metadata from file.
The other possibility is that a Lightroom catalog photo may have been modified in Lightroom (without saving the metadata to the file) and has also been edited by an external program, resulting in two possible "truths" for the file. Is the truth now in the Lightroom catalog, or is the truth in the externally edited file XMP metadata? If you see the icon shown in Figure 4.76, you can click it to open the dialog in Figure 4.77 where you can choose either Import Settings from Disk if you think the external settings are right, or Overwrite Settings if you think the Lightroom catalog settings are the most truthful and up to date.
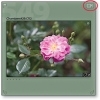
Figure 4.76 If there is a metadata status conflict where the settings have been modified both in Lightroom and another external program, you will see the warning icon shown here (circled).

Figure 4.77 The Metadata status conflict dialog.
XMP read/write options
Let's now take a closer look at what this XMP settings business is all about. The XMP space is the hidden space in an image document (such as a JPEG, TIFF, PSD, or DNG file) that the metadata settings are written to. In the case of proprietary raw files, it would be unsafe for Lightroom to write to the internal file header, so .xmp sidecar files are used instead to store the XMP metadata. The XMP metadata includes everything that is applied in Lightroom, such as the IPTC information, keywords, file ratings, flags, and color labels, as well as the Develop settings that are applied via the Quick Develop panel or Develop module.
In the Metadata section of the Catalog Settings (Figure 4.70), the "Include Develop settings in metadata inside JPEG, TIFF, and PSD files" option lets Lightroom distinguish between writing the Develop settings metadata to the XMP space for all files including JPEGs, TIFFs, and PSDs, or to raw and DNG files only. This is a preference that predetermines what gets written to the XMP space when you explicitly save the metadata to the file. The ability to save Develop settings with the file can be a mixed blessing. If you are sharing images that are exported from Lightroom as individual images (or as an exported catalog) with another Lightroom user, you will most definitely want to share the Develop settings for all the images that are in the catalog. But if you are sharing files from Lightroom with Bridge CS4 or later, this can lead to some unexpected file behavior when you open non-raw files via Bridge. Basically, what will happen is that raw and DNG images that have had their Develop settings modified via Lightroom will open in Camera Raw via Bridge exactly as you expect to see them, since Bridge is able to read the settings that were created in Lightroom. However, where you have non-raw files, such as JPEGs, TIFFs, or PSDs, that have been edited using the Develop settings in Lightroom, and the Develop settings have been written to the files' XMP space, Bridge may now consider such files to be like raw files and open them via Camera Raw rather than directly in Photoshop. That's what I mean by mixed blessings. If you want Lightroom to retain the ability to modify the XMP space of non-raw files for data such as file ratings, keywords, and labels but exclude storing the Develop settings, you should uncheck the "Include Develop settings in metadata inside JPEG, TIFF, and PSD files" option. Do this and the Lightroom Develop settings for non-raw files will get written only to the catalog and they won't get exported to the files when you choose Save Metadata. But raw and DNG files will be handled as expected. On the plus side, you will never be faced with the confusion of seeing your non-raw images such as JPEGs unexpectedly default to open via Camera Raw when you had expected them to open in Photoshop. The downside is that if you modify a non-raw image in Lightroom using the Develop module, these changes will be seen only by Lightroom and not by Bridge. For these reasons, my advice is to turn off "Include Develop settings in metadata inside JPEG, TIFF, and PSD files." To help explain the settings and how they affect image files after being modified in Lightroom, I have summarized below how these options affect the way different file formats will be handled. Please note that these steps do assume that you are using Photoshop CS4 with Bridge CS4 (or later) and have updated Camera Raw to version 5.7 or later.
If a photo in Lightroom is modified using the settings shown in Figure 4.78 with "Automatically write changes into XMP" and "Include Develop settings in metadata inside JPEG, TIFF, and PSD files" switched on, then all the adjustments that are made to the image will automatically be saved to the Lightroom catalog and also saved to the original image file. In the case of proprietary raw files, the XMP metadata will be written to an .xmp sidecar file and, when opened via Bridge, will (as you would expect) open via the Camera Raw dialog with the same Develop settings that were applied in Lightroom. In the case of DNG files, the XMP metadata will be written internally to the file and these, too, will open in Camera Raw. In the case of JPEG, TIFF, and PSD files, because you are including the Lightroom Develop settings in the export to the XMP space, they will default to opening in Bridge via the Adobe Camera Raw dialog.

Figure 4.78 This shows the Catalog Settings where all the metadata editing options have been checked.
If the "Automatically write changes into XMP" option is disabled, as shown in Figure 4.79, the metadata edits will now be saved only to the Lightroom catalog. If you were to open a JPEG, TIFF, or PSD image from Bridge that had been edited in Lightroom, it would open directly in Photoshop and not open via the Camera Raw dialog. But at the same time, any image ratings, metadata keywords, or other information that has been entered while working in Lightroom will not be visible to Bridge or any other external editing program either. (This assumes that you are not manually saving the metadata to the file, as described below.) In this example, the "Include Develop settings in metadata inside JPEG, TIFF, and PSD files" option is still switched on, so if you did want the metadata edits to be saved to the files' XMP metadata space, you would have to do so manually using a Save Metadata command ( [Mac],
  [PC]). But, in doing so, the problem with a Save Metadata command is that you would again be saving all the Lightroom settings to the files' metadata space (including the Develop settings), and we are back to the same scenario as in Step 1, where non-raw files may default to opening via Camera Raw, which is perhaps not what the customer wanted!

Figure 4.79 In this example, "Automatically write changes into XMP" has been disabled.
Now let's look at what happens when "Include Develop settings in metadata inside JPEG, TIFF, and PSD files" is disabled and "Automatically write changes into XMP" is switched on (Figure 4.80). Any edits made in Lightroom will automatically get saved to the Lightroom catalog as well as to the files' XMP metadata space—all the settings, that is, except for the Develop settings, which are saved to the proprietary raw and DNG files, but not to the JPEG, TIFF, or PSD files. In this scenario, all metadata information will be saved to all types of files (with the exception of the Develop settings not being written to JPEG, TIFF, or PSD files that have been edited in Lightroom). Proprietary raw and DNG files that have been edited in Lightroom will preserve their appearance when viewed in Bridge and open as expected via the Bridge Camera Raw dialog. But with JPEG, TIFF, or PSD files, the Develop settings won't be transferred, so they will open from Bridge directly into Photoshop without opening via the Camera Raw dialog. The downside is that such images may not always look the same in other programs as they did in Lightroom. It all depends on whether you want to use the Develop module to modify the JPEG, TIFF, or PSD images as you would do with the raw images. Overall, this is probably the most useful configuration because it preserves the informational metadata in non-raw files that have been modified in Lightroom and avoids non-raw files opening via the Camera Raw dialog when working in Bridge and Photoshop.

Figure 4.80 In this example, "Include Develop settings in metadata inside JPEG, TIFF, and PSD files" has been disabled.
Where is the truth?
The main point to learn here is that the most up-to-date or "truthful" settings can reside either in the Lightroom catalog or in the files themselves. If you work only in Lightroom, the answer is simple: The truth will always be in the catalog. But if you adopt a more complicated workflow where the files' Develop settings and other metadata can be edited externally, the truth will sometimes be in the file. To summarize, the "Automatically write changes to XMP," Save Metadata to Files, and Read Metadata to Files options allow you to precisely control how the metadata is updated between the Lightroom catalog and the image files.
Synchronizing IPTC metadata settings
You will often want to apply or synchronize metadata settings from one photo to other photos in the catalog. To do this, make a selection of images and click the Sync Metadata button, which opens the Synchronize Metadata dialog (Figure 4.81). The check boxes in this dialog can help you select which items you want to synchronize. You can then click the Synchronize button to synchronize the IPTC metadata information (including the keyword metadata) in the most selected image with all the others in the selection. You can also select an image and press  (Mac) or
  (PC) to use the "Copy Metadata settings" command and then use
  (Mac) or
  (PC) to paste those settings to another selected image or group of images.

Figure 4.81 If you make a selection of images and click the Sync Metadata button in the Metadata panel (right), this opens the Synchronize Metadata dialog. Here you can check the individual IPTC items that you wish to synchronize with the other photos in the selection.
Synchronizing folders
Some folder synchronization will happen automatically in Lightroom. For example, if you change a folder name in Lightroom, the system folder name should update too. But if the folder linked to in the Lightroom Folders panel happens to have been renamed at the system level, then you'll need to use a right mouse click to access the contextual menu shown in Figure 4.82 to relocate the missing folder. Once this is done, Lightroom will quickly relink all the photos that are in that folder.

Figure 4.82 If the name of the folder linked to in the Lightroom Folders panel has been altered at the system level, the Lightroom folder will appear dimmed with a question mark above it. If you right mouse click on the folder, you'll see the options shown here. Choose Find Missing Folder, and then navigate to relocate the original, renamed folder.
When it comes to synchronizing the folder contents, this requires an explicit Lightroom command to check and compare the folder contents in Lightroom with what's in the system folder. What sometimes happens is that you import a folder at the start of a project and as you continue working with that folder between Lightroom and Bridge (or in the Finder/Explorer), new subfolders get added, files may get moved into these subfolders, and some photos can get deleted or new ones added. All this can lead to a situation where the Folder view in Lightroom is no longer an accurate representation of what is in the real system folder.
The Synchronize Folder command, located in the Library menu, can be used to interrogate the system folder that the Lightroom folder refers to. Figure 4.83 shows the Synchronize Folder dialog, which as you can see, provides initial information about what differences there are between the two, such as whether there are any new photos to import, whether any photos in the Lightroom catalog are missing their master images, and whether any metadata changes have been made externally where the Lightroom database will need to be updated.

Figure 4.83 The Synchronize Folder dialog.
If you check the "Import new photos" option in the Synchronize Folder dialog, you can choose to simply import and update the catalog. The default settings for the Synchronize Folder dialog automatically imports the files to the same folder as they are in currently. It does this without showing the Import dialog and without modifying the filename, Develop settings, metadata, or keywords. However, you can also choose "Show import dialog before importing," which will open the Import Photos dialog shown in Figure 4.84. The main reason for choosing to show the Import Photos dialog when synchronizing a folder is so that you can adjust any of the settings as you carry out an import and update the Lightroom catalog. Note that if you have removed any photos from the folder at the system level, Synchronize Folder can also remove these files from the catalog, thereby keeping the Lightroom catalog completely updated for new additions as well as any photos that are no longer located in the original system folder.

Figure 4.84 The Import Photos dialog, shown here ready to add new photos to the current catalog (where it always defaults to selecting the New Photos option).
"Scan for metadata updates" works exactly the same as the "Read metadata from Files" option in the Library module Metadata menu (see page 189). For example, if you have edited the metadata in any of the catalog images in an external program such as Bridge or another program where the metadata edits you make are saved back to the file's XMP header space (or saved to an .xmp sidecar file), you can use the Synchronize Folder dialog to synchronize such metadata changes to the Lightroom catalog.
Sorting images
You have the option of sorting images in Lightroom by Capture Time, Added Order, Edit Time, Edit Count (for sorting Edit versions of master images in the order in which they were created), Rating, Pick, Label Text, Label Color, File Name, File Extension, File Type, or Aspect Ratio. You can set the sort order by selecting the View menu and highlighting an item in the Sort submenu, but an easier method is to use the Sort drop-down menu in the Toolbar (Figure 4.85). Next to the Sort menu is the Sort Direction button, which allows you to quickly toggle between ordering the images in an ascending or descending sort order (Figure 4.86). For example, if you come back from a shoot with several cards full of images, there is a high probability that the order in which you imported the photos may not match the order in which they were shot. If the files are renamed at the time of import, you may want to correct this later by re-sorting the capture files by Capture Time and then apply a batch rename by selecting Library  Rename Photos. The descending sort order can also be useful when shooting in tethered mode, where you want the most recent images to always appear at the top of the filter view in the content area.

Figure 4.85 The Library module toolbar sort order buttons.

Figure 4.86 The image sort order is, by default, set to photo Capture Time. This is probably the most useful sort order setting. In the View menu, you can choose to sort the images by say, Added Order or by Rating.
Sort functions
If you are viewing a folder, a filtered folder view, or a collection, you can manually adjust the image sort order by dragging and dropping photos either in the Grid view or via the Filmstrip. Manually sorting the photos defaults the sort order menu to a User Order sort setting, and the User Order sort will remain in force after you have exited a particular Folder or Collection view. But as soon as you switch to any other sort order menu option, such as Capture Time, the previous User Order sorting will become lost. However, you should note that it is only possible to drag and drop photos in the Grid or Filmstrip view when a single folder view or a collection is selected. You cannot drag and drop grouped folder views or filter views that span more than one folder.
The Sort menu can also help resolve some of the possible contradictions in the way color labels are identified in Bridge and Lightroom. This is because instead of having a single sort option for sorting by color labels, there are, in fact, two options: sort by Label Color and sort by Label Text. The reason for this is as follows:
- In Lightroom, the default color label set uses the following text descriptions alongside each label: Red, Yellow, Green, Blue, Purple. (To access the dialog shown here, go to the Library module Metadata menu
 Color Label Set
  Edit.) OK, this is not a particularly imaginative approach, but the label text that is used here did at least match the label text descriptions that were used in Bridge CS2 (as included with the CS2 Creative Suite). Note that the Lightroom dialog shown here says, "If you wish to maintain compatibility with labels in Adobe Bridge, use the same names in both applications." So far, so good. If you follow this advice, Lightroom can be compatible with the CS2 version of Bridge because both programs use identical color label text descriptions.
- However, in Bridge CS3 and CS4, the Color Label text naming was changed to a new default setting. Shown here is how the default label text appears in the Bridge CS3/CS4 program's Labels preferences. If you install Bridge CS3 or later and use the default color label settings in both Bridge and Lightroom, the label text descriptions will differ. This has led to problems such as white labels appearing in Bridge CS3 or later where Bridge is unable to read Lightroom's color label metadata correctly. In these specific instances, Bridge can "see" that a color label has been applied, but it does not know how to interpret the metadata correctly. Bridge can read the color label text description and display this in the Bridge Filter panel, but it does not know how to apply the label color part.
- Lightroom faces a similar problem in not knowing how to manage mismatched color labels where the label color and label description text differ. But at least in Lightroom, you can use the Custom Label filter (circled here in the Filter bar) to filter those photos that have a color label but where the text descriptions don't match the current color label set.
- If you were to choose an alternative color label set in Lightroom such as the Review Status set shown here, the problem between Lightroom and Bridge would persist because the descriptive terms used in both programs will again be different. Furthermore, subsequent Bridge updates have not necessarily managed to resolve this conflict, and the message remains the same. If you want to be absolutely consistent between applications when applying color labels, then make sure the color label text system adopted in both programs matches.
The sort by label text solution
If you edit a photo's color label setting in Bridge and then use the Lightroom Library module Metadata  Read Metadata from File command, a similar conflict can occur. But instead of showing a white label, Lightroom will not display any color labels in the Grid or Filmstrip views. However, if you go to the Metadata panel (Figure 4.87), you will notice that the Metadata panel does at least display the color label text data. This means that although Lightroom won't necessarily be able to display any of the color labels that might have been applied in Bridge, you still have a means to filter and sort them based on the color label text metadata. Therefore, the Sort by Label Color option allows you to sort photos by color labels that have been applied in Lightroom (and where the Bridge color label text matches). The Sort by Label Text option is a catch-all option that allows you to sort all color labeled photos regardless of whether the color label settings match in Lightroom and Bridge (but you'll still need to check the Metadata panel to identify the color label text).
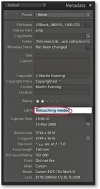
Figure 4.87 The Metadata panel displays the color label information using the color label text data.
On the subject of label colors and label color text, you might want to return to page 110 in Chapter 3, which discusses working with specific color label sets. It is important to note here that the Color Label filters can select only the color label photos that match the current, active color label set.


