- Digital Darkroom Tools
- Camera Raw, Photoshop, and Bridge
- Camera Raw Anatomy
- Camera Raw Process Versions
- Examining the Camera Raw Tools In Depth
- The Camera Raw Keyboard Commands
- Adobe Lens Profile Creator
- The Darkroom Toolkit
Examining the Camera Raw Tools In Depth
The environment of Camera Raw has become increasingly rich and powerful—and yes, complicated. No longer simply a raw processing plug-in, Camera Raw has moved into new and uncharted waters, giving you the ability to do both global tone and color corrections, and also make edits such as spot healing—tasks that once required a pixel-based image editor. We'll examine, in detail, each of the tools found in Camera Raw. But keep in mind that this chapter is intended to lay a foundation for what the tools do, not explain how to use them. We'll tackle that topic in Chapter 5, Hands-On Camera Raw.
As you can see in Figure 4-9, the main Camera Raw dialog box title displays the current version of Camera Raw being used as well as the camera model used to shoot the image.

Figure 4-9 Dialog box title.
The Preview Option and Full-Screen Toggle
The Preview option (see Figure 4-10) allows you to toggle the settings of an active adjustment panel on and off. This enables you to see the changes that have been made during the current editing session. Note that the Preview option is panel sensitive, which means that as you move from one panel to another and make changes, you'll see the preview adjustment for that particular panel. To reset the results of multiple panel changes, select Camera Raw Default in the Camera Raw flyout menu.

Figure 4-10 Preview option and Full-Screen toggle button.
The Full-Screen toggle (also shown in Figure 4-10) allows Camera Raw to expand to the entire screen of the display. By going to Full Screen you'll gain space by hiding the dialog box title. Note that when in full-screen mode, the version number and camera model shown in Figure 4-9 are hidden along with the dialog box title.
The Histogram
Arguably, the histogram is the most important but least understood of Camera Raw's information displays. The histogram is merely a graphical representation chart of the data distribution in your image, but it can reveal a lot. It can tell you how well distributed the values are in your image as well as whether values are near or past clipping. As shown in Figure 4-11, you can configure the histogram to show where in your image such clipping can be found.
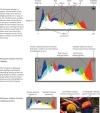
Figure 4-11 Main histogram display.
The histogram is calculated based on the Workflow Options color space you've chosen. The display is based on 8-bit/channel accuracy in the gamma of your color space. To view a 16-bit/channel histogram would be less useful, since the size would constrain how accurate the data could be plotted. The same could be said for viewing a linear-gamma histogram.
We'd like to stress that there is no such thing as a "perfect histogram." Nor should you try to adjust an image to arrive at some sort of optimal shape. The histogram's shape can give you hints as to what adjustments you'll need to make to more evenly distribute the levels in your image. A histogram with a concentration of data in the shadows with little or no data in the highlights may indicate underexposure, whereas concentration in the highlights may indicate overexposure.
The RGB and EXIF Readouts
The RGB readout (see Figure 4-12) shows the RGB values that will result from conversion at the current settings. The readout displays the RGB values for the pixels under the cursor: At zoom levels of 100% or less it always reads 5-by-5 screen pixels, so it may give different values at different zoom levels. When you fit the entire image into Camera Raw's preview, you're sampling a fairly large number of pixels; the exact number depends on the camera's native resolution and the size you've chosen from the Size menu in the Workflow controls. At zoom levels greater than 100%, however, the sample size is always 5-by-5 image pixels.

Figure 4-12 RGB and EXIF readouts.
The EXIF readouts (also shown in Figure 4-12) transcribe the embedded EXIF metadata to provide readings familiar to photographers. The accuracy of the readouts will depend entirely on the way in which the camera you're using stores the EXIF metadata. Sometimes that can be ambiguous, particularly when reading lens data. Not all camera makers provide data on all lenses, and some third-party lenses can cause either inaccurate or faulty lens information.
The Adjustment Panel Icons
As shown in Figure 4-13, Camera Raw now has ten separate Adjustment panels with several panels containing two or more subpanel variations and various dropdown menus. In general, the panels are designed to be used from the top down and from left to right. That's not to say you won't be bouncing back and forth, but generally the optimal approach is to start in Basic, which displays by default. The easy way to get to the Adjustment panels is to use the keyboard commands shown in Figure 4-13. The Camera Raw team ran out of keyboard shortcuts for accessing the Snapshot panel, so it's the only panel that you cannot access via a shortcut. You'll have to click the icon.

Figure 4-13 The Adjustment panel icons and keyboard shortcuts to access them (for Windows, substitute Ctrl-Alt for Command-Option).
The order in which you make adjustments has no bearing on the manner in which Camera Raw carries out the processing. That order is fixed in the Camera Raw processing pipeline, which sets the optimal order. So there's no reason not to make various adjustments in any order that is useful to you, knowing that Camera Raw will do the right thing when it processes. Inevitably, we find ourselves moving back and forth between Basic and Tone Curve often to adjust the image's overall distribution of tones. Color adjustments, even after the white balance is set, are typical, with moves to the HSL/Grayscale and Split Toning panels common. The Camera Calibration panel gets less attention on an image-by-image basis. You'll generally use that panel only a couple of times when zeroing in on your camera's color response. Using presets is one area where even advanced users often fail to take maximum advantage.
In this section we'll define what each panel's adjustment sliders do. In the next chapter we'll explain how to combine them to maximum advantage.
The Basic Panel
The Basic panel is the primary location for general adjustments for tone and color corrections. With 11 sliders, a dropdown menu, and two active buttons, it ranks as the second-most complicated set of adjustments, but it ranks at the top in terms of importance (see Figure 4-15).

Figure 4-15 The Basic panel with the White Balance dropdown menu. You can press Command-Option-1 to display this panel.
The White Balance Adjustments
White Balance adjustments are so important they are placed at the top of the Basic panel. The White Balance adjusts the following:
White Balance. At the top resides the White Balance settings with a dropdown menu. In general, the most useful setting in the dropdown menu is As Shot. When you select As Shot you allow Camera Raw to attempt to decode the white balance data stored when your camera captured the image. Camera Raw may not exactly match the camera's numbers or its rendering of that white balance, but it does a pretty good job of accessing most cameras' white balance metadata. The Fluorescent menu selection is also helpful because it often gives a more useful starting point than As Shot, if the shot was taken under fluorescent lights.
Keep in mind that the moment you adjust either of the White Balance sliders, the readout in the menu field will change to Custom, indicating that you've overridden the As Shot settings.
The White Balance adjustments are split between Temperature and Tint. Camera Raw 6 has interface clues—blue and yellow in the Temperature slider and green and magenta in the Tint slider. The Up and Down arrow keys adjust the color temperature in increments of 50 Kelvins. Pressing Shift at the same time adjusts the temperature in increments of 500 Kelvins.
- Temperature. The Temperature control lets you specify the color temperature of the lighting in degrees Kelvin, thereby setting the blue-yellow color balance. Lowering the color temperature makes the image more blue to compensate for yellower light; raising the color temperature makes the image more yellow to compensate for the bluer light. (If this seems counterintuitive, remember that we think of higher color temperatures as bluer and lower ones as yellower. The trick is to keep in mind that the Temperature control compensates for the color temperature of the light, so if you tell Camera Raw the light is bluer, it makes the image more yellow.)
- Tint. The Tint control lets you fine-tune the color balance along the axis that's perpendicular to the one controlled by the Temperature slider—in practice, it's closer to a green—magenta control than anything else. Negative values add green; positive ones add magenta. The Up and Down arrow keys change the tint in increments of 1. Pressing Shift at the same time changes the tint in increments of 10.
If you are not using the White Balance tool to set the white balance, the sliders give you the ability to adjust either by numbers or by eye.
Auto control. Camera Raw has a single Auto control, which does its work evaluating the statistics of the image's histogram while attempting to produce an optimal distribution of values throughout the image. Can it be wrong? Yes—and it often is in subtle ways. However, this single Auto adjustment is superior to Camera Raw 3's multiple settings and brings with it compatibility with Photoshop Lightroom.
When you're first looking at an image that may pose significant adjustment challenges, it's useful to let Auto take a crack at the adjustments. It may not be correct in all its "guesses," but it's often right in at least a couple. And remember, since Camera Raw is a parametric editor (and has Multiple Undo) you don't risk anything other than a bit of time by trying.
Default control. The Default control (grayed out in Figure 4-15 because all the settings are at their defaults) provides a simple way to return to the Camera Raw Default settings in the Basic panel based on your current Default settings (which can be changed).
The Tone Adjustment Sliders
Once the White Balance adjustments are made, the general rule is to begin adjusting the tones in your image. The Tone adjustments you can make in the Basic panel include the following:
Exposure. The Exposure slider controls the mapping of the highlight tone values in the image to those in your designated working space, but it's first and foremost a white-clipping adjustment. Remember, half of the captured data is in the brightest stop, so Exposure is a highly critical adjustment!
Large increases in exposure value (more than about 0.75 of an F/stop) will increase shadow noise and may even make some posterization visible in the shadows, simply because large positive exposure values stretch the relatively few bits devoted to describing the shadows farther up the tone scale. If you deliberately underexpose to hold highlight detail, your shadows won't be as good as they could be.
Holding down the Option key while adjusting Exposure gives you a live view of the area in the image that is getting clipped. White pixels indicate highlight clipping, and colored pixels indicate clipping in one or two channels. The Up and Down arrows change the exposure in increments of 0.05 of an F/stop. Pressing Shift at the same time changes the exposure in increments of 0.5 of a stop.
Recovery. This deceptively named slider can have a major impact on the extreme highlights of your image. Unlike most raw converters, Camera Raw offers "highlight recovery." Most raw converters treat as white all pixels where one channel has clipped highlights, since they lack complete color information. But Camera Raw can recover a surprising amount of highlight detail from even a single channel. It does, however, maintain pure white (that is, clipped in all channels) pixels as white, unlike most converters that turn clipped pixels gray. It also darkens the rest of the image using special algorithms to maintain the nonwhite pixels' color. Use of Recovery generally entails interactive adjustments of Exposure as well as other tone mapping controls. It is one of the adjustments often correctly guessed by the Auto setting.
See the sidebar "How Much Highlight Detail Can I Recover?" in Chapter 2 for more technical details and see Figure 2-12 for a real-world example.
Fill Light. Fill Light has been revered by Camera Raw users for its ability to draw out shadow detail, but it does have its limits. It's one of Camera Raw's most processor-intensive algorithms, so on slow machines it can seem to drag when first making an adjustment. This is because under the hood it is producing a blurred mask of the image, on the fly, to adjust the shadows in the image. After the mask is generated (which isn't done until the slider is first moved above 0), slider adjustments should be swifter.
Because of this soft-edge mask, overuse can also lead to visible halos on areas of extreme high-contrast edges. (The halo tendency has been reduced in the new Process 2010 version.) Despite these minor potential shortcomings, Fill Light remains an absolutely critical tool for modifying the tone mapping in your image.
Blacks. The Blacks slider is the black clipping control. It works much like the black input slider in Photoshop's Levels, letting you darken the shadows to set the black level. Since the Blacks slider operates on linear-gamma data, small moves tend to make bigger changes than the Black input slider in Levels. In earlier versions of Camera Raw, this control (formerly called Shadows) was something of a blunt instrument, but in more recent versions it has a much gentler effect. That said, you may find the default value of 5 a little too aggressive. You can alter the Camera Raw Default to a lower number; we often use 3 as a default instead of 5.
Adjustments between the low numbers of 1 to 5 can have a tremendous impact at each increment, whereas at higher numbers the changes smooth out. For this reason it's often useful to zoom into the deep shadow areas of your image and hold down the Option key to see what effect even small units of adjustments will have on your image. Black pixels indicate shadow clipping, and colored pixels indicate clipping in one or two channels. The Up and Down arrow keys change the shadows in increments of 1. Adding Shift changes the shadows in increments of 10.
Brightness. Camera Raw's Brightness slider is a nonlinear adjustment that works very much like the Gray input slider in Levels. It lets you redistribute the midtone values without clipping the highlights or shadows. Note, however, that when you raise Brightness to values greater than 100, you can drive 8-bit highlight values to 255, which looks a lot like highlight clipping. But if you check the 16-bit values after conversion, you'll probably find that they aren't clipped.
The Up and Down arrow keys change the brightness in increments of 1. Adding Shift changes the brightness in increments of 10.
Contrast. The Contrast slider differs from the Photoshop adjustment of the same name. While Photoshop's Contrast is a linear shift, Camera Raw's Contrast applies an S-curve to the data, leaving the extreme shadows and highlights alone. Increasing the Contrast value from the Default setting of +25 lightens values above the midtones and darkens values below the midtones, whereas reducing the Contrast value from the default does the reverse. Note that the midpoint around which Contrast adds the S-curve is determined by the Brightness value.
The Up and Down arrow keys change the contrast in increments of 1. Adding Shift changes the contrast in increments of 10.
Both Brightness and Contrast are rough-tuning adjustments that can often be better tuned by using the Tone Curve panel adjustments. However, they live on the Basic panel to allow you to do those rough adjustments in combination with the main levels of distribution adjustments of Exposure and Blacks. In the next chapter we'll provide examples of how to work interactively with Exposure and Blacks as well as Brightness and Contrast.
Clarity, Vibrance, and Saturation
In Lightroom, the adjustments named Clarity, Vibrance, and Saturation fall under the heading of "Presence"—and that's a pretty good description of what these adjustments are capable of. Subtle use of these adjustments can add a degree of presence to an image that can't be accomplished easily with other tools or adjustments (unless you count the 24 sliders in HSL/Grayscale). But while the HSL adjustments are scalpels, these tools are more "basic cutting tools," which is why they reside in the Basic panel in Camera Raw.
Clarity. The word really says it all: Clarity is like a lens-cleaning filter. It works in a mysterious way, using an adaptive image adjustment that is mask based (like the Fill Light adjustment) in that it creates a mask of the image and uses it to add midtone contrast. So why is it in the Basic panel?
Other than the fact it's a "basic" adjustment you'll want to use often, it's really a tone adjustment for the midtones. Clarity is a distant relative of Photoshop's Unsharp Mask filter. In fact, it uses an algorithm very much like Unsharp Mask set to a small amount but a large radius of sharpening that results in local-area contrast increases. The control is very image dependent: it uses the actual image to determine the area over which it will adjust contrast. The adjustments are tapered off the bright highlights and deep shadows so they concentrate on the midtones.
If you want to roughly duplicate the Clarity adjustment in Photoshop, here's the recipe: Take an image, duplicate the background layer, and apply an Unsharp Mask filter set to an Amount of 15% and a Radius of 100. Then in the layer's Blend If options (double-click the layer icon), select This Layer and split the highlight and shadows sliders to set the blend range so that shadows blend from 0/100 and the highlights blend from 127/255. Compare those steps with the effort it takes to merely adjust a slider in Camera Raw. Considering that this adjustment is done on the fly, it's a remarkable reinvention of an old technique in a new parametric wrapper. We'll provide examples in the next chapter, but for now keep in mind that almost every image can do with at least a small dose of Clarity; and sometimes a little negative Clarity does wonders.
Vibrance. While Vibrance is similar to the Saturation control that comes next, it has a twist: It increases the saturation of unsaturated colors more than it adjusts already saturated colors. An additional twist is that Vibrance will adjust all colors except for skin tones, which means it's safe to use on people (Saturation would likely result in less-than-desirable saturation boosts to portraits). For those of you who recall Pixmantec and Raw Shooter Pro (RSP), this control will be familiar. The Vibrance setting in Camera Raw, though inspired by RSP, has been written to work in the Camera Raw pipeline.
Saturation. The Saturation control acts like a gentler version of the Saturation slider in Photoshop's Hue/Saturation adjustment. It offers somewhat finer adjustments than Hue/Saturation—but not as fine as HSL/Grayscale, which has saturation controls broken down by not six but eight separate hues. So while Saturation in the Basic panel can be a useful tool for boosting overall saturation, it does run the risk of potentially causing saturation clipping. Please use it sparingly.
The Tone Curve Panel
The Tone Curve panel is the first panel with two tabs: the Parametric Curve Editor and the Point Curve Editor (see Figure 4-16). Why two curve editors? Parametric curve editing was introduced in Lightroom, and to maintain cross-compatibility, it was also incorporated into Camera Raw. For some functions, such as relatively simple contrast adjustments, either curve editor can be used. Their capabilities are similar, but their usability is vastly different: The Parametric Curve Editor offers a quicker means of achieving a desired tone mapping, whereas the Point Curve Editor can help you obtain a more accurate placement of points on a curve. Your choice should be predicated on the precision your image needs versus the ease of accomplishing what you need. Both require practice.
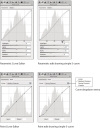
Figure 4-16 The two faces of the Tone Curve panel.
Parametric. The Parametric Curve Editor uses a simplified user interface to allow quicker adjustments of the Highlights, Lights, Darks, and Shadows. The effectiveness is further enhanced by the Range Adjustment slider underneath the curve plot, which is used to expand or contract the range over which the curve adjustments are applied. The Highlights control the one-quarter tones and white; the Lights control the one-quarter tones; the Darks control the three-quarter tones; and the Shadows control the three-quarter tones and black. Neither black nor white is affected—those points remain the domain of Exposure and Blacks for setting clipping points.
The Up and Down arrow keys change the units in increments of 1; adding Shift changes the units in increments of 10.
The plot of the luminance image data is in the background, although it's in a different scale than Camera Raw's main color histogram.
Point. While the Parametric Curve Editor can often produce the right tone curves more quickly, there's no denying that the Point Curve Editor can accomplish far finer-tuned controls—particularly in the data-rich areas of extreme highlights. The curve behaves like Photoshop CS5's Curves adjustment. Moving a point will have an impact on the other side of the next point. To place very fine point curves, you can simply click on the curve to add a point; to delete a point, just drag it off the curve plot.
The input/output readout is based on your current working space settings. The Up and Down arrows and right and left keys change the units in increments of 1. Adding Shift changes the units in increments of 10.
You can choose different hard-coded curve presets from the dropdown menu. You can save a new custom preset for just curves separated by parametric or point curves and apply presets in this manner.
The Detail Panel
It could be said, without much fear of contradiction, that in earlier versions of Camera Raw, the series of controls and the functionality provided in the Detail panel (see Figures 4-17a and 4-17b) didn't get much "true love." That changed with the release of Camera Raw 4.1 in Photoshop CS3 and now continues with Camera Raw 6 in Photoshop CS5. Not only did the luminance noise-reduction receive a much-needed overhaul, but the image sharpening has now reached near optimal capability and functionality as well. Adobe had a little special help to accomplish this task.

Figure 4-17a The Detail panel in Process 2010 and warning when the image is less than 100% zoom.

Figure 4-17b The Detail panel in Process 2003 and warning when the image is less than 100% zoom.
Bruce Fraser was hired as a special consultant to work with Thomas Knoll and Mark Hamburg (the founding engineer for Lightroom, which shares its processing pipeline with Camera Raw). With Bruce's untimely passing, Jeff Schewe had to step in to help fulfill the contract, but the results have Bruce's fingerprints all over them. Bruce's concept of a "sharpening workflow" that originated with a product he worked on for PixelGenius called PhotoKit Sharpener was embodied in Camera Raw's sharpening functionality.
That's not to say that Mark and Thomas, and more recently engineer Eric Chan, didn't do the hard work—they wrote the code. The Camera Raw engineers took Bruce's ideas as inspiration and incorporated those ideas into a series of four parametric sliders, which is astonishing when you consider the multitude of steps it takes to run PhotoKit Sharpener's Capture Sharpener inside Photoshop. That's exactly what Thomas wanted to be able to do in Camera Raw—capture sharpening.
The sharpening process, slightly tuned in Camera Raw 6, is specifically designed to work optimally as a "capture sharpener." The very process of capturing an image produces softness that must be reconstituted, and Camera Raw now has excellent tools to do just that. However, you shouldn't fall prey to the temptation to overdo it, nor should you try to sharpen "for effect."
The Sharpening Controls
For all the sharpening controls, holding the Option key while adjusting the slider will give you a preview of what the control is doing and how. The ability to see what is being done is incredibly useful for making decisions and evaluating settings. Until you become familiar with the controls and how they interact, we strongly suggest using this preview to arrive at optimal settings for your images.
Sharpening. As shown in Figure 4-17, there are four main controls for image sharpening in Camera Raw 6. The defaults are designed to roughly approximate the results of previous versions of Camera Raw and are intended for general-purpose sharpening. Adjusting the parameters tunes the result, and the adjustments are predicated on capture size and image content. We'll provide examples in the next chapter of image content types and how content impacts the optimized settings. But in this section we'll focus on defining and describing what the controls offer.
Amount. As you might expect, Amount is a volume control that determines the strength of the sharpening being applied. It runs from 0 (zero), meaning no sharpening is being applied (this is the default amount set for non-raw images), all the way to 150. If you go to 150 without adjusting other controls, your image will be pretty much sharpened to death, but you can go to 150 when you apply other controls because they will alter how the sharpening is applied.
Radius. Radius defines how many pixels on either side of an "edge" the sharpening will be applied. Camera Raw's Radius control goes from a minimum of 0.5 pixels to a maximum of 3 pixels.
Detail. During development, the team tried to come up with a better name for this, but the word Detail is at least descriptive. Similar in concept to Photoshop's Unsharp Mask (but totally different in application and function), Detail varies how the sharpening attacks your image. If you run Detail all the way to the right (a setting of 100), Camera Raw's sharpening will be similar to Unsharp Mask—not exactly the same, but very similar. Moving Detail to the left does a halo dampening on the sharpening. Moving it all the way to the left (to 0) will almost completely pin the sharpening edge halo.
Masking. Masking reduces the sharpening of nonedge areas and concentrates the sharpening on edges, which is a principle of capture sharpening. The fact that Camera Raw is creating an edge mask on the fly is very impressive. Note, however, that as with Camera Raw's Fill Light, the Masking control is very processor intensive and you may see a slowdown on old machines when using it. By default, Masking is set to 0, meaning there's no masking and no mask needs to be built.
This brings us to the point where you may be asking what constitutes "optimal." In the old days, the general consensus was that you needed to make an image "slightly crunchy" (slightly oversharpened) onscreen at 100% zoom. That slightly crunchy part is a difficult and imprecise description—it's like "salting to taste." It's ambiguous at best and subject to gross oversharpening at worst.
While Bruce was not able to see the final iteration of Camera Raw's sharpening, Jeff has worked on determining how best to optimize an image. The current thinking is to aim for "just right" sharpening at 100% zoom. You should sharpen just below the threshold of seeing any undesirable sharpening effects, including any actual appearance of "crunchiness."
Sharpening halos are to be expected, yet halos should remain invisible when viewed at 100%. You may see some when viewing at 200% or above but not at 100%. There are no "magic numbers" that will automatically work because you must factor the capture size and the image content into the equation when making adjustments. Chapter 5 provides examples and explains these factors in depth. In the meantime, Figure 4-18 shows the logical process and the previews available while determining the optimal sharpening for this image. (Note that all intermediate figures in grayscale are being displayed while holding down the Option key.) Figure 4-19 compares the results.
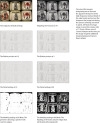
Figure 4-18 Sharpening tutorial.

Figure 4-19 Comparing results.
The Noise Reduction Controls
Noise can come from using a high ISO and the resultant amplification of the signal in the analog-to-digital conversion or be the result of underexposing the image and trying to recover detail from the extreme shadows. Noise-reduction in Camera Raw 6 with Process 2010 has been drastically improved. Not only is the demosaicing algorithm better, but also the Luminance noise-reduction was substantially refined using a wavelet algorithm that seeks to determine extremely high-frequency noise and separate it from high-frequency image texture. Additional controls have been added to allow you to fine-tune how the algorithm determines the sensor noise. Camera Raw's noise-reduction is now capable of doing heavy-duty noise obliteration like some third-party Photoshop filters.
One additional improvement is the ability to find and fix "outliers"—those random light or dark pixels that may occur as a result of demosaicing flaws that are often seen on high ISO captures. The key to successful use is to improve but not destroy the nature and look of the image. See Figures 4-20 and 4-21 for examples of the additional controls available in Process 2010 and examples of luminance and color noise-reduction. Figure 4-20 shows the base image in Camera Raw. The detail crops in Figure 4-21 show the front flower at a zoom of 400% in Camera Raw. The example image was shot with a Canon EOS Rebel T1i at an ISO speed of 12,800.

Figure 4-20 Large image and detail.

Figure 4-21 Comparing the effects of the Noise Reduction adjustments. All images have Camera Raw's default sharpening of Amount 25, Radius 1.0, Detail 25, and Masking 0.
We realize that it's tough to try to get across exactly what the noise-reduction sliders are doing here in this book. We'll make the original flower shot available as a download from the Real World Camera Raw Web site (www.realworldcameraraw.com) so you can plug in these same numbers to see the effects of the slider on the image. We do, however, have a description of what each of the noise-reduction sliders are designed to do—and it's direct from the horse's mouth, so to speak. The following descriptions are from Eric Chan, the Camera Raw engineer largely responsible for creating the new noise-reduction adjustments (so we're pretty sure they're correct).
Luminance. This slider controls the amount, or "volume," of luminance noise-reduction applied. The adjustment is tuned so that a setting of 25 is a reasonable balance of noise-reduction applied and detail preserved. This also means that the extra range between 25 and 100 can be used to control how much additional noise-reduction to apply. A value of 0 means "do not apply any luminance noise-reduction." When set to 0, the Luminance Detail and Luminance Contrast sliders are disabled, or grayed out. This slider is always enabled for Process 2003 and Process 2010. Default value: 0.
Luminance Detail. This control sets the noise threshold. You can drag the slider to the right to preserve more details; however, this may cause noisy areas of the image to be incorrectly detected as details and hence will not be smoothed. You can drag the slider to the left to increase image smoothing; however, this may cause real image details to be incorrectly detected as noise and hence smoothed out. This effect is mainly observable on very noisy images only. This slider is new to Camera Raw 6. It is disabled for Process 2003, or when the Luminance slider is set to 0. Default value: 50.
Luminance Contrast. Drag this slider to the right to better preserve image contrast and texture; however, it may also increase perceived "noise blobs" or mottling in high ISO images. You can drag it to the left to achieve very smooth, fine-grained results; however, you may lose local image contrast and textures may get smoothed out. As with Luminance Detail, the results are more noticeable on very noisy images (above ISO 6400 on a DSLR). This slider is new to Camera Raw 6. It is disabled for Process 2003, or when the Luminance slider is set to 0. Default value: 0.
Color. This adjustment is designed so that its default value of 25 does a pretty good amount of color noise-reduction, balancing the competing requirements of suppressing ugly color noise blobs yet maintaining color edge detail. Setting the slider to 0 means that no color noise-reduction will be applied. Setting the slider to values higher than 25 means that much more aggressive color noise-reduction will be applied; this will likely cause color bleeding at edges. Default values: 25 for raw files, 0 for non-raw files.
Color Detail. This control is most useful for extremely noisy images. It lets you refine color noise-reduction for thin, detailed color edges. At high settings (75 to 100), Camera Raw will try to retain color detail in edges, but this may cause pixel-level "color speckles" to remain in the image. At low settings (0 to 25), Camera Raw/Lightroom will suppress these small isolated color speckles, but thin features in the image may become desaturated (i.e., some color bleeding at fine edges). For testing purposes, try zooming to 400% pixel view to get a clearer understanding of the effect. This slider is new to Camera Raw 6. It is disabled for Process 2003, or when the Color slider is set to 0. Default value: 50.
If you examine the images in Figure 4-21 carefully you should be able to pick up the very subtle differences caused by the various settings. We realize it's tough to do in the context of the halftone process of this book. We do suggest downloading the noise example DNG so you can see the effects for yourself. Figure 4-22 shows the original Default settings (same used for Figure 4-21) and the final optimized sharpening and noise-reduction settings.

Figure 4-22 Comparing the Default settings with the optimized settings.
The HSL/Grayscale Panel
The HSL/Grayscale panel has three separate subpanels, which can then transform to yet a fourth panel at the click of the Convert to Grayscale button. Depending on which mode you're displaying, Color or Convert to Grayscale, up to 24 separate sliders are in play (see Figure 4-23). With all these controls, you might expect the HSL portion of the panel to be a complicated beast to manage, but it's not. It's rather elegantly simple yet incredibly powerful—and far more useful than the basic Saturation control.
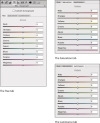
Figure 4-23 The HSL/Grayscale panel in Color mode. When in Color mode, this panel controls a total of 24 sliders separated by three tabs.
The HSL Controls
As you can see in Figure 4-23, the colors under control aren't the typical additive primaries (red, green, blue) or subtractive primaries (cyan, magenta, and yellow). No, the elves who worked on Camera Raw and Lightroom decided to throw in a twist by choosing color controls that are more useful for photographic correction than the primaries. And for good reason—the colors in nature often fall in between the spectral primaries, a fact that makes control of those colors more difficult using only the primaries.
Hue. The Hue control lets you "tween" a color between two related hues. Thus, red can move toward magenta (cooler) or toward orange (warmer). Each of the hues in the panel can have a useful impact on fine-tuning the exact color rendering the raw processing can deliver. While Hue is conceptually similar to the controls in the Camera Calibration panel, you shouldn't confuse its intended use. The Hue sliders are intended to correct photographic or "memory" colors, whereas Camera Calibration is intended to correct the technical rendering of your camera's spectral response. That said, you are free, of course, to use whichever tool catches your fancy.
Saturation. Saturation controls, well, the saturation of the target's hue. You'll note that on each of the HSL subpanels there is a Default button, which is grayed out since there currently are no adjustments. Once you move a slider it is enabled. Since there are three separate panels, the designers decided it would be useful to include a Default button so you could reset all the controls for that subpanel. It's quicker than going through all eight sliders per panel to reset them.
Luminance. The Luminance subpanel is the source of a lot of color and tone adjustment that may augment and improve on the overall tone mapping using Basic and/or Curves. Say, for example, the overall tone mapping is fine except that one particular color is too light or too dark in the resulting tone curve. It's simple to grab the slider for that color and lighten or darken it without affecting the rest of the tone mapping.
The Grayscale Controls
When you click the Convert to Grayscale checkbox (see Figure 4-24), the HSL/Grayscale dialog box displays the Grayscale Conversion tab, which lets you choose how certain colors convert to grayscale. Think of this as an infinitely variable "panchromatic response" filter for your images. Unlike the old days when B&W photographers would shoot with color contrast filters over their lenses to alter the color rendering of their B&W film, we can now exercise far more power and control by adjusting sliders.

Figure 4-24 The Grayscale version of the HSL/Grayscale panel.
The same sets of colors are represented here as in the color version of the panel to allow you to fine-tune the tone rendering for various colors.
Auto. Clicking Auto (which behaves like a button) performs an automated adjustment of the color settings to optimize the conversion to grayscale while trying to preserve a tonal separation between colors. It's common to have two colors with considerable color contrast, but upon conversion to grayscale, they end up with almost the exact same tone. The Auto conversion tries to optimize the separation of colors to tones, as shown in Figure 4-25. In general, it's often close—so close that many times all that is needed is a couple of slider tweaks to finish off what Auto started.
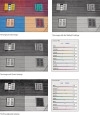
Figure 4-25 The Grayscale Mix subpanel.
The Split Toning Panel
With only five slider controls, the Split Toning panel is Camera Raw's simplest set of controls. Some people may think of this panel as a one-trick pony, but its usefulness would prove otherwise. Although many use the options on this panel only for grayscale conversion and to re-create chemical split toning, the adjustments can be used for color images as well. The functionality is pretty simple (see Figure 4-26): you select a color hue and a degree of saturation in Highlights or Shadows or both. Then, depending on the area you want to act as a balance point, you can adjust the Balance to bias the adjustment split lighter or darker.

Figure 4-26 The Split Toning panel.
The Lens Corrections Panel
The release of Camera Raw 6.1 has brought with it a marvelous new set of tools in the Lens Corrections panel (it wasn't finished yet in the original 6.0 release). While there were a couple of tools in the previous version of this panel, the most recent release incorporates Adobe's important steps to offer automatic lens corrections via a system of lens profiles that fingerprint lens distortion, lateral chromatic aberration, and lens vignetting. The new lens corrections first showed up inside the main Photoshop CS5 release and are now part of Camera Raw 6.1.
Why are lens corrections so important? Some camera lenses have defects that alter the precision of the recorded image. Lens distortions such as pincushion or barrel distortions (see Figure 4-27) distort images by bending the light as it passes through the lens. Also shown in Figure 4-27 is a detail of lateral chromatic aberration, the lens' inability to focus all colors of light at the same size that results in colored fringing and lens vignetting, which causes light falloff in the corners. The examples shown in Figure 4-27 are exaggerated for the purposes of clarity—although we have actually used lenses almost this bad.
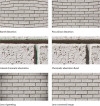
Figure 4-27 Examples of lens defects.
You can use both the new Profile and the Manual subpanel controls in the Lens Corrections panel to correct for lens defects and do perspective corrections, precise rotation, and scaling. The older Defringe, manual Chromatic Aberrations, and Vignetting controls are also still available.
The Profile Subpanel
A multitude of lens defects can negatively impact the final quality of photographs. Lens distortion, lateral chromatic aberration, and lens vignetting are the three defects that Camera Raw's new Auto Lens Profile Corrections (see Figure 4-28) can help resolve.

Figure 4-28 The Lens Corrections Profile panel.
Once you select Enable Lens Profile Corrections, Camera Raw searches through the installed lens profiles that came with the Photoshop CS5 install, matches the image's EXIF metadata with the lens profiles, and attempts to select the correct lens.
When people first started using the new Lens Profile tool inside of Photoshop CS5, there was a degree of confusion regarding the camera name being visible in the lens profile Search Criteria, as shown in Figure 4-29.
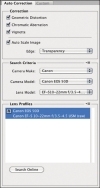
Figure 4-29 The Auto Corrections panel of Photoshop CS5's Lens Correction filter.
Users were dismayed to find that their camera model wasn't used to profile the lens. However, the actual camera being used when the lenses were profiled only matters relative to the sensor crop of the camera. So, if you shoot with a Canon EF-S 10-22mm lens on a Canon 50D, 7D, or even the Digital Rebel, it doesn't matter that the profile shows a different camera. While there may be reasons in the future that might make the mating of the lens and the camera important, currently the only critical criteria is the sensor size. As long as the lens was profiled for the largest sensor supported by the lens, the profile will be fine because the image circle of the lens is a constant regardless of the sensor size. A lens that was profiled on a Canon 1Ds Mark III will work fine on a Canon 5D Mark II and even the smaller sensor of the 50D or 7D.
To simplify the lens profile selection, Camera Raw has altered the display by concentrating only on the lens Make, Model, and Profile menus (see Figure 4-30).

Figure 4-30 Camera Raw's Lens Profile menus.
In Figure 4-30, Camera Raw has selected the Canon EF-S 10-22mm f/3.5-4.5 USM lens. The lens make is Canon; the lens model is shown as the Canon EF-S 10-22mm lens; and the lens profile is listed as Adobe (Canon EF-S 10-22mm f/3.5-4.5 USM). The fact that the previous Photoshop CS5 search criteria (see Figure 4-29) notes that the lens profile was made with a 50D is irrelevant. You'll also notice that the Profile dropdown menu lists an additional profile named "Custom (Canon EF-S 10-22mm f/3.5-4.5 USM)"; see Figure 4-30). This is what would show in the menu if you have made your own custom profile for the lens (as we did here) and named it "Custom" plus the lens model. We'll talk further about Adobe's profile creation tool and the lens profiling community later in the chapter; see the "Adobe Lens Profile Creator" section.
When you enable Camera Raw's lens-correction functionality, on the Profile subpanel the Setup menu defaults to "Default." Tricky, huh? If you modify the Profile selected or the Correction Amounts for the correction parameters, the Setup menu changes to Custom. There is also a menu item named Auto. We'll explain the Setup menu items further, but first take a look at Figure 4-31.

Figure 4-31 The Profile panel's Setup menu.
We realize it can look confusing—we were plenty confused when we first saw it—but you can grasp the behavior logic if you understand the options.
If you select Auto as a Setup menu item, Camera Raw will look for a matching profile and select it automatically. The Auto option seems pretty simple and straightforward, right? However, if you make any modifications to the Auto-selected profile's Correction Amounts or the lens profile selected (if you have multiple profiles for a lens) the menu will change to Custom. Assuming you do wish to save the modifications you've made into a lens profile Setup "Default," you can do so by selecting the Save New Lens Profile Defaults menu option.
Why do these different Setup menu items matter? They will dictate the way Presets you may make regarding lens-profile correction end up behaving. They will also play a role in the event you wish to have Camera Raw incorporate lens corrections automatically as the Camera Raw Default.
If you have Auto selected and you create a new Camera Raw Preset, you can apply that preset in Camera Raw or Bridge. Regardless of the camera model or lens on the camera, if Camera Raw can find a profile for the lens, an Auto lens correction preset will apply the correct lens corrections. This is incredibly useful and time-saving.
However, you can make this even easier by having Camera Raw automatically lens correct whenever it sees a particular camera. We'll explain how you can alter your Camera Raw defaults by camera, serial number or even ISO later in this chapter; see "Camera Raw Preferences."
You might then ask why there's an "Auto" menu item as well as a "Default" menu item in the Setup menu options. We wondered as well. The fact is, the only difference between Auto and Default shows up when you alter the settings for a particular lens profile. If you alter a lens profile's settings and you save that as a new lens profile default, then there would be a difference in the menu items because Auto would be Custom unless you save a new lens profile default, in which case the menu would show Default.
Some of the Adobe-provided lens profiles need slight modifications, in our experience. We usually give the chromatic aberration correction amount a boost to 125–130. In this case, we've used the Save New Lens Profile Defaults command (see Figure 4-31) and then we've saved a new Camera Raw Default to incorporate the new lens profile default automatically.
If you decide that you don't like the adjustments you saved as a new lens default, you can return it to the original settings by using the Reset Lens Profile Defaults command. Figure 4-32 shows this menu option.

Figure 4-32 The Reset Lens Profile Defaults command.
There is one function of Photoshop CS5's Lens Correction that Camera Raw's Lens Correction feature can't do: automatically search for a lens profile on Adobe's Lens Profile server. Camera Raw is a plug-in and can't directly connect to the Internet, so you'll need to employ Photoshop CS5 for the task.
Adobe has been very busy profiling a lot of camera lenses, but the potential matrix of lenses that might be used is huge. We hope that Adobe's efforts to build a lens-profiling community will greatly improve lens-profile availability.
Figure 4-33 shows the Camera Raw warning that there's no lens profile found for a lens. The next step is to open the image taken with the lens that has no profile and in Photoshop CS5 select the Lens Correction filter. Once that filter is open, you can click the Search Online button. If it finds a profile, you are given the option to download it. Once the profile is downloaded and installed, Camera Raw can use it.

Figure 4-33 Searching for a lens profile online.
The Manual Subpanel Transform Controls
While it might be a bit optimistic to hope that completely automatic lens corrections can be now accomplished, sometimes you have to take the hands-on approach and do things yourself. The Manual subpanel of the Lens Corrections panel enables manual control over lens corrections as well as correcting for distortion, adjusting both vertical and horizontal perspective, fine-tuning rotation, and adjusting the scale of the image. It's also where the old manual Chromatic Aberration, Defringe, and Lens Vignetting controls live. Figure 4-34 shows the full Manual subpanel.

Figure 4-34 The Manual panel in the Lens Correction dialog box and the image we'll be using to show the Manual Transform controls.
It's pretty remarkable that the Camera Raw team has engineered the ability to parametrically correct not only for lens defects but also for perspective problems as well. This is an impressive addition to the Camera Raw toolset. The Manual Transform controls are as follows:
Distortion. The Distortion transform in the Manual subpanel has the same sort of geometric distortion correction you find in the automatic lens corrections. The manual controls correct between barrel and pincushion distortions only, however. The Profile-based corrections can also correct for other lens distortions such as a "mustache" distortion (yes, a distortion shaped like a mustache). Pressing the Up or Down arrow keys changes the units by a single digit.
Vertical. The Vertical correction transform will correct for keystoning, the distortion that occurs when you tilt a camera up to include the top of a building, for example. Pressing the Up or Down arrow keys changes the units by a single digit.
Horizontal. The Horizontal correction transform is essentially the same as the Vertical transform but designed for lateral perspective corrections. Pressing the Up or Down arrow keys changes the units by a single digit.
Rotate. The Rotate command allows numerical rotational correction that is more precise than Camera Raw's Straighten tool. Pressing the Up or Down arrow keys changes the units in increments of 0.1. The range is plus or minus 10 degrees.
Scale. This command allows scaling the image up or down from 50% through 150%. This is useful when trying to subtract or add to the image after manual transforms without using the crop tool. Pressing the Up or Down arrow keys changes the units by a single digit.
We'll show you what the controls do on a synthetic image (it's actually a close-up on a shot of a lens-profiling target). We hope the alternating checkerboard pattern doesn't make you nauseous! The baseline image and the Manual subpanel of the Lens Corrections panel are shown in Figure 4-34; the effects are shown in Figures 4-35a and 4-35b.
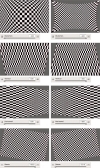
Figure 4-35a The effects of the Manual Transform controls.

Figure 4-35b The effects of the Manual Transform controls.
You'll note that in the images where the controls result in the actual image data being altered beyond the original boundaries, a gray null image area is added. This can be useful if the image correction results in a nonrectangular result. You can choose to keep the additional gray area or use the Scale control to make the overall image larger. Another alternative to using the Scale control is to use the Camera Raw Crop tool. Figure 4-36 shows drawing out a rectangular crop of the image. A new function of the Camera Raw Crop tool is the option to have the crop either constrained to the image or unconstrained depending on the option in the Crop dropdown menu. If the Crop tool is constrained to the image boundaries, none of the added gray filler will be in the final cropped image (shown in Figure 4-36).
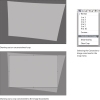
Figure 4-36 Cropping in the Lens Correction panel
The last important function the Camera Raw team provided in the new Lens Correction panel is the ability to overlay a grid to aid in the alignment of both rotation and perspective transforms. You can display the grid by pressing the V key when you are in the Lens Correction panel or by navigating to the Camera Raw flyout menu and selecting the Show Grid command (see Figure 4-37).

Figure 4-37 The alignment grid overlay in the Lens Correction panel.
The Manual Chromatic Aberration and Defringe Controls
There are two types of chromatic aberration: one that Camera Raw can work on and one that it can't. Longitudinal chromatic aberration, where the colors of light can't all be focused on the same plane (the sensor), will result in the type that Camera Raw can't do anything about. Lateral chromatic aberration, however, Camera Raw can help with. In lateral chromatic aberration the lens does focus light at the sensor plane, but does so in a manner in which the image formed is slightly different in size by color; for example, the red channel may actually be larger than the other channels. If the profile-based corrections don't work correctly (or you don't have a lens profile to use) you can use the Chromatic Aberration controls to make the correction manually.
In addition to color fringing caused by chromatic aberration, certain additional fringing effects can often found near extreme specular highlights. This effect is often caused by photo site flooding—too much exposure at a site flooding over to surrounding sites—or by demosaicing errors. Either or both can cause unwanted color fringe effects when you zoom in on your image. Figure 4-38 shows the Chromatic Aberration sliders and the Defringe control in use. The images are shown at a screen view of 400% to better show the effects in reproduction.

Figure 4-38 Fixing chromatic aberration and color fringing.
Remember to concentrate on one Chromatic Aberration slider at a time. To help with this, press the Option key as you move a slider to simplify the view. You will notice that even with the Chromatic Aberration corrections and a Defringe setting of All Edges, there is still some very slight fringe—but this is normal.
The Manual Lens Vignetting Controls
Many lenses create images that suffer from dark corners, for a variety of reasons. Some zoom lenses, because of their extremely complex lens groupings, can't project the image without causing light falloff. Some extreme wide-angle lenses suffer from lens barrel shadows because the lenses are trying to see such a wide angle of view. In either case, light falloff in the corners is common. If you don't have a lens profile for correction, you can use Camera Raw's Lens Vignetting controls to manually correct that falloff (see Figure 4-39).

Figure 4-39 Using the Lens Vignetting controls.
Amount. Moving the Amount slider to the right lightens the corners; moving it to the left darkens them. Darkening the corners is a common creative technique often referred as "hand-of-God burning," in which the center of the image is normally toned and the corners are burned (darkened) down. The Spot Healing, Red Eye, and Lens Vignetting tools are the only methods of adjusting local images in Camera Raw. Note that you apply the lens vignetting correction based on the total image size, not the cropped image. If you are cropping the image, the effect is also cropped. This is as it should be for technical corrections of lens vignetting, but it can be a problem if you're using the adjustment to darken the corners.
Midpoint. The Midpoint adjustment varies the area over which the Amount is applied. You can adjust it to taste. Midpoint is grayed out until the Amount slider is moved from the 0 Default setting.
The Effects Panel
The Effects panel is the new kid on the block in terms of Camera Raw panels (see Figure 4-40). Some people might find it odd that a raw processing engine would have features designed for creative effects, but this new set of functionality does have its uses.
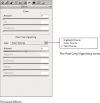
Figure 4-40 The Effects panel.
It may seem ironic that in the same version of Camera Raw touted for its superior noise-reduction powers that the Camera Raw engineers would design an ability to actually add Grain back into a photographic image. Yes, it's a delicious irony, yet the functionality can improve the final image quality. One of the rather counterintuitive aspects of digital imaging is that sometimes image sharpening added to substantial noise-reduction can have an unnatural-looking affect on your images. Often, images optimized with the Detail panel settings can benefit from a gentle touch of added grain. Figure 4-41 shows you a range of grain effects applied to a gray field with a Camera Raw zoom of 200%.
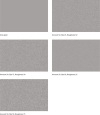
Figure 4-41 The Grain effect at various settings.
Amount. This setting controls how strong the grain effect will be. Generally, you'll want to use a subtle amount unless you are looking for a specific effect. The Default setting is 0.
Size. This slider controls the size of the grain. The size of the grain is not dependent upon the resolution of your images, but the impact of the grain is. You'll want to use smaller grain for lower-resolution images to avoid having the grain blow out image detail. Larger grain sizes soften your image a lot. Also note that using a computer display is not a very accurate method of determining the optimal grain size. You may need to run tests on images all the way through your print processing to determine what size grain you wish to use. The default size is 25.
Roughness. You can use Roughness to alter the grain clumps to more accurately simulate film grain. The default is 50. Reducing the setting will make the grain look like a fine reticulated pattern. Increasing the Roughness will more closely simulate a high ISO film or film that has been push processed.
One additional use for the Grain effect is to match up multiple ISO digital captures in the event you need to do an image assembly. Trying to composite a high-speed ISO capture with a low-speed image is usually best done by knocking down as much of the high-speed ISO noise while adding a bit of grain to the lower ISO capture before assembly. Figure 4-42 shows applying a Grain effect to an ISO 100 capture in an attempt to match the apparent noise of an ISO 1600 capture.

Figure 4-42 Simulating higher-speed ISO noise.
The Post Crop Vignetting Controls
The Post Crop Vignetting controls have been moved from the Lens Correction panel to the Effect panel. They operate on the image after it has been cropped rather than on the entire image, as the Lens Vignetting controls do. This is much more a creative tool than a correction tool. As with any creative endeavor, however, a little can be good but a lot will not. Figure 4-43 shows how the controls work on a synthetic gray image. While Lens Vignetting corrections are usually used to lighten darkened corners, Post Crop Vignetting tools are more often used to darken the corners to concentrate viewer interest toward the center. Often, you'll need to twiddle all the sliders to achieve the final effect you want.
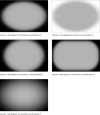
Figure 4-43 The Post Crop Vignetting controls in action.
Amount. The Amount setting is just that, the amount of darkening or lightening that will occur in the Post Crop Vignette. We chose maximum -100 and +100 settings in Figure 4-43 to make sure the effect would be visible.
Midpoint. The Midpoint adjustment moves the effect in toward the center or out toward the corners.
Roundness. This control allows you to adjust how round or oval—or in the extreme, nearly rectangular—the resulting effect is applied. A value of -100 will result in almost an image edge–only effect.
Feather. This setting controls how hard or soft the effect will gradate in and out. Generally, you'll want the effect soft enough so you don't see obvious start or stop points.
The best use of the Post Crop Vignetting effect is subtle. The effect is always exactly centered in the final cropped area of the image. You cannot move the coordinates left/right or up/down. To do that kind of adjustment, you would need to use either the Adjustment Brush or Graduated Filter (see "The Graduated Filter," later in this chapter). The examples shown in Figure 4-43 all use the Paint Overlay blending Style. New to Camera Raw 6 is the ability to change the blending style of the Post Crop Vignetting and modify the way colors and highlights are handled in the vignette effect. Figure 4-44 shows the full image we'll use to demonstrate the various blending options.
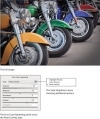
Figure 4-44 Post Crop Vignetting example image.
Paint Overlay. When the Post Crop Vignetting panel first appeared in Camera Raw, it had only a single blending option, which is now called Paint Overlay. This option simply darkens the image without regard to its contents. Everything gets darker and often results in a rather drab effect.
Color Priority. The Color Priority Style preserves the color appearance while making the corners darker. Color Priority also enables the Highlights slider to preserve the brightness of the highlights in the image that may be found in the corners. We tend to use the Color Priority the most as it is the best at maintaining color purity.
Highlight Priority. This control closely resembles the manual vignetting tools in the Lens Correction panel. The Highlights slider is available to help maintain the brightness of highlights in the corners. Highlight Priority tends to contaminate saturated colors, however.
Figure 4-45 shows the upper right corner of our sample image with various blend Style settings and adjusted Highlight settings. The settings from Figure 4-44 remain except for adjustments of the Highlights when using the Color Priority and Highlight Priority styles.

Figure 4-45 Comparing the various blend Style options of the Post Crop Vignetting controls.
The Camera Calibration Panel
The controls in the Camera Calibration panel (see Figure 4-46) let you fine-tune the behavior of the built-in camera profiles to allow for any variations between your camera and the one that was used to build Camera Raw's built-in profiles for the camera model. This panel also allows you to control what process version Camera Raw 6 will use when rendering your image.

Figure 4-46 The Camera Calibration panel.
The Camera Profile dropdown menu displays the version of Camera Raw used when the camera was first profiled as well as subsequent updates and the new DNG Profiles for the camera.
The DNG Profiles are based on the camera's EXIF metadata. Not all cameras will show all these options, and the naming of the camera-based options will vary based on the naming convention the camera makers use. The options are meant to simulate the camera makers' JPEG rendering based on the settings used onboard the camera. Note, however, that Camera Raw can't automatically pick the profile based on the EXIF metadata so you must manually choose something other than the Camera Raw Default of the Adobe Standard profile.
If you have already downloaded and used the previously released beta versions of these profiles, installing Camera Raw 6 and the current release of the profiles won't change what you've already done. You will need to take steps to change the profiles. You should consider making presets using only the Camera Calibration subsettings so you can apply the new profiles easily en masse from within Bridge.
JPEG or TIFF files opened into Camera Raw will have the Embedded profile (the profile that is currently embedded in the image). Files from Sigma cameras will also have the readout set to Embedded.
Figure 4-47 shows applying the Camera Standard profile to simulate the JPEG setting of a Canon 1DsMIII. These images of Michael Reichmann holding a ColorChecker card were shot using the camera's Raw+JPEG mode while he and Jeff shot together in Niagara Falls, Ontario. The camera saved both a raw and JPEG version of the exact same capture. Within the limits of halftone reproduction in CMYK, we think most readers will agree that the raw rendering of the DNG file using the Camera Standard profile looks very close to the same image shot in JPEG format.

Figure 4-47 Changing the DNG Profile to match the camera JPEG.
The Camera Calibration Panel Adjustments
Camera Raw can now simulate the color rendering that the cameras produce very accurately. However, you can modify the results of the profiles by further adjustments of the following settings. These adjustments can be used for accuracy as well as creative color rendering.
Shadows Tint. This slider controls the green–magenta balance in the shadows. Negative values add green; positive values add magenta. Check the darkest patch on the target. If it's significantly non-neutral, use the Shadows Tint control to get the R, G, and B values to match as closely as possible—normally, there shouldn't be more than one level of difference between them.
Red, Green, and Blue Hue. These sliders work like the Hue sliders in Photoshop's Hue/Saturation command. Negative values move the hue angle counterclockwise; positive values move it clockwise.
Red, Green, and Blue Saturation. These sliders work like gentler versions of the Saturation slider in Photoshop's Hue/Saturation command. Negative values reduce the saturation; positive values increase it.
The key points to wrap your head around when using the Hue and Saturation adjustments are these: The Red Hue and Red Saturation sliders don't adjust the red value, they adjust the blue and green; the Green Hue and Saturation sliders adjust red and blue; and the Blue Hue and Saturation sliders adjust red and green.
The Presets Panel
You should consider spending some quality time with the Presets panel (see Figure 4-48) because it's key to working efficiently inside of both Camera Raw and Bridge. If you find you are making the same types of adjustments over and over again, you can make your life easier by creating a preset. Not to be confused with the Camera Raw Default, presets are designed to be broken down by setting groups or individual subsettings.

Figure 4-48 The Presets panel and the New Preset dialog box.
Presets can consist of all settings or, more efficiently, subsettings. When saving a new preset, give it a meaningful name so you know by looking at it what to expect when it's applied. As shown in Figure 4-49, we have a variety of saved presets listed in the panel. Examples vary between camera calibrations (the 1Ds and Rebel presets), clarity settings, and sharpening settings, among others.

Figure 4-49 Saved presets in Bridge's Develop Settings submenu.
The reason that saving subsettings is so useful is that you can apply multiple settings, one after the other, to alter the total settings applied to single or multiple files. As long as the subsettings being applied don't overlap, they won't be altered by subsequent adjustments. So, you could apply a camera calibration preset, followed by a clarity setting, followed by additional presets to apply a custom mix of presets. And you can apply these presets either from within the Camera Raw dialog box or from Bridge's Develop Settings, found in the Edit menu, before ever opening an image in Camera Raw. The presets you create and save also appear in the Develop Settings in Bridge. You can create a new preset from any panel in Camera Raw by pressing Command-Shift-P.
The Snapshots Panel
Snapshots are multiple settings saved as .xmp data either in the raw file's sidecar file or directly within DNG, TIFF, and JPEG files. Figure 4-50 shows the Snapshots panel with a variety of snapshots already saved. This is the only panel that doesn't currently have a keyboard shortcut. However, you can press Command-Shift-S to create new snapshots from any panel.

Figure 4-50 The Snapshots panel (shortened to save space).
When you adjust the settings in a file, you can take a "snapshot" of all the settings that are being applied. This gives you the flexibility to try out new or different adjustments while always being able to come back to the previous settings, even after you close the file and reopen it. Figure 4-50 shows a variety of previously saved snapshots. The obvious ones such as Color Adjusted and B&W Neutral make it easy to pop back and forth when you need different rendering. Color Adjusted Darker and Color Adjusted Lighter would make it easy to open the same file multiple times for layer stacking or as Smart Objects.
When you click on a snapshot, all the settings stored in the snapshot are applied to the file. You can rename the snapshot by pressing Control-click to access the context menu. Figure 4-51 shows the active snapshot as well as the context menu and the Rename Snapshot dialog box.

Figure 4-51 Selecting a snapshot and renaming it.
Once you adjust an image and save a snapshot, it would be nice to be able to change your mind. Well, you can. If you want to make changes to an existing snapshot, just open the context menu and select Update with Current Settings after you've made the new adjustments that you want to save (see Figure 4-52).

Figure 4-52 The Update with Current Settings option.
The Camera Raw Flyout Menu
Tucked away at the far-right side of the Adjustment panels is the sometimes obscure flyout menu, where you'll find some really important controls. Some of the items are occasionally grayed out when not in play or relevant. Look closely at Figure 4-53; some of these controls can have surprising effects if you don't pay attention.

Figure 4-53 The Camera Raw flyout menu.
The menu's top portion contains information and gives you the ability to toggle through several states of your image. In Figure 4-53 we've opened a raw image in Camera Raw. The current state indicates the settings are at the Camera Raw Defaults, which means nothing has yet been changed. A checkmark alongside Image Settings would indicate that you've made changes that differ from the defaults.
Selecting the Previous Conversion menu item will change the current image's settings to match those of the most recent image opened in Camera Raw. This option can be useful if the current image shares properties with the previously converted image, but it can lead to unpredictable results if the most recently processed image bears no relation to the current image. The Previous Conversion setting is constantly updated as you work through images.
The Custom Settings option changes the moment you alter the settings from the way the image was just opened.
The Preset Settings, currently grayed out in Figure 4-53, would show the name of the Camera Raw preset if you had selected a preset either in Bridge (before opening the image in Camera Raw) or in Camera Raw.
Here's the magic decoder ring version:
Image Settings. This option will be checked if the image already had settings when you opened it. If you changed the settings after opening the image, selecting this option will return the settings to the state when the image was last opened.
Camera Raw Defaults. If the image had no settings upon opening, this option will be checked. If, after making adjustments to an image, you want to return to the Camera Raw Default settings for this image, select this option.
Previous Conversion. Selecting this command will apply settings that match those of the most recent image opened in Camera Raw (not the current image settings).
Custom Settings. If you make any changes to an image, the Custom Settings will be checked.
Preset Settings. If you select a Camera Raw preset or a snapshot to apply to the image, the name of that preset or snapshot will be displayed here.
Apply Preset. When you open the Apply Preset submenu, you'll get a listing of all the currently saved Camera Raw presets, as shown in Figure 4-54. This list will be the same as the list available in Bridge as well as in the Presets panel. Remember, applying presets is cumulative as long as the settings do not overlap. In the event any settings overlap, the most recent setting prevails.
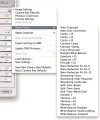
Figure 4-54 The Apply Presets flyout menu showing previously saved presets.
Apply Snapshot. If you have saved any snapshots inside the currently opened image, this flyout menu will show the names and allow you to select one to be applied to the image. Also note in Figure 4-55 that B&W Neutral is the currently active snapshot.

Figure 4-55 The Apply Snapshot flyout menu showing the image's saved snapshots.
Clear Imported Settings. In Camera Raw 6, this menu choice is grayed out. However, it is active in other hosts, such as Photoshop Elements. It will clear all imported settings when that host doesn't offer controls to make certain adjustments. This is not the same as the Bridge CS5 Clear Settings command (Edit > Develop Settings > Clear Settings), which does clear all Camera Raw settings.
Export Settings to XMP. This command is similar to the main Camera Raw Done button: The current settings in an image will be updated to the XMP metadata, either embedded into the file (in the case of DNG, JPEG, or TIFF images) or written in an XMP sidecar file if the image is in a proprietary raw file format.
Update DNG Previews. If the image file that is currently open in Camera Raw is in DNG format, you can update DNG previews. Choosing this menu item opens a dialog box that lets you choose the preview size.
Load Settings / Save Settings. Choosing either menu item opens a dialog box (see Figure 4-56) that allows you to save the file's settings or to load a specific setting preset that may not be in the Camera Raw Presets folder. After selecting the settings to save, you'll be prompted by a Save dialog, also shown in Figure 4-56.

Figure 4-56 The Save Settings dialog box.
The default location for Camera Raw Presets for the Mac OS is:
User/Library/Application Support/Adobe/CameraRaw/Settings
For Windows XP the location is:
Boot drive\Documents and Settings\User Name\Application Data\Adobe\CameraRaw\Settings
For Windows Vista and Windows 7 the location is:
Users\User Name\AppData\Roaming\Adobe\CameraRaw
When saving settings as a preset, you have the same option in this dialog box as you do in the New Preset dialog box. You select which settings will be saved if you want to save a subset. After selecting the desired settings, you'll be prompted to choose a name and location. By default, Camera Raw enters the filename as the preset name, but unless you want to save the setting for only that image, be sure to give the setting a descriptive name that will be meaningful to you in a dropdown list.
Save New Camera Raw Defaults. We realize the Camera Raw seems to have a lot of "defaults," but you can control what those defaults are from within the main flyout panel. Figure 4-53 shows that the Save New Camera Raw Defaults menu is currently grayed out. That means that at the moment, the image inside of Camera Raw is at the Camera Raw Defaults currently set for this camera.
Reset Camera Raw Defaults. Regardless of how the Camera Raw Defaults may happen to be set, you can always return them to the initial settings as they were originally designed by the Camera Raw team. This way you can be assured that you can always turn the clock back in the event you wish to return to Camera Raw's initial Default settings.
The Camera Raw Main Buttons
You might assume that the main buttons wouldn't hold any magic clues or hidden functions. Well, you would be wrong. The main Open, Cancel, and Done buttons go a bit further than you might expect. As you can see in Figure 4-57, each of the main buttons can be in one of eight different potential conditions.

Figure 4-57 The Camera Raw main buttons.
Since Camera Raw can be hosted by either Bridge or Photoshop, the highlighted buttons are set to indicate which application is currently hosting Camera Raw. Holding down the Option key changes the Open button to Open Copy, which is useful if you want to open an image with different settings and not save the new settings in the metadata. For example, suppose you want to open an image twice: once with a lighter setting and again with darker settings for later blending in Photoshop. Using Open Copy opens the image without changing your previous settings. It's also comforting that by default, Camera Raw will auto-resolve filenaming if you need to open the same image multiple times.
If in your Workflow settings you've specified that an image open into Photo shop as a Smart Object, the Open button tells you that by changing to Open Object. Even if you have the Workflow settings set to Smart Object, you can bypass the Smart Object placement and just open the image into Photoshop by holding down the Option key and clicking the resultant Open Copy button.
If you have already made a Smart Object using Camera Raw and you reopen the Smart Object to edit the settings, you will see a third variant of the Camera Raw buttons from inside the Smart Object file.
The Filename and Image Count Indicators
Continuing on our round-the-horn tour are two small and relatively minor (but useful nonetheless) items: the filename of the currently open image and, when in the filmstrip mode, an indicator of how many images you currently have opened in Camera Raw and the ability to navigate between those images. Figure 4-58 shows both items.

Figure 4-58 Filename and image count.
The Workflow Options
On the main Camera Raw interface, the blue info readout at the bottom of the window provides information on the current settings and also acts as a button to access the Workflow Options dialog shown in Figure 4-59.

Figure 4-59 Workflow Options Button and dialog box.
The Camera Raw can be configured to output into Photoshop or save images. You can set the Workflow Options to process these images in a variety of color spaces, bit depths, sizes, and resolutions; and you can open them as Smart Objects in Photoshop. Your options are as follows.
Space. Camera Raw can output into one of four color spaces or two grayscale spaces. The grayscale spaces will appear in the dropdown menu only when you have Convert to Grayscale selected in the HLS/Grayscale panel, and you don't have any color options enabled, such as Split Toning or a local color tint.
Depth. You can choose to process into either 8 bits/channel or 16 bits/channel, as shown in Figure 4-59.
Size. Camera Raw can resize the original image size to a fixed number of output sizes based on optimized resampling algorithms. Whether you resample in Photoshop or Camera Raw, the results should be very similar. However, Photoshop offers more options for exact resampling. The size readout is measured in megapixels (MP) and pixel dimensions (see Figure 4-59).
Units. While here in the United States the inch rules, most of the world uses the metric unit, so this is where you can show your "unit colors."
Sharpen For. The output sharpening is based on a collaboration between Adobe and PixelGenius, and it incorporates Bruce's sharpening workflow available in Camera Raw 6. Note that sharpening for output should only be done in the size you are opening in Photoshop or the final size of the image if you are running a Batch Save operation. If you plan on doing any additional sizing, you should not apply sharpening at this stage. The options for Screen (shown in Figure 4-59) apply to any image that will be viewed on a display—be it a computer display or video. The options for Print are divided between Glossy and Matte papers, and are designed for inkjet or photo lab prints, not halftone CMYK output.
Sharpen Amount. If you have Sharpen For set to None, this menu option will be grayed out. If you do use Sharpen For: you can use this setting to select from one of three strengths. We almost always use Standard because the sharpening here in output is tied to the capture sharpening in the Detail panel (and we're pretty good at nailing the capture sharpening), so we really don't seem to need to vary this setting. But it's there in the event you do.
Open in Photoshop as Smart Objects. Camera Raw lets you specify in Camera Raw that you want to open a raw file in Photoshop as a Smart Object (see Figure 4-59). This option allows you to make subsequent adjustments to the raw image while not rendering the image until you flatten it. We'll cover the use of Camera Raw as a Smart Object in Photoshop in the Chapter 5, Hands-On Camera Raw.
The Save Button
If you've already discovered Camera Raw's Save button batch capability, you can skip ahead but with a warning: If you do review this section, you might pick up a thing or three that may make it worth the effort. For those who've never used this functionality, listen up—this is something you should factor into your workflow.
Clicking the Save button brings up the Save Options dialog box (see Figure 4-60). This dialog box lets you select a file destination, name, and format. We'll provide an item-by-item breakdown to make sure you understand each and every option.

Figure 4-60 Click the Save button to open the Save Options dialog box.
Destination. The Destination option allows you to either save the processed file in the same folder as the original or navigate to a different folder. This setting is sticky until changed.
File Naming. If you need to change the processed name to a different filenaming convention, you can use this option to add up to four naming tokens or custom fields to the original filename. If you choose to add a renumbering option, you can set the starting number. The maximum custom renaming fields is four. If you need more extensive renaming, you can do so in Bridge after the Save process.
File Extension. This dropdown menu gives you the option of using uppercase or lowercase file extensions. Note that when you change the extension, the file takes on the new extension's format options, so this is a shortcut to changing formats.
Format. Camera Raw can save processed files in four different formats: Digital Negative (DNG), JPEG, TIFF, and Photoshop PSD (see Figures 4-61 through 4-64). Ironically, that means you can save a JPEG or TIFF file you may have opened in Camera Raw as a linear gamma DNG file. Is it raw? Well, no. The JPEG has already been converted to a gamma-encoded color space, and you can't get the toothpaste back into the tube. You can open a 16-bit/channel TIFF image and save it as DNG, and you may find that useful—but again, it will be a linear gamma, not a true raw file.

Figure 4-61 DNG format options.
The File Format Options
Digital Negative. The Digital Negative (DNG) options (see Figure 4-61) have gotten a bit complicated. We covered the various DNG file format options, including backwards compatibility, in the section "Using Adobe DNG Converter" in Chapter 3, Raw System Overview. The same options apply here in the Camera Raw Save dialog. The options allow you to use lossless compression (almost always a good idea), convert to linear (not a good idea unless you need a linear file), and choose the size of the embedded DNG preview. You can also address the backwards compatibility and the version number of the DNG specification that will be used. If the file you are converting is a proprietary raw file, you can choose to embed the original raw file into the DNG file.
JPEG. The JPEG format options (see Figure 4-62) let you alter the compression settings. The processed JPEG will contain an embedded profile and all the embedded metadata—so if you are planning on using the processed JPEGs on the Web, keep in mind that they won't be the smallest files. Photoshop's Save for Web will do better.

Figure 4-62 JPEG format options.
TIFF. The TIFF options (see Figure 4-63) offer either no compression or ZIP compression in 16-bit mode or None, ZIP, and LZW in 8-bit mode.

Figure 4-63 TIFF format options.
PSD. An interesting option for the Photoshop (PSD) file format (see Figure 4-64) is the ability to preserve cropped pixels upon opening in Photoshop. To access the cropped pixels in Photoshop, select Image > Reveal All.

Figure 4-64 Photoshop format options.
When processing images in Camera Raw in the filmstrip mode, Camera Raw provides a progress countdown, as shown in Figure 4-65. Figure 4-65 also shows how the Save button looks when you hold down the Option key. Holding the Option key allows Camera Raw to save images with the last set of save options while bypassing the Save dialog box. If you are serious about saving time, this is a good shortcut because Camera Raw will continue saving images and lining up additional images for a Photoshop processing queue. In fact, you can even go back to Bridge, open more images, adjust their settings, and keep adding images to the processing queue.

Figure 4-65 Progress countdown when in filmstrip mode.
This batching capability is something even Photoshop's Batch processor or Bridge's Image Processor can't do. Camera Raw provides a powerful processing workflow all by itself (well, with Photoshop working away in the background).
The Zoom Control
Camera Raw will respond to the typical keyboard commands used in Photo shop for zooming. Pressing Command plus the + or – keys will zoom in or out, respectively. As you resize the Camera Raw dialog box, it's useful to use Command-0 to set the Zoom setting to Fit in View (see Figure 4-66). However, remember that to see the effects of the Detail panel accurately, you must be zoomed to 100% (Command-Option-0). Camera Raw also uses only main fractional zooms such as 66%, 50%, and so on, and no infinite subfractions except for the Fit in View option.
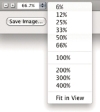
Figure 4-66 Zoom menu.
The Camera Raw Toolbar
We're in the home stretch, folks, so hang in there. The last big set of controls for Camera Raw resides in the main toolbar. Figure 4-67 shows the name and keyboard shortcut for each tool. To go to the tool you need only press the letter key.

Figure 4-67 The Camera Raw toolbar. Wherever possible, we suggest using the keyboard commands to make working in Camera Raw as efficient as possible.
While it could be argued that almost everything in Camera Raw is a tool, the Camera Raw toolbar is the location for what are referred to specifically as "tools." For certain functions relating to white balance, cropping, and retouching, this is where you'll turn. Another function of the toolbar is to give you access to Camera Raw's Preferences, which offer critical control over the way Camera Raw behaves.
Zoom and Hand Tools
 Zoom tool. By default, this tool is considered Camera Raw's home tool. It's the tool that is preselected whenever you launch Camera Raw. It's also considered a "safe tool" in that nothing you do with it will impact your image, only the display of your image. Dragging a marquee selection on your image will zoom to fill that area in the preview window. Holding down the Option key turns the Zoom tool into the Zoom-out tool.
 Hand tool. As you might expect, the Hand tool allows you to move the image around in the preview window when zoomed in. Holding down the spacebar will turn any other tool into the Hand tool for as long as the spacebar is held down.
White Balance Tool
As shown in Figure 4-68, the White Balance tool allows you to sample an area in your image to determine the optimal white balance settings. Clicking on an area in your image will instruct Camera Raw to set the Temperature and Tint settings to achieve a technically correct white balance setting of Neutral. This is only a starting point; you are free to make further adjustments for effect, but the White Balance tool is useful to establish a technically correct starting point.

Figure 4-68 The White Balance tool.
When Thomas Knoll designed the white balance adjustment in Camera Raw, he sampled a standard-sized ColorChecker card under two illuminations: D65 and Standard Illuminate A (2850°K). He used the second-to-brightest swatch as the white balance sample point, as shown in Figure 4-69. As a result, if you can include a ColorChecker card in your shot, you will have access to the same tools Thomas used. But that's not always convenient, is it? Alternatively, you can sample any nonspecular neutral in your image. If you try to use an area in your image that has one or more channels clipped, you'll receive the warning shown in Figure 4-69 telling you it's too bright.

Figure 4-69 Sampling on the ColorChecker and warnings for out of range.
If you receive this error, look for another area to sample. Trying to adjust the white balance using a gray that is too dark is not advised. Since you are working primarily with a linear capture when white balancing raw captures, a middle gray is too far down the tone scale to provide an optimal amount of image data to evaluate. A "graycard" that has traditionally been used by photographers in the past should be avoided because it's too dark, and graycards aren't noted for their neutrality. Third-party white balance cards are available whose spectral neutrality has been tested and found to be particularly useful when used as a white balance sample point for Camera Raw. WhiBal cards from RawWorkflow.com (www.rawworkflow.com) and WarmCards from Vortex Media (www.warmcards.com) are two popular options.
Regardless of how you first establish your white balance settings, it's important to understand that "technically correct" and "visually correct" may require different settings. White balancing a warm sunset to be neutral will perhaps be technically correct but visually wrong. We will have examples of when and why you would want to alter the white balance for effect in the next chapter.
Color Sampler Tool
The Color Sampler tool provides persistent color samples where you place them. They are persistent only for that single session in Camera Raw. You can place up to nine individual color samplers, as shown in Figure 4-70.

Figure 4-70 The Color Sampler tool with multiple samples set.
The Color Sampler is different from the cursor-based RGB readouts in that it is fixed at 5 by 5 actual image pixels. That ensures the readings will be consistent throughout Camera Raw's zoom range. To place the Color Sampler accurately, be sure to zoom in to 100%. The readings respect the Workflow settings and will read out in whatever color space is set there. Once you've placed a sampler, you can move it by clicking on the sample and dragging. To remove any samplers, click the Clear Samplers button.
Targeted Adjustment Tool
Originally introduced in Lightroom, the Target Adjustment tool (or TAT for brevity) is a now a feature for Camera Raw. The TAT lets you adjust parameters by simply clicking on the image and mousing up or down. The area of the image dictates what parameter will be adjusted. Figure 4-71 shows an exploded view of using the TAT on an image to adjust the Parametric Tone Curves and the HSL/Grayscale panels. You access the TAT by selecting the Targeted Adjustment tool dropdown menu and choosing which adjustment panel to activate.
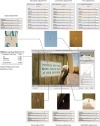
Figure 4-71 Using the TAT.
Parametric Tone Curves TAT Adjustment. The TAT will default to adjusting the Parametric Tone Curves regardless of what panel may be visible, with the exception of the HSL/Grayscale panel. Even when you are in the Basic panel, clicking on the TAT tool activates the TAT adjustments in the Parametric panel, although you still have access to the Basic settings.
To adjust one of the Parametric settings, click on a portion of the image. While holding down the mouse button, move the mouse up or down to increase or decrease the settings. If you have the Parametric Tone Curves panel visible, you can see which setting is active and watch as the settings go increase or decrease. Figure 4-71 shows all four of the Parametric Tone Curves settings being used. The lighter area of the sign activated the Lights parameter. The wooden area toward the bottom engaged the Darks, the darker portion of the pelican's neck activated the Shadows, and the head activated the Highlights.
HSL/Grayscale TAT Adjustments. To use the TAT in HSL/Grayscale, that panel must be visible. Since the default TAT behavior is to use the Parametric curve, you must designate the change of that default. Switching to HSL/Grayscale does that. In Figure 4-71, the TAT was used to adjust the blue sky saturation as well as the luminance. The blue saturation was increased and darkened. Then the mustard color hue was adjusted to be less orange.
You should note that the TAT can also be used when you engage the Convert to Grayscale mode of the HSL/Grayscale panel. Whether you use the TAT for tone or color adjustments, this new usability greatly aids the speed in which you can make critical adjustments. Activating the relevant panel, you simply click in the area of the image you want to adjust and slide the mouse up or down to make the changes. This is good stuff!
Crop and Straighten Tools
Crop and Straighten are just two variations of the same tool. The Crop tool is used to set the image pixels that will be processed by Camera Raw. You can drag out a marquee selection to set the crop and use command keys to alter the behavior of the marquee selection. Holding the Shift key allows you to constrain to a current crop proportion, whereas holding the Option key allows the crop to move in or out from the center. See Figure 4-72 for basic crop and straighten tasks.

Figure 4-72 The Crop and Straighten tools.
Figure 4-73 shows how you can crop outside the constraints of the image boundaries. Disabling the option to Constrain to Image in the Crop menu allows you to maximize the image area; Camera Raw will fill in the outer area with gray.

Figure 4-73 Crop tool dropdown menu and unconstrained crop. The image shows an unconstrained crop with a 90% Scale from the Manual Lens Correction panel
If you examine the menu options shown in Figure 4-73, you'll find that the Crop tool has some hidden powers. For example, you can use standard cropping ratios or enter your own custom ratio.
The Straighten tool is a semi-modal and related state of the Crop tool that allows you to draw a line to calculate the rotation of the horizon line. As soon as you release the line, the Crop tool is reselected. You can manually rotate the crop after doing the autostraighten. You can also fine-tune the image rotation by using the Rotate control in the Manual Lens Corrections panel.
If you select Custom in the Crop dropdown menu you can enter in a custom crop as shown in Figure 4-74. If you specify the ratio in pixels, you can enter a maximum of 65,000 in either dimension (this will give the effect of upsampling to the maximum size of 512 megapixels) to the image upon processing. If you try to enter in a size beyond Camera Raw's limits, you'll receive the warning also shown in Figure 4-74.

Figure 4-74 Custom Crop and maximum size.
To remove the crop from the image, either select the Clear Crop command in the Crop tool dropdown menu or click anywhere outside the image preview area in the canvas. If you are zoomed in, you must use the dropdown menu to remove the crop. If you process your image to a PSD format using the Save function in Camera Raw, you can undo the crop after the fact in Photoshop.
Spot Removal Tool
The Spot Removal tool (Figure 4-75) lets you do local spot healing and cloning when you need to remove those nasty sensor spots or that blemish on a person's face. In this regard, it competes directly with Photoshop for some quality brush time. But in reality, Camera Raw is not designed to offer extensive retouching capabilities; use it only to remove the occasional sensor spot or facial blemish.
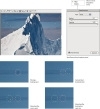
Figure 4-75 The Spot Removal tool.
There is a fine line but it's pretty definitive: If you have the exact same spot in the exact same location in a group of images, you will be a lot better off fixing it in Camera Raw if you can and then syncing it across the images that have that spot. However, if you need to spend considerable time spotting, cloning, or otherwise substantially retouching an image, you'll be better off waiting for Photoshop to do so.
As shown in Figure 4-75, the Spot Removal tool lets you set points for either healing or cloning. Healing uses a texture-based source to apply Photoshop's healing logic to adjust the tone and color to blend in the area surrounding the destination spot. Cloning just moves pixels without the blending logic. The image in Figure 4-75 has a lot of sensor spots on it. It was shot in Antarctica, one of the driest and windiest places on Earth. As such, it's a great place to test the sensor-cleaning skills of photographers. As you can see, the sensor was not very clean (which makes it useful for this example).
After deciding whether you want to heal or clone, place the cursor over the area you want to spot heal and click. If you click and hold, you can drag the spotting circle to make it larger or smaller. You can also use the brush size control in the interface, but we rarely do that.
Camera Raw uses logic to try to find the best source from which to heal. It's right about three out of four times. In this example, it was wrong. It located an area that was discontiguous with the gradations in the image. You can select the source circle and move it until the gradations align; select the edge of the circlet to alter its size. You can select previous spots by clicking on them to edit them. Pressing the Delete key will remove them. You can check your progress by deselecting the Show Overlay option at the top.
Healing and cloning are cumulative processes, which means that the order of the healing or cloning will build up the effect. You can start small and add additional larger spot points, or adjust the opacity of a healing or cloning spot. The Opacity slider allows you to adjust how much of the healing or cloning is blended into the resulting spot (see Figure 4-76). The Opacity adjustment is more useful for retouching than spotting because while you want to obliterate spots, when retouching a person's face you may want to only soften a blemish or mole. The Opacity slider gives you that option.

Figure 4-76 Adjusting opacity.
Once you have the sensor spots cleaned for a single capture frame, you can synchronize those spots to additional frames. When doing so, Camera Raw follows these rules: If the Spot Removal tool has autodetected the area on its own, it will autodetect the area in subsequent images while allowing the autodetect to be based on that subsequent image's unique parameters. If you move the source spot after autodetection, the Spot Removal tool will respect the moved destination and use those same coordinates for syncing.
In practice, this seems to work very well—most of the time. However, even if you let Camera Raw autodetect the optimal source location and it's correct for one image, it may not be correct for subsequent images. So, make a habit of double-checking images that you've synced to confirm that the source and destination healing or cloning are both correct.
For spots that move around in an image (for example, a blemish on a person's face), there is no way of syncing multiple images. That sort of job requires image-by-image evaluation and retouching. You should also consider whether the best results will be provided by Camera Raw or after the fact in Photoshop. In Camera Raw there is no manual blending or opacity control; either it works or it doesn't. That said, being able to do parametric retouching is an impressive accomplishment for Camera Raw.
Red Eye Removal Tool
The Red Eye Removal tool is another one-trick-pony feature that some people may question, but when you have a shot that contains red-eye, you'll appreciate the ability to remove it. Truth be told, it was difficult to find a shot that contained red-eye. In over 2.5 TB of files representing over 130,000 raw images, Figure 4-77 shows the only example we could find. The shot is of Mac Holbert (left) and Graham Nash (right) at their gallery opening in Seattle. Mac and Graham are partners in Nash Editions, a premiere fine art printing studio. (By the way, you should also check out Nash Editions: Photography and the Art of Digital Printing, ISBN 0-321-31630-4.)

Figure 4-77 Red Eye Removal tool.
When the Red Eye Removal tool works, it's great—and it works pretty well most of the time. The key is to not be shy about locating the eye (don't try to be too precise). It's better to draw out the marquee as large as you can. Camera Raw's red-eye logic will work to find the eye inside the marquee area and then locate and remove the red. The default Darken setting is 50%, but you can reduce that value if it makes the pupil too dark. You can also use the slider to alter the pupil size. We've found the Red Eye Removal tool useful when the eye size is relatively small, as it often is when shooting groups and the on-camera flash causes red-eye on several people. Unfortunately, it doesn't do much for a cat's or dog's eyes, which may be glowing in different colors.
The Adjustment Brush
One of the biggest bits of news for the last version of Camera Raw was the addition of parametric localized image adjustments. Figure 4-78 shows the various parameters available in the Adjustment Brush, which is essentially unchanged in Camera Raw 6.
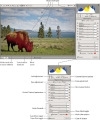
Figure 4-78 The Adjustment Brush and options.
Using the Adjustment Brush in Camera Raw shares some passing similarities with working in Photoshop, but there are some fundamental differences. First and foremost, when painting with the Camera Raw Adjustment Brush, you aren't painting adjusted pixels into the image but instead are modifying a mask through which the adjustments will be processed. In this regard, it shares a closer resemblance to painting in an Adjustment Layer mask. You can paint and then erase the mask. It's common for us to paint large, soft paint strokes and then zoom into the image to erase bits of the mask with a smaller and more precise brush.
You should also understand that while you may start by setting a single adjustment parameter, you can go back to add more adjustments and continue to tweak the original adjustments. In point of fact, it's optimal to adjust as many parameters as possible with a single mask because adding many new single parameter adjustment masks will slow things down.
When you add additional masks, "pins" are put on the image. Each pin is a single discrete mask made up of multiple dabs or strokes and indicated by the pin shape, which shows up once you start painting. Clicking a pin activates the mask and parameters for editing. All of the mask particulars such as opacity and stroke coordinates are stored along with the adjustments as metadata in the file or file's sidecar.
While the Adjustment Brush is a really cool tool for the nondestructive editing of raw files, it is not a replacement for Photoshop. There will be many tasks more suited to Photoshop's strengths. Some tasks—while possible in Camera Raw—might not make good workflow sense when doing final high-quality digital imaging. That caveat presented, what you can do with the Adjustment Brush and its related tool, the Graduated Filter (see "The Graduated Filter" later in this chapter), can greatly improve a raw processing workflow and substantially reduce the amount of time spent in Photoshop.
Control Channel Parameters. When making a local adjustment, you select one of the seven control channels offering adjustments. These channels do not directly correspond to the similarly named controls offered elsewhere in Camera Raw. The results will be similar, to be sure, but the control channels are tuned for use locally rather than their global cousins.
Figure 4-79 shows the tool options for the controls. You begin by either clicking one of the Quick Adjust buttons (the + and - circles at either end of the sliders) or grabbing a slider to make the adjustment. After you've applied a brush stroke, the options change from New to Add. This allows you to add more channels or to adjust the original. When you hold down the Option key, the Additive brush turns into an Erase brush that lets you delete portions of the painted mask. You can change the Separate Eraser Size behavior in the Adjustment Brush flyout menu (shown in Figure 4-80). Once you've made an adjustment, you can click one of the Quick Adjust buttons to pick a new primary adjustment and start a new brush stroke.

Figure 4-79 Adjustment Brush tool control channels and options.

Figure 4-80 Control channel presets.
Control Channel Presets. If you find that you're constantly making the same sort of adjustment with the same settings on multiple channels, you should consider making a Control Channel Preset. Why fight the sliders if you already have a preset saved? Figure 4-80 shows one preset already saved named "Skin smoother," which is a combination of Brightness +17, Contrast -12, Clarity -30, and Sharpness -42. This preset will smooth skin tones by gently lightening and decreasing contrast while adding negative Clarity and negative Sharpness.
To create a new preset, make the adjustments you want to have in the preset (including the color) and select the New Local Correction Setting option in the flyout menu. When you select it, you'll be prompted to name and save the preset (see Figure 4-80).
When you save a preset in the Adjustment Brush menu, the same preset will also be available in the Graduated Filter menu. So, what you create in one tool option is available in both.
Paint Brush Sizing. Camera Raw's brushes are not a fixed pixel size; they are based on the pixel dimensions of your image. Thus, a size setting of 100 will be the maximum allowed based on your image. Setting the size to 50 will be 50% of the maximum and so forth until you get to the smallest size. Figure 4-81 shows the relative sizing based on the maximum and minimum for this image.

Figure 4-81 Brush sizing.
Brush Feather. Not unlike Photoshop's brushes, you can change the softness and hardness of a brush. Remember that what you are painting is the mask; you are not adjusting the image directly. The brush cursor indicates the current softness by showing an inner, more solid line (where the dab will be applied at the full amount of the Flow/Density setting) and an outer circle where the dab drops off to nothing. Figure 4-82 shows different amounts of feather.

Figure 4-82 Brush feathering.
Brush Flow. The brush Flow modifies how strong the mask will be applied and the resulting buildup of strokes. A low Flow allows you to sneak up on the strength of the resulting effect. You can adjust the control parameters to be stronger and then gently apply the effect by using a lower Flow setting and more strokes. Figure 4-83 shows the subtlety of various Flow settings.

Figure 4-83 Brush Flow settings.
Density vs. Flow. While both Density and Flow will modify the opacity of the resulting painted mask, they do so in a different manner. Flow modifies the gentle buildup of strokes; Density sets a maximum threshold of opacity for those strokes. Figure 4-84 shows the difference.

Figure 4-84 Density vs. Flow.
As you can see, a reduced Flow at full Density will result in a buildup in those areas where the strokes overlap. With a Density setting of 50, the maximum density of the resulting strokes will be limited to 50. So, in use, when you're trying to build up an effect, and you do want the overlap to build up, you would use a higher Density with a lower Flow. Where you want to paint in an area that needs a specific mask opacity, the Flow matters less than the threshold set in Density.
Brush stroke and Mask relationship. When you paint a stroke, a pin is added and you'll see the results of the current control parameters. Sometimes it's difficult to know where you have and haven't painted. To find out, use the Show Mask toggle or hover the brush cursor over the pin; either will make the mask visible. Figure 4-85 shows a stroke and the stroke's mask.

Figure 4-85 Brush stroke and mask.
You can adjust the color and how the mask is previewed. Clicking the mask color options (the actual color swatch is a button) brings up a Color Picker that allows you to choose the color that the mask will be shown in and whether the preview will be of the Affected or Unaffected areas. Figure 4-86 shows the mask color options.

Figure 4-86 Mask color options.
Erasing the Mask. After the mask has been painted in, you can go back into the mask and, while holding the Option key, "unpaint" or erase the mask. Figure 4-87 shows a small part in the center of a paint stroke being erased.

Figure 4-87 Erasing a mask.
Auto Mask. When you select the Auto Mask option, the mask is generated based on the color and tone of the image area under the center of the cursor when painting is started. This allows you to paint in an area and automatically have the mask set to the shape of the object you paint into. Figure 4-88 shows an area with an auto mask.

Figure 4-88 Using the Auto Mask.
The trick is to make sure the center of the brush cursor remains inside the area where you want the mask to be painted. Note that the Auto Mask option works when erasing a mask, so if you go over an area a bit, you can use it to help erase the overpaint. Simply hold down the Option key when erasing with the Auto Mask option selected.
The Graduated Filter
The Graduated Filter uses the same set of control channels as the Adjustment Brush, to allow you to draw out a gradation over which the adjustments are applied. See Figure 4-89 for a diagram of the parts.
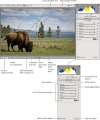
Figure 4-89 The Graduated Filter in use.
The diagram shows you some elements that would not be visible at the same time. For demonstration purposes, we've included the cursor icons for rotate, move, and adjust all in one figure. Normally, you would only see a single cursor.
As with the Adjustment Brush, you choose single or multiple controls to adjust and then drag out a gradation over which the adjustments will be applied. Rather than the pins of the Adjustment Brush, a Graduated Filter displays colored lines: green for the starting point and red for the ending point. While it's tempting to place many different filters, doing so will slow down Camera Raw. Each Graduated Filter and its parameters are stored as metadata in the file or sidecar file. Ideally, if you need multiple adjustments, deploy as many adjustments in a single filter as you can.
The example in Figure 4-91 shows how to use the Graduated Filter and the Adjustment Brush combined to optimize an image's tone and color. Figure 4-90 shows the image before and after the adjustments.

Figure 4-90 Graduated Filter and Adjustment Brush—before and after.
As you can see, using Camera Raw's local adjustments can substantially improve your image without having to go into Photoshop and engage in pixel editing. Figures 4-91a through 4-91c show step by step how the Graduated Filter and Adjustment Brush tools can be combined.

Figure 4-91a Step by step using the Graduated Filter and Adjustment Brush.
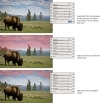
Figure 4-91b Step by step using the Graduated Filter and Adjustment Brush.
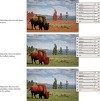
Figure 4-91c Step by step using the Graduated Filter and Adjustment Brush.
When combining the Adjustment Brush and Graduated Filter, there is no function that currently allows you to use the brush tool to erase a portion of a gradient. So, if a Graduated Filter darkens an object too much, you'll need to use an Adjustment Brush to bring back the color or tonality that the filter overcorrected. This was done to the clouds in the sky (Figures 4-91a and 4-91b) that were made too dark when the Graduated Filter darkened the sky. You should also be prepared to go back to various adjustment panels to make global corrections where needed if the local adjustment affects the global adjustment. To give you an idea of the time it took to do this series of adjustments, it took about 10 minutes after the global adjustments were made.
Local adjustments can't be used to create templates, and some people may wonder why. While you can move a Graduated Filter to fine-tune for image-by-image variation, the Adjustment Brushes can't be moved. Thus, local adjustments can't really be easily applied to multiple images with simple modifications of the local adjustments. You can, however, use local adjustments when syncing multiple images; see Figure 4-92 for the steps.

Figure 4-92 Synchronizing local adjustments.
The selected image had an Adjustment Brush with the settings of -100 Saturation to completely desaturate the background and another to increase the saturation of the eye. After selecting all five images, the Synchronize button was clicked to bring up the Synchronize dialog box with Local Adjustments selected. This synced all the images with the local adjustments, which worked well because the image was shot using a tripod with no movement between shots.
The Color Picker
The one topic that we haven't yet covered in depth is the Camera Raw Color Picker. If you are familiar with Photoshop's Color Picker, that won't do you much good—it's different in Camera Raw. Camera Raw's Color Picker is available in the control channel settings for the Adjustment Brush and the Graduated Filter. To access the Color Picker, click the color swatch icon shown in Figure 4-93.

Figure 4-93 The Camera Raw Color Picker.
Once you have the Color Picker dialog box open, you select a color either in the color spectrum or in the Color Swatch subpanel. You can save up to five different colors in the subpanel. Once the color is selected, you can adjust the saturation of the resulting color's tint.
One limitation of the Color Picker (that we hope will be addressed in the future) is that you can't grab a color sample from your image. But, once you have a color selected, you can add that color to the Color Swatch subpanel for later use. Figure 4-94 shows adding a new color to the swatch subpanel.

Figure 4-94 Adding a new color swatch.
To add a new color, hold down the Option key to access the Paint Bucket. Once added, the color swatch will also appear on the Control Channel panel. The color selected is persistent when you switch between the Adjustment Brush and Graduated Filter.
Camera Raw Preferences
Setting Camera Raw preferences is a relatively boring subject, but having control over the preferences is essential to making Camera Raw behave in a predictable and consistent manner. When you get unexpected results, it's useful to check the preferences (see Figure 4-95) to make sure they are set as desired. Unlike in other applications, Camera Raw's preferences are not prone to corruption. So, while it may be typical to reset preferences in Bridge or Photoshop, it's unlikely you'll need to do so in Camera Raw.

Figure 4-95 The Camera Raw Preferences dialog box.
The main Preferences dialog box contains the Camera Raw version number in its title. The preferences are grouped by function and include General, Default Image Settings, Camera Raw Cache, DNG File Handling, and JPEG and TIFF Handling. We'll cover each group separately.
General. The General preferences (see Figure 4-95) allow you to control the way Camera Raw deals with its image-setting metadata and whether to apply sharpening to images or only to previews.
The location where you save the image settings is important if you ever need to move your images (for example, from a laptop to a workstation). To be honest, we're not really sure there is a good-use case for not storing the image settings with the images, but the option is there. Our preference is to always save the image settings to the XMP metadata, either in sidecar files if you are using proprietary raw files or embedded into the DNG, JPEG, or TIFF files (Camera Raw can safely write the metadata into those formats).
Whether or not you want to apply the sharpening settings in Camera Raw to your processed images or only the image previews is the next choice you need to make. In the past, many people didn't use Camera Raw's image sharpening and instead chose to defer sharpening to a later time. However, it was useful to at least apply sharpening to the previews of images—hence the option. Since Camera Raw has substantially improved sharpening, we suggest that you make sure the "Apply sharpening to" option is set to All Images.
Default Image Settings. In this section (see Figure 4-95) you can choose how Camera Raw will behave regarding its default image settings. If you want Camera Raw to always determine the tone adjustments, select the "Apply auto tone adjustments" checkbox. If you often use exposure bracketing, you'll want to deselect this option.
The "Apply auto grayscale mix when converting to grayscale" option is indeed useful since Camera Raw generally does an excellent job. Usually, you'll only need to tweak a color or two to optimize the settings. We keep this selected.
The next two options are pretty powerful. Camera Raw can create different Camera Raw Default image settings based on your camera's serial number and the EXIF embedded ISO setting. For example, if you have two or more camera bodies of the exact same model, you may find the sensors in the bodies to be slightly different. You can then run a camera calibration for each body and set the respective calibration to be active based on the camera's serial number. Additionally, if you want to have a certain degree of luminance noise-reduction set based on the camera ISO, you can now do so.
The key in each of these options is to open an image from either a camera with the correct serial number or with the ISO setting set to the one you want to adjust. Make your adjustments as desired, and then in the Camera Raw flyout menu (see Figure 4-53), select the Save New Camera Raw Defaults command. This will update the Camera Raw Defaults for either that camera serial number, that ISO, or both. To remove these new defaults, select Reset Camera Raw Defaults in the flyout menu to return the defaults to Camera Raw's original defaults.
Camera Raw Cache. Camera Raw creates its own cache of image previews to make working with images more efficient. Accessing the same images over and over without a cache would force Camera Raw to generate a new preview from scratch each time. Instead, Camera Raw keeps track of a limited number of image previews and can serve them up when the images are opened in Camera Raw. Depending on your image capture size, these preview files can be rather large. Most previews are in the 4–5MB file size range. You can see that opening a lot of images could rack up a lot of image preview files. As a result, Camera Raw allows you to set a limit and change the location of where it stores the cache files (see Figure 4-96). Camera Raw 6 allows you to enter up to 200GB. If you have lots of free space on your hard drive, you might want to give Camera Raw a higher limit. Jeff sets the full 200GB on his main workstation at his studio but keeps the Cache set to 5GB on his laptop.

Figure 4-96 Increasing Camera Raw's cache.
You can also choose to relocate the cache because it's useful for the cache to be on a really fast drive. But if you choose to locate the cache on a removable drive and that drive is removed, at the next launch, Camera Raw will re-create a cache file in the default location and forget about the cache in the removable drive.
DNG File Handling. When you are working with DNG files, Camera Raw offers a couple of important options: You can choose to ignore .xmp sidecar files and you can update embedded JPEG previews (see Figure 4-95).
Some applications, rather than writing to the DNG file, will place the XMP metadata in a sidecar file. If you then use a product that writes XMP to the DNG image file, you end up with a metadata collision. Which contains the correct metadata about the image, the image file or the sidecar file? The "Ignore sidecar '.xmp' files" option allows you to tell Camera Raw to ignore any sidecar files and pay attention to the embedded XMP metadata only.
In addition, when you change the image settings for a DNG image file, you can choose whether or not to update the embedded JPEG preview, and if you do decide to update it, what size to use when updating (see Figure 4-95). Generally, we feel it's a good idea to update the embedded preview when working with DNG files.
JPEG and TIFF Handling. When Photoshop CS3 and Camera Raw 4 were released, this option for Camera Raw was, to put it mildly, very confusing. There were multiple locations in Camera Raw, Bridge, and Photoshop where behavior preferences were stored. Photoshop CS5 and Camera Raw 6 take care of that confusion by always being in charge of this behavior.
There are now three options each for JPEG and TIFF images, and you can be assured that changing them in this dialog will disable or enable the proper behavior. We suggest that if you want to use Camera Raw and Lightroom in a single workflow, you may want to select the "Automatically open JPEGs (or TIFFs) with settings" option. This will enable a workflow back and forth between files in Lightroom with settings and files in Camera Raw.
Keep in mind that if you have installed any third-party camera software for the handling of raw files, the camera company's software can conflict with Camera Raw's ability to access those files—hence, the Photoshop CS5 "Prefer Adobe Camera Raw for Supported Raw Files" preference. This option tells Photoshop and Camera Raw to ignore the "other" plug-in and use Camera Raw for supported raw files. See Figure 4-97 for the Photoshop CS5 preference setting that enables Camera Raw to ignore other raw processing plug-ins.

Figure 4-97 Photoshop's preference option to allow Camera Raw to override a third-party plug-in's raw handling.

