Publishers of technology books, eBooks, and videos for creative people

Home > Articles > Design > Adobe Creative Suite

This chapter is from the book

#26 Inserting Form Fields

Form fields are used within a form to collect data. The main, most widely used field types are text boxes, drop-down menus, sets of radio (option) buttons, and check boxes.

Text fields are used to collect all kinds of information in a form. Email addresses, phone numbers, purchase prices, zip codes, names, and a wide variety of other data can be entered into text fields.

Text fields collect a single line of text. Text areas can collect multiple lines of text. Text areas are used to collect comments, descriptions (like descriptions of problems for online service forms), guestbook entries, and other text that requires more than one line.

To place a text field or a text area in a form, follow these steps:

  1. With your cursor inside an existing form, choose Insert > Form > Text Field or Insert > Form > Text Area.
  2. After you place the text field, you can define the field attributes in the Properties inspector (Figure 26a). In the TextField field, enter a name that will help you remember the content of the field. In the Char width field, enter the number of characters that will display on a single line in a browser as a visitor enters data.
    Figure 26a

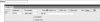
    Figure 26a Defining a one-line text field.

  3. In the Max chars field, you can enter the maximum number of characters that can be entered into the field.
  4. In the Init val field, enter text that will appear in the field in a browser before any user interaction. Sometimes (but not always) form designers will include text like "your email goes here" in a field. Visitors then replace that content with their own entry.
  5. In the Type options, choose Single line for a text field and Multiline for a text area. If you choose Multiline, the Num Lines field appears in the Properties inspector. Enter the number of lines that will display in the form (you cannot define a limit for the number of characters that are entered).
  6. Enable the Password option only if you wish to display content entered into the field as asterisks.
  7. You can use the Class pop-up menu to attach a CSS Class style to the field.

You can place any number of check boxes in a form. Check boxes provide two options for visitors: Checked or Unchecked. You can define a default state for a check box as either checked or unchecked.

To place a check box in a form, follow these steps:

  1. With your cursor inside an existing form, choose Insert > Form > Checkbox.
  2. After you place the check box, if you did not generate a label, you need to enter some text in the form (normally to the right of the check box) that identifies what is being selected when a visitor selects the check box.
  3. In the Properties inspector, enter a name for the check box in the Checkbox name field. In the Checked value field, enter a value to go with the check box name. For example, if the check box asks if a user wants to be contacted, the check box name might be "contact" and the checked value might be "yes."
  4. Select one of the Initial state options to define whether the default state of the check box is Checked or Unchecked (Figure 26b).
    Figure 26b

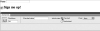
    Figure 26b Defining a check box.

Radio buttons differ from check boxes in that they are always organized in groups. You never have a single radio button—if you are asking a question for which a user can supply no, one, or several answers, use check boxes. The purpose of radio buttons is to compel a user to choose one from a group of options.

To create a radio button group, follow these steps:

  1. With your cursor inside an existing form, choose Insert > Form > Radio Group. The Radio Group dialog appears (Figure 26c).
    Figure 26c

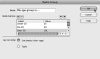
    Figure 26c Defining a group of radio buttons.

  2. In the Name field, enter a name that indicates to you the nature of the group of options. For example, if you are inquiring as to a type of shipping (Overnight, Two-day, Ground, etc.), you might call your group "Shipping_options."
  3. In the Radio buttons area of the dialog, click the Label column. In the first row enter a label that will appear for visitors. Next to that label, in the Value column, enter the data that will be sent with the form. For example, a label might read "Two-day shipping" to make clear to users what they are selecting. But the value sent to your shipping department might be "TD-002"—an internal code that tells those in the department how to handle and bill shipping.
  4. In the second row, enter another label and value. Use the plus button to add more rows of labels and values and the minus button to delete a selected row. Use the Up and Down arrow buttons to move selected rows up or down in the list of radio buttons.
  5. In the "Lay out using" area, choose either the Line breaks radio button (for separated rows) or the Table radio button (for rows designed in a table).
  6. After you define the radio button options, click OK in the dialog to generate the radio button group.

After you generate a radio button group, you can edit (or delete) radio buttons individually. If you want to add a radio button, you can copy and paste an existing one from the group and, in the Properties inspector, change the Checked value (but not the Radio Button) content.

Menus and file fields are two different types of fields that can be placed in forms. Menus allow visitors to choose from a list of items. File fields allow users to upload files when they submit a form. In this how-to, you'll explore both types of fields. (Consider this two how-tos for the price of one—I had to sneak them both into the same one to keep the book at an even 100 how-tos!)

Menus (sometimes called pop-up menus) allow visitors to choose one option from a pop-up menu. The main difference between menus and list menus is that list menus allow users to select more than one choice from a list, whereas regular menus restrict users to choosing just one item. List menus are usually a confusing way to collect data and are rarely used.

To create a menu, follow these steps:

  1. With your cursor inside an existing form, choose Insert > Form > Select (List/Menu). You use this menu option to create either a menu or a list menu. Later, you will decide whether to make your menu a list menu or a regular menu.
  2. To create a list for the menu, click the List Values button in the Properties inspector. The List Values dialog appears. In the Item Label column, enter the text that will display in the menu (for example, Alaska). In the Value column, enter the value that will be collected and sent in the form (such as AK). Use the plus button to add new items to the list and the minus button to delete selected items. After you define the list, click OK (Figure 26d).
    Figure 26d

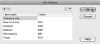
    Figure 26d Defining list values.

  3. After you generate a menu (or list), use the Properties inspector to define additional features. If you click the List option button in the Type area of the Properties inspector, you can convert the menu into a list menu. If you choose the List option, you can click the Allow Multiple check box in the Options area of the Properties inspector to allow users to choose more than one option from the menu. List menus can also display more than one option at a time in the drop-down menu.
  4. You can add, delete, or edit actual menu (or list) items by clicking the List Values button in the Properties inspector. This will open the List Values dialog, where you can edit or change the order of menu (or list) options. You can change the initially selected option in the Properties inspector by clicking an option in the Initially selected area. You can assign a CSS style using the Class pop-up menu.

File field forms allow visitors to attach files from their own computers to the form and send them along with the form. You can allow visitors to attach files to the form submission by inserting a File field in a form. Choose Insert > Form > File Field. You can define character width in the Properties inspector. A Browse button appears next to the field that the user can use to navigate to and select a file to upload.

For form content to be sent to a server, there must be a Submit button in the form. Submit buttons are usually matched with a Reset button. The Reset button clears any data entered into the form and allows the user to start fresh.

To place a button in a form, choose Insert > Form > Button. Use the Properties inspector to define the button as a Submit or Reset button. In the Action area, choose the Submit form or Reset form radio button (Figure 26e).

Figure 26e

Figure 26e Defining a Submit button.

You can define custom labels for either the Submit or Reset button by entering text in the Value field for either button. Don't get too fancy; visitors are used to seeing buttons that display something like Submit or Reset. But if you enter different text in the Value field, that text will display in browsers and can be previewed in the Document window.

Peachpit Promotional Mailings & Special Offers

I would like to receive exclusive offers and hear about products from Peachpit and its family of brands. I can unsubscribe at any time.

Overview


Pearson Education, Inc., 221 River Street, Hoboken, New Jersey 07030, (Pearson) presents this site to provide information about Peachpit products and services that can be purchased through this site.

This privacy notice provides an overview of our commitment to privacy and describes how we collect, protect, use and share personal information collected through this site. Please note that other Pearson websites and online products and services have their own separate privacy policies.

Collection and Use of Information


To conduct business and deliver products and services, Pearson collects and uses personal information in several ways in connection with this site, including:

Questions and Inquiries

For inquiries and questions, we collect the inquiry or question, together with name, contact details (email address, phone number and mailing address) and any other additional information voluntarily submitted to us through a Contact Us form or an email. We use this information to address the inquiry and respond to the question.

Online Store

For orders and purchases placed through our online store on this site, we collect order details, name, institution name and address (if applicable), email address, phone number, shipping and billing addresses, credit/debit card information, shipping options and any instructions. We use this information to complete transactions, fulfill orders, communicate with individuals placing orders or visiting the online store, and for related purposes.

Surveys

Pearson may offer opportunities to provide feedback or participate in surveys, including surveys evaluating Pearson products, services or sites. Participation is voluntary. Pearson collects information requested in the survey questions and uses the information to evaluate, support, maintain and improve products, services or sites; develop new products and services; conduct educational research; and for other purposes specified in the survey.

Contests and Drawings

Occasionally, we may sponsor a contest or drawing. Participation is optional. Pearson collects name, contact information and other information specified on the entry form for the contest or drawing to conduct the contest or drawing. Pearson may collect additional personal information from the winners of a contest or drawing in order to award the prize and for tax reporting purposes, as required by law.

Newsletters

If you have elected to receive email newsletters or promotional mailings and special offers but want to unsubscribe, simply email ask@peachpit.com.

Service Announcements

On rare occasions it is necessary to send out a strictly service related announcement. For instance, if our service is temporarily suspended for maintenance we might send users an email. Generally, users may not opt-out of these communications, though they can deactivate their account information. However, these communications are not promotional in nature.

Customer Service

We communicate with users on a regular basis to provide requested services and in regard to issues relating to their account we reply via email or phone in accordance with the users' wishes when a user submits their information through our Contact Us form.

Other Collection and Use of Information


Application and System Logs

Pearson automatically collects log data to help ensure the delivery, availability and security of this site. Log data may include technical information about how a user or visitor connected to this site, such as browser type, type of computer/device, operating system, internet service provider and IP address. We use this information for support purposes and to monitor the health of the site, identify problems, improve service, detect unauthorized access and fraudulent activity, prevent and respond to security incidents and appropriately scale computing resources.

Web Analytics

Pearson may use third party web trend analytical services, including Google Analytics, to collect visitor information, such as IP addresses, browser types, referring pages, pages visited and time spent on a particular site. While these analytical services collect and report information on an anonymous basis, they may use cookies to gather web trend information. The information gathered may enable Pearson (but not the third party web trend services) to link information with application and system log data. Pearson uses this information for system administration and to identify problems, improve service, detect unauthorized access and fraudulent activity, prevent and respond to security incidents, appropriately scale computing resources and otherwise support and deliver this site and its services.

Cookies and Related Technologies

This site uses cookies and similar technologies to personalize content, measure traffic patterns, control security, track use and access of information on this site, and provide interest-based messages and advertising. Users can manage and block the use of cookies through their browser. Disabling or blocking certain cookies may limit the functionality of this site.

Do Not Track

This site currently does not respond to Do Not Track signals.

Security


Pearson uses appropriate physical, administrative and technical security measures to protect personal information from unauthorized access, use and disclosure.

Children


This site is not directed to children under the age of 13.

Marketing


Pearson may send or direct marketing communications to users, provided that

  • Pearson will not use personal information collected or processed as a K-12 school service provider for the purpose of directed or targeted advertising.
  • Such marketing is consistent with applicable law and Pearson's legal obligations.
  • Pearson will not knowingly direct or send marketing communications to an individual who has expressed a preference not to receive marketing.
  • Where required by applicable law, express or implied consent to marketing exists and has not been withdrawn.

Pearson may provide personal information to a third party service provider on a restricted basis to provide marketing solely on behalf of Pearson or an affiliate or customer for whom Pearson is a service provider. Marketing preferences may be changed at any time.

Correcting/Updating Personal Information


If a user's personally identifiable information changes (such as your postal address or email address), we provide a way to correct or update that user's personal data provided to us. This can be done on the Account page. If a user no longer desires our service and desires to delete his or her account, please contact us at customer-service@informit.com and we will process the deletion of a user's account.

Choice/Opt-out


Users can always make an informed choice as to whether they should proceed with certain services offered by Adobe Press. If you choose to remove yourself from our mailing list(s) simply visit the following page and uncheck any communication you no longer want to receive: www.peachpit.com/u.aspx.

Sale of Personal Information


Pearson does not rent or sell personal information in exchange for any payment of money.

While Pearson does not sell personal information, as defined in Nevada law, Nevada residents may email a request for no sale of their personal information to NevadaDesignatedRequest@pearson.com.

Supplemental Privacy Statement for California Residents


California residents should read our Supplemental privacy statement for California residents in conjunction with this Privacy Notice. The Supplemental privacy statement for California residents explains Pearson's commitment to comply with California law and applies to personal information of California residents collected in connection with this site and the Services.

Sharing and Disclosure


Pearson may disclose personal information, as follows:

  • As required by law.
  • With the consent of the individual (or their parent, if the individual is a minor)
  • In response to a subpoena, court order or legal process, to the extent permitted or required by law
  • To protect the security and safety of individuals, data, assets and systems, consistent with applicable law
  • In connection the sale, joint venture or other transfer of some or all of its company or assets, subject to the provisions of this Privacy Notice
  • To investigate or address actual or suspected fraud or other illegal activities
  • To exercise its legal rights, including enforcement of the Terms of Use for this site or another contract
  • To affiliated Pearson companies and other companies and organizations who perform work for Pearson and are obligated to protect the privacy of personal information consistent with this Privacy Notice
  • To a school, organization, company or government agency, where Pearson collects or processes the personal information in a school setting or on behalf of such organization, company or government agency.

Links


This web site contains links to other sites. Please be aware that we are not responsible for the privacy practices of such other sites. We encourage our users to be aware when they leave our site and to read the privacy statements of each and every web site that collects Personal Information. This privacy statement applies solely to information collected by this web site.

Requests and Contact


Please contact us about this Privacy Notice or if you have any requests or questions relating to the privacy of your personal information.

Changes to this Privacy Notice


We may revise this Privacy Notice through an updated posting. We will identify the effective date of the revision in the posting. Often, updates are made to provide greater clarity or to comply with changes in regulatory requirements. If the updates involve material changes to the collection, protection, use or disclosure of Personal Information, Pearson will provide notice of the change through a conspicuous notice on this site or other appropriate way. Continued use of the site after the effective date of a posted revision evidences acceptance. Please contact us if you have questions or concerns about the Privacy Notice or any objection to any revisions.

Last Update: November 17, 2020