This chapter is from the book
This chapter is from the book
This chapter is from the book
Events
An animation requires two components: the object or objects being animated, and an event to trigger the playing of the animation. The triggering event could be the click of a button, a click of the animated object itself, or just the loading of the page on which the animation was created. Now you'll do some exploring, so you can see how easy it is to make simple objects do your bidding.
On Page Load
The default animation-triggering event is the simplest: The animation plays when the reader reaches the page (or opens the document, if the page is the first—or only—page).
- Launch InDesign, navigate to the Ch_4_Exercises folder, and open Events_Start.indd. Before changing anything in the file, resave the file as Events_Working.indd. If necessary, choose the Interactive workspace from the Control panel (unless you have a custom panel arrangement for the interactive panels and don't want to alter that).
- Notice the caption beneath each object, describing the trigger that will set the object's animation in motion (Figure 4.5). Select one of the objects and look in the Animation panel; nobody home. You'll create the animations and set up the event triggers. If you're curious, you can preview a finished version of the file in the exercises folder (Events_Done.indd).

Figure 4.5 The caption under each object specifies the event that will trigger the object's animation. You'll create each animation behavior and set up the event triggers.
- Select the green globe with the "On Page Load" caption and open the Animation panel. Rename the object GreenGlobe. (It's helpful to give objects names you'll recognize when you set up animations.) While each object in this page is unique, how would you address the correct circle in a page full of circles? By its name, of course. By the way, renaming the object in the Animation panel also changes its name in the Layers panel (and vice versa).
- In the Animation panel, choose Fly in from Top from the Preset pull-down menu. A charming lavender butterfly demonstrates the animation for you. The Event option should already be set to the default, On Page Load (Figure 4.6). If you don't see all the options, click the triangle to the left of Properties to reveal more of the panel. Leave all the other options at their defaults. Check the results in the Preview panel (Window > Interactive > Preview). Save the file and keep it open. There's more fun to be had.
)
)
Figure 4.6 Set the GreenGlobe object to fly in from the top of the page on page load.
On Page Click
You may find that you rarely use the On Page Click event as a trigger for animation, since a reader probably wouldn't feel the urge to click the page unless invited to do so. Artwork or text would have to give the reader a hint, or nothing would ever happen. But you never know when it might come in handy, so here goes.
- Select the embossed orange square, and then choose Fly Out > Fly Out Top from the Preset pull-down menu (the Fly Out Top option is available in the submenu of the Fly Out option).
The Events pull-down menu control isn't obvious; it's a tiny triangle about an inch to the right of the Event(s) label in the Animation panel, and it comprises about six pixels. Squint a bit, and you'll find it (Figure 4.7). The triangle is a small target, but you can activate it by clicking the name of the existing event: On Page Load. (You can also click a bit to the left of the pull-down triangle and activate it.)
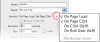
Figure 4.7 The Event options are available when you click the tiny triangle to the right of the Event(s) option. Could it be any more subtle?
Once you've found the miniature triangle, click it and choose On Page Click from the menu.
- IMPORTANT: Choosing the On Page Click option does not override the original On Page Load trigger; this is easy to overlook when you're in a hurry. Go back to the same menu and select On Page Load to toggle it off. Otherwise, the orange square will fly upward when the page loads, before the user has an opportunity to click the page, thus spoiling the surprise. In the Preview panel, wait for the green globe to fly in from the top, and then click in the Preview panel to set the orange square in motion. Be sure to click in an empty part of the page (despite the temptation to click on the orange square) to prove to yourself that it's the page click that does the trick. Save the file and keep it open.
)
On Click (Self)
If you want the reader to click on an object to wake it up, use the On Click (Self) event. The term may seem odd; after all, the object can't click itself. But it just means that the animation is triggered by clicking the object itself, rather than by clicking an external trigger.
- Select the red heart-shaped object, and change its name to Heart in the Animation panel. Choose the Pulse animation from the Preset pull-down (it's in the bottom part of the long list of presets).

- Now that you've found the elusive Events pull-down triangle, choose the On Click (Self) option. Be sure to go back and toggle the default On Page Load option off.
- Test the file in the Preview panel; click the heart and watch it beat hypnotically. If you like, experiment with the duration of the pulse, and set the number of times to 2 or 3. Remember this around Valentine's Day (or Halloween). Save the file and keep it open.
As with the On Page Click option, something has to lure the reader to click on the object to trigger its animation. While a "Click Me!" label might be a bit inelegant, something must provide a hint, or the heart will never have a chance to beat.
On Roll Over (Self)
Now that you know that "(Self)" refers to the animated object itself, it's obvious that the On Roll Over (Self) event triggers an animation when the reader rolls over the animated object. You'll use the rollover event to make the blue half-circle spin around.
- Select the blue object, and change its name to HalfCircle in the Animation panel. Choose the On Roll Over (Self) event, and then choose the Rotate > Rotate 180° CW option from the Preset pull-down menu. Remember to toggle the On Page Load event off. Test the half-circle in the Preview panel.
- Try holding the mouse on the half-circle, and you'll see that the half-circle keeps rotating. That's one oddity about using the rollover event as the trigger for an animation that keeps an object in the same location: If the user doesn't move the mouse away from the object, the animation is repeatedly triggered. Save the file and keep it open.
Note that when you choose the On Roll Over (Self) event, a new option appears in the Animation panel: Reverse on Roll Off. This would reverse (or undo) the animation move caused by the Roll Over event. For example, if the Reverse on Roll Off option is checked and you rotate an object 90 degrees clockwise by rolling over it, the object will rotate back to its original orientation when you roll off it.
On Button Event
One of the most common methods you'll use to trigger an animation is a button click. You must create the animation (even if it's just a temporary version of the animation) before setting up the button, or the button has nothing to hook up to. (In Chapter 5, "Button Up," you'll learn how to create cool button artwork in Adobe Photoshop, Adobe Illustrator, and Adobe InDesign.)
- Select the purple doughnut shape. Name it Doughnut in the Animation panel, and select the Grow option from the Preset pull-down. Set the scale factor to 150%, and choose the On Page Load event to toggle it off, in preparation for triggering the growing animation with a button.
- Select the gray button in the bottom right corner of the page, and open the Buttons panel (Window > Interactive > Buttons) to set it up. Choose the default On Release event, and click the plus sign next to Actions to select Animation (in the SWF section of the menu).
- Note that when you select the Animation action, the panel changes in response, adding a pull-down menu that allows you to select which animation is triggered, and to select from options including Play, Stop, Pause, and Resume. Select the Doughnut animation and the default Play option. Test the file in the Preview panel. Export the file if you'd like to view it in a browser. You're finished with this exercise, so you can save the file for future reference and then close it.
TIP
You can also create a relationship between the animation and the button right in the Animation panel. Click the Create Button Trigger icon ( ) in the Animation panel, and then click the button that will act as the trigger. If the trigger object is not yet a button, you're given the opportunity to make it a button.
Think about how the animated piece is presented, either in the Preview panel or in a browser. You knew where and what to click, because you were adding the interactive features. But would a reader, stumbling onto your Web page, know where to click? Probably not. This exercise was meant to familiarize you with the controls and options, not to create a final piece that would be published online. But when you start creating your own animations, you'll have to provide hints to the reader so they don't miss out on some of the fun, especially if the animated objects are hidden when the reader first views the document.
Combining Animations
If you were intrigued by the multiple behaviors of the object on page 6 of the Animation Encyclopedia, but don't have the time or inclination to learn scripting, you can cheat. I mean, use a workaround.
An animated object can be grouped with other objects, and then the group can be animated, resulting in a second behavior added to the original animation. Buttons can be grouped with other objects in a group that becomes animated, giving you the ability to make buttons move. You can keep nesting animations inside animations until... well, as long as your conscience will allow.
- In the Ch_4_Exercises folder, open MultiMoveStart.indd. Resave the file as MultiMoveWorking.indd in the same folder. The objects in the page have already been named in the Layers panel, which will save you some time (approximately half a second) when you animate them. If you like, preview the finished version of the project, MultiMoveDone.indd.
- Select the yellow star with a solid red stroke. In the Animation panel, choose the Grow preset, set the Duration to 2 seconds, and set the final scale factor to 200%. Be sure that the center point is selected in the scale orientation control (
 ) in the Animation panel, so the star scales up from the center. Test the growing star in the Preview panel.
 - Select the light-blue square, and send it behind the star in stacking order: Object > Arrange > Send to Back. Select the light-blue square and center it under the yellow star (Smart Guides can make this easy). If you're not sure the blue square and yellow star are perfectly centered, select them both, open the Align panel (Window > Object & Layout > Align), and use the vertical and horizontal center operations (Figure 4.8). It's even easier to use the alignment icons in the Control panel.
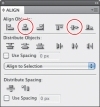
Figure 4.8 Make sure the yellow star is perfectly centered on the blue square by clicking the Align Horizontal Centers icon and then the Align Vertical Centers icon in the Align panel.
- Now you'll start piling on the animations. Group the blue square and yellow star together, and snap the group to the lower-left corner of the page. In the Animation panel, rename the group StarSquare, choose the Fly In From Top preset, and set the Duration to 2 seconds. The intention is to have the star-and-square group drop in from the top of the page, while the star scales simultaneously. But when you preview the animation, it clearly needs more work. You need to modify the length of the fly-in from the top of the page, as well as synchronize the fly-in and the scaling of the star.
If necessary, reselect the group so you can see the bright green fly-in path (Figure 4.9). Notice that it has little nodes. Yes, this means that you can edit any motion path. Click the path (the "bulb" at the top is probably the easiest target), and you'll see a narrow bounding box appear around the path. The goal is to stretch the top anchor point on the path up to the top edge of the page. Pull up on the top anchor point—and it snaps back to its original position. Aargh! (This is a peculiarity of the Fly in from Top and Fly in from Bottom presets.)
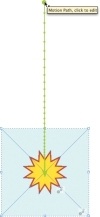
Figure 4.9 The anchor points provide a hint that you can edit the motion path just like any other Bézier path.
Here's the trick: Switch to the Direct Selection tool (white arrow). The bounding box disappears, and the motion path now appears as a hairline. Click on the tiny top anchor point, hold down the Shift key (lest the path wander left or right), and drag straight up until you touch the top edge of the page. You can also set up the length and position of the motion path in the measurements fields in the Control panel, but you may find selecting and dragging easier and more intuitive.
- The star should grow as the star-and-square group falls from the top of the page, so you'll have to synchronize the star's growth with the square's fall. Switch back to the black arrow, and reselect the group. In the Timing panel, Shift-click to select both the tacky star and StarSquare animations, and click the link icon to synchronize them (Figure 4.10). Now, the scaling of the star and the group's aerial drop will occur simultaneously. Preview the results, save the file, and keep it open for the grand finale.

Figure 4.10 Select the and animations and synchronize them by clicking on the small link icon at the bottom of the Timing panel.
TIP
There's a shortcut to the Timing panel at the bottom of the Animation panel: Just click the Timing panel icon (
 ).
). - Now you'll add another animation, to send the star-and-square group flying off the page to the right. Select the empty rectangle on the page, and move it to the lower-left corner so it's aligned with the star-and-square group; the lower-left corner of the group should be aligned with the lower-left corner of the page. Select all the objects and group them (Object > Group).
- In the Animation panel, name the new group FinalGroup, and choose the Fly Out > Fly Out Right preset. You'll have to edit the preset motion path so that the FinalGroup flies all the way off the right side of the page.
TIP
Sometimes it's easier to modify the behavior of an animation if you choose the Animation Proxy view mode. Click the Animation Proxy icon on the bottom of the Animation panel (
 ) to see "ghosts" of the object at the start and end points of the animation path.
 - If necessary, select the FinalGroup object so you can see its bright-green motion path. Unlike the Fly in from Top motion path, this path can be edited without switching to the Direct Selection tool (only the Fly In from Top and Fly In from Bottom presets have this limitation). Select the path itself, click the green arrowhead on the end of the path, and drag the arrowhead to the right until it's far enough off the page that the star-and-square group will disappear at the end of its travel. Look up in the Control panel; the total length of the path (the "L" field) should be about 425 px.
- You'll make one last change; rather than having the star-and-square group fade out as it exits, you'll keep it solid. In the Animation panel, change the Opacity setting from Fade Out to None. Preview the final animation, tweak if you want, and then save and close the file.
)
)
)
This is just a simple example, but it gives you an idea of what's possible without learning how to script InDesign. I don't mean to imply that this is a good thing to do, from a design standpoint; this is one of those "just because you can, doesn't mean you should" situations. The potential for garish, annoying animations is limitless. I feel guilty even showing this to you (you're welcome).