Motion Graphics with Adobe Creative Suite 5 Studio Techniques: Logo Animation
- Preparing Your Files
- Preparing for Animation
- Logo Animation Techniques
This chapter is from the book
This chapter is from the book
This chapter is from the book
- A pessimist sees the difficulty in every opportunity; an optimist sees the opportunity in every difficulty.
- —Winston Churchill
If you've been in motion graphics for any amount of time, most likely you've been asked to animate a logo. Often, this is a kind of "rite of passage" for young motion graphics artists. Unfortunately, so is dealing with not receiving the most optimum file formats to work with. Even if the stars align and we somehow end up with the proper files in their preferred format, logos also come with rules. Usually supplied by the original logo designer, these rules specify how the logo is to appear to best represent its brand. In this chapter we'll examine various workflows to help you find those opportunities where others might find difficulty.
Preparing Your Files
Where do you start? Do you begin in Adobe Illustrator, Adobe Photoshop, or Adobe After Effects? Well, there is no right or wrong answer. Each application and file format has its own advantages and disadvantages. By the end of this chapter, you'll learn how to move seamlessly between these applications and begin to develop your own personal animation workflows, no matter where you start.
Logos Have Rules
Whether it's a large corporation or a small business, everything from the color to the placement of that logo says something about that business. With this knowledge, most companies will create a style guide to go along with their logo. The style guide is created to ensure that the logo will always be used and seen in the best possible light. It has a direct impact on what exactly can and can't be done when animating the logo. For example, some style guides will specify that the logo can only appear on a solid white background. Many guides will specify exact color values, specific fonts, text placement, and its respective point size. Figure 4.1 shows an example of a style guide so you see what we mean.
)
Figure 4.1 Some style guides are very detailed; others are short and to the point. This is an example of a "one sheet" style guide. Smaller guides like this are often found in digital form along with the logo.
Every logo should have a style guide to help define precisely how the logo is to be used. Sadly, we've found that most style guides only account for print or Web usage. If there are no specifications for video, Web specifications are often the best place to start for help. They both use RGB color space and have lower-resolution requirements.
Should you ever receive a logo without a style guide, the Web is a great place to go for guidance. Use the company website as a rough reference for placement and usage; that way you'll always have a fallback if questions arise.
Best Files for Animation
When you're getting ready to animate a logo, some file formats are more preferable than others. Unfortunately, all too often you'll end up with a "less-than-preferred" file format. When this happens, it's usually time to consider how much extra work will be required just to get the logo ready for animation. Don't accept your first dead end as being the end of the road. Make a right turn and keep looking and asking. Even if you sometimes end up re-creating the logo from scratch, we've found that double-checking with clients will often give them that extra push required to dig up a better solution.
We follow some general rules when it comes to file formats for animation. Vector files such as those created from Illustrator are always best because they allow you to scale your logo up to any size without losing quality (thanks to the After Effects Continuously Rasterize option).
Layered vector files are even better. If each element resides on its own layer in Illustrator, you can easily import the layered Illustrator file as a composition directly into After Effects for animation. Because layers are preserved on import, they are ready for animation. Even if the original logo doesn't have layers, it's often possible to split the file.
If you can only get a bitmap version of the logo, focus on the measurements for width and height, and make sure they are least twice the resolution of your final video format. For example, when working at a resolution of 1280x720, we would want a file that's at least 2560 pixels across or 1440 pixels high. This way there is some flexibility to scale up the logo in the animation. We often refer to this as the "200% rule" for preparing stills for video. Of course a layered file would be best, like a PSD or a TIFF for the same reasons we mentioned earlier.
Preparing Logos in Illustrator
With its vector tools and ability to customize type using OpenType, Illustrator has long been the preferred application for designers when creating a logo. It is quite common to receive logos as Illustrator files. Usually, preparing these files for animation is pretty painless, but here are a few gotchas to watch out for.
Color Space
Because most logos were originally created for use in print materials, the files will most likely be in CMYK. And because video is RGB, you'll want to convert any CMYK documents to RGB before animation. Converting a file from CMYK to RGB is not nearly as problematic as the other way around. This is because CMYK has a narrower range of colors, also called a gamut. You should see little to no shifting in colors when you convert from a CMYK to RGB color space. To convert your Illustrator document to RGB, choose File > Document Color Mode > RGB Color. To better understand how the two spaces overlap, take a look at the color gamut chart in Figure 4.2.
)
Figure 4.2 As you can see, RGB colors include more colors than CMYK except for some very small areas. It's really only when you have a color value that's outside the range of your desired color space that you end up with a color shift.
You might find it interesting that RGB and CMYK at their core are designed to function quite differently. RGB is an additive color model. RGB starts with black (no colors at all) as a base color, and as you add more colors, eventually you will get to white (a mix of all colors) (Figure 4.3). CMYK works through subtraction. An image starts with white as the background color. As colors are "added," they actually subtract from each other as they mix together. So, if you mix all colors in the spectrum together in a CMYK document, the result is black (Figure 4.4).
)
Figure 4.3 Red, green, and blue are added together to create white.
)
Figure 4.4 Cyan, magenta, and yellow are subtracted from each other to create black.
Preparing the Artboard
If your document is CMYK, its artboard dimensions are most likely also set for print dimensions. Because Illustrator works with vectors, converting the artboard to different dimensions doesn't technically change any of the artwork within the document. However, when you start moving that file between applications, the artboard dimensions have an impact. For example, when importing a layered Illustrator file into After Effects as a composition, the dimensions of the composition will be determined by the size of the artboard. To change the size of an artboard, choose File > Document Setup and click the Edit Artboards button at the top of the dialog box (Figure 4.5). However, you'll find it faster to resize the artboard and convert color space by using the copy and paste technique we outlined in a previous note.
)
Figure 4.5 Changing artboards to the dimensions of their intended video format will help you preview the size of the logo in relation to the screen.
Release to Layers
If you're starting with a flattened file in Illustrator, the Release To Layers option is a quick way to have Illustrator create layers from the elements that make up the logo. You have two options when using Release To Layers (Figure 4.6):
- Release to Layers (Sequence). Places each object onto its own layer.
- Release to Layers (Build). Creates a sequential build with all the objects, starting with the bottommost object on the bottom layer and then duplicating each layer and adding objects until the topmost object is added to the top layer.
)
Figure 4.6 On the left, layers are created using Sequence. On the right, layers are created using Build.
Once you've released to layers, it's quite common to end up with too many layers. To fix this, you'll need to group layers together by selecting their corresponding targets in the Layers panel and pressing Command+G (Ctrl+G). Don't forget to name your layers as you group objects together. A random name like "Layer 56" won't be very helpful when animating in After Effects. In addition to the organizational benefits, the group command also helps make selecting objects in your canvas easier as well (Figure 4.7).
)
Figure 4.7 To quickly select a group in the canvas, use the Selection tool (A). If you want to select one element within that group, use the Group Selection tool (B). If you need to select the individual anchor points of an object, use the Direct Selection tool (C).
Working with Template Layers
You can manually trace over an image by changing its layer into a template layer. Usually, we use template layers in Illustrator to allow us to trace more artistic interpretations of an image directly overtop of the original image (Figure 4.8). Unlike painting in Photoshop, Illustrator creates brush strokes with fully editable vector paths. This is amazingly helpful when you need to go back and adjust a brush stroke that might just be a little off.
)
Figure 4.8 Fully editable brush strokes created with Artistic Watercolor brushes are traced directly over the template layer.
There are three ways to create a template layer in Illustrator (Figure 4.9):
- When placing an image, select the Template option in the pop-up window.
- Double-click a layer and select Template.
- Choose Template in the Layers menu.
)
Figure 4.9 It's always easy to spot a template layer because the layer will lock, the image will dim its opacity, and the eye icon in the Layers panel will change. Converting a layer to a template layer allows you to trace over the layer without worrying about accidentally moving the image as you work.
Using template layers in Illustrator is also a great way to create extra elements to use in the animation. As motion designers, we have the benefit of time (don't laugh). Even if the animation needs to end on the original logo, that doesn't mean we can't play with it along the way. In the Timeline for an animation, we can cut between treated versions of a logo or just use some of the elements to help highlight and add accents to different parts of the animation (Figure 4.10).
)
Figure 4.10 Creating multiple versions of a logo gives you flexibility when it comes time to animate. Just using a simple jump cut between the traced and untraced version can spice up the animation without having to use a single keyframe.
Live Trace
If you want to create some stylized versions of a bitmap image, Live Trace can save you loads of time tracing (Figure 4.11). It will automatically trace a bitmap image, creating a vector graphic. Several settings control the amount of detail as well as the colors used after tracing.
)
Figure 4.11 You can create multiple styles quickly by using the Live Trace Presets.
- To activate Live Trace, simply place or open a bitmap image in Illustrator. When placing an image in Illustrator, the adjustments will appear at the top of the screen in the Control panel.
- Click the arrow button between the Trace button and the Mask button, and choose a preset from the list to apply your Live Trace.
Live Trace with Layers
Live Trace as a function is very powerful because of its presets and ability to quickly deliver some very accurate tracings, but sometimes you'll want more—more detail and more control over individual areas of an image. When it comes to selecting and isolating specific parts of an image, there's nothing better than Photoshop. So go ahead and use Photoshop to separate the different sections of the image onto their own layers.
When you're ready to use Live Trace in Illustrator, choose File > Open and select your new layered PSD document. Choose Convert Layers to Objects in the Options area (Figure 4.12). All the layers are imported just as they were in Photoshop.
)
Figure 4.12 Layered Photoshop files work well for import into Illustrator.
Preparing Logos in Photoshop
Because video is not vector based, we use Photoshop a lot when preparing files for animation. If you're starting with a flattened bitmap image file, Photoshop makes it easy to remove the background or separate your logo into multiple layers for easy animation.
Color Space
As discussed earlier in the chapter, RGB color space is very important for maintaining color accuracy when creating and converting artwork for use in video. If your logo was delivered in CMYK, choose Image > Mode > RGB Color to convert your file.
Even if you're placing an external file into your Photoshop document, it's always wise to make sure that document is already converted to RGB before placement.
Resolution
As you learned earlier, follow the 200% rule for the best resolution results, and be sure to consider the overall pixel count determined by pixel height and width.
Pixel Aspect Ratio
There are so many different dimensions, frame rates, and codecs that remembering the exact settings, workflow, limitations, and or advantages can get confusing to say the least. When you add nonsquare pixels into the mix, there's yet another detail to consider. Using the Film and Video project presets found throughout the Creative Suite can help lend some organization to the specifics of each format. The Creative Suite offers many options that allow you to preview nonsquare pixel footage throughout many of its applications.
When we design for large projects, we've often found it easiest to actually convert any nonsquare pixel footage into a square pixel composition so there is one less detail to think about. Once everything is square pixel, we no longer have to worry about pixels being distorted, interpreted, or displayed improperly. Again, because large motion graphics projects have so many files moving between various applications, one less item to worry about really can make a difference.
Keep in mind that nonsquare pixel assets can be easily converted into a corresponding square pixel resolution. For example, if you had a project in an Adobe Photoshop Extended document that was created with the DVCPRO HD 1080p preset (1280x1080 nonsquare pixels), you could use one of three ways to convert that to the HDTV 1080p preset (1920x1080 square pixels) (Figure 4.13):
- Choose File > Place and place the DVCPRO HD 1280x1080 footage into a project with corresponding square pixel dimensions, in this case, HDTV 1920x1080.
- Copy and paste the layers between the two projects.
- Drag and drop the layers into the proper project.
)
Figure 4.13 If you use any of the three conversion methods listed, Photoshop will automatically properly resize the footage to fit the square canvas settings. To preview a document with nonsquare pixels, choose View > Pixel Aspect Ratio and select the desired ratio. Photoshop will then distort the document to simulate its final dimensions.
Removing a Background Using Channels
Consider a typical "worst-case" scenario: Let's say we have clients with time constraints, and the only version of a logo they can get us quickly is embedded in a video clip. Before Photoshop Extended, we'd usually ask the video editor to quickly save out a still frame. Either way, as a still or video file, once our logo is open in Photoshop we can separate the logo from the background.
With newer tools like the Quick Selection tool and the Refine Edge command, separating an object from its background isn't nearly the challenge it used to be. However, sometimes it might just be faster to use an "old-school" technique using channels. Before many of the selection tools were created in Photoshop, channels were often the easiest and fastest way to select specific areas in an image. To view the channels of a Photoshop document, navigate to the Channels panel (Figure 4.14).
)
Figure 4.14 Each channel shows the luminance values for each color channel that makes up that image.
When you're using channels, look for the most contrast between the logo and the background (Figure 4.15). You want to create a selection using the luminance values from one of the channels. To have more options for animation, don't worry about keeping the drop shadow as a part of the logo. You can always add that back in later.
)
Figure 4.15 The Blue channel looks like a good starting point.
To create a selection from a channel, drag the desired channel down to the Layer button in the Channels panel to create a duplicate (Figure 4.16). This new copy is now an alpha channel. If you were to save this document right now, this new alpha channel would control the transparency for all the channels combined. To be honest, in this example it's hard to see one channel that works better than another. Since there is no clear winner, this is the perfect time to use more than one channel. Let's mix it up with Calculations!
)
Figure 4.16 Duplicating a channel is a good start to making a clean mask.
Using Calculations to Create Layer Masks
The Calculations command controls how you blend together multiple channels. You can even blend together the same channel to get various results. Using Calculations can save you loads of time when you're trying to create quick selections. You'll clean up the mask later with the new Refine Mask function, so don't worry about any jagged edges or selecting all of the image. You just need to create a general selection that's close.
- Convert the background layer into a regular layer by double-clicking it in the Layers panel, and then rename the layer Logo.
With the Logo layer selected, choose Image > Calculations (Figure 4.17 ).
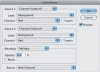
Figure 4.17 Although all the options may seem a bit overwhelming, it's these options that give Calculations its versatility.
The key to success with Calculations is to try and try again. Play around with different settings to see where they take you. Figure 4.18 shows some of the many settings within Calculations.
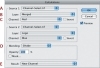
Figure 4.18. After changing a few options, you have a much better starting point for your mask.
- A Source. Gives you the ability to blend channels between more than one open document.
- B Layer. Creates the ability to blend between individual layers as well as the entire document.
- C Channel. Specifies exactly which channels to blend between.
- D Blending. Controls the specific blending modes happening between the above layer and chosen channel settings.
- E Result. Specifies what format or file to deliver when the Calculations command has been processed. You can save the blend as a new channel, in a brand-new document, or as a selection.
Have fun and change a few settings in the Channel areas and the Blending mode options. If you're using the example file from the book, don't worry about specifying layer settings because there is one layer in this example.
- When you get an outcome that might work, choose a setting for your result. For this example, we chose Selection.
- Choose Window > Mask to open the new Masks panel, and click the Add Pixel Mask button to apply the selection as a mask to the layer (Figure 4.19).
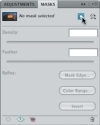
Figure 4.19 The new Masks panel makes working with selections and masks a joy.
- Since the mask is masking out the logo, not the background, click the Invert button in the Masks panel.
)
)
)
Although the result might be close to what you want to achieve, you still have some work to do. Let's clean up the mask manually.
- To view the grayscale mask you created, Option-click (Alt-click) the layer mask thumbnail (Figure 4.20).
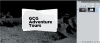
Figure 4.20 Viewing the mask is a fast way to see which areas need attention.
- To flatten out the variable White and Black levels left in the mask, press Command+L (Ctrl+L) to apply a levels adjustment (Figure 4.21). Click the black eyedropper tool and click on any gray pixel. Any pixel darker than the one you clicked will turn black. Repeat the same process using the white eyedropper tool. If you flatten out too many of the gray values, you'll end up with a very aliased image. Again, don't worry about that now; you'll fix it soon using the new Refine Mask command.
Figure 4.21 The mask after using the black eyedropper tool outside the logo shape to set the black levels. As you can see, it helped flatten out the background a lot.
- Now that the center of the logo is masked out, just paint out any random extra pixels remaining outside the logo with the Paint tool.
)
)
Finalizing Masks with Refine Mask
Instead of using blur to fix the rough edges of the mask you've been working with, you'll use the new Refine Mask function. To activate Refine Mask, click the Mask Edge button in the Masks panel (Figure 4.22). If you've ever found pulling a clean mask to be a challenge, this new feature should make life much easier.
)
Figure 4.22 Mask Edge does an amazing job of refining edges with little or no painting involved.
Refine Mask actively analyzes the contrasts around the defined edge of a mask to improve detail along the edges of a mask. The panel is divided into four distinct sections that contain several options (Figure 4.23).
)
- A View button. Displays the logo over different backgrounds or the original unmasked layer.
- B Show Original. Toggles the visibility of the layer with the original mask applied.
- C Edge Detection. Controls the width of the edge selection. Use a larger number for softer edges and a smaller number for more precise edges.
- D Radius. Toggles the visibility of the edge selection being made by Refine Edge. Smart Radius automatically adjusts for sharp and soft edges within the selection.
- E Smooth. Smoothes out any minor irregularities along the edge of the selection to remove any jagged edges.
- F Feather. Softens the transition between the affected and unaffected pixels in the selection.
- G Contrast. Sharpens any soft-edge transitions in the selected edge.
- H Shift Edge. Moves the border of the mask in or out. This is similar to choking or expanding a matte when color keying.
- I Decontaminate Colors. Removes any extraneous color fringing along the edge of the mask by changing the color of the edge to better match the contained source.
- J Output To. Determines the format to apply the new refined mask.
Change the View mode to help clarify exactly how the various adjustments are affecting the mask. Although an edge may seem clean over black, it may show different results over white (Figure 4.24). In addition to the slider adjustments, there are four tools within the Refine Mask panel (Figure 4.25).
)
Figure 4.24 Use the key commands listed to the right of each name to quickly change between View modes.
)
Figure 4.25. The Refine Radius and Remove Refine Mask tools help refine the selection of the edge being affected by the Refine Edge command.
- A Zoom and Hand tools. Function exactly like the corresponding tools in the Photoshop Tools panel, controlling magnification and navigation around the canvas.
- B Refine Radius tool. Allows for precise control in defining edges through painting directly on the canvas.
- C Remove Refine Mask tool. Provides paintable control for removing areas affected by the Refine Mask function.
Figure 4.26 shows how we fixed the aliasing on the original matte using Refine Mask. Consider the following tips when using this function:
- Only use Smart Radius if you have irregular edges that transition from smooth to sharp to smooth again.
- Wait to paint. Make sure all the sliders are first set to 0. Start by adjusting the Radius slider, and then move on to the other sliders.
- Use the Refine Radius and Remove Refine Mask tools to further refine the mask with more precise control. Be as accurate as possible with the placement of your brush as you paint. If you need to make a minor fix, start painting away from the area and slowly move the brush back toward the area to watch the adjustments.
- If you want to compare the original mask with the refined mask, choose one of the New Layer options in the Output To menu when you've finished your adjustments.
)
Figure 4.26 After some trial and error, the Refine Mask command has really helped smooth out the mask.
File Formats in Practice
When creating graphics for use in a film or broadcast, it's quite common to have to deliver graphic elements to an editor for final placement into the project. Most editing systems natively support layered Photoshop documents, but some may not. If the editor is working outside an Adobe workflow, two of the more popular and widely supported formats for still graphics are TIFF and TARGA. Because they are uncompressed by default and also support alpha channels for transparency, they are a good choice for graphics.
Manually Creating Alpha Channels
Saving a TIFF or TARGA file out of Photoshop is a straightforward process. But if you want a graphic to have transparency, you need to save that transparency information as an alpha channel. Here's a quick shortcut: Command-click (Ctrl-click) on the thumbnail of a layer to load any painted pixels as a selection (Figure 4.27). If you want to add more than one layer's information, hold down Command+Shift (Ctrl+Shift) as you click on more thumbnails in the Layers panel.
)
Figure 4.27 Once you're comfortable using Command-click (Ctrl-click) for quick selections, don't be surprised at just how often you'll use it.
To save the selection as an alpha channel, choose Select > Save Selection and click OK. With the transparency saved as an alpha channel, the document is ready to save as a flattened TIFF or TARGA file while still preserving the transparency.