Motion Graphics with Adobe Creative Suite 5 Studio Techniques: Repairing and Retiming Footage
- Repairing Footage
- Modifying Footage
- Retiming Footage
- Putting It All Together
From the book
From the book
- There is one advantage to having nothing, it never needs repair.
- —Frank Howard Clark
Unfortunately, you are not always in complete control of a project from start to finish. As a motion graphics artist, you will often be excluded from the field production stage. Footage will be shot without you (and often without regard to your needs). We learned an important lesson early on: If you're at the end of the line (which is where video editors and motion graphics folks are in the process), you're responsible for everything that's wrong with the final product. Sadly, there's not much you can do to change this fact.
Except of course, you can "fix it in post."
Now, we hate this phrase as much as you. Fortunately, After Effects and Photoshop offer some great options for repairing footage. You can fix color and exposure problems, change the speed or duration of clips, and even remove unwanted objects (Figure 6.1).
)
Figure 6.1 This shot required multiple techniques to repair it. The hand was isolated with the Roto Brush tool, and the cables were extracted with Keylight. New lights were added using the Screen blending mode as well. You'll learn all of these techniques in this chapter and can explore the shots on the accompanying DVD (footage courtesy Data Robotics, Inc.—www.drobo.com).
In this chapter we'll explore how you can wrestle your footage to the ground and pound it into shape. When you combine the techniques in this chapter with those you learned in Chapter 4, you'll have a much better chance of getting the results you desire from footage sources.
Repairing Footage
There are several reasons that footage might need repair. Archival sources (especially those that are tape-based) can wear with time or equipment failure. Rushed crews or poor preproduction can also impact the quality of a shot through inadequate lighting. Environmental conditions, such as a sunset or inconsistent cloud cover, can wreak havoc with footage as well.
Although the reasons may vary, you'll find a useful collection of tools in After Effects. The footage we'll show you is bad (in this case purposely so). We've exaggerated the problems so they're easier to see in the book. You can also open the project Ch6_Repair Footage.aep on the book's DVD to see the damage (and repairs) up close.
Removing Noise and Grain
An all-too-common problem with footage is noise or grain. Noise is typically caused by shooting in low light and can become very visible when camera gain or ISO is raised. Noise often results in unwanted "dancing pixels" and color aberrations in the shot. Both can be quite distracting (Figure 6.2).
)
Figure 6.2 The original footage shows a lot of color noise due to shooting in low light (focus is also impacted). The image on the right has been cleaned up significantly.
Grain on the other hand can be caused by the actual film stock used. You may need to remove grain because it is distracting or because it is interfering with tasks like color keying.
The approach for both problems is virtually identical; you use the Remove Grain effect. The effect is very powerful and combines signal processing and statistical estimation techniques to repair footage. The Remove Grain effect attempts to isolate fine details and only process grain or noise. To further improve the quality of the effect, you can use temporal filtering, which analyzes the clip over time.
Before tackling the grain, we recommend setting the Levels properly. Often, adjusting the white and black points (as well as the gamma) can influence the grain or noise. Get the shot where you want it with a Levels adjustment. You can also adjust the Red, Green, and Blue channels separately to remove any color cast (Figure 6.3).
)
Figure 6.3 The Levels effect can restore contrast (using the Input parameters). You can also remove color cast by adjusting each channel.
Initial Cleanup of Grain
To clean up grain, start by choosing a layer in need of repair. To make the task easier, you'll want to view your composition or footage at 100% magnification so you can make accurate decisions. Apply the effect by choosing Effect > Noise & Grain > Remove Grain.
The primary controls are those in the Noise Reduction parameter group. Usually, the Noises Reduction settings are enough on their own, working in Multichannel mode. You can also isolate noise reduction to a single channel or to different amounts per channel with the Channel Noise controls.
Next, increase the Passes value to broaden the range of noise that is detected. Use a higher number of passes to reduce larger-sized noise. Note that more passes will increase render time. Once the ideal number is chosen, additional passes will have no added benefit.
The Fine Tuning control group can be used to refine the noise reduction. There are several properties to use for better image quality:
-
Chroma Suppression. Use this option to suppress color in the noise (Figure 6.4). Just be careful not to go too high or you'll remove color from the image.

Figure 6.4 Color noise can be very distracting.
- Texture. This option preserves fine details. Lower values create a smoother, possibly artificial-looking result. Using a higher value may leave the final result difficult to distinguish from the original.
- Noise Size Bias. This control lets you favor smaller or larger noise. A value of 0 (zero) treats all noise equally. A negative value favors larger noise; a positive value preserves more of the smaller noise.
-
Clean Solid Areas. This option can smooth out additional pixels. It works well if you have large areas of flat color. Be careful not to use too high of a value or the image may look artificial (Figure 6.5).

Figure 6.5 The original image (left) shows too much noise in the wall. The center image has some of the detail smoothed. The image on the right has too much cleaning applied and is overly smoothed.
)
)
As you make adjustments, you'll notice that the effect is initially previewed in a 200x200 pixel preview window. You can drag the preview window around the composition window as needed to change the preview area. If you want to control where the noise is sampled from, change the Viewing mode to Noise Samples and adjust the Sampling controls. When you want to see the entire frame, change the Viewing mode to Final. This mode takes longer to preview but should be invoked when you want to finalize the effect.
Smoothing Over Time
The Temporal Filtering controls can be used to reduce grain more subtly over time (reducing some of the chatter between frames). To enable Temporal Filtering, twirl down the Temporal Filtering controls and select the Enable check box.
Initially, set the Amount slider to 100% and create a short RAM preview at Full quality to see the results. If streaks or blurs occur around a fast-moving subject, reduce the Amount slider. Temporal filtering adds significantly to render times, so you may want to wait to apply it until after you're happy with all other settings.
Sharpen the Image
As you reduce noise, it's possible that the image may go soft. If your noise is caused by shooting in low light, your image might be soft to begin with. Fortunately, the Remove Grain effect has Unsharp Mask controls. Use these to increase contrast in the edges and restore image sharpness.
Use the Amount slider to increase the sharpening (be careful not to go too high or the image will looked sketched). You can then use Threshold and Radius to refine the details in the image.
Stabilizing Footage
A shaky shot can truly be distracting. Unfortunately, it seems like folks just don't have a love for tripods like they used to. Fortunately, After Effects can smooth out some of the shake and remove the jostle.
Stabilizing footage is identical to motion tracking; it's just what you do with the data that's different. Essentially, you need to identify elements in a scene that are in every frame, and then have After Effects track their position. For stabilization purposes, it's best to track objects that are supposed to be stationary. Once After Effects tracks these items, it can create keyframes to move the layer in the opposite direction (hence removing movement).
Stabilizing a shot typically requires two tracking points. You can choose to stabilize any two of the following: position, rotation, and scale. For example, if the camera was panning, you'd deselect Position and only affect Scale and Rotation. If the camera was zooming, you could use Position and Rotation only.
Here's how to tackle a shot:
- Select the desired shot in the Timeline panel and choose Animation > Stabilize Motion. The selected layer should be set as the Motion Target in the Tracker panel.
- Click the Stabilize Motion button in the Tracker panel, and then choose what to stabilize. For our sample shot, we used Position and Rotation (Figure 6.6).
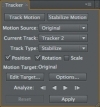
Figure 6.6 If you don't see the Tracker panel, choose Window > Tracker.
- Drag the current time indicator to the frame you want to start stabilizing. Typically, this will be the first frame of the clip.
- With the Selection tool, adjust the track points. There are three primary elements to control:
-
Feature region. This is the element that you want tracked. Adjust the smaller, inside box to surround the object (Figure 6.7). The feature should be distinct without other objects passing in front of it.
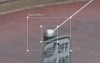
Figure 6.7 Adjust the bounding box to surround the tracked element.
-
Search region. This region identifies where After Effects will look for the object. A smaller region speeds up stabilization but may lose track of the feature. Adjust the bounding box, but keep it relatively tight to the Feature region (Figure 6.8).
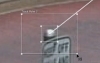
Figure 6.8 The larger the Search region, the longer the processing time.
- Attach point. The attach point is the small crosshair. For stabilization, just place this on the center of the feature you are tracking.
-
Feature region. This is the element that you want tracked. Adjust the smaller, inside box to surround the object (Figure 6.7). The feature should be distinct without other objects passing in front of it.
- Repeat the adjustment for the second track point (Figure 6.9).

Figure 6.9 If you're trying to stabilize rotation, be sure your two track points are a good distance apart.
- Click the Analyze Forward button to begin tracking. If the track loses accuracy, click Stop and make adjustments to your Search and Feature regions.
- When you're satisfied with the tracking, click the Apply button to convert the tracking data into keyframes. After Effects prompts you to choose a direction for the Apply Dimensions. You can use X and Y for most camera shake or only X or Y if there is a light vibration in the scene.
- The Tracker likely produced too many keyframes, which can lead to unwanted bounce from overcompensation. Use the Smoother panel to reduce this. Click on an individual property (such as Anchor Point), and then click Apply. Use a higher value in the Smoother panel for greater reduction (Figure 6.10).

Figure 6.10 Experiment with different values in the Smoother panel to get fewer keyframes in the Timeline.
- Switch back to the Composition panel. The shot likely drifts in the frame due to the stabilization. Scale the layer larger to avoid gaps at the edges (Figure 6.11).

Figure 6.11 Only scale as much as needed to hide the gaps; otherwise, your footage will soften.
)
)
)
)
)
)
Quick Fixes with Auto Effects
We're big fans of taking care to create handcrafted designs, but we're also realists. Chances are you've faced a few tough deadlines, and nothing's worse than missing your mark. Fortunately, the Auto effects options offer a quick and easy way to make up time and fix less-than-perfect footage.
All the Auto effects offer a Temporal Smoothing option. By using a range of surrounding frames, the effect will not flicker. This option is very useful and should be turned on for most clips. If your clip has several changes in it (or contains existing edits), be sure to combine the Scene Detect option with Temporal Smoothing for the best results.
Choose one or more of the following options to save time repairing clips:
-
Auto Color. The Auto Color effect adjusts the contrast and color of an image automatically. It works by analyzing the shadows, midtones, and highlights in the clip. It is best for fixing color issues (Figure 6.12).

Figure 6.12 The Auto Color effect correctly removed the color cast in the scene and restored some contrast. Footage courtesy of the American Diabetes Association—tour.diabetes.org.
-
Auto Contrast. The Auto Contrast effect improves the overall contrast of the clip. Be sure to use the Black and White Clip sliders to further refine the footage (Figure 6.13).

Figure 6.13 The clip on the right has much better definition after the Auto Contrast effect was applied.
- Auto Levels. The Auto Levels effect maps the lightest and darkest areas of a clip to white and black. The intermediate values are also distributed to improve the exposure. When combined with Temporal Smoothing and Scene detection options, it works great on a long clip to remove flicker.
)
)
Controlling Exposure
We're often presented with clips that lack proper exposure, and we're sure you will be too. We understand that it can be difficult to achieve the required lighting in all circumstances. Crews are often pressured to "get the shot" and aren't given enough time or resources. Regardless of the cause, you'll have to fix it.
Although there are several ways to tackle an underexposed clip, we prefer one that's popular with those working in forensic video (yes, we mean law enforcement). By stacking multiple copies of a dark clip on top of each other and setting the copies to Screen mode, it's possible to blend the clips and add up details (Figure 6.14).
)
Figure 6.14 The original clip is quite dark. The middle image adds one copy in Screen mode, and the right image shows two copies.
The blended copies may show some unwanted artifacts, but a little touch-up is quite simple. By adding the Auto Contrast effect, it's easy to improve the details in the clip.
Even more useful is the Change to Color effect for cleaning up overly saturated skin tones. By selecting the unwanted color as the From well, you can then use the To well to target the desired skin tones (Figure 6.15). Once the colors are targeted, select the View Correction Matte check box to see which areas are being affected. Refine the matte with the Tolerance control group. Deselect the View Correction Matte check box to see if your adjustment is working (Figure 6.16).
)
Figure 6.15 Be sure to zoom in on the image in the Composition panel to ensure a larger area for accurate sampling.
)
Figure 6.16 The image on the left shows the woman before the Change Color effect was applied. Using the View Correction Matte option (center), you can target an accurate adjustment (right). Notice that the red in the woman's cheeks is reduced.