- Understanding the System File Structure
- Managing Font Resources
- Managing Hidden Items
- Using Aliases and Links
- Understanding File System Metadata
- Managing Launch Services
- Using Spotlight and Quick Look
- Using File Archives and Disk Images
- Managing Time Machine
- What You've Learned
- References
- Review Quiz
This chapter is from the book
This chapter is from the book
This chapter is from the book
Managing Time Machine
Several mature and relatively easy-to-use backup solutions are available for the Mac, so you may be wondering why the folks at Apple chose to invent a new backup architecture for Mac OS v10.5. They did a little research and discovered that, prior to Time Machine’s introduction, only 4 percent of Mac users were backing up their data on a regular basis. This was an unacceptable number, so Apple decided that the only way to convince users to do so on a regular basis was to create a new backup process that would be as easy as possible and also surprisingly fun to use. Apple’s solution was Time Machine.
Aside from being built into the operating system, Time Machine has two features that make it fundamentally different from any other solution currently out there. First, configuring Time Machine is so easy it’s nearly automatic. The system practically begs you to set up Time Machine if you haven’t done so already, and with as little as one click it’s configured.
The second, more significant feature is that Time Machine is so tightly integrated with the operating system that users don’t even have to exit the application they are currently using to recover data. Applications, both built in and third party, can tie directly into the Time Machine backup system. From applications supporting Time Machine, a user can activate the visually striking Time Machine interface and travel back through time to see the application’s data as it was in the past. If an application doesn’t yet support Time Machine, you can use the Finder while in Time Machine’s interface to browse the entire file system through time.
)
Understanding Time Machine Backups
Time Machine can save backup archives to any locally connected Mac OS Extended volume that is not the startup volume. You are allowed to select a backup destination volume that resides as another partition on the system disk drive, but this is an incredibly bad idea—if the system drive dies, so does your backup. New in Lion is support for an encrypted local backup destination. This option automatically reformats the backup drive as Mac OS Extended (Journaled, Encrypted). If you don’t have a local volume suited for backup, you can also select a shared network volume as your backup destination. Time Machine supports network shares by creating a disk image on the share to store the backups. Time Machine currently only supports backing up to Apple Filing Protocol (AFP) network shares hosted from Mac OS X Servers or Time Capsule wireless base stations.
Logistically, Time Machine uses a sophisticated background process, named backupd, to automatically create new backups of the entire file system every hour. This only works, though, if the backup destination is readily available. As more users go for portable Macs, it’s becoming increasingly possible that a user may be away from his backup destination for quite a while. New with Time Machine in Lion is support for local snapshots. As the name implies, Time Machine will take local snapshots if the backup destination is unavailable. Even if the user is away from the backup destination, he will at least have access to restore from the local snapshots. This feature is only enabled on Mac portables with Time Machine left in the “on” state. Once the Mac can locate the backup destination again, the local snapshots will be converted to traditional backups and saved to the destination.
While Time Machine’s local snapshots are a convenient new feature, they certainly aren’t true backups, as they are located on the same drive they are backing up. If the system drive fails, then the local snapshots are lost as well. This is why, after not backing up to the backup destination for ten days, the system will warn the user on a regular basis to reconnect that destination. Users should be trained to ensure their Mac is connected to the Time Machine destination on a regular basis. Again, as long as the Mac can connect to the destination, Time Machine will automatically handle the backup maintenance.
Obviously, Time Machine must employ some tricks to keep backups as small as possible so that you can maintain a deep history. The initial Time Machine backup will copy almost the entire contents of your file system to the specified backup volume. In order to provide fast backups and convenient restores, Time Machine does not use a compressed archive format common to many other backup systems. Instead, Time Machine simply copies the items as is to the backup destination. As you’ll see later, this allows for easy access to those items.
The space saving comes into play with each subsequent backup. Between backups, a background process, similar to the one used by the Spotlight search service, will automatically track any changes to the file system. When the next scheduled backup occurs, only the items that have changed will be copied to the backup volume. Time Machine will then combine this new content with hard link file system pointers (which occupy nearly zero disk space) to the previous backup content, and create a simulated view of the entire file system at that point in time.
Time Machine also saves space by ignoring files that do not need to be backed up, as they can be re-created after a restoration. Generally speaking, Time Machine ignores temporary files, Spotlight indexes, items in the Trash, and anything that can be considered a cache. Of particular note, Time Machine will not back up system log files, which you could need for later troubleshooting. Software developers can also tell Time Machine to ignore specific application data that does not need to be backed up.
Eventually, so as not to waste space on your backup volume with historical data that has outlived its usefulness, Time Machine will start “aging out” backups. Time Machine will only keep hourly backups for a day, daily backups for a week, and weekly backups until your backup volume is full. After your backup volume is full, Time Machine will start deleting the oldest items first. However, Time Machine will always keep at least one copy of every item that is still also on your current file system.
Configuring Time Machine
Despite the rather complex process going on behind the scenes to make Time Machine possible, configuration couldn’t be easier. In fact, Time Machine is enabled by default and simply waiting for you to pick a backup destination. If you haven’t configured a Time Machine backup destination, the system will automatically scan the network for a Time Machine network share or wait for you to attach an external drive. If the system locates either, you will be prompted to select it as your backup destination. If you select your backup destination with this method, after you click the Use as Backup Disk button, Time Machine is fully configured. It’s just that easy.
)
On the other hand, you can choose to manually configure Time Machine settings to better suit your needs:
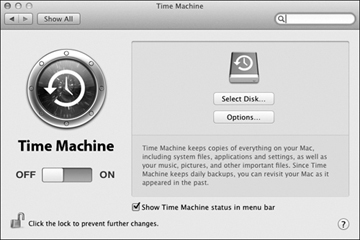
Open the Time Machine preferences by choosing Apple menu > System Preferences, and then click the Time Machine icon.
Enable Time Machine by sliding the switch to the On position, and then click the Choose Backup Disk button.
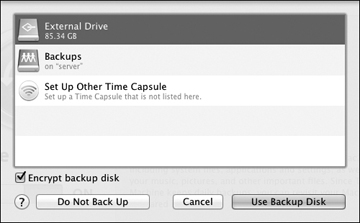
This will reveal a dialog allowing you to select a backup destination. Once you have selected an appropriate volume, click the Use Backup Disk button.
Depending on the Time Machine destination you chose, you may be presented with an additional dialog:
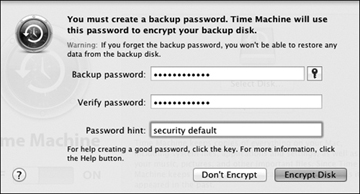
- If you selected a locally connected external drive and the encryption option, you will need to specify a password to protect the encryption. Enter a strong password twice, followed by a password hint, and then click the Encrypt Disk button to continue. This password will be saved to the local Mac’s System keychain so backups can occur unattended.
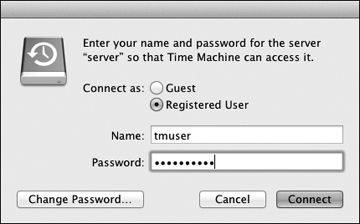
- If you selected a network share or Time Capsule as the destination, you will need to specify an authentication that allows you to access the share. Enter the appropriate account information and then click the Connect button to set the network backup destination. This authentication information will be saved to the local Mac’s System keychain so backups can occur unattended.
At this point Time Machine will wait two minutes, allowing you to make further configuration changes, before it starts the first backup.

Click the Options button to reveal a dialog allowing you to adjust a few Time Machine settings.
The most important configuration choice you can make with Time Machine is to exclude items from the backup. Excluding items will obviously reduce the amount of space required to maintain your backups. It’s not uncommon for users to leave only the /Users folder as the single item to back up; after all, that’s where all the important user items reside.
You can drag and drop items into the list field, or you can click the small plus button at the bottom of the list to reveal a file browser, allowing you to select specific folders or volumes to exclude.

- Click the Save button when you are ready to commence with the backup.
)
)
)
)
)
)
The two-minute timer will reset every time you make a Time Machine configuration change. Once you are done, simply wait two minutes, and the initial Time Machine backup will begin.
Depending on the amount of data that has to be backed up, it can take from minutes to hours for the initial backup to complete. Time Machine will open a small progress dialog that will also allow you to cancel the backup by clicking the small “X” button to the right of the progress bar. The Time Machine preferences have a similar progress bar.
)
Subsequent backups will occur automatically in the background. Revisiting the Time Machine preferences will show you the time and date of the oldest, last, and next backup. You can also verify the last backup and force an immediate backup from the Time Machine menu extra (or icon) near the clock in the menu bar.
)
Restore from Time Machine
Using Time Machine to restore data is what many will consider the best part because of the dynamic interface Apple has created to “look through time.” Opening the Time Machine application or using the Time Machine menu extra will take you into the Time Machine history browser. Few applications currently support the Time Machine interface, so in most cases you will be presented with a historical view in the Finder.
)
The Finder windows will let you browse as usual, with one significant addition. You can use the navigation arrows on the bottom right, or the navigation timeline on the right side, to view Finder contents as they change through time. New in Lion is support for local Time Machine snapshots. If this feature is enabled, the local non-backed-up snapshots will show as purple tick marks in the navigation timeline. Normal snapshots, which are backed up to the Time Machine destination, will show as white tick marks in this timeline.
To aid in your search through time, the Spotlight search field remains active, and you can quickly preview any item using the Finder’s Quick Look feature. Once you have found the item you were looking for, simply click the Restore button at the bottom-right corner and the Finder will return to “the present” with your recovered file intact where it once was.
)
Restoring with Migration Assistant
You can also restore a complete user home folder or other non-system data from a Time Machine archive using the Migration Assistant. You can use this technique if you choose not to perform full system backups, if your system is already running and you want to migrate specific information from a backup. First, make sure the Time Machine backup volume is available to the destination Mac, then open /Applications/Utilities/Migration Assistant. When the Migration Assistant opens, simply choose to restore from a Time Machine backup. The remainder of the Migration Assistant process is similar to the standard migration process covered in Chapter 1, “Installation and Configuration,” for system items, or Chapter 2, “User Accounts,” for user home folders.
)
Restoring an Entire System
You can restore an entire system volume when started up from Lion Restore. This technique assumes you did not exclude any items from your system volume; thus, you have backed up the entire system volume. When started up from Lion Restore, as covered in Chapter 1, “Installation and Configuration,” choose Restore From Time Machine backup from the Mac OS X Utilities window. This will open the Time Machine System Restore Assistant. The assistant will first scan for local and network Time Machine backup volumes. Once you have selected the Time Machine volume, you can restore the entire system from any backup instance on that volume to your new system drive.
)
Manually Restoring from Time Machine
If you are experiencing problems using one of the Time Machine restoration interfaces, you can always browse the backup from the Finder. Time Machine’s backup technology uses file system features that are part of standard Mac OS Extended volumes, so no special software is needed to browse through backup contents.
If you’re accessing a locally attached drive for Time Machine, then the backups are located on the root of your backup volume in a folder named Backups.backupdb. Once inside the backup database folder, you will see folders with the name of each computer that is backed up to that volume. Inside each computer folder you will see folders named with a date and time indicating each backup. Finally, inside each dated folder you will see folders representing each volume that was backed up.
)
If you’re accessing Time Machine over a network, you will need to manually connect to the Time Machine share first. Connecting to shares is covered in Chapter 7, “Network Services.” Once connected, you will need to locate the Time Machine backup disk images. They will be at the root of the Time Machine share and named with the computer’s name followed by the .sparsebundle extension. Double-click to mount the Time Machine backup disk image volume, which will be named “Backup of” followed by the computer’s name. Inside this volume you will find the same Backups.backupdb folder and contents that you would find on a directly connected Time Machine backup.
)
Time Machine Caveats
Though Time Machine is supported by Apple, it is not without flaws. Time Machine’s backup architecture does not lend itself well to large files that change often. For example, many database files appear as large, single files to the file system. While the database application may be able to change just a few bytes of the large file as a user edits the database, Time Machine will not recognize this, and it will have to create another copy of the entire database file during the next backup. This will obviously fill your backup volume much quicker than if the database had been stored as many smaller files.
This leads to the next Time Machine issue: running out of backup space. Once Time Machine fills up the backup volume, it will begin deleting older items to make room for newer ones. Therefore, the depth of your backup history will vary based not only on the size of your backup volume, but also on how often you change your files and how Time Machine recognizes those changes. Because you cannot change how Time Machine chooses to delete older items, you may discover that items you thought would still be on the backup volume have already been deleted.
One final issue is that Time Machine can only back up Legacy FileVault accounts when the user is logged out of the system. The solution to this problem is to simply stop using Legacy FileVault in favor of Lion’s FileVault2, as covered in Chapter 3, “File Systems.”