Imaging and Behavior Lingo
Like this article? We recommend
Like this article? We recommend
Like this article? We recommend
Imaging and Behavior Lingo
This article by Phil Gross, co-author with Jason Roberts of Director 8 Demystified, explains how to perform a smooth transition from one image to another.
One of the new features that was added to Director 8 is the ability to directly modify images using Lingo. Director programmers can use this "imaging Lingo" to modify images of bitmap and text cast members, or even create images on the fly. Judicious use of manipulating images should help cut down on the size and number of images required for a Director movie, and ease the bandwidth problems typically found with Shockwave movies.
Imaging Lingo also opens up the possibility of creating types of movies that were previously either extremely difficult of even impossible. For example, you can create a paint program within Director that provides the user with drawing tools. The drawing is implemented by modifying the image, using Lingo, as the user draws. This sort of program has been impossible until now, since there was no way to include all the images needed to build all the possible drawings. If you look in the folder where you installed Director 8 you'll find an example of a simple drawing program-the file is called imaging.dir and is found in the Lingo Examples folder within the Learning folder.
Another example is the ability to create custom transitions, the example we will be using here. For the remainder of this article, we will use a pixalating or mosaic-type transition as a means of introducing you to elements of imaging Lingo. There is actually a similar (though more robust) transition included with Director 8 in the Sprite Transitions window of the Library Palette. The one supplied by Macromedia is undoubtedly less quirky and has more options, but for this learning exercise, we'll work through the process of creating one. Feel free, however, to browse the code that makes up Macromedia's version.
The theory behind the mosaic-type transition that we are going to make is simple. If you copy an image into a box that is only one-fourth as big, you loose three quarters of the pixels. If you then copy the image back into a box the same size as the original, you don't get back the information that was lost. Instead, each pixel is duplicated in three others to make up the added space. You can consider the modified image to be made up of blocks of four identical pixels instead of single pixels. If you squint just right, the modified image will look almost like the original. If you perform the same operation with an increasingly smaller box, the resulting image will become progressively boxier. Because the boxes are created from the original image, the colors of the boxes will maintain a similarity to the original colors, providing the transition.
When the image is boxy enough, the new image is slipped in, also boxy, and then the reverse process makes the new image come to view.
Let's start simple and create a script that performs one step for each mouse click on a button. For this movie, we'll need an image and a button, and then we'll write some handlers. You can follow along using you own image, or download the example file which contains the complete version. If you are creating your own movie from scratch, you should be able to copy the source for the handlers right from these pages as we discuss them.
Getting weird characters when you try to download? Right-Click (Win) or Ctrl-Click (Mac) and use SAVE THIS LINK AS... and select SOURCE in the dialogue box
Place the image in sprite channel 1 and the button in sprite channel 2. Create an exitFrame handler in the behavior channel at the last frame of the sprites that loops on the frame:
on exitFrame me
  go to the frame
end
While you can actually modify the image of a cast member, doing so isn't such a good idea, for two reasons: Modifying a cast member means that you don't have the original anymore, and modifying a cast member is much slower than modifying an image object in memory. Since you can't modify a sprite's image, only the sprite cast member's image, we will need to have a cast member containing the modified image. We don't want to modify our original cast member, or we wouldn't be able to run the program more than once. The easiest fix is to create a new cast member, and that is what we'll do first. Later, we'll be creating image objects to perform the modifications, and one of those will then be placed in the new cast member.
Take a look at the following startMovie handler. Some global variables are declared and then assigned values. The stepNumber variable is used determine how many modification steps have already been performed, and therefore, how blocky the next modification will be. The gSourceMember variable contains a reference to the original cast member-we'll be referencing that each time a new modification takes place. The gSourceImage variable will be a reference to the new cast member being created. The image of the original graphic is placed in the new cast member, and the sprite is set to use this new member instead of the original. Each time a modification is performed, the resulting image will be placed in that new cast member and the modified image will show on the Stage. If you have your Cast window open when the new(#bitmap) command is issued, you'll see the new cast member appearing in the Cast.
on startMovie
  global stepNumber
  	-- For counting the morphing steps
  global gSourceImage
  	-- Our new working cast member
  global gSourceMember
  	-- The original cast member
  stepNumber = 1
  -- Create a new bitmap to contain the
  -- image that will be modified, so we
  -- don't mess with the original.
  gSourceImage = new(#bitmap)
  gSourceImage.name = "SourceImage"
  gSourceImage.image = sprite(1).member.image
  -- Create a reference to the sprite's
  -- original member
  gSourceMember = sprite(1).member
  -- Set the sprite's member to the (for now)
  -- identical new member
  sprite(1).member = gSourceImage
end
There is also a stopMovie hander that removes the newly created cast member from the cast. Otherwise, you'll get a new cast member each time you run the movie.
on stopMovie
  -- Remove the new bitmap, otherwise we'll
  -- get a new one each time the program
  -- runs.
  global gSourceImage
  if not voidP(gSourceImage) then
    erase gSourceImage
    gSourceImage = void
  end if
end
For starters, you might want to comment out the stopMovie handler so your modified image will still be visible when the movie stops. When you're comfortable with what you're seeing you can uncomment it again.
With the setup taken care of, it's time to write a mouseUp handler for the button that will perform the modification. This is where we begin using imaging Lingo, starting with the image function. The image keyword actually comes in two flavors. As a property, it can be used to access an image of a bitmap or text cast member, the Stage, or a window. To save a copy of the Stage, for example, you might issue a command such as:
member("saveStage").image = (the Stage).image
As a function, the image() keyword creates a new image object and returns a reference to the new object. That's what we want, image objects where we can perform our modifications. The required parameters for the image function are the image's width, height and bit depth. There are also parameters for specifying the alpha channel bit depth and a palette, but we don't use those. We actually need two image objects: one set to the original source size and one set to a smaller size. The original image is placed in the full-size object, copied to the smaller, then copied back to the full-size one. For the full-size image, we use the width and height of the original image, and the current color depth of your system. By the way, this is probably going to look best if you are running at full (32 bit) color. Here's the full handler:
on mouseUp
  global stepNumber, gSourceImage,
         gSourceMember
  w = gSourceImage.width
  h = gSourceImage.height
  -- Create an image object
  imSource = image(w, h, the colorDepth)
  -- Each modification starts with the
  -- original image, otherwise you are
  -- modifying a modification.
  imSource = gSourceMember.image.duplicate()
  -- Create an image object that is smaller
  imSmall = image(w/(stepNumber*4),
                  h/(stepNumber*4),
                  the colorDepth)
  -- Copy the original image into the small
  -- image
  imSmall.copyPixels(imSource, imSmall.rect,
                     imSource.rect)
  -- Copy the small image back into the
  -- larger, resulting in the desired
  -- modification
  imSource.copyPixels(imSmall, imSource.rect,
                      imSmall.rect)
  -- Put the modified image in the sprite's
  -- member
  gSourceImage.image = imSource
  -- Get ready for the next, greater,
  -- modification
  stepNumber = stepNumber + 1
end
The image imSource is the full-size image object. Once the object is created, the image property is used to place an image in imSource, taken from gSourceMember. There are two concepts that need clarifying here. First, the duplicate function is used instead of directly assigning the image. By default, when you access the image of a cast member and assign it to an image object, Director creates a reference to the member's image. If you then modify the image object, the cast member's original image is also modified. Since we want to maintain the original image intact, we use the duplicate function to create a copy of the original instead of a reference to it.
Second, we use the image from the original cast member, rather than the possibly-modified new cast member. In other words, the process is original image into full size object, object into smaller object, smaller object back into full-size object, full-size object into new member. At each step the small object gets progressively smaller, providing the mosaic effect. It also works if you begin with the modified object instead of the original object at each step, but the modification looses its relationship to the original faster and doesn't look as good.
The image object imSmall is the small-size object. The size is determined by the stepNumber counter variable:
imSmall = image(w/(stepNumber*4),
                h/(stepNumber*4), the colorDepth)
To begin with, stepNumber is 1 and the small-image object is one-fourth the size of the original. At each step, stepNumber is increased by one and the imSmall object is recreated as a smaller object. The factor of 4 was chosen because I think it looks good. In a more robust version the choice of factors should be one of the user-settable properties for the transition.
While the image property is pretty handy, and allows you to access full images, it's not enough for manipulating images. For that we have three more functions: copyPixels, getPixel and setPixel. We don't use the getPixel and setPixel functions here, but they allow full access to individual pixels in an image. That's high-power functionality, but at a cost-they are very processor intensive, and modifying an image one pixel at a time can result in a serious degradation in performance. The copyPixels function, on the other hand, works with rectangles and is pretty fast. Using copyPixels, you can copy a specified rectangle (all or a portion) from one image into a specified rectangle of another image, with appropriate resizing. For our mosaic transition, that's what we need. Our rectangles are full size of the image, rather than a portion, but we need the resizing to make it work. The syntax is
imageObject.copyPixels(sourceImage,
                       destinationRect,
                       sourceRect {,propList})
The optional fourth parameter is a property list using typical Director properties to modify the copy. We don't use any, but they allow you to specify such modifications as ink, blend and dithering. One command we use is
imSmall.copyPixels(imSource, imSmall.rect,
                   imSource.rect)
which copies into imSmall from imSource using the full-size rect of both.
That's it! If you give this movie a try, each mouse click should result in an increasingly boxy image.
Next, we want to make some small changes to our code so that the modifications to the images happen within an exitFrame handler. The button will only initiate the transition. This is one step in the process of converting to a reusable behavior.
This next version of the mosaic transformation really isn't a whole lot different than the previous version. The major difference is that the exitFrame handler is a behavior that is attached to the sprite. In the final version, this is what we want, a behavior for a transition that can be dropped onto any bitmap sprite. The behavior is only for one direction, getting boxier. Eventually, we will need to supply the reverse so that the "from" image gets boxier, then the "to" image starts boxy and gets less boxy. Here is the second version for download:
Getting weird characters when you try to download? Right-Click (Win) or Ctrl-Click (Mac) and use SAVE THIS LINK AS... and select SOURCE in the dialogue box
The mosaic2 movie uses identical images, the same movie script (startMovie and stopMovie) and the same exitFrame handler (for looping) in the behavior channel. The mouseUp script is changed since it only needs to start the transition (the final behavior will be automatic and won't need a button). Most of the previous functionality of the mouseUp handler has been transferred to an exitFrame handler.
on mouseUp
  global stepNumber
  global isTransforming
  -- Image modified while TRUE
  isTransforming = TRUE
  stepNumber = 1
end
The new exitFrame behavior contains the code to perform the modifications to the image. Since a "boxy" step is implemented at each exitFrame, a test is added (with an if construct) to see if enough steps have passed. I chose ten steps as a reasonable number, and it's hard-coded into the behavior, but a well-written behavior would allow the user to determine this number (and we'll implement that later). Also, a well-written behavior would probably loop on the first frame while the transition takes place. Since this is a simplified version, we're holding off on those improvements for now. Here is the source for the behavior. To be implemented, the behavior is dragged onto the image sprite (sprite 1 in our example source).
on exitFrame
  global stepNumber, gSourceImage,
         gSourceMember, isTransforming
  if isTransforming = TRUE then
    w = gSourceImage.width
    h = gSourceImage.height
    -- Create an image object
    imSource = image(w, h, the colorDepth)
    -- Each modification starts with the
    -- original image, otherwise you are
    -- modifying a modification.
    imSource =
       gSourceMember.image.duplicate()
    -- Create an image object that is
    -- smaller
    imSmall = image(w/(stepNumber*4),
                    h/(stepNumber*4),
                    the colorDepth)
    -- Copy the original image into the
    -- small image
    imSmall.copyPixels(imSource,
                       imSmall.rect,
                       imSource.rect)
    -- Copy the small image back into the
    -- larger, resulting in the desired
    -- modification
    imSource.copyPixels(imSmall,
                        imSource.rect,
                        imSmall.rect)
    -- Put the modified image in the
    -- sprite's member
    gSourceImage.image = imSource
    -- Get ready for the next, greater,
    -- modification
    stepNumber = stepNumber + 1
    if stepNumber > 10 then
        isTransforming = FALSE
  end if
end
When you give this movie a try you should see the image transform each time a frame passes. To be effective, your image needs to span at least eleven frames.
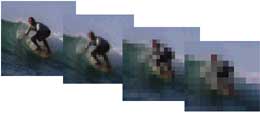
The next manifestation of our movie adds the opposite behavior-starting with a fully-boxed image and ending up with a regular image. This version still uses a button to implement the transition, but provides a transition to a new image. With a little work, this sort of implementation could be used to progress through a series of images. You might, for example, create a list of member references and then cycle through them. The movie is simplified by using hard-coded references to the original and new images, but converting to variables would be simple. Here's the new version, including the second image (did I mention that that's me in the pictures?).
Getting weird characters when you try to download? Right-Click (Win) or Ctrl-Click (Mac) and use SAVE THIS LINK AS... and select SOURCE in the dialogue box
The startMovie and stopMovie handlers in the movie script are identical to the previous versions. The mouseUp handler is only changed by the addition of a global variable gOutgoing that lets the movie know whether the image is the "from" image getting boxy (gOutgoing = TRUE) or the "to" image that is getting less boxy.
on mouseUp
  global stepNumber, isTransforming,
         gOutgoing
  isTransforming = TRUE
  stepNumber = 1
  gOutgoing = TRUE
  -- Means alter the FROM image,
  -- as opposed to the NEXT image.
end
The exitFrame handler, on the other hand, has some extensive changes. Like the exitFrame handler in the mosiac2 movie, this behavior is intended to be dropped onto a sprite. Notice how the gOutgoing variable is used to determine whether the "from" image is being modified or the "to" image:
on exitFrame
  global stepNumber, isTransforming,
         gOutgoing, gSourceImage
  if isTransforming = TRUE then
    w = member("crouchA").width
    h = member("crouchA").height
    -- Create an image object
    imSource = image(w, h, the colorDepth)
    -- Create an image object that is
    -- smaller, but watch out for
    -- divide-by-zero.
    if stepNumber <> 0 then
      imSmall = image(w/(stepNumber*4),
                      h/(stepNumber*4),
                      the colorDepth)
    else
      imSmall = image(w, h, the colorDepth)
    end if

    if gOutgoing then
      imSource =
          member("crouchA").image.duplicate()
      stepNumber = stepNumber + 1
      if stepNumber > 10 then
        stepNumber = 10
        gOutgoing = FALSE
      end if
    else
      -- Now to bring in the new image
      -- New image needs to start off in
      -- mosaic form
      imSource =
          member("standA").image.duplicate()
      stepNumber = stepNumber - 1
      if stepNumber = -1 then
        isTransforming = FALSE
      end if

    end if
    imSmall.copyPixels(imSource,
                       imSmall.rect,
                       imSource.rect)
    imSource.copyPixels(imSmall,
                        imSource.rect,
                        imSmall.rect)
    gSourceImage.image = imSource
    sprite(1).member = gSourceImage
  end if
end
For the outgoing modification process the same stepNumber counter is used, only this time it counts down instead of up. As the counter gets smaller, so do the sizes of the mosaics used in the modification. Everything else, such as the copyPixels operations, works pretty much the same as before.
At some point the counter gets to zero, however, so the creation of the imSmall image object has to watch out for that. The easiest solution was to put in a test to avoid a divide-by-zero error:
if stepNumber <> 0 then
    imSmall = image(w/(stepNumber*4),
                    h/(stepNumber*4),
                    the colorDepth)
else
    imSmall = image(w, h, the colorDepth)
end if
If the counter is zero, then a full size image object is created and the returned image is a copy of the original with no modifications--just what the final image should be.
The next step is to break apart the outgoing and ingoing routines so they can each be used separately. That will allow you to drop the outgoing behavior on one sprite and the incoming behavior on a subsequent sprite, providing the transition between them. All of the work using imaging Lingo has been done, so these next modifications to the movie are to create real behaviors, rather than just handlers acting like behaviors. This means using properties rather than global variables, and adding the ability for the programmer to set values when the behavior is dropped on a sprite. Here's the Director file for the final version:
Getting weird characters when you try to download? Right-Click (Win) or Ctrl-Click (Mac) and use SAVE THIS LINK AS... and select SOURCE in the dialogue box
The conversion of the script to two behaviors is interesting, especially if you have never used some of the behavior Lingo such as getPropertyDescriptionList. Check out the article that follows this one for comments on implementing the behaviors on the Demystified web site at http://www.demystified.com.