- Effects basics
- Using the Effects Rack
- Amplitude and Compression effects
- Delay and echo effects
- Filter and EQ effects
- Modulation effects
- Noise reduction/restoration
- Reverb effects
- Special effects
- Stereo imagery effects
- Time and Pitch effect
- Third-party effects (VST and AU)
- Using the Effects menu
- Managing presets
- Review questions
- Review answers
Using the Effects menu
You can process any audio selected in the Waveform or Multitrack Editor by choosing the desired effect from the Effects menu. Unlike the Effects Rack, you can apply only one effect at a time.
This section covers effects that are available exclusively from the Effects menu. Any effects you can also access from the Effects Rack work the same way when opened from the Effects menu, with three exceptions:
- The Invert, Reverse, and Silence effects are applied to the audio as soon as you select them. You can use the Undo command to undo the effects.
- Most effects chosen via the effects categories (Amplitude and Compression, Delay and Echo, etc.) have an Apply and Close button. Clicking Apply applies the effect to the selected audio.
- Unlike the Effects Rack, editing is destructive (although the changes aren’t made permanent unless and until the file is saved). However, you can still audition any changes before applying them, because most effects chosen via the effects categories have a Play and Loop button to the right of the effect’s power on/off button. Loop repeats the selected portion of the audio when you click Play.
Invert, Reverse, and Silence effects
Invert changes the signal’s polarity (commonly called phase) and produces no audible difference. Reverse flips an audio selection so that the beginning occurs at the end and the end at the beginning. Silence replaces the selected audio with silence.
- Choose File > Open, navigate to the Lesson04 folder, and open the file NarrationNeedsHelp.wav.
- Play the file to hear what it sounds like, and then select the part at the beginning that says, “Most importantly, you need to maintain good backups of your data.”
- Choose Effects > Invert. Note that the positive and negative sections are flipped, so the positive peaks are now negative and vice versa. However, if you play this, you’ll hear no audible difference.
- Choose Effects > Reverse. Play back the selection, and you’ll hear reversed speech.
- Select the same section. Choose Effects > Silence to convert the audio to silence.
- Close the File without saving it, and close the project without saving.
Match Volume effect
It’s often helpful to match volume levels among different pieces of music. This is particularly important for broadcasting, where some governments impose regulations defining maximum volume levels.
However, there are many ways to measure “level.” A signal’s peak is one indication of level, but so is a signal’s average level. A drum hit will have a high peak level but a low average level because once hit, the amount of energy decays rapidly. On the other hand, a sustained sound, like distorted guitar, will have a high average level but low peak level.
As a result, the International Telecommunications Union (ITU) has developed standard measurement protocols—the most recent being LUFS (Loudness Units referenced to Full Scale). One application of Audition is to match levels to the broadcasting standard of -23 LUFS.
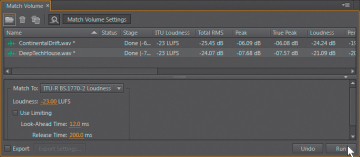
- Choose Effects > Match Volume. The Match Volume panel opens.
- Open the Lesson04 folder. Drag the files ContinentalDrift.wav and DeepTechHouse.wav into the upper half of the Match Volume panel. Audition analyzes the signal and displays readings that relate to different ways to measure loudness.
- Click the Match To drop-down menu and select ITU-R BS.1770-2 Loudness if it is not already selected.
For the Loudness parameter, enter -23.00 LUFS. Leave the Look-Ahead Time and Release Time at their default values (12.0ms and 200ms, respectively).
- Click Run. Audition will adjust both files to an ITU Loudness level of -23dB. The other readings will change to reflect the changes in overall level.
- Click the Editor panel’s file selector menu, and select ContinentalDrift.wav. Listen to about a minute of it.
Click the Editor panel’s file selector menu, select DeepTechHouse.wav, and again, listen to about a minute of it. Note how the subjective levels over time for the two files are very similar.
Additional Amplitude and Compression effects
Three Effects menu functions are not available with the Effects Rack: Normalize, Fade Envelope, and Gain Envelope.
- Choose File > Open, navigate to the Lesson04 folder, and open the file Bass110.wav.
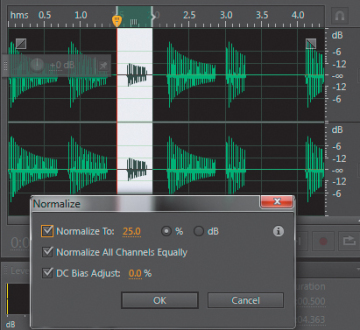
- Select a single bass note, and choose Effects > Amplitude and Compression > Normalize (process). Normalization adjusts a selection’s level so that its peak (highest level) attains a particular percentage of the overall level.
- Set Normalize to 25% and click OK; the note’s peak will reach 25% of the maximum available level.
- Choose Edit > Undo or press Ctrl+Z (Command+Z) to restore the bass note to its previous level.
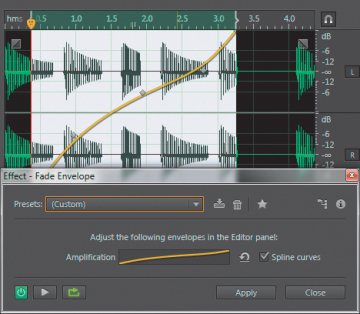
- Select the left half of the waveform (the first three notes), and choose Effects > Amplitude and Compression > Fade Envelope (process).
- Load the Linear Fade In preset. A line that indicates amplitude appears superimposed on the selection. Play the file, either by clicking the Fade Envelope dialog box’s Play button or by pressing the spacebar, and you’ll hear the bass notes fade in.
- Adjust the fade shape by clicking on the line to create new nodes, as you did toward the end of Chapter 3, “Basic Editing.” A thumbnail in the Fade Envelope dialog box shows the shape; select the Spline Curves check box to round the fade line.
- Select a different region. The curve now adapts to fit within the selection. Regardless of the size of the selection, the curve adapts proportionally to fit.
- Click Close in the Fade Envelope dialog box without applying the fade.
- Select part of the waveform, choose Effects > Amplitude and Compression > Gain Envelope.
- Select the +3dB Hard Bump preset. A line that indicates amplitude appears superimposed on the selection. You can adjust the gain curve shape by clicking on the line to create new nodes, and as with the fade, a thumbnail in the Gain Envelope dialog box shows the shape. If desired, select the Spline Curves check box to round the fade line.
- Select a different region. As with the Fade Envelope, the curve adapts to fit within the selection.
Diagnostic, Noise Reduction, and Restoration effects
Diagnostic, Noise Reduction, and Restoration effects will be covered in Chapter 5 along with the real-time, nondestructive noise reduction and restoration tools. The effects selected from the Effects menu produce the same sonic results but are destructive, DSP-based processes. The Loudness Radar Meter in the Special menu is covered in Chapter 6, “Mastering.”
Doppler Shifter effect
The Doppler Shifter effect (found in the Special menu) is an unusual effect that changes pitch and amplitude to make signals sound “three dimensional” as they circle around you, whiz by from left to right, and do other effects that alter spatial placement. Chapter 7, “Sound Design,” includes more information on using the Doppler Shifter.
Note that opening the Doppler Shifter effect automatically opens the Preview Editor so you can see the effect the Doppler Shifter has on the processed waveform.
- Choose File > Open, navigate to the Lesson04 folder, and open the file FemaleChoir.wav.
- Choose Effects > Special > Doppler Shifter (process). Click the dialog box’s Play button to hear the default effect. Like all of the Doppler Shifter presets, this effect is particularly dramatic on headphones.
- Choose various presets. You will need to stop and restart Play between presets.
- The best way to understand how this effect works is to choose a Path Type (straight or circular), and then vary the parameters to hear how changes to specific parameters affect the sound. Take a few moments to do this now. You can get some really wild effects with this processor; note that you may need to stop and restart Play with major edits.
- When you’re finished, close the project without saving anything.
Manual Pitch Correction effect
The Manual Pitch Correction effect is one of three Time and Pitch effects that are available only from the Effects menu.
- Choose File > Open, navigate to the Lesson04 folder, and open the file Drum+Bass+Arp110.wav.
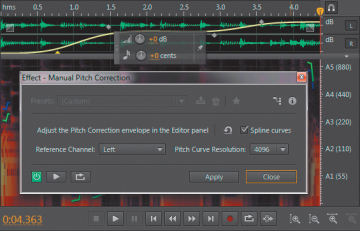
- Choose Effects > Time and Pitch > Manual Pitch Correction. The Waveform Editor changes to a spectral view, and the Manual Pitch Correction dialog box appears. Play the file as a reference.
- The HUD now has an additional control for pitch along with the standard volume control. Click on this control and drag down to lower pitch; drag up to raise pitch. For now, drag down to -200 cents (2 semi-tones). A yellow line superimposed on the Waveform overview shows the amount of pitch change.
- Click Play to hear the sound transposed down to a lower pitch.
- Drag the HUD so it’s not on top of the yellow line. Click on the yellow line to create a node, which you can drag up or down to further change pitch. As with other Audition envelopes, you can insert multiple nodes and make complex curves, as well as round them off by selecting the Spline Curves check box.
- Click Close without applying the effect. Leave Audition open for the next lesson.
Pitch Bender effect
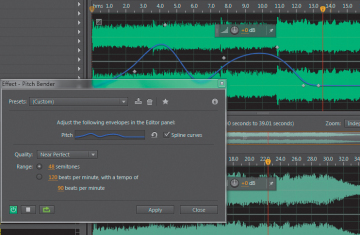
The Pitch Bender can change a file’s pitch over time. This effect doesn’t stretch time to compensate for pitch changes, so it takes less time to play through sections with higher pitches and more time to play through sections with lower pitches. The Pitch Bender allows for drawing an envelope for smooth changes.
- Open the file FemaleChoir.wav, and then choose Effects > Time and Pitch > Pitch Bender. Opening the Pitch Bender effect enables the Preview Editor automatically, so you can see the results of pitch bending on the waveform before you apply it.
- The upper waveform now displays a blue line. You can adjust the pitch bend shape by clicking on the line to create new nodes; a thumbnail in the Pitch Bender dialog box shows the shape (select the Spline Curves check box to round the fade line). Choose Near Perfect for Quality, and leave the Default range at 48 semi-tones (a lower value allows for making finer adjustments).
- Create a curve with lots of variations.
- Start playback, and you’ll hear some wild pitch variations. Note that the playhead in the upper waveform changes speed as it tracks the pitch variations, whereas the playhead in the lower waveform proceeds at a constant speed because it’s previewing the file after the effect has been applied, resulting in a constant playback rate.
- Click Close without applying the effect. Leave Audition open for the next lesson.
Stretch and Pitch effect
The Stretch and Pitch effect is the third Time and Pitch effect that’s available only from the Effects menu. It offers high-quality time and pitch stretching.
- Open the file Drum+Bass+Arp110.wav file, and then choose Effects > Time and Pitch > Stretch and Pitch. This enables the Preview Editor automatically.
- The default preset changes neither time nor pitch. Set the Stretch slider to 200%, click the dialog box’s Loop button, and then click Play. The file will now play at half speed.
- Set the Stretch slider to 50%, and then click Play. The file now plays at double-speed. After auditioning this change, reset the Stretch fader to 100%.
- Vary the Pitch Shift slider and note how this affects the sound. There’s a slight delay before any pitch change takes effect, because Audition has to do a lot of calculations. You can shorten this time by selecting a level of Precision other than the default setting of High.
- Select Lock Stretch and Pitch Shift. This links the two parameters so that if, for example, you shift pitch up an octave, the speed doubles; shifting pitch down an octave halves the speed. For an interesting “slowdown” effect, set Stretch to 100%. Click Play, and then slowly move the Stretch slider to the right. With Stretch and Pitch Shift still locked, return the Stretch slider to 100% before proceeding.
- You can also use the Stretch effect to change a file’s length. For example, the current file is 4.363 seconds long. Suppose it needs to be 5.00 seconds long. Select the Lock Stretch Settings to New Duration check box, and enter 5.00 for the New Duration parameter. Click Play; now the loop is exactly 5.00 seconds long.
- Because the stretch settings are locked to duration, the pitch will be somewhat lower because the file is longer. To preserve the pitch, deselect Lock Stretch Settings to New Duration, make sure Lock Stretch and Pitch Shift are deselected, and then set Pitch Shift to 0 semi-tones. When you’re finished, close Audition without saving the file.
The Advanced parameters are mostly important when you’re manipulating voice; make sure the Solo Instrument or Voice and Preserve Speech Characteristics check boxes are selected, and adjust the Pitch Coherence slider for the best sound quality (this will be subtle). You can try deselecting Solo Instrument or Voice and Preserve Speech Characteristics with audio other than voice, but you may not hear much difference.
- Click Close.
