- Measuring Light
- Rule of Thirds
- Adobe Bridge
- Lab Challenge
This chapter is from the book
This chapter is from the book
This chapter is from the book
Adobe Bridge
Admittedly, when Bridge was first released for Adobe Creative Suite 2, it was, how shall I put this, not terribly user-friendly. I didn’t use it. My students didn’t use it. No one I knew used it. We might have tried it a few times, but it just didn’t seem worth the effort. After several revisions, Bridge has become an organizational tool that is absolutely worth learning. Bridge was primarily developed to allow you to organize and view file information relating to all the various types of files you generate using Creative Cloud.
What You’ll Need
Download the following source materials to complete the exercises in this chapter:
- The chapter4-start folder from the Chapter 4 downloads area on the book’s companion website includes a rule-of-thirds folder and a batch-rename folder for those exercises.
You’ll begin the exercises in this chapter by exploring your digital camera.
What You’ll Make
In the exercises for this chapter, you’ll organize your digital photographs in Bridge and create a PDF that showcases a series of images (Figure 4.8). This serves the same purpose as and looks similar to the contact sheets that photographers have used for decades. Your PDF will contain images, and it will display your file naming system.
)
FIGURE 4.8 Completed PDF contact sheet created in Chapter 4 exercises.
In the following exercises, you’ll learn how to rename a folder of files, label (or rate) your files, and generate a contact sheet in a PDF, all at the click of a button. In Chapter 16, Automation, you’ll use Bridge to apply Photoshop actions.
Exercise 1. Camera Mechanics
Basic operations take place when you create a photograph with your digital camera. There may be many adjustments to the camera that you can make, if your camera gives you control over them. These will have a direct result on the aesthetics of the resulting photograph. Most cameras also have an automatic setting, which lets you simply point and shoot. Even if you’re just pressing the button, each of the following steps will take place. Details about each step are included in Exercise 2.
- Before shooting, consider adjusting the white balance, ISO, and file size settings. Or, just let the camera do that work for you. (Your camera might not allow you to control some of these settings.)
Frame a scene by placing your eye to the viewfinder or by peering at the LCD screen on the back of the camera. Many DSLRs don’t allow use of the LCD during shooting. If you have both options, consider the pros and cons of each (TABLE 4.1).
TABLE 4.1
LCD VERSUS VIEWFINDER: WHERE SHOULD YOU LOOK WHILE FRAMING A PHOTOGRAPH?
This choice is dictated by personal preference and limitations presented by the type of camera you're using. When using my DSLR, I always use the viewfinder. However, on my iPhone, I'm forced to use the LCD.
LCD
VIEWFINDER
Accurately represents the framed image space
Can be slightly inaccurate in consumer cameras due to what is called “parallax” as the viewfinder location is slightly above and to the left of the lens
Can lead to instability: since you'll hold the camera away from your face to see through the viewfinder, the camera is less stable than it would be if you were holding it closer to your balanced body.
Often leads to greater stability: you'll hold the camera to your face while making the photograph. Remember to square your hips and be still while you shoot.
Drains battery power
No extra battery power is required for composing through the viewfinder.
- After the image is framed, decide whether to shoot in automatic or manual mode. Do you want the camera to control the amount of light on the sensor, or do you want to control it by balancing the relationship between the f-stop (the diameter of the aperture) and the shutter speed (the quickness of the shutter release)? You’ll learn more about f-stop and shutter speed settings in the next step.
- Press the shutter release button. Hold the camera tightly and try to eliminate body movement.
- The shutter will open, and the aperture will enlarge or decrease according to the f-stop settings.
- Light will be recorded on the digital sensor.
- The shutter will close based on the duration of time indicated by the shutter speed settings.
- You can preview your image immediately as it is saved on a memory card.
Exercise 2. Camera Settings
The following items are elements you might be able to control when making a photograph. All digital cameras have different user interfaces. I’ve indicated where these items typically appear on the cameras I’ve seen in my classroom. Yours might be different. The best thing to do is read your camera’s manual, or at least view the page containing the illustration of the camera and its settings! Did you lose it (or throw it away with the box)? Most manuals can be downloaded from the manufacturer’s website.
File Size, Compression, and/or File Format. These typically appear in the camera menu or function area.
Even if your camera isn’t terribly fancy, you may have a choice of creating small, medium, or large images, or you might even have a specific set of resolutions, via pixel dimensions or megabytes, to choose from in the File or Camera menu.
You also might be able to choose to shoot in JPG, TIFF, or even RAW mode. Shooting in RAW mode yields the most information and adaptability, but processing a RAW image is outside the scope of this book. (There are plenty of books that deal specifically with Camera RAW, and I encourage photography students to become familiar with these details.) If you can choose between shooting in JPG or TIFF modes, you should know that the JPG will be more compressed (and usually a smaller file size) than the TIFF.
ISO. ISO typically appears in the Camera or Function menu.
The ISO rating is analogous to what was once referred to as the film speed. Silver nitrate is the light-sensitive chemical found in film. The amount of silver in the film stock directly correlates to its ISO rating.
- Low ISO. A low ISO rating (25 or 50 in special films, 100 or 200 in the kind of film you can purchase at the drug store) indicates that there’s little silver nitrate in the film. This in turn means that you’ll need a lot of light in order to register the image on the film. If you’re shooting outside on a bright day, set the ISO to a low setting. What’s the advantage of using a super low ISO setting? In the film world, you’ll see less film grain in the resulting print. In the digital world, the same rule applies—though we’ll just call the film grain “digital noise.” If you’re shooting in a studio and you want to create a high-quality print devoid of noise, use the lowest ISO your camera offers and set up plenty of lights.
High ISO. A high ISO rating (800, 1600, 3200 in special films, 400 in common film stocks) indicates that there’s a large quantity of silver nitrate in the film. This in turn means that you’ll need little light in order to register the image on the film. If you’re shooting indoors, in the late evening, or at night, you’ll probably need to set the ISO to a high setting. The advantages of using a high ISO setting are that you have greater flexibility in low-light situations. However, you’ll see the grain of the film or some digital noise in your files (Figure 4.9).
FIGURE 4.9 Although high ISO settings make it possible to create images in low light, they often result in digital noise. Photograph by Thomas Van Deusen.
White Balance. Along with ISO, this typically appears in the camera or function menu.
Setting the white balance on your camera, if you’re able, will ensure that the whites appear as a true white, and that the rest of the colors in the spectrum of the photographs are not the victims of a nasty “color cast” (Figure 4.10).
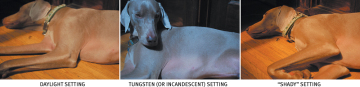
FIGURE 4.10 Three photographs of the same scene made in natural daylight demonstrate the results of different white balance settings. If the white balance setting on the camera does not match the situation, the result may be an unpleasant color cast.
The following are typical (self-evident) setting labels or icons you might find in a menu or function area. Match the white balance lighting to your situation: Auto (A-WB), Daylight (sunshine icon), Cloudy (cloud icon), Tungsten (lightbulb icon), and Night (moon or flash icon).
Aperture. If you can control the aperture, you’ll typically do so with a dial or button near the top of the camera body.
The aperture is the size of the opening that light travels through the lens to the digital sensor. The wider the aperture opens, the more light you’ll send to the digital sensor; of course, the inverse is true, too (Figure 4.11). The aperture’s diameter size is controlled by the f-stop. Here’s the tricky part: the smaller the f-stop number, the wider the aperture is open.
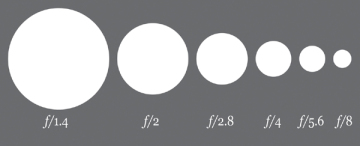
FIGURE 4.11 This illustration demonstrates decreasing aperture sizes. Created by Cbuckley and updated by Dicklyon on Wikipedia.
)
)
)
Depth of Field. When the aperture is wide open (for example, f/2) the resulting image has a small area of focus; a large f-number (for example, f/22) generates a large area of focus in the image. Photographers refer to this optical phenomena as “depth of field.” Shallow depth of field is created with lower f-stop numbers (Figure 4.12), while greater depth of field is seen in photographs made with larger f-stop numbers (Figure 4.13). Figures 4.12 AND 4.13 showcase the results of using lower and higher f-stop values and the types of visual situations where one is preferred to the other.
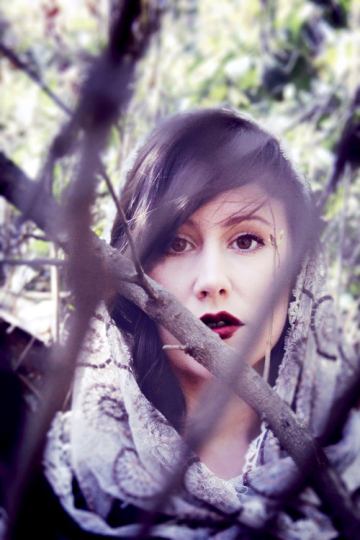
FIGURE 4.12 Lauren Thompson, Snow White series, 2012. In this image, a low f-stop was used to create shallow depth of field. The focus on the figure’s face contrasts with the blurriness of the tree branches she stands behind.
FIGURE 4.13 Tracey Cole, 2012. In this photograph, a high f-stop is used to capture the details in the glass object.
Shutter Speed. If you can control the shutter speed, you’ll typically do so with a dial or a button near the top of the camera body.
- The shutter speed indicates how quickly (or slowly) the shutter will open and close. In automatic mode with a reasonable amount of light, the shutter will probably release at about 1/60th of a second.
Anything above 1/60th of a second (which might just be indicated by the number “60” on your digital camera) is considered somewhat fast. A fast shutter speed will appear to “freeze” time, allowing viewers to see a moment that often escapes us. A cup filled with liquid in midair, for instance, can be recorded before it spills (Figure 4.14).
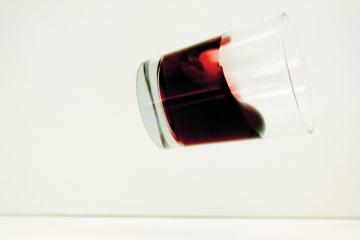
FIGURE 4.14 Ashley Tingley, Untitled, 2012. Photographs captured at a fast shutter speed appear to freeze time.
A slower shutter speed (1/15th of a second, 1/8th of a second, or more) will result in images that record subject matter movement. In Figure 4.15, the musicians and lights are blurred as they move rapidly on the stage.
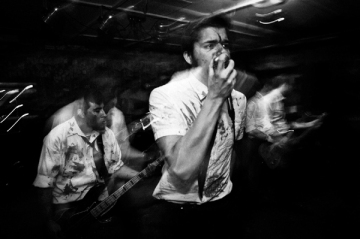
FIGURE 4.15 David Le, Untitled, 2012. Slower shutter speeds record movement.
- Exposure Value (EV or E/V). If you can’t control the f-stop or shutter speed, you may be able to alter the exposure value, typically accessed by a button on the back of the camera near the LCD. This button will normally allow you to take a photograph with slightly lighter and darker exposure values. On some cameras, you can press a Plus (+) or Minus (-) button; on others, you just spin a dial to move across a sliding scale. Altering the exposure value is an essential skill to learn so you can bracket your exposures while you’re still learning to create photographs.
)
)
)
Exercise 3. Bracketing
Like the rule of thirds (see Exercise 5), bracketing is one of the first lessons new photographers learn. Since you’re drawing with light when you create a photograph, the exposure of light that you set in your camera has one of the biggest visual impacts on the photograph. Bracketing is a method of increasing and decreasing the exposure value on the same scene in order to understand the visual results of an array of exposure values in a particular lighting situation. If you’re new to photography, bracketing in as many lighting situations as you can will help you understand how light will register in the visual image made by your camera.
On any camera where you can control the exposure value, use the bracketing technique by shooting the same scene at least three times (TABLE 4.2). First, take a photograph using the most accurate exposure value according to your light meter (built in to DSLRs or likely whatever the automatic mode will indicate on consumer cameras). Then create another photograph of the same scene with one stop of additional light (a single shutter speed setting or f-stop setting). Follow this by creating one more photograph of the same scene by decreasing the amount of light to the sensor by one stop (a single shutter speed setting or f-stop setting in the opposite direction), starting from the “center” or original metered reading (Figure 4.16).
TABLE 4.2
|
COMMON BRACKETING SETTINGS |
||
|
If you can control the f-stop and shutter speed settings, use the following list. |
If you simply have the Exposure Value (EV or E/V)button on your camera, use the following list. |
|
|
DSLR |
consuMer caMera |
|
|
Photo 1 |
Use the most accurate exposure value according to your light meter. You may need to manually adjust your shutter speed or f-stop value, or both, to achieve a balanced meter reading. |
Use the most accurate exposure value according to your light meter. You'll probably see in the Exposure Value (EV or E/V) area of your camera settings that there's a dotted or dashed line, or perhaps a series of vertical straight lines with an indicator (a dot, usually) of the current exposure value. In automatic mode, the exposure value will likely fall in the center of the line. Pressing the EV button (or spinning a dial) will let you register that dot to the right or left of the center mark, which increases or decreases the exposure value. |
|
Photo 2 |
Lighten the exposure value by one f-stop or by one notch on the shutter speed scale. For instance, if Photo 1 was taken at 1/60th of a second, take Photo 2 at 1/30th of a second to lighten the exposure value by one notch down on the shutter speed scale. (The shutter will remain open longer, allowing more light to register on the digital sensor.) Or, if Photo 1 was taken at f/5.6, take Photo 2 at f/4 to increase the amount of light through a wider aperture. |
Lighten the exposure value by one notch to the right of the center on the exposure value line. You'll have to figure out how to add and subtract a notch on the EV scale. |
|
Photo 3 |
Now decrease the exposure value. Create a photograph that's darker by one f-stop or one notch on the shutter speed scale. For instance, if Photo 1 was taken at 1/60th of a second, take Photo 3 at 1/125th of a second to darken the exposure value by one notch up on the shutter speed scale. Or, if Photo 1 was taken at f/5.6, take Photo 3 at f/8 to decrease the amount of light through a narrower aperture. |
Darken the exposure value by one notch to the left of center on the exposure value line. |
)
FIGURE 4.16 Bracketed photographs. If you’re only bracketing with three images, watch out for digital cameras that include half-stops. It’s best to bracket at least five or eight times if you’re brand new to the concept. You’ll learn how your camera operates by experimenting.
Exercise 4. Before You Shoot
Before you take off with your camera for a photography session, set aside an intentional moment where you consider some of the camera settings that may not change throughout your shoot:
Prepare for the lighting situation: Is it daylight? Is it near evening?
- Set the ISO for the amount of light you expect to capture.
- Set the white balance for the type of lighting condition.
Where will the photographs be published or printed? Do you need high-resolution images or are these just “practice shots?” Will the photographs be published strictly on a website?
- Set the image size or resolution. (Use the largest size if you plan to print your images, and a medium or smaller size for experiments or web content.)
- Set the format of the file. Use RAW only if you know how to process the RAW formatted images. If this is currently beyond your expertise, it may not be worth saving such large image sizes at this point in time.
- If you have the option, do you want to shoot in full manual mode, shutter speed priority, or aperture priority? Set the mode now.
Exercise 5. Rule of Thirds
As you’ve seen, the rule of thirds is a compositional concept that photographers use while framing the image during its production. Some cameras have a rule-of-thirds grid that you can superimpose in the viewfinder to see the guides while you’re creating the photograph. In this exercise, you’ll see how to use this compositional structure in Photoshop to assist you during post-production editing.
- Open the file dog-beach.psd from the rule-of-thirds folder.
- I’ve purposefully selected a lousy composition for you to work with in this exercise. Where are the first and second focal points? What’s happening at the edges of the frame? Notice that the middle dog and the large branch are two main areas of focus. Where are they positioned in the frame? The top of the frame is full of distracting information: the cone, the volleyball net, and the houses in the background are all unnecessary to the activity in the primary focal area. In the next step, you’ll reframe this image.
Choose the Crop tool from the Tools panel and set the tool options to Unconstrained and View: Rule of Thirds (Figure 4.17) in the Options panel.
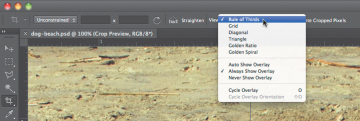
FIGURE 4.17 The rule-of-thirds grid can be viewed by using the Crop tool.
Pull the Crop anchor at the middle of the top frame down so the top of the frame touches the tip of the red dog’s tail (Figure 4.18).
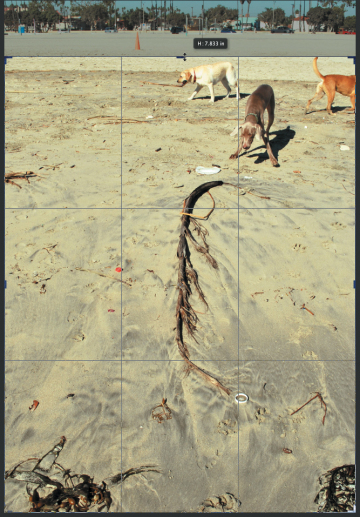
FIGURE 4.18 Adjust the Crop anchor to eliminate distracting information.
Notice where the rule-of-thirds guides are located on the image. The branch is located precisely in the central square. You’d rather see main elements on one of the vertical or horizontal lines than inside what would be a cell if you think of the grid as a table. Move the crop guide on the left edge of the frame toward the middle of the image until the branch is more or less aligned on the left vertical rule-of-thirds guide (Figure 4.19).
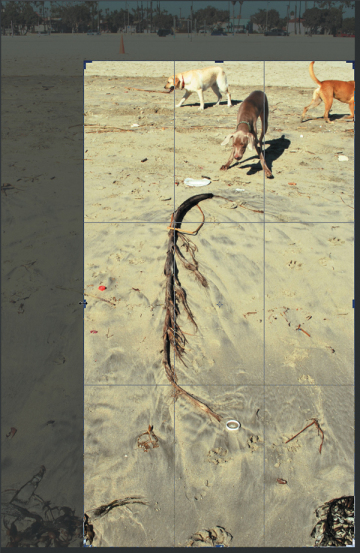
FIGURE 4.19 Align the subject on the rule-of-thirds grid.
Let’s eliminate some of the bottom area of the image, just as you did with the top—the information at the bottom is simply distracting the viewer from the activity. Move the bottom crop guide toward the top of the image, keeping the idea of a two-thirds to one-third compositional ratio in mind. I adjusted the bottom crop guide so that the Weimaraner’s front left paw is planted on the top horizontal guide (Figure 4.20).
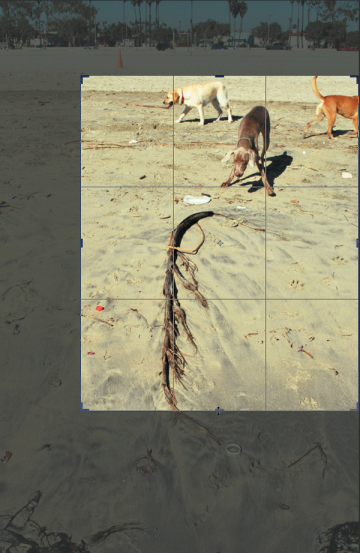
FIGURE 4.20 Pay attention to the edges of the photographic frame when cropping the image.
You can continue to adjust the crop guides until you’re satisfied with the crop. Notice that while you’re cropping the image, the Layers panel indicates that you’re in a Crop Preview (Figure 4.21). Press the Commit Current Crop Operation button in the Options panel when you’re finished (Figure 4.22).
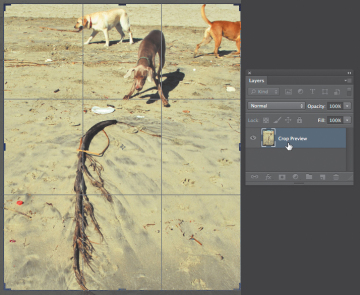
FIGURE 4.21 The Layers panel will display the layer as Crop Preview while you’re working with the Crop tool.

FIGURE 4.22 Starting with Photoshop CS6, you have the option to retain or delete cropped pixels. I prefer to retain pixel information, so I leave the Delete Cropped Pixels button unchecked, as seen here. Click the checkmark icon to exit the Crop tool or press the Return key.
)
)
)
)
)
)
Save the file as dog-beach-cropped.psd to complete the exercise.
Exercise 6. Bridge Workspaces
For the following exercises, you may use the images from your photo shoot or the series of photographs in the batch-rename folder. To demonstrate the following exercises, I used 12 daguerreotype photographs taken by Mathew Brady with the words “unidentified woman” in the title, which I downloaded from the Library of Congress website. Place the files in one easily accessible folder. I copied mine to a chapter04 folder on my desktop.
Launch Bridge from the Mac dock or the PC Start menu, as you would open any other application. However, if you’re opening Bridge, you probably have a particular set of files in mind that you want to review. An easy way to get into Bridge is to drag and drop the file of folders you want to view directly on the Bridge application icon. This method of opening the application forces a specific set of images to be on view immediately, once Bridge is open. Drag your folder of photographs on the Bridge icon (Figure 4.23).
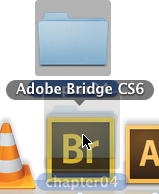
FIGURE 4.23 Open a folder by dragging it onto the Bridge icon.
- To ensure that your screen looks similar to mine, choose the Window menu > Workspace > Essentials.
Notice that the content of the folder you dragged on the Bridge icon appears in the main window (the second of three columns) beneath a tab labeled Content. The file path to this content appears on the top left of the application window (Figure 4.24).

FIGURE 4.24 In Bridge, the file path to items in the Content area is a reminder of the location of files on the hard drive.
- The top of the first column holds a set of tabs for Favorites and Folders. If your folder isn’t displaying in the Content area, you can use one of these two tabs to navigate to the folder you want to view. (For instance, if your folder is located on the desktop, you can click the Desktop button from the Favorites list and then double-click the appropriate folder in the Content area.) Locating your files within Bridge is essential because you won’t be able to do anything to your files unless you can see them in the Content area.
Drag the slider in the lower right of the Content area to enlarge or decrease the thumbnail view of your files (Figure 4.25). Since I only have 12 files in my folder, I zoomed out enough to see all of them on the screen at once.
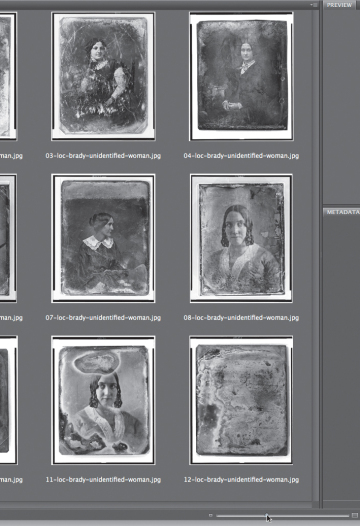
FIGURE 4.25 You can use the slider near the lower-right corner of the Content area to increase or decrease the size of the thumbnails.
The column on the far right contains the Metadata tab. This provides you with the most information about your files. Click once on any of the images in the Content area—be careful not to double-click, as this may open your file in another application! Meta information (or information about the selected file) appears in both the Metadata Placard (Figure 4.26) and the File Properties menu. The Metadata Placard is especially helpful if the images were created on a digital camera that stores metadata within the image file. (For instance, digital single lens reflex cameras will store this information.) If the files were downloaded from a website (as mine are), the Metadata Placard won’t show as much information. However, the File Properties menu will enable you to learn about the file’s format (or document type), size, pixel dimensions, color mode, and more (Figure 4.27). Quick access to this type of information can be extremely helpful when you have a folder with many similar files.
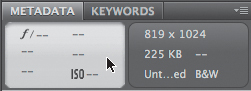
FIGURE 4.26 Information about the file appears in the Metadata Placard. If I’d used my DSLR to take these images, I would also see f-stop, shutter speed, and ISO information.
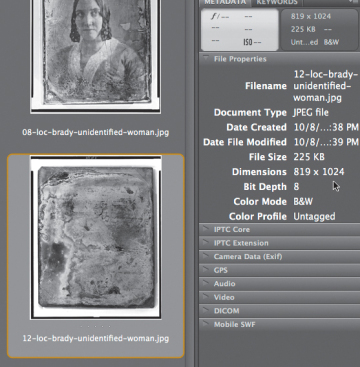
FIGURE 4.27 When a file is selected, its properties appear in the Metadata Placard.
)
)
)
Be Careful!
Double-clicking on a file in Bridge may open that file in a different application, such as Photoshop or Illustrator. You can alter these settings in the Preferences dialog, Command( )-K, by selecting File Type Associations from the list in the left column and choosing an application to open for files in the JPG (or other) format.
Exercise 7. Batch Rename
The tool I use most in Bridge is Batch Rename. This command lets you assign a new file name to a group of files. You can rename an entire folder of files or just a few files selected within a folder.
Key Commands
Press -A to select all the files in the folder (that is, all files present in the Content area). Use the Shift key to select files that are next to one another. If you accidentally include a file in your selection, hold the Command key while clicking on it once to deselect it from the group.
The file names that I’ve assigned to the 12 photographs are long. I included a number, the source (“loc” for “Library of Congress”), the photographer’s last name, and the name of the series. Let’s assume that you’re going to select half of these original files to modify in your own work. You want a new folder for your work, and you want to rename the files with your first initial, last name, and a sequence number (for example, x-burrough01.jpg). Before running a batch rename, decide on a system for renaming the files. Start by selecting the files you want to use. In this hypothetical situation, I’ll select every other file by holding the Command key as I click on each of them in the Content area (Figure 4.28).
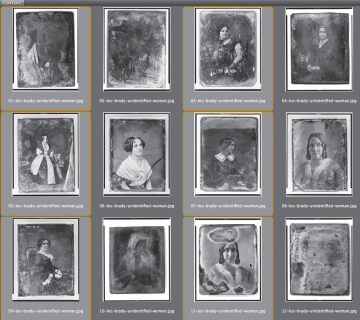
FIGURE 4.28 To select multiple files in a row, press the Shift key and click from the first to the last file. To select multiple files that are not positioned next to each other, press the Command key while clicking one time on each image.
- With the files actively selected (you’ll see an outline around the selected file thumbnails), choose the Tools menu > Batch Rename. In the Batch Rename dialog box, you’ll make several choices as follows.
In the Destination Folder area, press the radio button next to “Copy to other folder” because you are going to create a copy of the original files with a new name. Press the Browse button, locate your chapter04 folder (or the folder where you’re saving the images in the Content area), press the New Folder button, name the new folder (Figure 4.29), and then press the Open button.
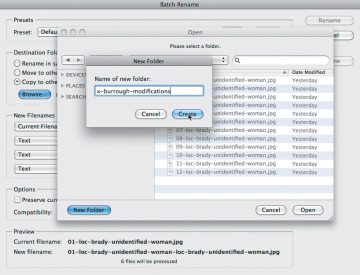
FIGURE 4.29 Create a new destination folder during the Batch Rename process.
In the New Filenames area, I pressed the small Minus (-) radio button to the right of several of the Filenames fields (Figure 4.30). The original file name was lengthy, and I find it easier to start anew.
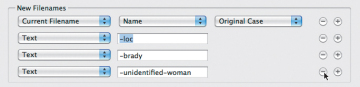
FIGURE 4.30 Rename files using the new filename fields. Add and delete fields by pressing the plus and minus icons to the right of each field.
Change the first Filenames field to Text and then enter the first initial of your name followed by a dash (-) in its field (Figure 4.31).
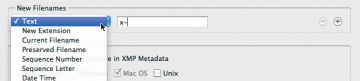
FIGURE 4.31 Change the first filename field to Text.
Press the Plus (+) radio button to the right of the first Filename field you just set to add more information to the filename.
Select the Text option again and enter your last name in the field. Press the Plus button (Figure 4.32).

FIGURE 4.32 Add an additional filename field after the second one by clicking on the plus icon.
Choose the Sequence Number option from the pull-down list. Be sure the numbering starts with “1” and choose Two Digits from the pull-down list to the right of the field (Figure 4.33).
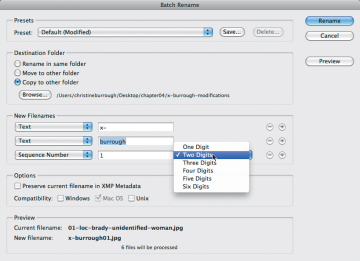
FIGURE 4.33 If it’s possible, you’ll end up with more than 99 images, so choose a name with three digits. A folder with fewer than 99 files should be saved with two digits if you’re using sequence numbers in the name in order to keep the 10th through 99th files organized. You can see the file path to the location of the saved new folder next to the Browse button in the Destination Folder area. Also, you can see a preview of the new file names in the Preview area.
- Review your selections. You should see the proper file path to the new folder. An example of the new file names appears at the bottom of the dialog box, as well as a message about how many files will be renamed. If all of this seems accurate, press the Rename button.
Scroll down in the Content area if you need to and find the new folder you created. Double-click the folder to open its contents. You should see your six renamed files in the Content area (Figure 4.34).
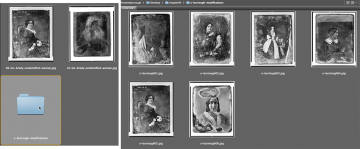
FIGURE 4.34 Double-click the folder (left part of the screenshot) in the Content area to open its contents (right part of the screenshot). Notice the file path at the top of this window area.
)
)
)
)
)
)
)
Exercise 8. Generate a PDF to Showcase Your Files
If you had one or several sheets of negatives to preview, you’d go to the darkroom, press the negatives directly onto a sheet of sensitized photographic paper with heavy glass, and expose the glass-negatives-paper sandwich with the light of an enlarger. The resulting proof is called a contact sheet because of the direct (negative in contact with the paper) printing process. Digital images can be previewed on the camera, so in a sense the need for contact sheets is not terribly urgent. Yet it’s extremely common to share a set of images, mock-ups, or compositions with others in a single file. Earlier versions of Photoshop (before CS4) included an automated process for creating these types of documents, aptly titled Contact Sheet. Starting with CS4, the Contact Sheet automated task was transferred to Bridge. In the following exercise, you’ll create a PDF of thumbnail (or larger)-sized images using Bridge’s Output Workspace.
- View the contents of your chapter04 folder (my set of 12 images or your own photos) in Bridge. I had to choose the View menu > Show Reject Files to see all 12 images. You may also see the folder you created in Exercise 3.
Press
-A to select all the files. Press the Command key while deselecting the folder or any other files you don’t want to include in the PDF (Figure 4.35).
FIGURE 4.35 To select all the files without selecting the folder press
-A (to select all) and then hold the Command key while clicking once on the folder to deselect it. Click and drag to move the files into the deselected folder.- Notice that the selected items appear in the Preview tab in the top-right column.
Press the Output button in the top-right area of the application window or choose Window > Workspace > Output (Figure 4.36). Notice that the layout of the tabs in Bridge changes. The selected content items are organized in a single row along the bottom of the application. The main area is reserved for the Preview tab. The right column is dedicated to the Output tab and menus beneath it.
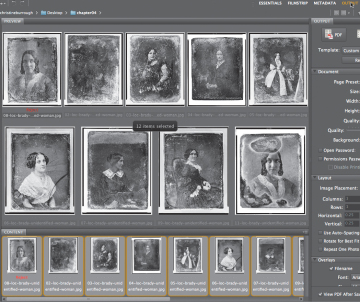
FIGURE 4.36 Select files in the Output workspace to save them as a PDF.
Starting at the top of the Output tab, make the following selections:
- Press the PDF button. (It’s selected by default.)
- In the Document menu, choose a page preset (I selected US Paper), a size (Letter), and set the Quality slider to the resolution of your choice. If you’re just sharing files for a screen presentation, you can set the resolution as low as 72 or 96 DPI. I typically ask students to set the quality to 150 DPI so you can zoom in on images without seeing them pixelate during a critique session.
- In the Layout area, set the number of columns and rows you want to see. The more columns and rows you choose, the smaller the images will be on the page. I set mine to 2 by 2 and checked the Use Auto-Spacing box.
The Overlays area lets you include a file name with your image. I keep the box next to Filename checked, because I like to see the filename so I can check how my students are naming their files (Figure 4.37). Also, it easily allows you to reference an image by name, rather than by description.
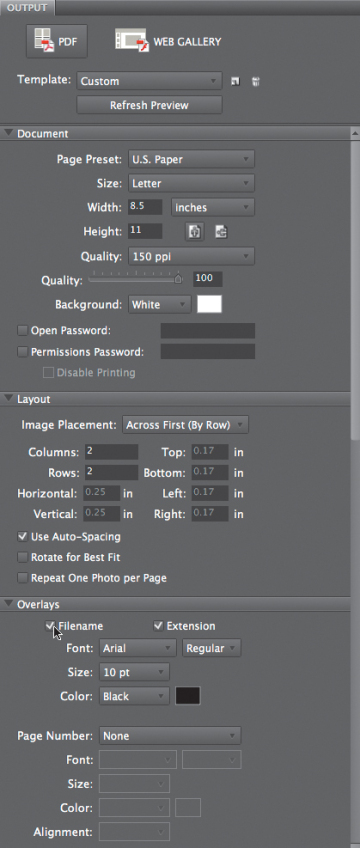
FIGURE 4.37 Modify the Output panel to customize your PDF. I tend to keep Overlays active in order to see the file name beneath each thumbnail in the PDF.
Scroll down in the Output area. I don’t often use the Header, Footers, Playback, or Watermark menus, but they’re clearly labeled should you want to add those features to your document. You can collapse the menus you don’t want to use by pressing the sideways arrow to their left (Figure 4.38). Finally, check the View PDF After Save box and then press the Save button.
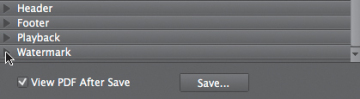
FIGURE 4.38 Collapse areas of the Output panel that you’re not using by clicking on the sideways arrow to the left of the menu name.
- Save the PDF in your chapter04 folder. Open it if it doesn’t open automatically (if you forgot to check the View PDF After Save button, for instance) and preview your files.
- Check the PDF file size on your operating system. On a Mac, you can see the file size by viewing the files in list format or by clicking on the file once and then choosing File menu > Get Info in the Finder or Desktop area. On a PC, you can right-click the file and view the file size in the Properties area. Since I set the resolution to 150 DPI (which is relatively low), my document showcasing 12 images is less than 4 megabytes—a reasonable size for emailing or uploading the file.
)
)
)
)
)
)
)