This chapter is from the book
This chapter is from the book
This chapter is from the book
Mixing Sound
You have adjusted the gain of your clips and they are starting to sound OK. However, you’re not done; you need to do more to your clips. Maybe some parts of your clips are still a little too loud, or maybe some of the different sounds on the different tracks are competing with each other. You need to make sure that this is not an issue, so you need to start mixing sound. To help you with this task, use the Audio meters (VU Meters).
VU Meters
A VU meter lets you see how loud (and soft) your audio is. You need to constantly monitor how loud your audio is not only to maintain uniformity, but also to make sure that your audio does not clip: If the audio is so loud that the media cannot reproduce it, you’ll end up with a clip lacking in dynamics, or a “square” instead of a wavy waveform, and the result will be distorted audio, which of course is highly undesirable (Figure 4.13).
)
Figure 4.13 Waveforms with square or “flat” areas at the top usually mean clipping/distortion has occurred.
Clipping
To better understand how clipping negatively affects your audio, follow these steps.
- Open the project Chapter04_Audio.prproj, and then open the sequence named Clipping. The sequence contains two different clips.
- Listen to the first clip; it hasn’t been processed.
- Listen to the second clip; it’s been processed through gain.
In the second clip you’ll notice that there are less dynamics and that the audio goes into the red in the VU meter. The sound is also harsher and distorted in this second clip.
Dynamic range
All audio material has a DR. DR is the difference between the loudest and the softest part of your audio, and is measured in decibels. Depending on which genre of audio you’re working with, you’ll need to have a wider or narrower DR, so keep this is mind. As mentioned earlier, Classical music, for example, will have a much wider DR than Pop or Rock.
To see this DR, you need to use the VU Audio meters.
- Open Chapter04_Audio.prproj, and then open the sequence named Dynamic Range. The sequence contains two different clips.
- Listen to the first clip and then the second clip. As they play, look at the Audio meters. The first clip has a DR of -28dB to -6dB. The second clip (through compression, described later in this chapter) has a DR of -16dB to -12dB.
Adobe Premiere Pro’s VU meter (Figure 4.14 on the next page) defaults to a 60dB range, displaying dynamic peaks, and shows color gradients that correspond to the audio levels. A gradient that progresses from green to yellow to orange to red indicates low audio levels, normal audio levels, and peaking audio levels.
)
Figure 4.14 Audio VU meters provide a clear view of your audio peaks and your DR.
You can customize the audio track meter by right-clicking and choosing one of the available options. Some of the options will be grayed out, depending on the type of audio master that you are using. Some of them are available only to 5.1 surround masters, or adaptive tracks. I prefer showing static peaks and valleys, and not showing the color gradients. This lets me see with more detail what my levels are and what my DR is. I use this information to help me set my levels (Figure 4.15). These options are

Figure 4.15 Right-click on the VU meter and customize its display by choosing from these options.
- Show Valleys. Displays an indicator on the audio track meter that corresponds to the lowest audio amplitude in the portion of the clip that you play back. This is effectively the noise floor. You should know what the noise floor is because it will help you determine the DR.
- Show Color Gradient. Indicates track meter levels in a gradual gradient rather than hard color changes, although in such a small meter the difference is very subtle. Showing the color gradient is a little softer on the eyes, and it is fine if you don’t need to be very precise with the levels. I usually leave these off. However, I’ve met several editors who prefer to see the color gradients here.
Solo in Place. Allows you to solo one or more channels without changing their speaker assignment (available for Source Monitor and Timeline panels). You may want to use this option if you need to temporarily listen to just one or some of the channels. When you select this option, you’ll see solo buttons at the bottom of the VU meters, one per channel (Figure 4.16).
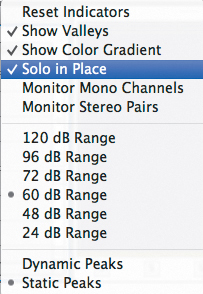
Figure 4.16 You could change which channels you are listening to by choosing one of these options.
- Monitor Mono Channels. Allows you to listen to one specific channel out of both of your stereo monitoring speakers regardless of its assignment (available for adaptive clips and multichannel masters). You may want to use this option if you need to temporarily listen to just one of the channels. When you select this option, you will also see solo buttons at the bottom of the VU meters, one per channel. However, you will be able to solo only one of the channels at a time.
- Monitor Stereo Pairs (default option). Allows you to monitor some of the channels from the left and right speakers (available for multichannel masters).
- 120–24 dB Ranges. Allows you to change the decibel range from six options that range from 24dB to 120dB. You may want to change this range depending on how precise you need to be with your audio levels. Obviously, if you select the 120dB range, you will be able to more accurately see your level values than if you selected the 20dB range.
- Dynamic Peaks. Allows you to see the max peak of the audio change depending on the part of the clips you are listening to. Levels are constantly refreshed every three seconds.
- Static Peaks. Displays the loudest peak until the indicator is reset (by clicking on the meter) or playback is restarted.
- Reset Indicators. Resets your indicators.
Close-Up: Audio VU Meter Target

Setting and monitoring audio levels in your program requires more than just making sure the audio is not too loud so it doesn’t distort Audio target levels differ depending on how you will deliver the final product. The Loudness Radar effect (discussed later in this chapter) will help you tremendously to achieve target levels. Here are two common targets:
- Broadcast. Traditionally, many broadcasters have maintained strict audio level requirements of -10dBFS for peak audio with average audio levels at -20dBFS. But some broadcasters are allowing editors to “work hot” and submit video with audio that has non-broadcast peaks of -3 or -6dBFS. Always check with your broadcaster because its requirements will vary.
- Non-broadcast. Similar to how online video delivery doesn’t have a hard 100 IRE limit, online audio delivery doesn’t have a set peak limit. Therefore, I recommend limiting audio peaks to somewhere around -6dBFS and have average audio levels around -12dBFS.
Level Adjustment in the Timeline
By default Adobe Premiere Pro is set up to show clip keyframes, which, as discussed earlier, also means that audio adjustments you make on the Timeline affect individual clips (not the entire track).
You can adjust the volume level of an individual clip by hovering your pointer over the volume band until it changes to a volume band pointer (Figure 4.17). Then drag the volume band up to increase the volume by up to 6dB or down to lower the volume to -∞. This adjustment affects the volume for the entire clip that is selected (if it doesn’t have any existing keyframes). But often you’ll want to make changes to the volume of a clip over time; you can do this by adding keyframes. This can be useful to fade in and out audio clips or to adjust for loud or soft sections in an individual clip.
)
Figure 4.17 You can change the volume levels of your clips by dragging the volume band up or down.
You can add clip keyframes either in the Timeline or by using the Effect Controls panel. If you’re working in the Timeline, you can add, select, move, and remove keyframes using the Pen tool.
Select the Pen tool (press P) from the toolbar (Figure 4.18).
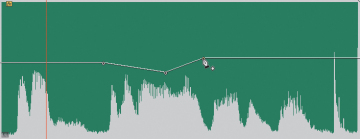
Figure 4.18 You can balance the audio levels over time by adding keyframes in the Timeline.
- Play the Timeline and determine the points in time at which you need the audio to become softer or louder. Then click on the band to add the keyframe.
- Using the Selection tool, drag individual keyframes or sections between keyframes up or down to increase the clip volume at that point in time.
- Play back the audio clip, and look at the peaks and valleys of the audio in the VU meter.
- In some cases you’ll need the same keyframes in more than one place or in more than one clip. You could have more than one track or music or dialogue that requires the same changes in volume. You could copy these keyframes and then paste them as needed, either to the same clip in a different point in time or to a different clip.
)
)
)
Other ways of adding keyframes
Here are a few other ways you can use to add keyframes to the Timeline:
- Use the Selection tool instead of the Pen tool by holding down the Command (Ctrl) key and clicking on the points at which you want to add a keyframe along the clip’s volume band (also known as the rubber band).
- Use the Add/Remove Keyframe button.
- Adjust the audio volume of a nonselected clip by using the [ and ] keys . If the playhead is on a keyframe, you will adjust that keyframe only. If the playhead is not on a keyframe, you will adjust the span between keyframes
- Quickly reset keyframes by clicking on clip(s) and choosing Clip > Remove Effects.
Keyframes in action
To get a practical understanding of how to use keyframes, follow these steps.
- Open the project Chapter04_Audio.prproj, and then open the sequence named Begin Keyframes.
- Play the sequence. You will hear that the music fades as the voice starts.
- If necessary, expand the track; then notice that some keyframes were added.
- Play the sequence again and listen to the audio levels as the playhead goes through the sections with keyframes.
- Add other keyframes to make the audio get louder and softer over time.
Track Keyframes
Track keyframes are identical to clip keyframes except they are applied to the track, not to the clip. So, if you were to move, remove, or change a clip in the Timeline, these keyframes would remain unaffected and would apply to any clip placed in the track where the keyframes are located. I’ll discuss track keyframes further in the “Track Mixer” section later in this chapter.
Crossfades
Crossfades are the gradual lessening of the audio volume in one clip at the same time as the gradual increase of the volume of a different audio clip. They are used in two different ways: to fade in between two clips and to fade up from silence. It is common to fade a clip up from silence at the beginning and fade down to silence at the end because not doing so may cause the sound of those clips to “pop” in and out (there might be loud ambient sound or a loud first sound in the clip). This means that you would need to fade in and out every audio clip in your entire program.
To avoid manually keyframing these clips, you usually use crossfades. An audio crossfade is a transition, a lot like a video crossfade, that is used instead of manually keyframing the clips to fade them up from or down to silence.
Open the project Chapter04_Audio.prproj, and then open the sequence named Crossfades. Play the sequence. You’ll notice that there are crossfades added to the first clip in the Timeline and that it fades in at the beginning and out at the end.
If both clips are adjacent in the same track, you can easily add a crossfade by adding a transition: Adobe Premiere Pro creates the overlap from handle media, and a single transition will suffice for the edit point. You can see an example of a crossfade on the next set of clips in the Crossfade sequence. Notice how the crossfades affect the audio. If the clips are in two different tracks, you can still use the audio transition, but you need to ensure that the clips overlap by the amount of time that you want the crossfade to last. Of course, you can also use keyframes to accomplish the crossfade. You can see an example of crossfades that exist between clips in different tracks in the next set of clips in the Crossfade sequence.
For multiple clips
To add crossfades to multiple clips at the same time, adjust the default transition duration for the audio crossfade first and then use the transition. You can change this value by choosing Preferences > General and changing the Audio Transition Default Duration (Figure 4.19). Because I prefer a fast crossfade, I usually set this value to between 0.10 and 0.17 seconds, which in NTSC will give me a duration of three to five frames.
)
Figure 4.19 You can adjust the default duration of the audio transition by accessing the General preferences and changing the time duration.
Then select the clips you want to affect and choose Sequence > Apply Audio Transition (Figure 4.20).
)
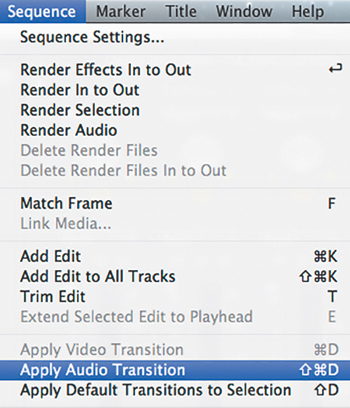
Figure 4.20 You can apply audio transitions to your selected clips by choosing Sequence > Apply Audio Transition.
When you’re doing crossfades, avoid these two mistakes:
- If you made your cuts a little too close, the audio might fade out too soon.
- If you do a crossfade in between two clips, you may be adding unwanted sounds, because Adobe Premiere Pro will add enough frames to the edit to create the crossfade.
Exponential Fade, Constant Power, Constant Gain
As you may already know, there is more than one type of crossfade. The difference is in the rate of change of the levels during the transition. You should use Exponential Fade when coming up from silence and Constant Power when using a crossfade in between two different clips. The different types of crossfades are
Constant Gain. Changes the audio at a constant rate. This is not very natural, which is why it is not used much (Figure 4.21).
Figure 4.21 Constant Gain changes the audio at a constant rate.
Constant Power. Creates a slow fade that gradually changes to a faster rate of change when fading out. When fading in, the opposite occurs: Constant Power increases the rate of the audio and then as the fade progresses the rate of change slows down. This causes the levels to not “lose power” during the transition, which is what would have happened if you had used Exponential Fade (Figure 4.22).
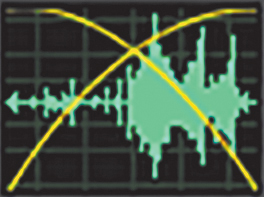
Figure 4.22 Constant Power changes gradually and then speeds up the rate of change.
Exponential Fade. Uses a logarithmic curve to fade up and down. It is very similar to the Constant Power fade but is more gradual. This is more natural to your ears because this is how you naturally perceive sound (Figure 4.23).
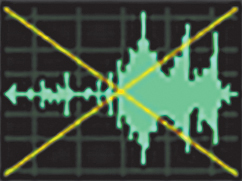
Figure 4.23 Exponential Fade uses a logarithmic curve to fade up and down. The fade is slower at the beginning but gets faster in the middle of the duration of the transition.
)
)
)
Noise Floor/Room Tone
All rooms have a “sound,” or “room tone,” that is generated by lights, furniture, and even the people in it. No place is totally silent (unless you’re in a vacuum). You should record at least 20 seconds (at the very minimum) of this room tone (make sure you record it during production). Mixing it with your clips on a separate track will help you create the illusion of evenness.
TIP

No room tone? Find the longest amount of silence in a spoken track for a minimum of one second. Place this little audio piece into its own sequence and then reverse it. You now have at least two seconds of room tone and don’t have to play games with crossfades to make it work. Build 30–40 seconds and you can add it to your clips as needed.
Panning
Panning places the signal anywhere between hard left and hard right in a stereo recording (or in any of the channels of a 5.1 surround panning). It is used to give the perception of depth and space (Figure 4.24). In other words, panning will give listeners a better illusion that they were present during the events presented in your program.
)
Figure 4.24 Adjusting the pan of a stereo clip adjusts both channels. However, adjusting a mono clip’s pan adjusts independently by clip or track.
For example, if you see a car moving from left to right, the sound should move from left to right following the car. Panning accomplishes that through animating (keyframing) the panning so that the sound goes from one channel to the other gradually, just like the sound of the car would travel from one side to the other in real life.
You can adjust panning on a global basis, or you can animate it (as just explained in the preceding moving car example). Most of the time I’ll set panning to about 30 percent into a channel (rarely any more than that). I won’t go all the way to 100 percent unless the sound is coming from offscreen.
In my experience, the following is usually true:
- True stereo recordings (most commercially available music) will not need any panning modification.
- Voice-overs will almost always be right in the center.
- Interviews can pan (a little) to the left and right to correspond with the speaker’s positioning on the screen.
- SFX will also correspond to whatever on the screen is producing the sound.