- Listening Environment
- Gain and Levels
- Timeline Interface
- Mixing Sound
- Mixers and Submixes
- Audio FX
- Adobe Audition
This chapter is from the book
This chapter is from the book
This chapter is from the book
Mixers and Submixes
Mixing audio on the Timeline alone can be restrictive, especially when you’re trying to mix down several different clips and audio on multiple tracks. For more advanced audio mixing controls, Adobe Premiere Pro CC offers two different audio mixers that you can use to speed up and increase your control over the audio mixing levels.
These mixers are the Audio Clip Mixer and the Audio Track Mixer. You use the Audio Clip Mixer when you need to change the levels of individual clips on a clip-by-clip basis. You use the Audio Track Mixer when you need to change the levels of audio on a track basis, when you don’t need the changes to travel with the clips in case you need to replace the clips with different ones. Track and clip keyframes were discussed earlier in this chapter.
Clip Mixer
The Audio Clip Mixer is a new feature in Adobe Premiere Pro CC that allows you to view and adjust audio on a clip-by-clip basis. You can access this new window by choosing Window > Audio Clip Mixer or by pressing Shift+9.
Using the Audio Clip Mixer (Figure 4.25) lets you monitor and adjust individual clips on the go, even if they are in the Timeline. If you play your program in the Timeline and use the Audio Clip Mixer to adjust levels during the playback, the Clip Mixer will affect the clips as you hear the audio being played from the Timeline. You’ll be able to perform changes on the fly. Any changes you make to the volume of the clip using this tool will be reflected in the Timeline volume line (rubber band). When you’re using the Clip Mixer, note that only the clip is affected, not the track (the Track Mixer affects the track level).
)
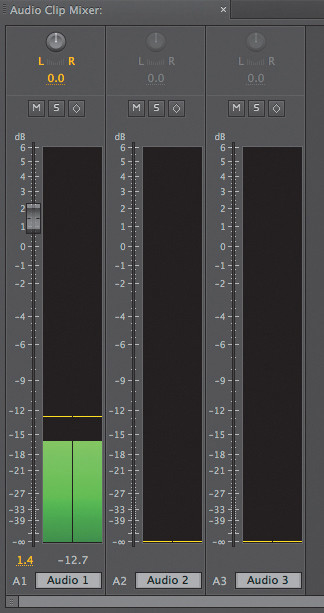
Figure 4.25 Using the Audio Clip Mixer allows you to add clip keyframes in real time as you listen to the clip being played in the Timeline.
As you move the playhead along, tracks that contain audio clips will become available to control; the controls for those tracks that don’t contain audio clips will be grayed out.
TIP

When you stop recording keyframes in the Audio Clip Mixer panel, Adobe Premiere Pro creates a final keyframe at the point in time where you stopped. This keyframe is often an abrupt change from the next-to-last keyframe, so I recommend deleting it. Simply select that keyframe and then press the Delete key.
To better understand how the Audio Clip Mixer works, follow these steps.
- Move the playhead to the spot in the Timeline where you want to start your changes.
- In the Audio Clip Mixer panel select the keyframe icon for the tracks that you want to affect. Remember that although this selection is on a track-by-track basis, the adjustments made are applied to clips, not tracks.
- Mute any tracks you don’t want to hear or solo a single track if you need to.
Start playback, move the volume level up and down, and pan left and right as desired.
When you stop playback, keyframes will be added.
- Adjust the keyframes if needed, or even record a second pass.
- Play back and enjoy your work!
Audio Clip Mixer practice
To better understand how the Audio Clip Mixer works, follow these steps.
- Open the project Chapter04_Audio.prproj, and then open the sequence named Clip Keyframes.
- Open the Audio Clip Mixer panel and click the Write Keyframes icon.
Play the Timeline, and as it plays, adjust the Volume fader.
Notice that when you’re done, keyframes are on your clip (if you do not see them, make sure Clip Keyframes is selected in the audio track header).
Track Mixer
The Audio Track Mixer has Volume and Pan controls, and it will add keyframes, but instead of making changes to a clip it makes changes to the audio tracks. I usually use these track keyframes in conjunction with clip keyframes. If I’m editing a segment with a voice-over preceded by music, I’ll add track keyframes to fade the music at the appropriate time, and if needed, add clip keyframes to further adjust the level of the music.
To open this tool, choose Window > Audio Track Mixer (Figure 4.26).
)
Figure 4.26 The Audio Track Mixer makes changes to the audio tracks through keyframes or through changes to the whole track’s level.
Several automation modes help you create the keyframes that will affect your track (Figure 4.27):
)
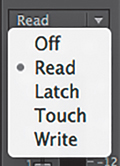
Figure 4.27 The automation modes in the Audio Track Mixer panel create keyframes on the go as you listen to the audio in the Timeline.
- Off. This setting, as you may have guessed, ignores existing keyframes. Even though you can still make changes to the track, these changes will not be recorded. Off is simply, off.
- Read. After you’ve created some keyframes, change the automation mode to Read to hear how they sound. Read mode will read any changes that you’ve already performed on the clip. If a clip has no keyframes and you adjust a track, the changes will affect the entire track. Once you stop adjusting, the fader will return to its former value. The speed of the return is determined by the Automatch Time option (Preferences > Audio > Automatch Time).
- Write. This automation mode lets you record any changes to volume or pan that you make to the track (as long as the Automation Mode is not set to Safe During Write). When you adjust the levels using this automation mode, new keyframes will be added, overwriting existing ones. You could also preserve a track property while recording the mix by right-clicking an effect or send and choosing Safe During Write from the menu.
- Latch. Similar to Write, but Latch changes don’t start recording until you begin adjusting the property. So, if you are set to Latch and you play the track, nothing will be altered until you actively start adjusting.
- Touch. Same as Write, but when you stop adjusting a property, the fader will continue following existing keyframes, or return to the original value of the clip if there are no keyframes present. The speed of the return is determined by the Automatch Time option (Preferences > Audio > Automatch Time).
To better understand how the Audio Track Mixer works, follow these steps.
- Move the playhead to the spot in the Timeline where you want to start your changes.
- In the Audio Track Mixer panel select the desired automation mode.
- Mute any tracks you don’t want to hear or solo a single track if needed.
- Start playback, move the volume level fader up and down, and pan left and right as desired.
- When you stop playback, keyframes will be added. If you do not see these keyframes, click the Show Keyframes button in the track header and choose Track Keyframes.
- Adjust the keyframes if needed, or even record a second pass.
- Play back and enjoy your work!
If you feel you are adding too many keyframes, check and adjust the value in Preferences > Audio > Minimum Time Interval Thinning; larger values will reduce the number of keyframes. If you create keyframes that make changes that last one second, this option will create only the necessary keyframes at the beginning and at the end of the change. Otherwise, Adobe Premiere Pro may create other keyframes in the middle of these.
To make this process easier, rename your audio tracks from the default of Audio 1, Audio 2, and so on to reflect the type of clips you’ll be placing on the track, such as male voice, female voice, nat sound, music, effects, and the like. You can rename your audio tracks in the Audio Track Mixer or in the Timeline. To see an example of renaming tracks, open the project Chapter04_Audio.prproj, and then open the sequence named Mix. Notice the names of the tracks in the Audio Track Mixer.
Audio Track Mixer practice
To better understand how the Audio Track Mixer works, follow these steps.
- Open the project Chapter04_Audio.prproj, and then open the sequence named Track Keyframes.
- Open the Audio Track Mixer panel and select the Write automation mode.
Play the Timeline, and as it plays, adjust the Volume fader or the Pan control.
Notice that when you’re done, keyframes are added to your track (if you don’t see them, make sure you have Track Keyframes selected in the audio track header).
- Test the different automation modes and experience their differences. Remember to adjust the Automatch Time value in the Audio Preferences if you need to do so.
Submixes
In audio a submix is a grouping of tracks that are processed together to add some common effects. In Adobe Premiere Pro you use a submix mainly to avoid having to add the same effects over and over to many clips, and to be able to adjust levels of several tracks at the same time.
A submix is akin to a nested sequence, where you can add effects to the nested sequence instead of adding many different effects to many different clips (Figure 4.28). Consider a submix an intermediary track between the original tracks and the master track. The source for this intermediary track is other audio tracks, so you cannot add clips directly to this submix track; however, you can add as many tracks to a submix as you need.
)
Figure 4.28 Submixes let you adjust several tracks at the same time.
A send takes the audio signal from a track and “sends” it somewhere else before it goes to the master track. This is what you use to route audio tracks through submixes.
To create a submix, you can use the Send Assignment menu on the Track Mixer, or you can right-click on the audio track button area in the Timeline and choose Add a Submix Audio Track. Then, in the Audio Track Mixer panel, select the Sends drop-down from the track(s) you want to send to the Submix track and choose Submix.
Close-Up: Pre-fader or Post-fader?

Sends can be applied pre-fader or post-fader (Figure 4.29). If you choose pre-fader, the send ignores the fader control track, which means that it will ignore any level changes applied to the track. If you choose post-fader, the send level is based on the fader control (and still has its own level of adjustment too). So, if your fader is set to –4dB, a post-fader send will begin at –4dB, but a pre-fader send will be at 0dB regardless of the fader level.
)
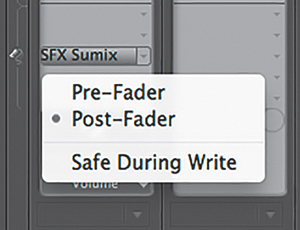
Figure 4.29 Pre-faders and post-faders will ignore or follow the fader in the Audio Track Mixer before going to the submix.
Most of the time you will want a post-fader send, because it seems natural that if you adjust the track’s volume, the signal that is sent to the submix would be adjusted in turn. However, sometimes you want the signal that is being sent to the submix to remain unchanged no matter what happens to the fader of the track. A good example of using a pre-fader send is to keep a reverb effect consistent regardless of the track fader level. To change the post-fader default of the send, right-click on the send’s name in the Track Send Assignment menu (in the Audio Track Mixer) and choose Pre-Fader.
In the Audio Track Mixer panel you can adjust the fader and/or add any effects you desire to the submix.
Submixes practice
To better understand how submixes work, follow these steps.
- Open the project Chapter04_Audio.prproj, and then open the sequence named Submix.
- Open the Audio Track Mixer panel, which contains two submixes: one called SFX submix the other called VO Submix. The different tracks are being routed to different submixes except for the music track, which goes directly to the master. Some effects are already applied.
- Test different settings and experiment with different effects to hear how they affect your sound.