- Reference 4.1 Understanding a Project
- Reference 4.2 Defining the Primary Storyline
- Reference 4.3 Modifying Clips in the Primary Storyline
- Reference 4.4 Timing the Primary Storyline
- Reference 4.5 Editing Above the Primary Storyline
- Reference 4.6 Creating a Connected Storyline
- Reference 4.7 Editing Below the Primary Storyline
- Reference 4.8 Finessing the Rough Cut
- Reference 4.9 Sharing Your Progress
- Lesson Review
This chapter is from the book
This chapter is from the book
This chapter is from the book
Reference 4.6 Creating a Connected Storyline
When B-roll clips are connected to the primary storyline, the B-roll takes over the video storytelling of the project. When reviewing the project, you may want to shift the B-roll timing to better align the visuals with the audio-driven storyline. Because each connected clip is independent, trimming one B-roll clip does not ripple trim to affect the others. The vertical relationships of each connected clip isolates it from adjacent clips.
However, an editor may establish horizontal relationships between connected clips by placing them within a connected storyline. Doing so creates a horizontal relationship between the grouped connected clips, reducing their individual vertical relationships to a single connection between the connected and primary storylines. Furthermore, by creating a connected storyline, you gain access to several trimming options such as ripple trim.
A connected storyline is a container identified by a gray handle across the top of the grouped clips. This handle is the selection point when you want to apply an edit to the connected storyline. To insert edit a clip into a connected storyline, you must select the storyline's handle, and not the clips within the storyline.
Creating a connected storyline is as simple as selecting connected clips and instructing Final Cut Pro to group them as a storyline. However, not all connected clips may be added to a group. Only connected clips that can exist in the same lane without overlapping may be converted into a connected storyline.
Exercise 4.6.1 Converting Connected Clips into a Connected Storyline
You can create a connected storyline comprising the first three B-roll clips in two easy steps.
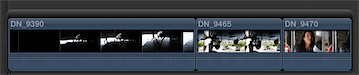
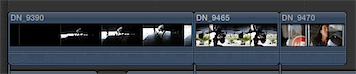
Select the three connected B-roll clips at the start of the project.
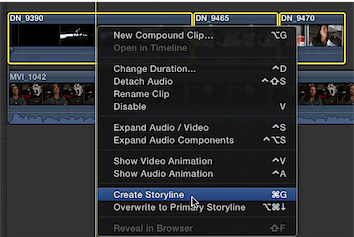
Control-click any one of the three, and from the shortcut menu, choose Create Storyline, or press Command-G.
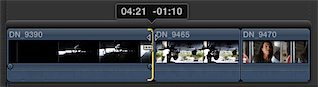
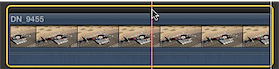
Notice the gray bar or handle above the clips that becomes the outline of a container surrounding the clips. Now that the clips are contained in a storyline, you can ripple trim them.
Place the Select tool over the end point of DN_9390.
The ripple trim icon appears with the filmstrip.
Drag the end point to the left to shorten the clip, but do not release the mouse button yet.
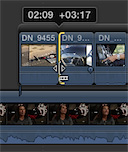
A few things for you to notice. First, the two following B-roll clips ripple along with the trim. The storyline established a horizontal, magnetic relationship similar to the primary storyline clips.
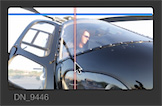
Second, as you ripple trim the edit point, a two-up display appears in the Viewer. The area to the left shows the new end point of the hangar door opening clip while the right shows the existing start point of DN_9455 recorded from under the helicopter. The two-up display allows you to see both sides of the edit so you may match the action between the two clips.
Referencing the two-up display, ripple trim the end point of DN_9390 appearing on the left to match the action appearing on the right in the Viewer's two-up display.
Enclosing connected clips in a storyline gives you the advantages of a storyline's magnetic properties when trimming and rearranging the B-roll clips.
Another trim tool similar to ripple trim is roll trim. Whereas ripple trim modifies the duration of one clip (and potentially the project's duration), the roll trim modifies the adjoining points of two clips, not affecting other clips or the total project duration. The roll trim achieves this net-zero duration change by trimming the opposing edit points in opposite directions: inserting frames at one edit point while removing the same number of frames from the adjoining edit point.
In the edit you just completed, the roll trim is handy for fine-tuning the cut's trigger. With the ripple trim, your focus was on continuity of action at the edit. Now that the continuity is in place, you may need to adjust when the cut happens. Should the cut to the shot underneath the helicopter occur as Mitch reaches for the camera, while Mitch is dropping down, or even after Mitch has stopped moving? The roll trim allows you to explore all of those options.
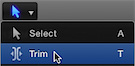
From the Tools pop-up menu, choose the Trim tool.
The roll trim function requires that the Trim tool be selected when working with storyline clips.
Place the Trim tool over the edit point between DN_9390 and DN_9465.

With the Trim tool on the edit point, the tool becomes the Roll trim with filmstrips pointing at both clips to indicate that the end point of DN_9390 and the start of DN_9465 are about to be changed.
Drag to the right until Mitch has squatted down, which you can see in the Viewer two-up.
Drag back to the left and decide where within the action to cut between the two clips.
The roll trim allowed you to move the edit to find the best cut point between the two clips. This roll and the earlier ripple trim worked because the clips are enclosed in a storyline. Connected clips do not interact with other connected clips editing-wise. Grouping them together in a connected storyline brings the trimming and magnetic properties of the primary storyline to these clips.
)
)
)
)
Exercise 4.6.2 Appending Clips to a New Connected Storyline
In this exercise, you will create a connected storyline, and append additional B-roll clips to it. This editing method offers the speed and convenience of the batch and ripple trim techniques that you previously performed on the primary storyline.
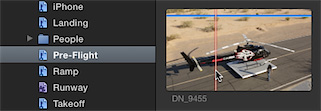
- In the Libraries pane, select the Pre-Flight Keyword Collection.
In the Pre-Flight collection, find DN_9455.
This clip shows Mitch getting into his helicopter, and is the first of a series of clips depicting the preflight and startup.
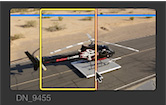
In DN_9455, mark a start point just before Mitch appears in the frame. Set an end point after Mitch is in the helicopter.
Next you need to define where this clip goes timing-wise within the Timeline.
In the project, cue the playhead after Mitch says, "has been shot on the ground."
You'll connect the first clip of this series of B-roll clips at this point.
Click the Connect button, or press Q to make the edit.
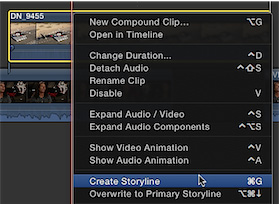
To quickly set up an append edit for the following B-roll clips, you will convert this one clip into a storyline.
Control-click DN_9455, and from the shortcut menu, choose Create Storyline, or press Command-G.
The clip is now contained in a storyline. To make additional edits to this storyline, you must select the storyline's handle rather than the clip inside.
Click the storyline's handle to select it.
When you select its handle, the storyline is outlined in yellow. The goal is to efficiently add the subsequent B-roll clips to the selected storyline.
In the Browser, locate DN_9446.
Mark a start point on the jib's first take of Mitch's feet on the pedals. Set an end point after the jib movement ends for that take, leaving the clip duration at approximately six seconds.
PressE to append this clip to the end of the selected storyline.
You also can batch edit clips into this storyline.
Mark the following ranges for each listed clip:
Clip
Start
End
Result
DN_9453
Start of third take tilt/pan on Mitch
End of tilt/pan move to panel

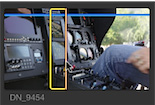
DN_9454
Flips switch and the displays change
Releases switch and displays change again
DN_9452
Before rotors start turning
End of clip
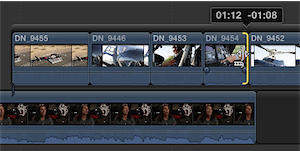
After marking these three clips, you can select all three for the append edit into the DN_9455 and DN_9446 storyline, which we'll call the Preflight storyline.
With DN_9452 still selected, Command-click the ranges you marked for DN_9454 and DN_9453 to select the three clip ranges.
In the project, ensure the gray handle of the Preflight storyline is still selected.
Make sure you select the gray handle and not DN_9455 or DN_9446. The outline will be yellow if the Timeline pane is active, or dimmed if the Browser is active.
Click the Append button, or press E, to append the three clips to the selected storyline.
The clips are added to the selected storyline in the order you selected them.
)
)
)
)
)
)
Editing Within a Connected Storyline
Because these clips are now inside a storyline, rearranging and ripple trimming them is a breeze.
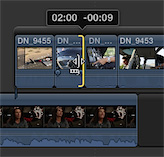
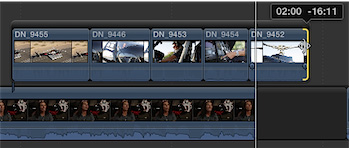
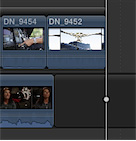
Drag DN_9452 to the end of the Preflight storyline after DN_9454.
Next you'll ripple trim each of these storyline clips to reduce their durations. The goal is to finish playing the first four clips in this storyline by the end of the MVI_1055 sound bite. There's a lot of content to remove!
No joke. The selected clip, DN_9453, should end a few moments before the end of MVI_1055, where the playhead is located in the previous image. This is a common editing scenario and the reason why you batch edited the clips into the storyline. The durations you marked earlier in the Browser were set to narrow down the clips to the needed content. But the timing of these clips with the sound bite and to each other is what determines their final durations and positions.
The art of editing is the art of compromise. You need to present just enough information for the viewers to understand the actions they are seeing and tell the story. You want to present these four preflight actions while Mitch is talking about the whole new look of shooting something from the air. When he finishes that statement, the rotors start turning and the helicopter takes off. The compromise to make that edit happen is to adjust the timing of not only these preflight clips to Mitch's sound bites, but also adjust the earlier hangar storyline clips' timing to the sound bites. Don't be afraid to look at previous edits when trying to make up time in a project.
Let's first gain a few seconds by trimming the hangar storyline.
In the hangar storyline, ripple trim the start point of DN_9390 so the clip begins with just a sliver of light visible through the hangar door.
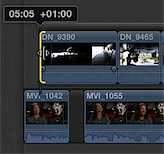
After trimming the start of DN_9390, the start of MVI_1042 is now visible. You can drag the hangar storyline to realign it with the beginning of the project.
Drag the storyline to the beginning of the project.
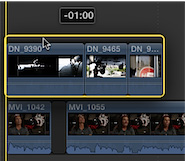
Remember the gap clip you previously added to the beginning of the primary storyline? You can gain some additional time by lengthening that gap clip. Increasing its duration allows you to shift the start of the Preflight storyline earlier in relation to the sound bite MVI_1055.
In the primary storyline, drag the end point of the first gap clip to the right to a duration of about 2:15.
The hangar storyline now ends and Mitch's interview video becomes visible as he says, "Nobody." Mitch needs to be on camera for a short time to accommodate a graphic you will add in a later lesson, so you will leave a few seconds of him visible. The Preflight storyline can now start a little earlier.
Drag the Preflight storyline so that its first clip starts at the "standpoint" audio cue.
That edit gained you another two seconds, more or less. But more trimming is still needed.
DN_9455 is much too long. When you review the clip's content, you see that the real action occurs at the end of the clip when Mitch gets in the helicopter. Cutting the clip duration to that last action will make the shot more interesting and gain you time.
When you trimmed the start of DN_9390, you did so using the Select tool and moving the entire storyline to the beginning of the project after the trim. This time, you'll save a step by performing a ripple trim using the Trim tool.
From the Tools pop-up menu, choose the Trim tool, or press T.
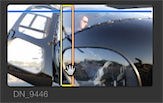
Drag the start of DN_9455 to the right, but don't release the mouse button yet.
As you drag with the Trim tool, the two-up display appears in the Viewer. The area on the right shows the new start point you are setting for DN_9455 with the Trim tool.
Referencing the right frame of the Viewer's two-up, drag the start point until you see Mitch stepping on the skid to get in the helicopter. Release the mouse button.
Now you'll trim the end point of DN_9455 to tighten the shot.
Drag the end point of DN_9455 to the left until the two-up display shows that Mitch just got into the helicopter.
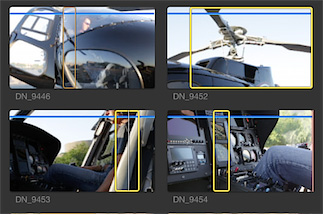
The end result is a clip just over two seconds long. That's quite a bit of tightening for that clip. Let's shorten DN_9446, too.
Using the Trim tool, drag the start point of DN_9446 right until the two-up display in the Viewer shows the body of the helicopter at the bottom of the frame blocking the transport cart from view.
Now trim the end point of DN_9446 to realize an overall clip duration of two seconds.
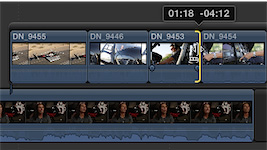
The next clip should be DN_9453 followed by DN_9454. Because these two clips are inside a storyline, this involves only a simple rearrangement of the two clips.
With the Select tool, drag DN_9453 left to insert the clip before DN_9454.
Staying on DN_9453, trim the start point to where Mitch is centered in the image and starts to reach forward.
Trim the end point to a clip duration of around 1:20, the point at which Mitch has his fingers on a switch and drops his hand to a "wrist low" position.
To create the pacing and the feel that Mitch is starting the engine, you will cut from this movement to a closer "throwing the switch" shot.
In DN_9454, trim the start point to where Mitch's hand is still open before pointing and throwing the switch.
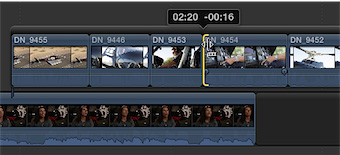
Trim the end point to realize a 1:15 clip duration ending while Mitch is holding the switch.
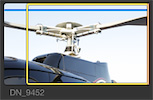
Finally, you'll trim the clip of the helicopter rotors starting to move.
Trim DN_9452's start point so the rotors have already started to turn. Trim the end point to a clip duration of about two seconds. Review the edits.
You have just one more B-roll storyline to go!
)
)
)
)
)
)
)
)
)
)
)
)
)
Creating and Editing the Third Connected Storyline
Use the following tables to create and trim the third Takeoff storyline.
Mark each clip as detailed in this table:
Clip
Keyword
Start
End
Result
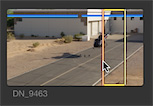
DN_9463
Takeoff
Before forward movement
Exits frame
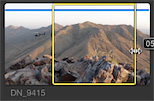
DN_9415
In Flight
A couple of seconds before the mountain is behind the helicopter
Duration of five seconds
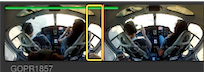
GOPR1857
In Flight
Two seconds before Mitch stretches his arm out behind seat
Duration of five seconds
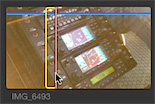
IMG_6493
Flight Controls
Before gps lens flare ends
Before tilt up to follow hand
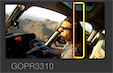
GOPR3310
In Flight
Last third of clip; before Mitch leans forward into sunlight
Duration of five seconds
DN_9503
In Flight
Halfway point; helicopter behind tree
Helicopter exits frame

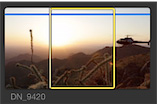
DN_9420
In Flight
Helicopter is just off screen
Helicopter exits frame
With the clips' start and end points marked, Command-click them in the order they are listed in the table.
In the project, cue the playhead immediately after DN_9452, if necessary.
You will perform a connect edit first to place these clips in the project, and then group these clips into a connected storyline.
Click the Connect button, or press Q, to connect edit the selected clips into the project.
Now that the clips are part of the project, you can group them.
In the project, select the connected clips you just added. Control-click any one of the selected clips, and from the shortcut menu, choose Create Storyline, or press Command-G.
The clips are grouped into a connected storyline, the third such storyline in your project, which we'll refer to as the Takeoff storyline.
You have two more B-roll clips to add, you also have some very loud nats on a couple of B-roll clips, but let's take a break from B-roll to add a music clip, and align some edits to it.
)
)