Favorite Adjustment Layers and Filters for Compositing in Adobe Photoshop
This chapter is from the book
This chapter is from the book
This chapter is from the book
)
Remember your first few composites—those roughly cut and pasted, disjointed collages? Whether we like to admit it or not, we all go through this stage before honing our eyes and skills to craft an element of photorealism into our work. That element is what elevates a composite from a mere copy-and-paste-fest to a seamless new reality. The craft behind it is largely the craft of using filters, adjustment layers, and their masks (FIGURE 4.1). These features represent their own art form when used by a pro. Endlessly useful for a multitude of situations, they can be the difference between realizing your vision and consigning yet another project to the digital scrap heap of “not quite right.”
)
FIGURE 4.1 Filters and adjustment layers are essential for blending very different image sources into a seamless composite.
Rather than giving you a hasty flyby of every adjustment layer and filter, this chapter will push deep into my four favorite adjustment layers (along with their subterranean features), as well as the Photoshop filters that I find come in most handy for composite work. This focus will get you going for most situations and provide a solid base for the more complex tutorials and projects in Sections II and III.
Adjustment Layers
When working nondestructively, adjustment layers are the professional way to go rather than choosing the destructive adjustments available from the Image menu. By making your adjustment as a dedicated layer with an accompanying mask (FIGURE 4.2), you can later fine-tune or remove your changes without any permanent alterations or loss of quality. Just like standard layers, adjustment layers affect the layers directly below them in the stack and can be independently altered by themselves. When you just want to adjust a single layer, you can restrict an adjustment layer to a single layer or group by clipping it to the layer placed directly below it (as covered in Chapter 3). As a standard feature, every adjustment layer comes with a clean white mask for safe and nondestructive adjusting.
)
FIGURE 4.2 Each adjustment layer includes a mask for immediate nondestructive erasing of the adjustment.
Although the Adjustments panel (choose Window > Adjustments to bring this up if it is not open) offers many choices, each with its own specialty, I have come to rely on four adjustment layers in particular. Whether piecing layers together seamlessly or correcting for some shortcomings of an image, I use Curves, Black & White, Color Balance, and Hue and Saturation most heavily.
Curves
Of my top four, Curves is perhaps my most used adjustment layer and is by far the most versatile, as well. It is my go-to when something is just not looking right or when I need more control over the general lights and darks of an area, when I need to isolate a tone, and much more. A Curves adjustment layer enables you to nondestructively shift tonal attributes of an image, making specific tones lighter or darker.
The controls you need are housed in the Curves Properties panel (FIGURE 4.3) The horizontal and vertical gradient strips along the bottom and left side of the Curves control represent the range of possible tones (from darks through midtones to lights) in an image. The diagonal line (the “curve”) represents the value of each of the tones in the gradients as they compare to each other. Notice that when you first apply a Curves adjustment layer, any point on the line corresponds to the same tone on the horizontal gradient (the scale for tones in the starting, or input, image) as on the vertical gradient (the scale for tones in the adjusted, or output, image). You’ve not adjusted anything, so the values are the same along both gradients. Click the line to add a control point, and drag the point upwards. Notice that because the point is higher, it now corresponds to a lighter shade on the vertical gradient than on the horizontal gradient? By dragging up, you’ve lightened the original tone at that point, as well as along the curve. Dragging a control point down does the opposite.
)
FIGURE 4.3 The Curves Properties panel contains both the controls to adjust the levels of darks, midtones, and lights in an image and a histogram that graphically represents the quantity of those tones present.
For example, in FIGURE 4.4, I shifted a wide range of tones lighter by lifting the single control point (perhaps not the best aesthetic choice, but a good demonstration); to see how this works, pick any point along the new curve line and compare where it lies along the horizontal gradient (the original tone) to where it aligns with the vertical gradient (the new, adjusted lighter tone). This is a good way to remember how Curves works by default: Pull a point higher means lighter, pull it lower means darker. (Note that this default changes; it inverts when you work on a grayscale image, or you can change it to match RGB.)
)
FIGURE 4.4 Pulling a curve’s single control point upwards or to the left shifts the tonal values lighter and keeps the lightening effect proportional with all nearby tones as they are gently elevated along the curve.
Curve Strategy
With a better understanding of the technical theory of Curves adjustment layers, consider some practical tips for using curves to their full potential:
Don’t try anything too radical. For example, curves with a very exaggerated S shape (such as doubling back on themselves as in FIGURE 4.5) create an inversion for some tones of the image, causing lights and darks to switch places with each other. (Try pressing Ctrl/Cmd+I on an image layer to see the full effect of this.) The power behind Curves adjustment layers is in the subtlety and gentleness of the curve that you make.
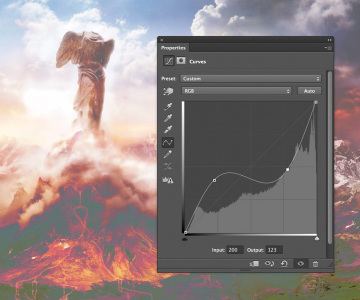
FIGURE 4.5 Curves that get too exaggerated end up looking pretty awful (like a posterizing effect) or produce inversions of lights and darks as shown here. Keep your adjustments gentle and controlled instead.
- Use two points to create a fully controlled contrast adjustment. Click to add two control points along the curve line, one toward the bottom darks and one towards the lighter end. Slightly drop the darks control point downward and similarly bring the highlights control point upwards for a punchier look!
- Use no more than three control points along the curve whenever possible. I usually stick to adding just one or two unless I am trying to isolate a very specific tonal adjustment. The more points you make, the higher the chances are that the image might begin to look “off” or inversion begins.
- Isolate a tone by using the Sampling tool
 , (found to the left of the Curves histogram in the Curves Properties panel) to click on a specific area or tone in the actual image. You will see a phantom control point along the curve line demonstrating where the value falls. With a click, you can add control points for whatever distinct tone you clicked on within your image. This can be helpful for those times when you need to find a specific value and shift it lighter or darker.
 Use the mask provided with the adjustment layer to isolate your Curves adjustment to specific areas. Suppose you want to lighten one area to draw further attention to it, but you don’t want it to lighten the edges of the image. As you adjust, focus only on the critical areas, then paint black on the layer’s mask to remove the changes from areas you wish to be unaffected. Alternatively, you can also make a selection before adding the adjustment layer, and Photoshop will automatically adjust only the selected area, applying a mask to everything outside of the selection.
- Use a pair of Curves. One Curves adjustment layer can be helpful for controlling, say, the darks, but when you try to get the highlights right in the same curve, it changes too much or is harder to control. Adding a second Curves adjustment layer that finesses another portion of the image, such as the lights, will keep a more even tonal adjustment than trying to do it all in one go and getting dramatic with the curve shape.
- Clip the Curves adjustment layer to a single layer below it so that you can affect that clipped layer only. This is so important for composite work where images are taken from a wide variety of sources that you must match the lights and darks consistent with the background (FIGURE 4.6) or each other. To clip the adjustment layer, either click the clipping icon
 at the bottom of the Adjustment Properties panel or Alt/Opt-click between the adjustment layer and the layer directly below it.
)
)
FIGURE 4.6 Adjust an individual layer by clipping the adjustment to it and then matching the lights and darks to the others around it; in this case, the piece was much too dark and needed a Curves adjustment layer to lighten it up.
Black & White
Although not specifically designed for the purpose, B&W adjustment layers can replace hours of traditional black-and-white dodging, burning, and filtering to a swift move of the slider. True, this adjustment layer will turn the content black and white, but you can control the lights and darks of each color of the original image separately to enhance certain features once in grayscale. To begin, simply click the B&W Adjustment Layer icon  in the Adjustments panel; from the Black & White Properties panel that opens you can adjust the values of each color individually (FIGURE 4.7). Suppose you want a green (converted to a mid-gray) to become an even lighter gray; find the green slider, and move it to the right to shift all the related greens lighter.
)
FIGURE 4.7 The mix-match of lighting amongst the elements ended up just being too overpowering in the image (left), so I added a B&W adjustment layer (right) to alter the saturation (by lowering opacity) and values of separated colors.
At lower opacities, the Black & White adjustment layer is phenomenal for subtly controlling saturation and the lights and darks of certain colors. (I rarely use it full force, which produces a black-and-white image.) The power of moving around the darks and lights for each color has far reaching benefits. For example, I photographed the elements of Figure 4.7 with a wide range of lighting color temperatures, edited them together with a certain vibrancy in mind, then decided I needed to tone down the colors instead. Adding a B&W adjustment layer, I lowered the opacity to under 40% until it curbed the saturation. From there, I further adjusted the colors to lighten the yellows and darken the reds and blues slightly to create a more contrast in the composition.
TIP
The Black & White Properties panel’s Slider Modifier icon ( above the sliders) is especially helpful for times when you need to modify a specific color family quickly. Simply click the icon, then click and drag directly within the image to sample a color. Sampling a color within the image tells Photoshop to find the closest matching slider in the panel (just one at a time); move the cursor back and forth to adjust the color slider in the same way as using it directly.
Color Balance
As an adjustment layer, Color Balance is a good choice for blending in layers whose colors don’t match those of the other elements in a composite. Perhaps the images were shot on different light settings, different cameras, or just have a different color palette in general. With a Color Balance adjustment layer, you can easily correct moderate differences. The Color Balance Properties panel contains three sliders: one ranging from cyan to red, one from magenta to green, and the last from yellow to blue. FIGURES 4.8A and B are a good example of better blending two images with Color Balance. The woman with the sword was too warm in color compared to the cooler background, so shifting the sliders over to the cooler sides (more cyan, blue, and just a hint more of green) helped dramatically with fitting the two images together. The sliders start out neutral at the center, so you easily can go back and forth to finesse the colors.
)
)
FIGURES 4.8A and B Color Balance is not especially refined, but is quick, efficient, and works wonderfully for most color discrepancies. When I first composited the figure with the background, I discovered I photographed her with warmer colors compared to her new, cooler surroundings (a). To cool the subject down and match the scene, I applied a Color Balance adjustment layer (b).
Although Photoshop offers many other ways (some a lot more refined and exacting) to help with color balance, this adjustment layer does a fairly decent job and is so straightforward and quick, it works with very little effort or tweaking, making it my go-to choice in most cases.
Hue/Saturation
As my first choice for quick color shifts and general desaturation, a Hue/Saturation adjustment layer is also great for altering a selected color using color range (revisit Chapter 3 for a reminder) and shifting the color to an entirely new hue. Combining simplified features of the Color Balance and B&W adjustment layers, Hue/Saturation includes a very basic, yet quick-to-use Saturation slider and can be good for simple neutralizing or color shifting. I find this adjustment layer especially valuable when I need to shift over a specific color. For example, in FIGURE 4.9 I needed a small green object down by the crib to help complete a compositional triangle of color. I added a Hue/Saturation adjustment and mask color range to shift just the juggling ball by the crib to the proper green.
)
FIGURE 4.9 A Hue/Saturation adjustment layer and mask using Color Range (see Chapter 3) works especially well for isolated color changes; you can alter a selected color or restrained portion of the image. Here I changed the ball from red to green.