- Getting started
- Working with artboards
- Transforming content
- Creating a PDF
- Review questions
- Review answers
This chapter is from the book
This chapter is from the book
This chapter is from the book
Transforming content
Transforming content allows you to move, rotate, reflect, scale, shear, and either free distort or perspective distort objects. Objects can be transformed using the Transform panel, selection tools, specialized tools, Transform commands, guides, Smart Guides, and more. For the remainder of the lesson, you will transform content using a variety of methods and tools.
Working with rulers and guides
Rulers help you accurately place and measure objects. They appear at the top and left in the Document window and can be shown and hidden. Guides are non-printing lines created from the rulers that help you align objects. Next, you will create a few guides based on ruler measurements so that later you can more accurately align content.
- Choose View > Rulers > Show Rulers, if you don’t see the rulers.
- Choose View > Fit All In Window.
With the Selection tool (
 ) selected, click each of the artboards and, as you do, look at the horizontal and vertical rulers. Notice that the 0 (zero) for each ruler is always in the upper-left corner of the active (selected) artboard.
The point on each ruler (horizontal and vertical) where the 0 appears is called the ruler origin. By default, the ruler origin is in the upper-left corner of the active artboard. As you can see, the 0 point on both rulers corresponds to the edges of the active artboard.
There are two types of rulers in Illustrator: artboard rulers and global rulers. Artboard rulers, which are the default rulers that you are seeing, set the ruler origin at the upper-left corner of the active artboard. Global rulers set the ruler origin at the upper-left corner of the first artboard, or the artboard that is at the top of the list in the Artboards panel, no matter which artboard is active.
- Click the leftmost artboard, called “Front.”
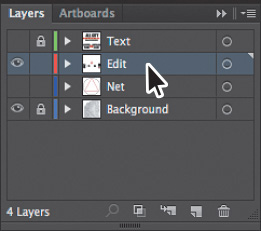
Open the Layers panel by choosing Window > Layers, and select the layer named Edit.
Shift-drag from the left vertical ruler right to create a vertical guide at 1 inch on the horizontal ruler (the ruler above the artboard) on the “Front” artboard. Release the mouse button, and then release the Shift key.
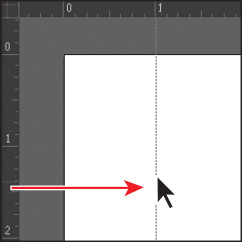
Dragging with the Shift key pressed “snaps” guides to the measurements on the ruler. The guide is selected and when selected, its color matches the color of the layer that it’s associated with (red in this case). By default, guides that are not selected are aqua in color.
With the guide still selected (it should be red in color), change the X value in the Control panel to 0.25 in, and press Enter or Return.
On the horizontal ruler, measurements to the right of 0 (zero) are positive and to the left are negative. On the vertical ruler, measurements below 0 (zero) are positive and above are negative.
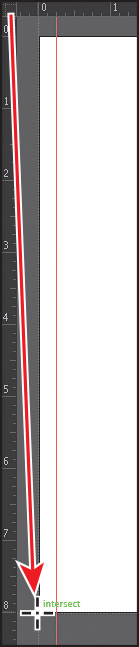
Position the pointer in the upper-left corner of the Document window, where the rulers intersect (
 ), and drag the pointer to the lower-left corner of the artboard. When the word “intersect” appears, release the mouse button.
As you drag, a crosshair in the window and in the rulers indicates the changing ruler origin. This sets the ruler origin (0,0) to the lower-left corner of the artboard. This can be very useful when you need to place content a set distance from the bottom edge of the artboard, for instance.
Next, you’ll add a guide using a different method that can sometimes be faster.
- Select the Zoom tool (
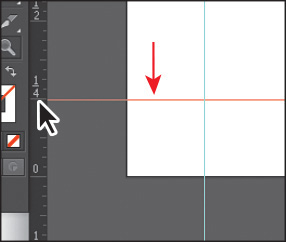
 ) and click several times, slowly, on the lower-left corner of the artboard until you see 1/4-inch measurements on the ruler. We had to click at least four times.
 Shift-double-click the vertical ruler at the 1/4-inch mark (the ruler to the left of the artboard), above the 0 on the ruler. This creates a guide that crosses the bottom edge of the artboard at –0.25 in from the bottom.
- Position the pointer in the upper-left corner of the Document window, where the rulers intersect (), and double-click to reset the ruler origin.
Choose View > Guides > Lock Guides to prevent them from being accidentally moved.
The guides are no longer selected and are aqua in color by default.
- Choose View > Fit All In Window.
- With the Selection tool () selected, select the white text “ALL CITY.”
Choose View > Hide Edges so you only see the bounding box of the grouped paths.
This hides the inside edges of the shapes, but not the bounding box. It can make it easier to move and position the artwork.
Drag the text group into the lower-left corner of the artboard with the guides. When the left and bottom edges snap to the guides, release the mouse button.
)
Positioning objects precisely
At times, you may want to position objects more precisely—either relative to other objects or to the artboard. You could use the alignments options, like you saw in Lesson 2 “Techniques for Selecting Artwork,” but you can also use Smart Guides and the Transform panel to move objects to exact coordinates on the x and y axes and to control the position of objects in relation to the edge of the artboard.
Next, you’ll add content to the backgrounds of two artboards and then position that content precisely.
- Press Command+– (Mac OS) or Ctrl+– (Windows) (or View > Zoom Out) three times to zoom out. You should see content off the bottom edge of the artboards.
- Click the artboard with the guides on it (the artboard named Front) to ensure that it is the active artboard (check the origin of the rulers and make sure that 0,0 starts in the upper-left corner of the artboard).
- With the Selection tool (), click to select the large background shape on the left, below the artboards (see the next figure for which shape).
Click the upper-left point of the reference point locator (
 ) in the Control panel. Then, change the X value to 0 and the Y value to 0.
The content should now be precisely positioned on the artboard, since it was the same size as the artboard to begin with.
- In the Artboards panel, select the artboard named Back to make it the active artboard.
- Select the group with the “City Arena” text in it below the artboards. You may need to either zoom out or scroll over and down to see it.
With the upper-left point of the reference point locator (
) selected in the Control panel, change the X value to 0 and the Y value to 0.Next, you will use Smart Guides to move content. When moving objects with Smart Guides turned on (View > Smart Guides), measurement labels appear next to the pointer and display the distance (X and Y) from the object’s original location. You will use these to make sure that an object is a certain distance from the edge of the artboard.

- With the Selection tool, click to select the basketball hoop with net below the artboards. With the upper-left point of the reference point locator () in the Control panel selected, change the X value to 0 and the Y value to 0.
- Choose View > Fit Artboard In Window.
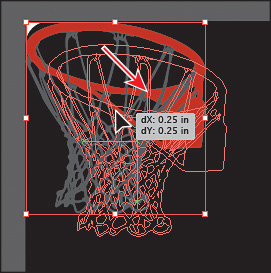
Using the Selection tool, position the pointer over the selected basketball hoop with net and drag the group down and to the right. As you drag, press the Shift key to constrain the movement to 45°. When the measurement label shows approximately dX: 0.25 in and dY: 0.25 in, release the mouse button, and then the Shift key. Leave the artwork selected.
The dX indicates the distance moved along the x axis (horizontally), and dY indicates the distance moved along the y axis (vertically). Don’t worry if you can’t get the exact values, it’s difficult when zoomed out so far. Also, because there is other content on the canvas, Smart Guides are attempting to snap to it. You can always change the X and Y values in the Control panel or Transform panel.
- Choose File > Save.
)
Scaling objects
So far in this book, you’ve scaled most content with the selection tools. In this lesson, you’ll use several other methods to scale objects.
With the artwork (basketball hoop and net) still selected, ensure that the upper-left point of the reference point locator (
) is selected in the Control panel. Click to select the Constrain Width And Height Proportions icon ( ) located between the W and H fields. Change the Width (W:) to 255%. Press Enter or Return to accept the value.
When typing values to transform content, you can type different units such as percent (%) or pixels (px) and they will be converted to the default unit, which is inches (in) in this case.
- Choose View > Fit All In Window.
- Press Command+– (Mac OS) or Ctrl+– (Windows) (or View > Zoom Out) twice to zoom out. You should see content off the bottom edge of the artboards again. You may need to scroll down to see all of the content.
- Select the basketball and double-click the Scale tool (
 ) in the Tools panel.
 In the Scale dialog box, change Uniform to 61%. Toggle Preview on and off to see the change in size. Click OK.
Select the Selection tool (
) and drag the basketball onto the first artboard named “Front,” like you see in the figure.- Select the basketball court group (without the numbers on it) below the larger artboard. Notice that the Stroke weight in the Control panel shows as 1 pt.
- Select the Zoom tool () in the Tools panel and click several times, slowly, to zoom in to it.
- Choose View > Show Edges.
- Open the Transform panel by clicking the X, Y, W, or H link in the Control panel (or the word “Transform” if that appears in the Control panel). Select Scale Strokes & Effects.
In the Control panel, either click the word “Transform” to reveal the Transform panel, or click the center reference point of the reference point locator (
 ) in the Control panel. Ensure that the Constrain Width And Height Proportions is set (
 ), and type 3.5 in the Width (W) field, and then press Enter or Return to increase the size of the artwork. Notice that the Stroke weight has scaled as well, and is now 2 pt. Leave the artwork selected.
By default, strokes and effects, like drop shadows, are not scaled along with objects. For instance, if you enlarge a circle with a 1 pt stroke, the stroke remains 1 pt. But by selecting Scale Strokes & Effects before you scale—and then scaling the object—that 1 pt stroke would scale (change) relative to the amount of scaling applied to the object.
)
)
)
)
Reflecting objects
When you reflect an object, Illustrator flips the object across an invisible vertical or horizontal axis. In a similar way to scaling and rotating, when you reflect an object, you either designate the reference point or use the object’s center point, by default.
Next, you’ll use the Reflect tool ( ) to flip the basketball court artwork 90° across the vertical axis and copy it.
TIP
If all you want to do is flip content in place, you can also choose Flip Horizontal or Flip Vertical from the Transform panel menu ( ).
).
Select the Reflect tool (
), which is nested within the Rotate tool ( ) in the Tools panel. Click the right edge of the basketball court group (the word “anchor” or “path” may appear).
This sets the invisible axis that the shape will reflect around on the right edge of the selected artwork, rather than on the center, which is the default.
TIP
You can reflect and copy in one step. With the Reflect tool (
) selected, Option-click (Mac OS) or Alt-click (Windows) to set a point to reflect around and to open the Reflect dialog box, in one step. Select Vertical, and then click Copy.With the basketball court artwork still selected, position the pointer off the right edge and drag clockwise. As you are dragging, hold down the Shift+Option (Mac OS) or Shift+Alt (Windows) keys. When the measurement label shows –90°, release the mouse button and then release the modifier keys.
The Shift key constrains the rotation to 45° as the artwork is reflected, and the Option (Alt) key will copy the artwork. Leave the new court artwork where it is for now. You’ll move it later.
- Select the Selection tool () and drag across both groups, then choose Object > Group.
)
)
Distorting objects with effects
You can distort the original shapes of objects in different ways, using various tools. Now you’ll distort the basketball net using the Pucker & Bloat effect. These are different types of transformations because they are applied as effects, which means you could ultimately edit the effect later or remove it in the Appearance panel.
- Choose “2 Inside” from the Artboard Navigation menu to fit the larger artboard in the Document window.
Click the Layers panel icon (
 ) to open the panel, and then click the visibility column (an arrow is pointing to it in the figure) to the left of the Net layer name to show that content, and click the eye icon (
 ) to the left of the Background layer to hide its contents.
You are going to create a net for the basketball hoop that is already on the artboard.
- Click to select the red triangle shape. Choose Effect > Distort & Transform > Pucker & Bloat.
In the Pucker & Bloat dialog box, select Preview and drag the slider to the left to change the value to roughly –20%, which distorts the triangle. Click OK.
Drag across the triangle and circle to select them both. Choose Object > Transform > Rotate. In the Rotate dialog box, change the Angle to 30, select Preview, and then click Copy. You will learn more about rotating artwork in the next section.
TIP
To access the Rotate dialog box, you can also double-click the Rotate tool (
) in the Tools panel. The Transform panel (Window > Transform) also has a rotate option.- Choose Object > Transform > Transform Again to repeat the transformation on the selected shapes.
Press Command+D (Mac OS) or Ctrl+D (Windows) once to apply the transformation one more time.
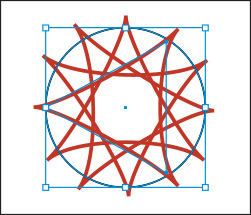
- Choose Select > Deselect, and then drag across the edge of the circle (see the figure below) to select all of the copies and press Delete.
Drag across the triangles to select them all and choose Object > Group.
- Drag the group down onto the basketball hoop and visually center-align them. Change the Stroke color to White in the Control panel.
In the Layers panel, click the visibility column to the left of the Background and the Text layers to show the content for each.
Next, you will apply a Free Distort effect to artwork.
- Choose “3 Back” from the Artboard Navigation menu and select the basketball net.
- Choose Effect > Distort & Transform > Free Distort.
In the Free Distort dialog, box drag the lower-left and lower-right points so they match the figure. Click OK.
)
)
)
)
)
)
TIP
Later in this lesson, you will learn about the Free Transform tool ( ) that has a free distort option. Applying a free distort via the Free Transform tool is permanent and affects the underlying artwork, whereas the Free Distort effect can be edited and even removed later because it’s an effect.
Rotating objects
You rotate objects by turning them around a designated reference point. There are lots of ways to do this, including methods that range from more precise to more free-form rotation.
First, you’ll rotate the basketball manually, using the Selection tool.
- Choose “1 Front” from the Artboard Navigation menu in the lower-left corner of the Document window.
With the Selection tool (
), select the basketball. Option-drag (Mac OS) or Alt-drag (Windows) the basketball up and to the left to create a copy. When the artwork is positioned like you see in the figure, release the mouse button and then the modifier key.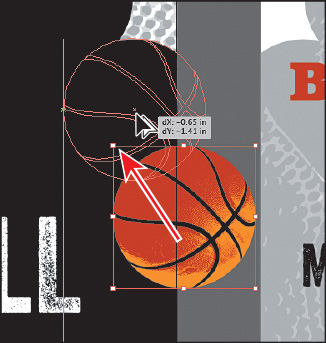
Position the pointer just off either the upper-right or lower-right corner points of the bounding box of the basketball you just created and when the pointer changes to rotate arrows (
 ), drag in a counterclockwise fashion (up). When the measurement label shows approximately 15°, release the mouse button.
TIP
You can press the Shift key as you rotate artwork with the Rotate tool (
) or Selection tool ( ) to constrain the rotation to 45°. Remember to release the mouse button before the key.
Next, you’ll rotate content using the Rotate tool (
) and learn how this method can be different from rotating with the Selection tool.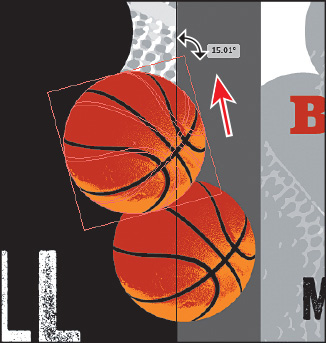
With the Selection tool, Option-drag (Mac OS) or Alt-drag (Windows) the selected basketball up and to the left to create another copy. When the artwork is positioned like you see in the following figure, release the mouse button and then the modifier key.
Select the Rotate tool (
) in the Tools panel (it’s under the Reflect tool). Notice the rotate-around point in the center of the basketball artwork. The Rotate tool allows you to rotate the object around a different reference point. Position the pointer to the right of the basketball, and drag counterclockwise (up) until the measurement label shows approximately 15°, and then release the mouse button.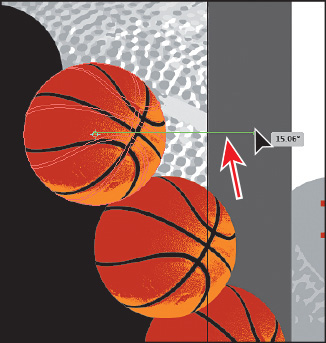
TIP
If you select an object and then select the Rotate tool (
), you can Option-click (Mac OS) or Alt-click (Windows) anywhere on the object (or artboard) to set a reference point and to open the Rotate dialog box in one step.Next, you will rotate each basketball in place using the Transform Each command.
With the Selection tool, Option-drag (Mac OS) or Alt-drag (Windows) the selected basketball up and to the left to create a final copy. When the artwork is positioned like you see in the following figure, release the mouse button and then the modifier key.
With the last basketball selected, double-click the Rotate tool in the Tools panel. In the Rotate dialog box that appears, the last rotation value should be the value set for the Angle value. It should be approximately 15°. Make sure it’s 15° and click OK.
- Choose File > Save.
)
Shearing objects
Shearing an object slants, or skews, the sides of the object along the axis you specify, keeping opposite sides parallel and making the object asymmetrical.
Next, you’ll copy artwork and apply shear to it.
- Choose View > Fit All In Window.
- Press Command+– (Mac OS) or Ctrl+– (Windows) (or View > Zoom Out) twice to zoom out. You should see content off the bottom edge of the artboards again.
- Select the Selection tool (). Click to select the grouped content below the first artboard that contains the “N1,” “N2,” etc.
- Choose Edit > Cut, and then choose “3 Back” from the Artboard Navigation menu in the lower-left corner of the Document window.
- Select the basketball net and choose Object > Hide > Selection.
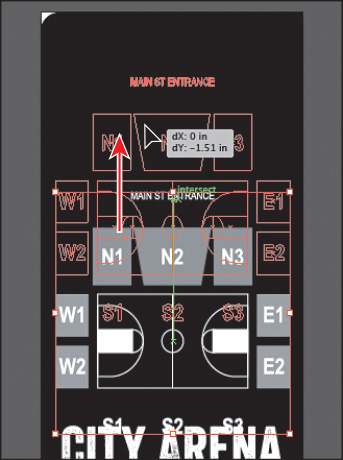
- Choose Edit > Paste to paste a copy in the center of the artboard.
Begin dragging the group of content up, and as you drag, press the Shift key to constrain the movement. Drag it up until it looks something like you see in the figure. Release the mouse button and then the Shift key.
- Choose Object > Ungroup and the Select > Deselect.
- Press Command++ (Mac OS) or Ctrl++ (Windows) once to zoom in to the artboard.
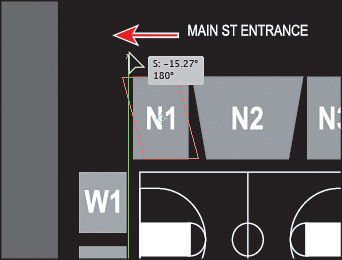
Select the gray square beneath the “N1” text. Select the Shear tool (
 ), nested within the Scale tool () in the Tools panel. Position the pointer above the shape; press the Shift key and drag to the left. The Shift key constrains the artwork to its original width.
If you were shearing a single object and precision didn’t matter, you could leave the object as is. But this artwork requires the shapes beneath “N1” and “N3” to have the same shearing applied.
- Choose Edit > Undo Shear.
With the rectangle still selected, double-click the Shear tool. In the Shear dialog box, change the Shear Angle to 170, select Preview, and click OK.
With the Selection tool, select the gray rectangle beneath the “N3” text. Double-click the Shear tool in the Tools panel and change the Shear Angle to –170, select Preview, and click OK. Leave the rectangle selected.
- Select the Selection tool, and with the Shift key pressed, select the gray rectangles behind the “N1” and “N2” text to select all three.
- Choose Object > Group.
Select the Rotate tool (
) and position the pointer over the center of the circle below (circled in the figure). When the green word “center” appears, Option-click (Mac OS) or Alt-click (Windows). In the Rotate dialog box, change the Angle to 180 and click Copy.- Choose Object > Show All to show the basketball net you hid earlier.
- Choose Select > Deselect, and then choose File > Save.
)
)
)
Transforming with the Free Transform tool
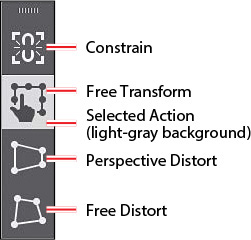
The Free Transform tool () is a multipurpose tool that allows you to distort an object, combining functions like moving, scaling, shearing, rotating, and distorting (perspective or free). The Free Transform tool is also touch-enabled, which means you can control transformation using touch controls on certain devices. For more information on touch controls, see the sidebar at the end of this section.
- Select the Selection tool () in the Tools panel. Press the Spacebar to access the Hand tool (
 ) temporarily. Drag up so you can see the basketball court artwork beneath the artboards.
 Click to select the basketball court group, and then select the Free Transform tool (
) in the Tools panel.After selecting the Free Transform tool, the Free Transform widget appears in the Document window. This widget, which is free-floating and can be repositioned, contains options to change how the Free Transform tool works. By default, the Free Transform tool allows you to move, shear, rotate, and scale objects. By selecting other options, like Perspective Distort, you can change how the tool transforms content.
First, you’ll change the width of the selected artwork using the Free Transform tool.
Position the pointer over the left middle point of the artwork bounding box, and the pointer changes its appearance (
 ), indicating that you can shear or distort. Begin dragging to the right. As you drag, press the Option (Mac OS) or Alt (Windows) key to change both sides at once. Notice that you can’t drag the artwork up or down—the movement is constrained to horizontal by default. When a width of approximately 3.7 in shows in the measurement label, release the mouse button and then the key.
Next, you will rotate with the Free Transform tool around a specific point.
Position the pointer over the lower-left corner and double-click when the pointer looks like this (
 ). This moves the reference point and ensures that the artwork will rotate around it. Press the Shift key and drag the upper-right corner in a counterclockwise fashion until you see 90° in the measurement label. Release the mouse button and then the Shift key.
Like other transform tools, by holding down the Shift key while dragging with the Free Transform tool, you can constrain the movement for most of the transformations. If you don’t want to hold down the Shift key, you can also select the Constrain option in the Free Transform widget before transforming, to constrain movement automatically. After dragging, the Constrain option is deselected.
Position the pointer over the right middle point of the artwork bounding box, and drag to the right. Drag until a width of approximately 7.7 in shows in the measurement label.
With the Free Transform tool still selected, click the Perspective Distort option in the Free Transform widget (circled in the figure below).
With this option selected, you can drag a corner point of the bounding box to distort the perspective.
NOTE
The Free Distort option of the Free Transform tool (
) allows you to freely distort the selected content by dragging one of the corner bounding points.Position the pointer over the upper-left corner of the bounding box, and the pointer changes in appearance (
 ). Drag to the right until it looks like the figure.
- Change the Opacity to 60% in the Control panel.
- Press Command+– (Mac OS) or Ctrl+– (Windows) several times to zoom out, until you see the artboard with the basketballs on it.
Select the Selection tool and drag the artwork onto the artboard similar to what you see in the figure.
Select the Artboard tool (
 ) in the Tools panel. Drag the 1 Front artboard to the left until the basketball court is no longer overlapping the artboard to the right.
NOTE
When you drag an artboard with content on it, the art moves with the artboard, by default. If you want to move an artboard but not the art on it, select the Artboard tool (
) and then click to deselect Move/Copy Artwork With Artboard ( ) in the Control panel.
- Choose View > Fit All In Window and then choose Choose File > Save.
)
)
)
)
)
)