- Motion-Tweening Strategies
- Animating titles
- Shape-Tweening Strategies
- Creating Special Effects
- Animated and Complex Masks
This chapter is from the book
This chapter is from the book
This chapter is from the book
Animated and Complex Masks
Masking is a simple way to reveal portions of the layer or layers below it selectively. This technique requires making one layer a mask layer and the layers below it the masked layers.
By adding tweening to either or both the mask layer and the masked layers, you can go beyond simple, static peepholes and create masks that move, change shape, and reveal moving images. Use animated masks to achieve such complex effects as moving spotlights, magnifying lenses that enlarge underlying pictures, or "x-ray" types of interactions that show more detail within the mask area. Animated masks are also useful for creating cinematic transitions such as wipes, in which the first scene is covered as a second scene is revealed; and iris effects, in which the first scene collapses in a shrinking circle, leaving a second scene on the screen.
Inserting layers above and below masks can add even more complexity to animated masks. A shape filled with an alpha gradient, for example, can make the hard edges of a mask fade out slowly for a subtle spotlight.
Using movie clips in mask layers opens even more possibilities: multiple masks, masks that move on a motion guide, and even dynamically generated masks that respond to the user. Because dynamic masks rely on ActionScript, however, I'll discuss them in detail in Chapter 7.
To tween the mask layer:
In Layer 1, create a background image or import a bitmap.
Insert a new layer above the first layer.
Select the top layer, and choose Modify > Layer.
Select Mask Type.
Select the bottom layer, and choose Modify > Layer.
Select Masked Type. The top layer becomes the mask layer, and the bottom layer becomes the masked layer (Figure 1.58).
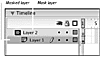 Figure 1.58 Layer 2 is the mask layer, and Layer 1 is the masked layer.
Create a shape tween or a motion tween in the mask layer (the top layer) (Figure 1.59).
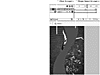 Figure 1.59 A shape tween of a moving vertical swirl is on the mask layer. The diver image is on the masked layer.
Insert sufficient frames into your masked layer to match the number of frames in the mask-layer tween.
Lock both layers to see the effects of your animated mask on the image in the masked layer (Figure 1.60).
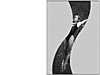 Figure 1.60 The shape tween uncovers the image of the diver. The portion
of the mask that does not reveal the photo is the color of the Stage.
Figure 1.60 The shape tween uncovers the image of the diver. The portion
of the mask that does not reveal the photo is the color of the Stage.Tips
Place duplicate images that vary slightly in a normal layer under both the mask and masked layers. This technique makes the animated mask act as a kind of filter that exposes the underlying image. Add a bright image in the masked layer and a dark version of the same image in a normal layer under the masked layer, for example. The mask becomes a spotlight on the image (Figure 1.61). Explore other duplicate-image combinations, such as a sharp and a blurry image, a grayscale and a color image, or an offset image (Figure 1.62).
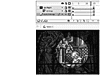 Figure 1.61 The moving spotlight in the mask layer (spotlight) uncovers
the stained-glass image in the masked layer (bitmap). A duplicate darker image
resides in the bottom, normal layer (dark bitmap).
Figure 1.61 The moving spotlight in the mask layer (spotlight) uncovers
the stained-glass image in the masked layer (bitmap). A duplicate darker image
resides in the bottom, normal layer (dark bitmap).
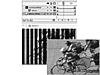 Figure 1.62 The moving vertical shapes in the mask layer (venetian blinds) uncover the image of bicyclists in the masked layer (bikers). A duplicate image in the bottom normal layer (bikers offset) is shifted slightly to create the rippling effect.
Place a tween of an expanding box in the mask layer that covers the Stage to simulate cinematic wipes between images (Figure 1.63).
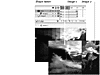 Figure 1.63 The mask layer contains a large shape tween that covers the
entire Stage. This technique creates a cinematic wipe between an image in the
masked layer (image 1) and an image in the bottom, normal layer (image 2).
Figure 1.63 The mask layer contains a large shape tween that covers the
entire Stage. This technique creates a cinematic wipe between an image in the
masked layer (image 1) and an image in the bottom, normal layer (image 2).
) Figure 1.58
Figure 1.58) Figure 1.59
Figure 1.59) Figure 1.60
Figure 1.60) Figure 1.61
Figure 1.61) Figure 1.62
Figure 1.62) Figure 1.63
Figure 1.63To tween the masked layer:
Beginning with two layers, modify the top to be the mask layer and the bottom to be the masked layer.
Draw a filled shape or shapes in the mask layer (Figure 1.64). This area becomes the area through which you see your animation on the masked layer.
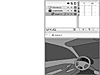 Figure 1.64 The windshield shapes are in the mask layer called windshields. The drawing of the car interior is in a normal layer above the windshields layer.
Create a shape tween or a motion tween in masked layers that pass under the shapes in the mask layer (Figure 1.65).
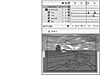 Figure 1.65 Several motion tweens in masked layers (tree, cow, ground, and sky) move under the windshield shapes in the mask layer.
Lock both layers to see the effects of your animated masked layers as they show up behind your mask layer (Figure 1.66).
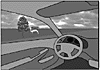 Figure 1.66 The images of the tree, cow, ground, and sky move under the mask, creating the illusion of the car's forward motion.
 Tip
This approach is a useful alternative to using shape tweens to animate borders or similar types of objects that grow, shrink, or fill in. Imagine animating a fuse that shortens to reach a bomb (Figure 1.67). Create a mask of the fuse, and animate the masked layer to become smaller slowly, making it look like just the fuse is shortening (Figure 1.68). Other examples that could benefit from this technique include trees growing, pipes or blood vessels flowing with liquid, and text that appears by filling in with color. Just remember that Flash doesn't recognize strokes in the mask layer, so if you want to create thin lines in the mask layer, use fills only.
 Figure 1.67 The fuse of a bomb shortens.
 Figure 1.68 The bomb's fuse is a thin shape in the mask layer. The rectangular tween in the masked layer shrinks, making it appear as though the fuse is shortening.
) Figure 1.64
Figure 1.64) Figure 1.65
Figure 1.65) Figure 1.66
Figure 1.66) Figure 1.67
Figure 1.67) Figure 1.68
Figure 1.68In the mask layer, Flash sees all fills as opaque shapes, even if you use a transparent solid or gradient. As a result, all masks have hard edges. To create a softer edge, place a gradient with a transparent center either under or over the mask to hide the edges.
To create a soft-edged mask:
Create a mask layer and a masked layer.
Place or draw a background image in the masked layer.
Draw an ellipse in the mask layer.
Copy the ellipse.
Insert a new layer between the mask layer and the masked layer. Your new layer will become a masked layer.
Choose Edit > Paste in Place (Cmd-Shift-V for Mac, Ctrl-Shift-V for Windows). A new ellipse appears in the new masked layer, right under the ellipse in the top mask layer (Figure 1.69).
 Figure 1.69 The same ellipse appears in both the mask layer (ellipse 1)
and the top masked layer (ellipse 2). The image of the windsurfer is in the
bottom masked layer (background).
Figure 1.69 The same ellipse appears in both the mask layer (ellipse 1)
and the top masked layer (ellipse 2). The image of the windsurfer is in the
bottom masked layer (background).Fill the pasted ellipse with a radial gradient, defined with a transparent center to an opaque perimeter, in the same color as the Stage (Figure 1.70).
 Figure 1.70 A radial gradient with a transparent center in the top masked layer.
Lock all three layers to see the effects of the mask (Figure 1.71). The mask layer lets you see through an elliptical area. The top masked layer hides the edges of the ellipse by creating a gradual fade toward the center. The bottom masked layer holds the contents of your background image (Figure 1.72).
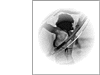 Figure 1.71 The resulting soft-edged mask.
 Figure 1.72 The soft-edged mask is the combination of the mask in the top layer (mask
layer), a radial gradient in the middle layer (top masked layer), and the
background image in the bottom layer (bottom masked layer).
Figure 1.72 The soft-edged mask is the combination of the mask in the top layer (mask
layer), a radial gradient in the middle layer (top masked layer), and the
background image in the bottom layer (bottom masked layer).
) Figure 1.69
Figure 1.69) Figure 1.70
Figure 1.70) Figure 1.71
Figure 1.71) Figure 1.72
Figure 1.72Animated and Complex Masks
Creating soft edges with radial transparent gradients works well with circular masks, but if the shapes of your masks are more complicated, you'll need to resort to customizing the fades of your edges.
To create a soft-edged mask with an irregular shape:
Create a mask layer and a masked layer.
Place or draw an image in the masked layer.
Draw an irregular shape in the mask layer.
Copy the shape.
Insert a new masked layer between the mask layer and the first masked layer.
Choose Edit > Paste in Place. Your irregular shape appears in the new masked layer right under the original shape in the top mask layer (Figure 1.73).
 Figure 1.73 An irregular shape in the top masked layer above an image in the bottom masked layer.
With the Oval or Rectangle tool, draw an outline around your shape (Figure 1.74).
 Figure 1.74 An empty rectangle drawn around the irregular shape.
Fill the area between your shape and the outline with the background color, and delete the fill in the original shape. Your complex shape is now the "hole" of a larger shape (Figure 1.75).
 Figure 1.75 By filling the area between the shape and the rectangle and then deleting the shape, you create a hole.
Select the entire shape, and choose Modify > Shape > Soften Fill Edges (Figure 1.76). The Soften Fill Edges dialog box appears (Figure 1.77). The Distance option determines the thickness of the soft edge. The Number of Steps option determines how gradual the transition from opaque to transparent will be. The Direction option determines which way the edge softening will take place.
 Figure 1.76 Choose Modify > Shape > Soften Fill Edges.
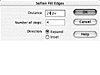 Figure 1.77 The Soften Fill Edges dialog box.
Enter the Distance (in pixels) and the Number of Steps, and choose Expand for the Direction. All the edges around your shape soften. Because the entire shape expands, the actual hole shrinks (Figure 1.78).
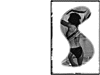 Figure 1.78 The softened edges expand into the Òhole,Ó where it is visible through the mask in the top mask layer.
Lock all three layers to see the effects of the mask (Figure 1.79).
 Figure 1.79 The soft edges of an irregular mask created with Modify > Shape > Soften Fill Edges.
) Figure 1.73
Figure 1.73) Figure 1.74
Figure 1.74) Figure 1.75
Figure 1.75) Figure 1.76
Figure 1.76) Figure 1.77
Figure 1.77) Figure 1.78
Figure 1.78) Figure 1.79
Figure 1.79Although Flash allows multiple masked layers under a single mask layer, you cannot have more than one mask layer affecting any number of masked layers (Figure 1.80). To create more than one mask, you must use movie clips. Why would you need to have multiple masks? Imagine creating an animation that has two spotlights moving independently on top of an image (Figure 1.81). Because the two moving spotlights are tweened, they have to be on separate layers. The solution is to incorporate the two moving spotlights into a movie clip and place the movie clip on the mask layer.
) Figure 1.80 Layer 1 and Layer 2 are both defined as mask layers, but only
Layer 2 affects Layer 3—the masked layer.
Figure 1.80 Layer 1 and Layer 2 are both defined as mask layers, but only
Layer 2 affects Layer 3—the masked layer.
) Figure 1.81 Two independent spotlights moving, each uncovering portions of the image.
Figure 1.81 Two independent spotlights moving, each uncovering portions of the image.
You will learn much more about the movie clip in chapters 4 and 7. If you'd like, skip ahead to read about movie clips and return when you feel comfortable.
To create multiple masks:
Create a mask layer and a
Place your image on the
Choose Insert > New Symbol for Mac, Ctrl-F8 for Windows) The Create New Symbol appears.
Enter a descriptive name Movie Clip (Figure 1.82); then click OK.
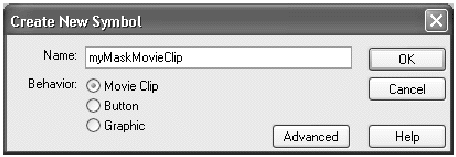 Figure 1.82 Choose Movie Clip to create a new movie-clip symbol.
Flash creates a movie-clip symbol, and you enter symbol-editing mode for that symbol.
Create two motion tweens of spotlights moving in different directions on the Timeline of your movie-clip symbol (Figure 1.83).
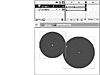 Figure 1.83 The two moving spotlights are motion tweens inside the movie clip called myMaskMovieClip.
Return to the main Stage, and drag and instance of your movie-clip symbol into the mask layer (Figure 1.84).
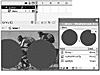 Figure 1.84 An instance of the myMaskMovieClip movie clip is in the top
(mask) layer, and the image of the bikers is in the bottom (masked) layer.
Figure 1.84 An instance of the myMaskMovieClip movie clip is in the top
(mask) layer, and the image of the bikers is in the bottom (masked) layer.Choose Control > Test Movie to see the effects of the movie-clip mask. The two motion tweens inside the movie clip both mask the image on the masked layer.
Tips
To see what your masks are uncovering, use a transparent fill or choose the Outlines option in your Layers Properties (Figure 1.85).
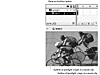 Figure 1.85 Viewing your masks as outlines lets you see the image underneath; choose the Outlines option in the Layers Properties dialog box, or click the Show as Outlines icon in your layer.
To prevent the animation inside the movie clip from looping constantly, add a keyframe to its last frame and also add a Stop action.
) Figure 1.82
Figure 1.82) Figure 1.83
Figure 1.83) Figure 1.84
Figure 1.84) Figure 1.85
Figure 1.85Putting a movie-clip instance inside the mask layer not only makes multiple masks possible, but also provides a way to have a mask follow a motion guide. Build your tween that follows a motion guide inside a movie clip. Place that movie clip in a mask layer on the main Stage, and voilà—you have a mask that follows a path.
To guide a mask on a path:
Create a mask layer and a masked layer.
Place your image on the masked layer (Figure 1.86).
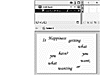 Figure 1.86 The words of this interesting question and a background fill are put on the bottom (masked) layer.
Create a new movie-clip symbol.
Inside your movie-clip symbol, create a motion tween that follows a motion guide (Figure 1.87).
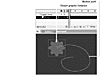 Figure 1.87 Inside a movie clip, the flower graphic instance follows a motion path.
Return to the main Stage, and drag an instance of your movie clip into the mask layer (Figure 1.88).
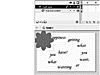 Figure 1.88 The movie clip containing the moving flower is in the mask layer and positioned over the words.
Edit the motion path to get it exactly the way you want, relative to the other graphics on the Stage, by choosing Edit > Edit in Place or double-clicking the instance (Figure 1.89). Flash grays out all graphics except for the instance you are editing.
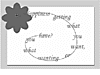 Figure 1.89 Edit in Place allows you to make changes in your movie-clip symbol and see the graphics on the main Stage at the same time.
Choose Control>Test Movie to see the effect of your movie clip on the mask layer. The animation follows its path in the motion guide, and at the same time, it masks the image in the masked layer on the main Stage (Figure 1.90).
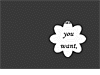 Figure 1.90 The moving flower exposes the question as it moves along its motion path.
) Figure 1.86
Figure 1.86) Figure 1.87
Figure 1.87) Figure 1.88
Figure 1.88) Figure 1.89
Figure 1.89) Figure 1.90
Figure 1.90