This chapter is from the book
This chapter is from the book
This chapter is from the book
Setting Up the Grid
The nonprinting, customizable grid appears as an overlay across the entire document window. As with the rulers, it can be used for scaling and positioning, but it can be especially helpful for maintaining symmetry in your layout and design, or for occasions when you'd like objects to snap to specific points in the window.
To show or hide the grid:
From the View menu, choose Grid to turn the grid on and off (Figure 2.44).
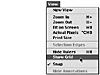 Figure 2.44 Choose View > Show Grid to display the document grid.
) Figure 2.44
Figure 2.44To change the grid settings:
-
From the Edit menu, choose Preferences > Grid to open the Grid Preferences dialog box (Figure 2.45).
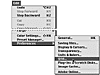 Figure 2.45 Choose Edit > Preferences > Grid to open the Grid Preferences dialog box.
 From the Color pop-up menu, choose a preset grid color, or choose Custom (Figure 2.46).
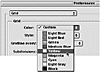 Figure 2.46 Choose a grid color from the list of preset colors or create a custom color.
-
From the Style pop-up menu, choose a line style for the major grid lines (Figure 2.47).
 Figure 2.47 Examples of grid line styles.
 In the Gridline Every pop-up menu, choose a unit of measure; then enter a number in the accompanying field to define the spacing of the major grid lines.
-
In the Subdivisions field, enter a number to define the frequency of minor grid lines (Figure 2.48).
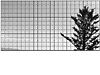 Figure 2.48 This figure shows a document grid with major grid lines set
every inch, subdivided by four minor grid lines.
Figure 2.48 This figure shows a document grid with major grid lines set
every inch, subdivided by four minor grid lines. -
Click OK.
) Figure 2.45
Figure 2.45) Figure 2.46
Figure 2.46Choosing Custom displays the color picker, where you can select a custom grid color.
) Figure 2.47
Figure 2.47) Figure 2.48
Figure 2.48