This chapter is from the book
This chapter is from the book
This chapter is from the book
Animating Along a Path
In Flash, when you need to move objects in something other than a straight line, path-based animation is the simple, straightforward way to do it. In fact, moving symbols along a path is the only way to do it without programming special routines in ActionScript. (We'll cover those kinds of advanced techniques later in the book.)
Since we have already discussed how to make your movies more efficient by using symbols, the next logical step is to begin using those symbols to create movie clips. A movie clip is really nothing more than a symbol with two special properties: it has its own timeline, and that timeline runs independently of the main timeline. Because it's almost always a good idea to make whatever you create reusable, we will build the path-based animations you'll create inside a movie clip.
TIP
Movie clips are the most important building block in Flash. Using (and understanding) movie clips will raise your Flash work above the realm of the beginner. Think of a movie clip as a sort of super symbol that changes static symbols into rich, reusable objects. Even better, movie clips can contain other movie clips, allowing you to build behaviors and animations that can be combined into even more interesting and robust objects.
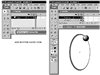
Click on the Scene 1 tab near the top of the Flash application window, just below the main toolbar.
Note the changes to the TEC logo when you change views.
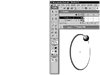
Create a new empty symbol by pressing Ctrl+F8 (Windows) or Command+F8 (Macintosh). Call it Electron Orbit, and make sure you specify Movie Clip as the symbol type. Click OK. Open the Library panel and double-click on Electron Orbit to edit the newly made symbol.
You won't see much of a change in your screen, but notice the tabs just under the horizontal toolbar. Next to Scene 1 you should see another tab labeled Electron Orbit. If you do, congratulations! You're in the right place.
From the Library panel, drag the Orbit symbol onto the stage.
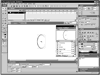
Center the Orbit object in the middle of the Electron Orbit symbol.
NOTE
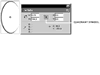
"Center" is a relative concept in Flash. Each symbol has an origin which may or may not be the center of the object. The difference? The origin is the point that Flash will use to rotate the object or symbol. Therefore, if you want an object to rotate around something other than the physical or geometric center of the symbol, you'll want to relocate the object or the origin to suit your needs. The easiest way to do this is through the Info panel.
Select the Orbit symbol on the stage, and then open the Info panel. Note the quadrant symbol next to the edit boxes for the X and Y values. Click in the center of this symbol to specify alignment to the center of the symbol. Change the X and Y values to 0.
The quadrant symbol allows you to specify an alignment point. You can choose to see the coordinates for the center or the upper left corner.
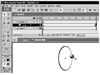
Create a new, blank layer in the timeline. Drag the Dot symbol onto the stage.
Your 3D dot symbol now appears in the new layer.
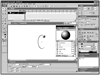
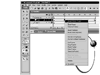
Move the dot over one of the end points of the elliptical arc on the first layer. Then right-click (Windows) or control-click (Macintosh) the new layer and choose Add Motion Guide from the contextual menu.
This will create a third layer, and indent the layer with the dot under it. Essentially, you have created a layer on which you can draw a path. The path you create will control the movement of the object on the indented layer. If this seems confusing, read on; we'll talk more about motion layers soon.
NOTE
In addition to being able to add a motion guide via the contextual menu, you can take advantage of the user interface. Just click on the Add Motion Guide icon under the layers area.
Select the oval tool and draw an ellipse that follows the shape of the Orbit symbol. If the object you create is filled, delete the fill, leaving only the line. Select a small portion of the ellipse just below where you have positioned the dot symbol, and delete the selection.
NOTE
Make sure that snap to objects (View > Snap to Objects) is turned on and that you are reasonably close to drawing an ellipse over the orbit symbol. This enables Flash to snap the ellipse into place and size it to match the orbit object.
You want a path that is almost—but not quite—a complete ellipse.
Every path must have a start and an end point. Because circles and ellipses have no beginning and no end, you must cut out a small section of their outline in order to create a path that Flash can use. Be sure to keep the gap between the start point and the end point small, because if you don't, there will be a noticeable jump as the object moves from the end point to the start point as it repeats its cycle.
Select all the layers at frame 40 of the timeline. Extend the frames to that point. Select the middle layer (the one that contains the dot symbol) and create a keyframe. In the new keyframe at frame 40, move the dot symbol to the endpoint of the motion path.
Use Insert > Frames or the F5 key to extend frames out to a specified point.
Create the keyframe by choosing Insert > Keyframe or pressing F6.
Flash relies on keyframes as a way of defining "snapshots" of how you want each object positioned. Typically, there is at least one blank frame between the first and second keyframe. When you turn on Motion Tween (more on this in a minute), Flash calculates the differences between the way the symbol looks in the first and second keyframes and populates the intermediate frames with that interpolation.
NOTE
By default, every object in Flash has at least one keyframe; in our example, the first keyframe is at frame 1.
TIP
Flash has the ability to tween (automatically interpolate between keyframes), saving you a lot of time and trouble when you animate. There are two kinds of tweens—motion tweens and shape tweens, which apply to symbols and shapes respectively. You can't use motion tweens on shapes not already converted to symbols (well, technically you can, but Flash converts them to symbols for you—it just doesn't tell you about it, so it's much better to make your objects into symbols first). Shape tweens only work on (you guessed it) shapes. You might think that shape tweening is a really useful technique...right up until you try it. I consider shape tweening a last resort, as it's generally pretty difficult to make look exactly the way you want.
What makes path animation different from a simple motion tween is the addition of what Flash calls a motion layer. A motion layer is much like a regular layer, but has several properties that differentiate it. First, a motion layer does not display any graphic content of its own when you export to SWF. Second, it is by definition bound to the layer or layers immediately below it. Third, if you draw a path on the motion layer, and if that path intersects both the instance of the object on the first keyframe and the instance of the object on the second keyframe, then the object will now tween along the path, instead of in a straight line.
Click after the first frame of the Dot layer. Then right-click (Windows) or control-click (Macintosh) the new layer and choose Create Motion Tween from the contextual menu.
Unlike its behavior with a lot of other functions, Flash is very picky about following the rules for path-based animation. If your path and objects don't intersect precisely, the symbol will not tween along the path. If you don't get the results you want on the first try, it's usually because the symbol and the path are not perfectly aligned. Fortunately, you can turn on snap to objects (View > Snap to Objects) and either adjust the path itself or move the symbol on one or both of the keyframes until it snaps to the path object. If the path and symbol snap together on both keyframes, you should now be able to play your animation and see the dot following the path around the Orbit symbol.
TIP
Don't worry about hiding the motion guide layers—they automatically become invisible when you publish your Flash movie to the SWF format.
Play the animation (Ctrl+Enter in Windows, Command+Return on a Mac).
The dot now appears to orbit along the orbit path. Notice, though, that the Electron Orbit symbol curve is wider in some parts and thinner in others. In order to make this animation even more convincing, we'll scale the dot as it orbits.
Click on the dot layer at frame 15, and then press F6 to create a keyframe. Click on the dot on the stage and open the Transform panel. Make sure the Constrain check box is checked, and then change the scale of the dot on frame 15 to 180%.
Flash understands that you want to make some sort of incremental change when you add a keyframe in the midst of a motion tween. By changing the size of the dot, you imply a sense of 3D motion, making it appear that the dot is moving closer and farther away as it orbits.
)
)
)
)
)
)
)
)
)