Meeting the Layers
Before we jump in and start creating a bunch of layers, you should get familiar with their place of residence: the Layers palette ( Figure 3.2 ). You're going to be spending a lot of time with this palette, so take a moment now to get on friendly terms with it. It's not terribly complicated, and after you've used it a few times, you should know it like the back of your hand.
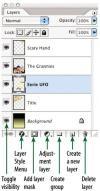
Figure 3.2 The Layers palette.
As you make your way through this chapter, you'll learn about the Layers palette and the fundamental tasks associated with it. Now, assuming that you've done your part and introduced yourself to the Layers palette, let's get on with the business of creating and manipulating layers in Photoshop.
Creating Layers
Photoshop will automatically create the majority of the layers you'll need. A new layer is added anytime you copy and paste an image or drag a layer between documents (we'll talk about this later in the chapter). If you're starting from scratch, however, you can click the New Layer icon at the bottom of the Layers palette to create a new, empty layer.
Give it a try: Choose File>New and create a document that is around 200 x 200 pixels in size with a transparent background (the resolution doesn't matter at this point). Then, click the New Layer icon at the bottom of the Layers palette to create an empty layer. Next, click on your foreground color and pick out a bright color, choose the round Shape tool (it's called an Ellipse and is grouped with the Rectangle Shape tool found below the Type tool in the Tools palette) and click on the rightmost icon of the three available in the upper left of the Options bar. Now, click and drag across your image to draw a big circle ( Figure 3.3 ). Once you're done with the first shape, create another layer and use the Rectangle Shape tool to draw a square on it, but with a different color ( Figure 3.4 ). Finally, create a third layer and draw a triangle ( Figure 3.5 ) with yet another color (create the triangle by using the Polygon Shape tool with the Sides setting to 3 in the Options bar). You can use this simple document you've just created to try out the concepts in the following sections that describe the features of the Layers palette ( Figure 3.6 ).

Figure 3.3 A new layer.

Figure 3.4 The second layer.

Figure 3.5 The third layer.
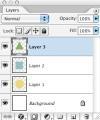
Figure 3.6 The Layers palette view.
Active Layer
The layer you're currently working on will be highlighted in the Layers palette. To change the active layer, just click the name of another layer. Or, if you'd rather not use the Layers palette, Command-click (Mac) or Ctrl-click (Windows) on your image while the Move tool is active. That will cause the topmost layer that contains information under your cursor to become active. As you Command/Ctrl-click on different parts of your image (circle, square, triangle in this example), watch the Layers palette to see which layer becomes active. Unlike previous versions, Photoshop CS2 allows you to have more than one layer active at a time, but for now we'll stick to working with one layer to keep things simple.
Stacking Order
You can change the stacking order of the layers by dragging the name of one layer above or below the name of another layer in the Layers palette. The topmost layers can often obstruct your view of the underlying images. To change this, you can reorder the layers by dragging them up or down in the Layers palette ( Figures 3.7 to 3.10 ).

Figure 3.7 The original image.
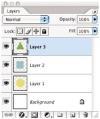
Figure 3.8 The original Layers palette.

Figure 3.9 The changed stacking order.
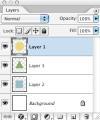
Figure 3.10 The revised Layers palette.
Background Image
The Background image in Photoshop (which some people refer to as the Background layer) is a bit different than the other layers that make up your image. If you liken the layers to the individual pages in a pad of tracing paper, you could think of the pad's cardboard backing as the Background image. It might be the same size and it relates to the other pages in the pad, but it has some qualities that make it quite different.
The Background image has the same limitations as most of the common file formats in use today (such as JPEG and EPS): it's always 100% opaque, no part of the background can extend beyond the document's bounds, and it's not actually considered a layer since most file formats don't support layers (with a few exceptions such as .PSD and .TIFF formats). In fact, that's the whole reason why the Background image exists. If all your document contains is the Background, then you should be able to save the image in just about any file format without losing information. That's also why most images start life as a Background image—because they originated in a file format that didn't support layers or came from a program that doesn't support layers. When you save a layered document into a file format that doesn't support layers (like JPEG), Photoshop will automatically combine all the layers that make up your image and turn the result into a Background image (known as flattening).
The Background image always displays a lock symbol to indicate that it cannot be repositioned with the Move tool, moved up or down in the layers stack, or be made transparent. For that reason, many tools will work differently when the Background image is active. For instance, the Eraser tool will paint with your Background color when the Background image is active since it is not able to make areas of the Background image transparent.
With all that said, you don't actually have to have a Background in your document. If you want to convert the Background into a normal layer, just change its name (the Background image must be named "Background," otherwise it becomes a normal, unlocked layer). To change the name of a layer, double-click the layer's name in the Layers palette and type a new name.
The Eyeballs: What They See Is What You Get
The eyeballs in the Layers palette determine which layers will be visible in your document as well as which ones will print. The eyeballs turn on and off in a toggle effect when you click them: Now you see them, now you don't.
If you turn off all the eyeballs in the Layers palette, Photoshop will fill your screen with a checkerboard. This checkerboard indicates that there's nothing visible in the document. (If Photoshop filled your screen with white instead, you might assume that there was a layer visible that was filled with white.) You can think of the checkerboard as the areas of the document that are empty. When you view a single layer, the checkerboard indicates the empty areas of that layer. As you turn on the other layers in the document, the checkerboard is replaced with the information contained on those layers. When multiple layers are visible, the checkerboard indicates where the underlying image will not be obstructed by the elements on the visible layers ( Figures 3.11 to 3.14 ).

Figure 3.11 The checkerboard indicates a transparent area.
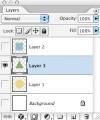
Figure 3.12 The Layers palette view.

Figure 3.13 As more layers become visible, the transparent areas become smaller.
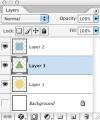
Figure 3.14 The Layers palette view.
Opacity
The Opacity setting at the top of the Layers palette controls the opacity of the active layer. When this setting is lowered, the entire layer becomes partially transparent (transparent is the exact opposite of opaque). If you want to lower the opacity in a specific area instead of the entire layer, you can lower the opacity of the Eraser tool and then brush across the area of the layer you want to become more transparent—that is, unless the background is active. If you use the Eraser tool on the background, it will simply paint with your background color instead of truly deleting areas (remember, the background is always opaque).
Try this: Open the document you created earlier in this chapter. Create a new layer, and then use any painting tool to brush across the layer. Now, lower the Opacity setting in the Layers palette to 70% ( Figures 3.15 to 3.17 ).

Figure 3.15 Layer at 100% opacity.

Figure 3.16 Layer at 70% opacity.
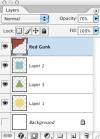
Figure 3.17 Lowering the opacity of a layer affects the entire layer.
Now let's compare this effect with what happens when you lower the Opacity setting of the Paintbrush tool. Create another new layer; however, this time leave the layer's Opacity setting at 100%. Now choose the Paintbrush tool, change the tool's Opacity setting to 70% (in the options bar), and then brush across the layer (just don't overlap the paint you created earlier). The paint should look exactly the same as the paint that appears in the other layer ( Figures 3.18 and 3.19 ).

Figure 3.18 The Paintbrush options view.

Figure 3.19 Painting with a 70% Opacity setting.
Finally, create one more new layer, and paint across it with the tool's Opacity setting at 100%. Now, brush across an area with the Eraser tool using an Opacity setting of 30% ( Figures 3.20 and 3.21 ).

Figure 3.20 The Eraser options view.

Figure 3.21 Using the Eraser tool with a low Opacity setting will also make areas of a layer transparent.
All of these options do the same thing to your image. You just have to think a bit: Do you want to apply the Opacity setting to the entire layer? If so, use the Layers palette's Opacity setting. Do you want to apply the Opacity setting to only part of the layer? If so, use the Opacity setting in the tool's options bar. Do you want to change the opacity of an area you've already painted across? If so, use the Eraser tool with an Opacity setting.
Photoshop always (well, almost always) offers you more than one way of doing things. It reminds me of my favorite hardware store, McGuckins. It's the kind of place that takes your breath away—it has everything! If you just want a screwdriver, you'll probably find an entire aisle full of screwdrivers, each one designed for a specific use. Photoshop has the same approach; you just have to play around with it to figure out which tool best suits your needs.
Moving Layers
If you want to move everything that's on a particular layer, first make that layer active by clicking its name; then use the Move tool to drag it around the screen ( Figure 3.22 ). If you drag the layer onto another document window, Photoshop will copy the layer into that document. If you want to move just a small area of the layer, you can make a selection and then drag from within the selected area using the Move tool.

Figure 3.22 Using the Move tool to reposition a layer.
You can also use the arrow keys on your keyboard (when the Move tool is active) to nudge a layer one pixel at a time. Holding Shift while using the arrow keys will nudge the active layer 10 pixels at a time.
Selecting Multiple Layers
With CS2, Adobe gave us the ability to make more than one layer active at a time. Clicking on individual layers with no keys held will cause individual layers to be active ( Figure 3.23 ). Command-clicking (Mac) or Ctrl-clicking (Windows) on a layer will add that layer to the other layers that are selected ( Figure 3.24 ). Shift-clicking will select the range of layers that appears between the layer you Shift-clicked on and the one you clicked on previously ( Figure 3.25 ). You can also Shift-Command-click (Mac) or Shift-Ctrl-click (Windows) within an image while the Move tool is active to add the layer that appears under your mouse to the layers that are currently selected. There is no limit to the number of layers that can be selected at one time.
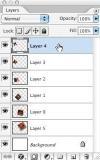
Figure 3.23 Clicking on individual layers will cause a single layer to become active.
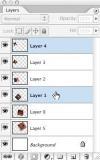
Figure 3.24 Holding Command/Ctrl when clicking will add a layer to the ones that are already selected.
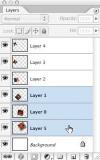
Figure 3.25 Shift-clicking a layer will select the layers between that layer and the last one you clicked on.
Many of Photoshop's features will be unavailable when multiple layers are selected (such as filters and adjustments) because they were designed to only work on one layer at a time. When multiple layers are selected, you can do the following:
- Reposition by clicking and dragging with the Move tool.
- Change the stacking order by dragging the selected layers up or down in the layers stack.
- Scale or rotate (but not warp) the layers by choosing an option from the Edit>Transform menu.
- Align or distribute the layers using commands found in the Layer menu.
- Duplicate, delete, link or group the layers using commands found on the side menu of the Layers palette.
Linking Layers
When multiple layers are linked together, using the Move tool or choosing Edit > Transform will cause the currently active layer and all the layers that are linked to it to change (as if all the linked layers were selected). The advantage to linking layers is that the linking behavior will be maintained regardless of which layer is active. So, if two layers should always relate in size and position, link them together so that rerlationship will remain consistent. To link multiple layers, select the layers and then click on the Link symbol that's found at the bottom of the Layers palette ( Figure 3.26 ). After linking the layers, moving or transforming the image while any one of the linked layers are selected will cause all the linked layers to change. To unlink layers, select the layers you want to unlink and click the link symbol again.
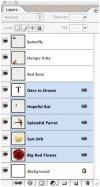
Figure 3.26 The Chain icon indicates linked layers.
Trimming the Fat
If you use the Move tool to reposition a layer, and a portion of the layer starts to extend beyond the edge of your document, Photoshop will remember the information beyond the edge ( Figure 3.27 ). Therefore, if you move the layer away from the edge, Photoshop is able to bring back the information that was not visible. You can save a lot of memory by getting Photoshop to clip off all the information beyond the edge of the document ( Figure 3.28 ). Here's a little trick for trimming off that fat. Just choose Select > All and then choose Image > Crop—no more wasted memory.

Figure 3.27 The original image. (multiple images ©2005 PhotoSpin, www.photospin.com)

Figure 3.28 After the image is cropped.
It also wastes memory when you leave extra white space around the edge of your image ( Figure 3.29 ). Because the paper you print on is white to begin with, that extra white space just makes your file size larger, and has no effect on how the image will look when it's printed. You can choose Image > Trim to have Photoshop remove any unnecessary white space ( Figure 3.30 ). Just adjust the Based On setting so that it will find white information in your image (depending on which corner of your image contains white), and then specify which edge of the document you'd like to trim away—I usually leave all four of the Trim Away check boxes turned on ( Figure 3.31 ).

Figure 3.29 The white space around this image increases its file size.

Figure 3.30 Applying the Trim command, removes the extra white space.

Figure 3.31 The Trim settings used on Figure 3.30.
So far we've talked about how to make your images smaller to save memory and hard drive space, but now let's do the opposite with Photoshop's Image > Reveal All command. When you choose that command, Photoshop will enlarge your document to include any information that extends beyond the bounds of your document ( Figures 3.32 and 3.33 ). That means that all the layers that you've moved beyond the edge of your document will become visible once again.

Figure 3.32 Many of the layers in this document extend beyond the document's bounds.

Figure 3.33 After applying the Reveal All command, the elements that used to extend beyond the document's bounds are now completely visible.
Copying Between Documents
When you use the Move tool, you can do more than just drag a layer around the document on which you're working. You can also drag a layer from one image window to another ( Figure 3.34 ). This copies the selected layers into the second document. The copied layers will be positioned directly above the layer that was active in the second document. This is similar to copying and pasting, but it takes up a lot less memory because Photoshop doesn't store the image on the clipboard. You can achieve the same result by dragging the name of a layer from the Layers palette onto another document window, regardless of which tool is active.

Figure 3.34 To copy between documents, use the Move tool to drag from the image window, or drag the name of the layer in the Layers palette.
When you drag layers between documents, occasionally an image will appear as if it has not only been copied, but also scaled at the same time. That's not what's really happening. Instead, you're viewing the two images at different magnifications ( Figure 3.35 ). Look at the tops of the documents; if the percentages do not match, the image size will appear to change when you drag the image between the documents. If you view both images with the same magnification, this won't happen. It doesn't change how large the image is; it simply gives you a preview of how large it will look. It's just like putting your hand under a magnifying glass: Your hand looks larger, but when you pull your hand out, it looks normal again.

Figure 3.35 Images viewed at different magnifications.
Duplicating Layers
If you have a picture of Elvis, and you want to make Elvis twins, just drag the name of the layer onto the New-Layer icon at the bottom of the Layers palette. This icon has two purposes: It will duplicate a layer if you drag one on top of it, or it will create a new empty layer if you just click it. You can also hold Option (Mac) or Alt (Windows) when dragging a layer up or down within the layers stack, or type Command-J (Mac) or Ctrl-J (Windows) to duplicate the currently active layer. Just make sure you don't have a selection active; otherwise, this command will copy only the area that is selected instead of the whole layer.
Deleting Layers
If you've created a document that looks a little cluttered, you can delete a layer by dragging its name onto the Trash icon at the bottom of the Layers palette. Or, if you have a long distance to drag to get your layer in the trash, try Option-clicking (Mac) or Alt-clicking (Windows) the Trash icon instead (the Option or Alt key prevents a warning dialog box from appearing). However, this icon does not work like the trash on a Mac or the recycle bin in Windows. Once you put something in it, you can't get it back (that is, without resorting to the History palette).
Transforming Layers
To rotate, scale, or distort the active layers, choose one of the options in the Edit > Transform menu; then pull the handles to distort the image ( Figures 3.36 and 3.37 ). When you like the way your image looks, press the Enter key to commit to the change (press Esc to abort). If you want to know more about the transformation controls, see Chapter 2, "Selection Primer" and Chapter 15 "Collage."
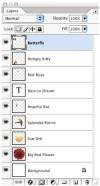
Figure 3.36 The Layers palette view.

Figure 3.37 Transforming a layer.
Locking Up
The icons at the top of the Layers palette allow you to lock the transparency, image, and position of an individual layer ( Figure 3.38 ). Once a layer has been locked, changes that can be performed on that layer are limited.

Figure 3.38 The Lock icons.
Lock Transparency
The Lock Transparency icon (which looks like a checkerboard) at the top of the Layers palette gets in my way most often (because I forget it's turned on). Lock Transparency prevents you from changing the transparency of areas. Each layer has its own Lock Transparency setting. Therefore, if you turn on the Lock Transparency icon for one layer and then switch to another layer, the Layers palette will display the setting for the second layer, which might be different from the first one.
Try using the Eraser tool when Lock Transparency is turned on—it will mess with your mind! Because the Eraser tool usually makes areas transparent (by completely deleting them), it will start painting instead when Lock Transparency is turned on. It will fill any areas you drag over with the current background color. However, if you paint across an area that's transparent, it doesn't change the image at all (because the transparent areas are being preserved). You can see how it can get in your way if you forget you turned it on.
Try this: Open a photo, and delete areas around it using the Eraser tool. To accomplish this, you'll have to change the name of the background first (you can't poke a hole in the background, but you can on a layer); then make sure Lock Transparency is turned off. Otherwise, you can't make areas transparent. Now use the Eraser tool to remove the areas that surround the subject of the photo, and then choose Filter > Blur > Gaussian Blur and use a really high setting. You'll notice that the edge of the image fades out and blends with the transparent areas surrounding it ( Figure 3.39 ). Now, choose Edit > Undo and try doing the same thing with the Lock Transparency option turned on ( Figure 3.40 ). Notice that the edge cannot fade out because Photoshop will not change the transparency with this option turned on.

Figure 3.39 Lock Transparency is off.

Figure 3.40 Lock Transparency is on.
Here is another example: Create a new layer, and scribble across it with any painting tool, making sure the Lock Transparency option is turned off. Next, drag across the image with the Gradient tool. The gradient should fill the entire screen ( Figure 3.41 ). Now, choose Edit > Undo, and try doing the same thing with the Lock Transparency option turned on ( Figure 3.42 ). Because Photoshop can't change the transparency of the layer, it cannot fill the transparent areas, and therefore is limited to changing the areas that are opaque to begin with.
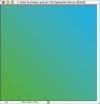
Figure 3.41 Lock Transparency is off.

Figure 3.42 Lock Transparency is on.
When you're trying to use any of the techniques in this book, be sure to keep an eye on that little Lock Transparency icon. If it's turned on when you don't want it to be, it might ruin the entire effect you're trying to achieve. Therefore, unless I specifically tell you to turn it on, you should assume that it should be left off (that's the default setting). If I ever tell you to turn it on, I'll let you know when to turn it back off again so that you don't get messed up when trying to reproduce a technique from this book. Now, turn off that pesky (but useful) setting, and let's continue exploring Photoshop.
Lock Image
The Lock Image icon (which looks like a paintbrush) at the top of the Layers palette prevents you from changing the pixels that make up a layer. That means you won't be able to paint, erase, apply an adjustment or filter, or do anything else that would change the look of that layer (although you can still move or transform the layer). Just as with Lock Transparency, each layer has its own Lock Image setting. I use this feature after I've finished color-correcting and retouching a layer so I don't accidentally change it later on.
Lock Position
The Lock Position icon (which looks like the Move tool) at the top of the Layers palette prevents you from moving the active layer. I select this feature to prevent someone else from accidentally moving an element that I've taken great care to position correctly.
Lock All
The Lock All icon (which looks like a padlock) at the top of the Layers palette locks the transparency, image, and position of the current layer.
Layer Styles
A bunch of really neat options are available under the Layer > Layer Style menu ( Figure 3.43 ). You'll find the same options under the Layer Style pop-up menu at the bottom of the Layers palette (it's the leftmost icon). To experiment with these options, first create a new, empty layer, and paint on it with any of the painting tools. Then apply one of the effects found in the Layer > Layer Style menu: Drop Shadow, Inner Shadow, Inner Glow, Outer Glow, Bevel and Emboss, and so on ( Figures 3.44 to 3.46 ). You can use the default settings for now. After applying an effect, use the Eraser tool to remove some of the paint on that layer. Did you notice that the layer effect updates to reflect the changes you make to the layer? Layer Styles create in one simple step the same results that would usually require multiple layers and a lot of memory.
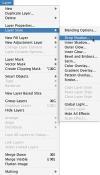
Figure 3.43 The Layer > Layer Style menu.

Figure 3.44 The Layer Style dialog box with the Drop Shadow panel.

Figure 3.45 The original image.

Figure 3.46 Drop Shadow style was applied to the text layer.
Once you have at least one Layer Style applied to a layer, you'll see a black circle with a small "f" inside it in the Layers palette. That's the only indication that a layer has a Layer Style attached to it. You can click on the triangle that appears next to that symbol to see a list of the Layer Styles that are applied to that layer ( Figure 3.47 ). If you drag one of the Layer Styles from that list and release your mouse button when it's on top of another layer, you'll move that Layer Style to the second layer. Holding Option (Mac) or Alt (Windows) when dragging a style will copy the style instead of moving it. Dragging the word "Effects" will move all of the Layer Styles that are attached to that layer. If you'd like to remove one of the Layer Styles, just click on its name in the list and drag it to the Trash icon at the bottom of the Layers palette.

Figure 3.47 Click on the triangle that appears next to the "f" symbol to see a list of the Layer Styles that are applied to that layer.
You can even lower the Fill setting at the top of Photoshop's Layers palette to reduce the opacity of the layer contents (or hold Shift and type a number while the Move tool is active) while keeping the Layer Style at full strength ( Figure 3.48 ). Not only that, you can choose Layer > Layer Style > Create Layer to have Photoshop create the layers that would usually be needed to create the effect. For example, you might want to choose Create Layer if you want to distort the effect separately from the layer it was attached to. Let's take a look at what a few of the Layer Styles do to your image ( Figures 3.49 to 3.51 ).

Figure 3.48 A result of lowering the Fill opacity to 0.

Figure 3.46 The Layer Style dialog box with the Inner Shadow panel.

Figure 3.49 Inner Shadow style is applied to the text layer.

Figure 3.50 The Layer Style dialog box with the Outer Glow panel.

Figure 3.51 Outer Glow style is applied to the text layer.
Adjustment Layers
The Adjustment Layer pop-up menu at the bottom of the Layers palette (it's the half black and half white circle) allows you to apply adjustments that will affect multiple layers. This is the most versatile method for applying adjustments and it is such a powerful feature that I've devoted an entire chapter to it (Chapter 11 "Adjustment Layers").
Fill Layers
The options in the Layer > New Fill Layer menu allow you to add solid color, gradient, and pattern content to a layer. This is especially useful when combined with Vector Mask, as described in Chapter 15, "Collage." If you don't want a fill layer to fill your entire document, then make a selection before creating one, which will create a layer mask. After a fill layer has been created, you can reset your foreground and background colors to black/white by pressing D. Then you can use the Eraser tool to hide the area and the Paintbrush tool to make areas visible again.
Solid Color Layer
Choosing Layer > New Fill Layer > Solid Color will bring up a dialog box that asks you to name the layer you're creating. Once you click OK, it will open the color picker, where you can specify the color that will be used for the solid color layer. After you've created one of these layers, you can double-click the leftmost thumbnail of the layer in the Layers palette to edit the color.
Gradient Layer
Choosing Layer > New Fill Layer > Gradient will bring up a dialog box that asks you to name the layer; this will create a new layer that contains a gradient ( Figure 3.52 ). The gradient is always editable by double-clicking the leftmost thumbnail in the Layers palette. If the Align with Layer check box is turned on, then the start and end points of the gradient are determined by the contents of the layer instead of the document's overall size.

Figure 3.52 The Gradient Fill dialog box.
Pattern Layer
Choosing Layer > New Fill Layer > Pattern allows you to create a new layer that contains a repeating pattern ( Figure 3.53 ). I like to use this type of layer to add a brushed-aluminum look to a background. Then, if I ever decide to change the pattern, it's as simple as double-clicking the thumbnail in the Layers palette and choosing New Pattern from the drop-down menu.

Figure 3.53 The Pattern Fill dialog box.
The Blending Mode Menu
The Blending Mode menu at the top left of the Layers palette is immensely useful. It allows the information on one layer to blend with the underlying image in interesting and useful ways. Using this menu, you can quickly change the color of objects, colorize grayscale images, add reflections to metallic objects, and much more. This is an advanced feature, so you'll have to wait until you get to Chapter 13, "Enhancement," to find out more about it.
Automatic Selections
To select everything on a particular layer, just Command-click (Mac) or Ctrl-click (Windows) on the thumbnail image of the layer in the Layers palette. If the layer fills the entire screen, then it will select all because this trick looks for transparent areas. You can hold down the Shift key to add to a selection that already exists, or use the Option key (Mac) or Alt key (Windows) to take away from the current selection ( Figures 3.54 to 3.57 ).
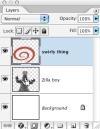
Figure 3.54 Command-click (Mac) or Ctrl-click (Windows) a layer to select all the objects on that layer.

Figure 3.55 The result of Command-clicking (Mac) or Ctrl-clicking (Windows).

Figure 3.56 Refining the selection with the Lasso tool, while holding down Option (Mac) or Alt (Windows) to take away from the selection.

Figure 3.57 The result of copying the selected area of Godzilla and pasting it on a layer above the swirl (look at his head and chest).
Via Copy
The Layers menu offers you a wide variety of options for copying, merging, and manipulating layers. Let's look at one of these choices. If you select an area of your image and then choose Layer > New > Layer Via Copy, the area you've selected will be copied from the layer you were working on and moved to a brand-new layer in the same position ( Figure 3.58 ). This is particularly handy when you want to move just a portion of a layer so that you can place it on top of another layer.
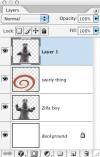
Figure 3.58 Result of using Layer > New > Layer Via Copy and moving the new layer over the swirly layer.
Use All Layers
When you're editing on a layer, some of the editing tools might not work the way you expect them to. This happens because most of the tools act as if each layer is a separate document—they ignore all layers except the active one; that is, unless the tool has the Use All Layers check box (labeled All Layers in the Paintbucket tool) turned on in the options bar of the tool you're using. This check box allows the tools to act as if all the layers have been combined into one layer ( Figures 3.59 to 3.61 ).
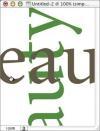
Figure 3.59 Using the Paint Bucket tool to add color with the All Layers option turned off.
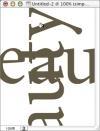
Figure 3.60 Using the Paint Bucket tool with All Layers turned on.

Figure 3.61 The All Layers check box in the Paint Bucket options bar.
Shortcuts
You'll be doing a lot of switching between layers, and this can get a bit tedious. Therefore, I'll show you some quick shortcuts. First, you can Command-click (Mac) or Ctrl-click (Windows) anywhere in the image window when using the Move tool to activate the layer directly below your cursor. Then you can find out which layer you're working on by glancing at the Layers palette.
You won't always need the layer below your cursor, so instead of Command-clicking (Mac) or Ctrl-clicking (Windows), try Control-clicking (Mac) or right-clicking (Windows). This will bring up a menu of all the layers that contain pixels directly below your cursor; you just choose the name of the layer you want to work on and Photoshop will switch to that layer.
Remember that you can get to the Move tool temporarily at any time by holding down the Command key (Mac) or Ctrl key (Windows). Therefore, if you hold down Command and Control (Mac) or Ctrl and right-click (Windows) at the same time, no matter what tool you are using, Photoshop will present you with the pop-up menu.
Grouping Layers
Have you ever had one of those mega-complicated images with dozens of layers? If so, you are probably familiar with the agony of having to fumble through an endless sea of layers, hoping you won't drown before you find the right one. If this describes you, you'll be ecstatic to know you can group a bunch of layers together. A group of layers looks like a folder in the Layers palette. You can view all the layers in the group or just the group name.
To group multiple layers, select the layers and then either Shift-click on the folder icon at the bottom of the Layers palette, or choose Layer > Group Layers. You can also click the folder icon (without holding any keys) to create an empty folder. Then, you can move any number of layers into the folder by dragging and dropping them onto the folder you just created. The folder will have a small arrow just to its left that allows you to collapse the group down to its name or expand the group to show you all the layers it contains. You can even drag one folder onto another to create a hierarchy of up to five levels of folders ( Figures 3.62 and 3.63 ). This can greatly simplify the Layers palette, making a document of 100-plus layers look as if it's made of only a few layers.

Figure 3.62 Collapsed layer sets.
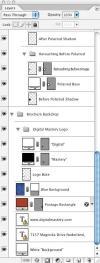
Figure 3.63 Expanded layer sets.
Option-clicking (Mac) or Alt-clicking (Windows) on the arrow next to a group will expand or collapse all the groups and Layer Style lists within that group. Adding the Command key (Mac) or Ctrl key (Windows) will expand or collapse all the groups in the entire document.
Groups can also be useful when you want to reorganize the layers in your image. If one of the layers within a group is active, then using the Move tool will affect only that layer (unless it's linked to other layers). If the group is active, then using the Move tool will move all the layers within that group.
Smart Guides
Adobe added a new feature in Photoshop CS2 that allows you to easily align one layer with another. When you choose View > Show > Smart Guides, Photoshop will display pink guides to indicate how the active layer aligns with the surrounding layers ( Figure 3.64 ). They pay attention to the top, bottom, left, right and center of each layer and extend the pink guides across all the layers that are aligned. The layers will also snap to these alignment points making it especially easy to get your layers in alignment. You can toggle the snapping behavior off or on by choosing View > Snap To > Layers.

Figure 3.64 The pink guides indicate where the active layer aligns with the other layers in the document.
The Smart Guides will ignore Layer Styles that are applied to a layer. In the example below, the outer ring of each object was created using the Stroke and Bevel & Emboss Layer Styles, so it was not used when determining where the edge of the layer is located. The Smart Guides will also ignore any areas that have an opacity of less than 50%, which will also affect any layers that have soft edges, causing the snapping behavior to treat the halfway point of the fadeout as the edge of the layer.
No Thumbnail View
If, after organizing your image into layer sets, you still find that the Layers palette is a mess, you might want to simplify the way Photoshop displays layers. If you choose Palette Options from the side menu of the Layers palette, you'll find the option that allows you to turn off the layer thumbnails. Once you've done that, you should find that the list of layers takes up a lot less space, but you still have the full functionality of all of Photoshop's features ( Figures 3.65 and 3.66 ). This also speeds up the screen redraw of the Layers palette.
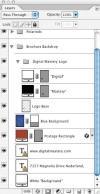
Figure 3.65 The Layers palette using the default thumbnail size.
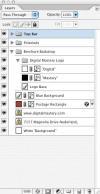
Figure 3.66 The Layers palette after setting the Thumbnails setting to None.
Layer Bounds View
If you have many small elements on individual layers, then the Layers palette might look like a sea of checkerboard. Photoshop CS2 allows you to have Photoshop crop the layer thumbnails so that they show the contents of a layer while ignoring any empty area surrounding the content. To get to this view, choose Palette Options from the side menu of the Layers palette and turn on the Layer Bounds setting ( Figures 3.67 and 3.68 ).
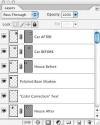
Figure 3.67 The Layers palette using the Entire Document setting.
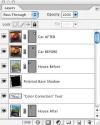
Figure 3.68 The Layers palette using the Layer Bounds setting.
Color Coding
If you work within a large group of Photoshop users, it can be useful to assign colors to layers to indicate their current status. Maybe some text needs to be proofed, maybe the client approved a certain part of the image, or perhaps an area needs to be sent off for color correction. All you have to do is Control-click (Mac) or right-click (Windows) on the name of a layer and choose Layer Properties. That will bring up a dialog box where you can color code a layer or a group ( Figures 3.69 and 3.70 ).

Figure 3.69 The Layer Properties dialog box.
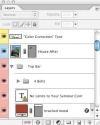
Figure 3.70 Each layer can be color coded using one of seven colors.
Merging Layers
When you create a complicated image that contains dozens of layers, your project can start hogging memory, which in turn makes it difficult to manage all the layers. Every time you create a new layer and add something to it, Photoshop gobbles up more memory. Photoshop not only has to think about what's on that layer, but also has to remember what's below the layer (even if that information is completely covered by the information on the layers above).
Whenever possible, I try to simplify my image by merging layers. This combines the layers into a single layer, and thus saves memory (because Photoshop no longer has to remember the parts of those layers that were previously being covered). The side menu on the Layers palette and the Layer menu itself give you several ways to do this:
- Merge Down: Merges the active layer into the layer directly below it.
- Merge Visible: Merges all the layers that are currently visible in the main image window.
- Merge Layers: Merges all the currently selected layers.
- Merge Group: Merges all the layers that are within the active group.
- Flatten Image: Merges all visible layers into the background, discards hidden layers, and fills empty areas with white.
If you want to know how much extra memory the layers take up as you're modifying your image, choose Document Sizes from the menu that appears at the bottom center of the document ( Figure 3.71 ). The number on the left should stay relatively constant (unless you scale or crop the image); it indicates how much memory your image would use if all the layers were merged together. The number on the right indicates how much memory the image is using with all the layers included. This number changes as you add and modify your layers. Keep an eye on it so that you can see how memory-intensive the different layers are.

Figure 3.71 Memory usage indicator.
The number on the right might get huge if you're using a lot of layers; however, keep in mind that you'll know exactly how large the image will be when you flatten the layers by glancing at the left number.