This chapter is from the book
This chapter is from the book
This chapter is from the book
Frames, Dashes, and Stripes
There are times when you want to put a picture on your wall with a frame, and there are times when you just tape it up frameless. When you're making pages, there are times when you want a frame around a text, picture, or contentless box, and there are times when you don't. Similarly, there are times when you want to apply a custom line style to a path (see "Lines and Arrows," earlier in this chapter).
In this section, I explore how to place borders around boxes and then how to build custom line styles that you can use either as frames on boxes or as line styles.
Frames
All boxes have frames, but by default the frame thickness is zero width, which is the same as no frame at all. You can add a frame to a box by selecting it, choosing Frame from the Item menu (or pressing Command-B or Ctrl-B), and then increasing the frame thickness to anything above zero.
The Frame tab of the Modify dialog box contains fields and popup menus that let you specify the weight, color, gap color, shade, and line style of your frame (see Figure 3-69). Color and shade are self-explanatory, but I should talk a little about frame styles, gap color, and thickness.
)
Figure 3-69 The Frame tab of the Modify dialog box
Frame style. In addition to the normal solid black line, XPress offers 10 PostScript-styled frames and nine bitmapped frames (see Figure 3-70). I encourage you to avoid the bitmapped frames with names like Yearbook, Deco Shadow, and Maze. These frames generally print incredibly slowly and often look jaggy because they're based on black-and-white bitmapped images rather than smooth, PostScript vector lines (see "Frame Editor," below, as well as Chapter 9, Pictures, for more information on bitmapped versus vector images). These bitmapped frames are only available on rectangular boxes anyway; if you select a Bézier, oval, beveled, or photo-frame-shaped box, the bitmapped frames disappear.
)
Figure 3-70 Default frame styles
Earlier versions of QuarkXPress for Windows didn't have these bitmapped frames, but for the sake of consistency Quark added them to version 4. I would have been just as happy if they left them out. However, if you do use one of them, I encourage you to choose the frame thickness that is outlined in the Width popup menu; any other width may look odd or cause trouble at print time.
The PostScript lines are made up of dashed or striped lines. I describe how you can edit these or make your own below.
Gap color. All the PostScript frame styles (other than the basic solid line) have gap areas—dashed lines have gaps between the dashes, stripes have gaps between the stripes. The Gap section of the Frame tab lets you specify what color those gaps should be. At first, this feature appears really frivolous and designed for silly special effects. But on closer inspection, you'll see that it's actually a quite important role when using these frame styles because it lets you choose whether the gap should be transparent (color of None) or opaque (any other color; see Figure 3-71).
)
Figure 3-71 Gap color
Frame weight. Quark calls the thickness of a frame its "width." I'm used to calling it the weight. No matter what you call it, it's the thickness of the line making up the frame. And, similar to lines, if the line weight is not thick enough, the frame style may not show up properly (a triple line set to 0.5 point generally comes out looking just like a single 0.5-point line).
Frames can grow from the box edge in, or from the box edge out. That is, a 10-point frame is measured from the edge of the box to either the outside or inside. This is different from lines: their weight is measured from their center (a 10-point line falls 5 points on one side of the line and 5 points on the other).
You can control which side of the box edge the frame falls on with the Framing popup menu in the Preferences dialog box (from the Edit menu, or press Command-Shift-Option-Y or Ctrl-Alt-Shift-Y). Choosing Inside from this menu places frames on the inside of boxes; Outside places them on the outside. The confusing thing is that even when you have Frames set to Outside, the frame looks like it's falling on the inside. That's because QuarkXPress actually makes the box itself a little bigger to set the frame correctly as though it were an Inside frame. I think this method is sort of a pain in the butt, so I always leave it set to Inside.
Note that you can create a frame on a box while in the Inside mode, then change the mode to Outside, and subsequent frames are built on the outside of boxes (or vice versa). Existing boxes don't change when you change the preferences.
)
Figure 3-72 Typographic borders
Tip:
It's easy to make concentric circles in QuarkXPress: After making a single circle, duplicate it, scale it larger, and then use Space/Align (Command-comma or Ctrl-comma) to align the circles to their centers. However, it's significantly harder to make non-regular shapes or letters concentric. Here's one way to do it.
- If you're using text, first convert it to outlines by selecting Text to Box from the Style menu.
- Use Step And Repeat with offsets set to zero to "clone" the object (make a duplicate exactly on top of itself).
- In the General tab of the Preferences dialog box (Command-Option-Shift-Y or Ctrl-Alt-Shift-Y), set Framing to Outside and click OK.
- Now use the Border feature (Command-B or Ctrl-B) to add a frame around the object you want to make larger. Note that when you set Framing to Outside, XPress doesn't just put the frame on the outside of the object, it actually makes the object bigger and then puts the frame on the inside. Weird? Very!
- Now return to the Preferences dialog box and set Framing to Inside and press OK.
- Select the enlarged object and set the border thickness to something small (like 1 point). Instead of the outside of the frame shrinking back in, the inside of the frame "shrinks out," so that what's left is a bloated version of the original shape.
- Finally, select Send to Back from the Item menu so you can see the original object centered inside this new "bloated" version (see Figure 3-73).

Figure 3-73 Making concentric objects
)
You can "choke" objects (make them concentrically smaller) by following just the opposite procedure: First add a somewhat thick frame while the Framing preference is set to Inside, change Framing to Outside, and then set the frame smaller again.
As you can probably tell, this trick is really forcing XPress to do something that it wasn't really meant to do, and you'll find that it won't work at all in some circumstances. The key is to watch out for sharp corners. For instance, typefaces with serifs don't work well at all because they have much sharper corners than the bulky san serif type faces. It's pretty obvious when the trick won't work: the edges shoot out in very improbable directions (see Figure 3-74). (Of course, you might find this an interesting design element to work with if you're producing something for a punk rock band.)
)
Figure 3-74 When good tricks go bad
Creating Custom Dashes and Stripes
Those dashed and striped PostScript patterns that you can use as frames around boxes or as line styles are great, but no matter which one I pick, I find myself wanting to change it, if even just a little. This may be my own peculiar compulsive nature (I prefer to think of it as my "style"), but fortunately, QuarkXPress lets me tweak these styles to my heart's content with the Dashes & Stripes feature.
To create your own line style, or to edit one of the built-in styles, select Dashes & Stripes from the Edit menu (see Figure 3-75). Like style sheets, H&J settings, and colors (each of which I discuss later in this book), when you edit Dashes & Stripes while a document is open, the change applies to that document only. If no documents are open when you make a change, it applies to all new documents that you create from then on, but not to previously saved documents.
)
Figure 3-75 The Dashes & Stripes dialog box
Dashes. To create a new dash style, select Dash from the popup menu that appears when you click on the New button (the button is actually a popup menu in disguise). The Edit Dash dialog box appears complex at first, but, like most features in QuarkXPress, it's easy if you take it one piece at a time.
-
Ruler Area. Dashes are defined by a repeating pattern of segments. For instance, a basic dash is made of two segments: a solid line followed by a gap. A more complex line might be made by combining two or three different-length lines separated by gaps (see Figure 3-76). The ruler area at the top of the Edit Dash dialog box lets you specify the size of these segments. To specify the beginning or ending point of a segment, click in the ruler; or you can define the full length of a segment by clicking and dragging. (The values in the ruler change depending on the Repeat Every popup menu setting; see below.)If you like the length of a segment, but not where it sits in the full length of the pattern, you can click on the segment itself (as opposed to the arrow markers in the ruler) and drag it to the left or to the right. Note that the only time you would want to add more than a single segment marker is if you want a non-regular pattern—that is, a pattern like "thin, thick, thin, thick," and so on.
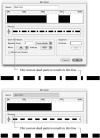
Figure 3-76 Dashes
- Position. If you click on one of the segment markers in the ruler area, its value appears in the Position field. You can also add a segment marker to the ruler by typing a value here and clicking Add. I find this much more efficient than clicking and dragging in the ruler area, though the interactive method is usually more fun.
- Preview. You can see approximately how the dash pattern will appear in the Preview area of the dialog box. The slider control to the left of the preview line lets you see how the pattern appears in thinner or thicker lines. Remember, however, that you're still only seeing a low-resolution screen preview of the dash; often, especially in dash patterns with really thin lines, what you see on-screen may be significantly different from what you get on paper.
-
Repeats Every. Contrary to intuition, the Repeats Every control lets you set the length of the repeating pattern. There are two options in the popup menu to the right of the Repeats Every field: "Times Width" and "Points." When this is set to "Times Width" (it is by default), the length of the pattern is determined by the thickness of the line or frame—so as the line gets thicker, the pattern becomes longer (see Figure 3-77). For instance, let's say you set Repeats Every to 3. If you apply this to a 6-point-thick line, the pattern you specify in the ruler area is 18 points long (3 x 6). If you decrease the line weight to 3 points, the dash reduces, too, to 9 points (3 x 3).On the other hand, you may not want the distance between the patterns to shift when you change the line weight. You can accomplish this by changing the popup menu to "Points." Now, the Repeats Every value specifies an absolute width for the pattern—if you say the pattern is 10 points long, that's how long it'll be (see "Stretch to Corners").
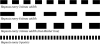
Figure 3-77 Repeat Every
-
Miter. The Miter setting determines what the line style does when it hits a corner. If you apply this dash only to a smooth line or a rounded-corner box, the Miter control has no effect at all. There are three options in the Miter popup menu: sharp corner, rounded corner, and beveled corner (see Figure 3-78). (Miter is actually controlled by PostScript itself, not QuarkXPress.)

Figure 3-78 Miter
-
Endcap. Endcap is another PostScript-level feature, and it lets you choose the look of each line segment within the dash (see Figure 3-79). The basic distinction is square ends versus round ends, though you also have the choice of whether the endcap extends past the edge of the segment.
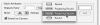
Figure 3-79 Endcap
- Stretch To Corners. When you turn on the last control in the Edit Dash dialog box, Stretch to Corners, you're giving QuarkXPress the leeway to adjust the Repeat Every setting so that your pattern reaches from one end of your path to the other, or from one corner of your frame to another (see Figure 3-80). For instance, imagine XPress repeating the pattern along your line; when it gets to the end, it might only be able to fit half the pattern in. If Stretch to Corners is on, the program adjusts the pattern. In general, it adjusts it so slightly that you wouldn't even notice, though it is obvious on occasion, depending on the pattern, the line thickness, and the length of the line. Nonetheless, I always turn Stretch to Corners on and only turn it off when the effect is displeasing on my pages.
)
)
)
)
)
Figure 3-80 Stretch to Corners
Stripes. You can create the second type of custom PostScript line style by selecting Stripe from the New popup menu in the Dashes & Stripes dialog box. The Edit Stripe dialog box is slightly less imposing than the last we explored, and its functionality is very similar (see Figure 3-81). The primary difference, of course, is that you end up with a stripe, in which the line segments and gaps run along the path, as opposed to dashes, which run perpendicularly.
)
Figure 3-81 Edit Stripe
There are four options in the Edit Stripe dialog box: ruler area, Position, Preview, and Miter.
- Ruler Area. Stripes are defined by separating the width of your path into smaller lines and gaps. You can specify the width of these subpaths by placing width markers in the ruler area of the Edit Stripe dialog box. As with dashes, you can click in the ruler area to place a marker, or click and drag to specify the thickness of a subpath. If you like the width of the subpath, but not the vertical placement, you can click on the subpath (not the index markers) and drag it up or down.
- Position. When building or editing a stripe, it's always a good idea to watch the Position field, which gives you feedback as you click or drag markers in the ruler area. You can also add markers at specific places in the ruler area by typing them here.
- Preview. The Preview area offers an example of what your stripe will look like when applied to a path or a line. I recommend setting the slider to the largest line setting, as typical low-resolution monitors can't hope to give you a good approximation on the thinner lines.
- Miter. As with the dash pattern, the Miter setting controls what happens to the stripe at corners. Let's say you choose the rounded-corner Miter setting; if you apply this stripe to a rectangular picture box, the four corners will each be rounded slightly, even though the Corner Radius setting in the Modify dialog box is set to zero. (In fact, they're slightly rounded because this value is set to zero; if you increase the Corner Radius value, the Miter goes away.) In general, I use the default sharp-corner Miter unless I'm trying to achieve some special effect with the stripe.
Moving dashes and stripes around. You can make custom dashes and stripes all you like, but if you make them in one document, how do you get them into another? There are two ways to move Dashes & Stripes styles between documents.
- Move An Item. If you apply a custom dash or stripe to a line, or set it as a frame style for a box, you can copy that item from one document to another and the custom style comes with it. Even if you then delete the item, the custom style remains. Remember, you can copy items from one document to another with Copy and Paste, or by dragging it between the two document windows.
- Append. You can also move a line style from one document to another by clicking the Append button in the Dashes & Stripes dialog box. XPress asks you for the document you want to copy from, and then asks you for the Dashes & Stripes setting you want to copy. Note that the Append feature also appears under the File menu, though if you choose it there, you can append style sheets, lists, H&J settings, and colors, too.
Frame Editor
A quick history lesson: QuarkXPress, before version 5, used to ship with a little utility called Frame Editor that let you create borders or frames that you can apply to rectangular boxes. Unfortunately, all the frames you could make were bitmapped, like the horrible Deco and Ornate frames that ship with XPress. That means that rather than defining a border with smooth lines and curves, you have to use dots in a bitmap (see Chapter 9, Pictures, for more information on the differences between object-oriented and bitmapped images). The biggest problem with this is that diagonal and curved lines appear jaggy at almost any size. Fortunately, Quark no longer ships the Frame Editor.