Fig. w4.1 Creator2's Script menu, showing many of the standard AppleScripts that the program ships with. Each script can executed immediately from within Creator2 simply by selecting it from the menu.
Multi-Ad's Creator2 is the most impressive, accessible, and out-of-the-box AppleScriptable graphics software available. Only PhotoScripter coupled with Photoshop can compete. We've already looked at another scriptable contender, B&E's RagTime, in Chapter w2.
Whereas RagTime shines in its wide-ranging integration of all sorts of functionalities, Creator2 focuses on graphics and publishing features that put it in the same league as Adobe Illustrator and Quark XPress.In this chapter, we'll create and export custom graphics, and batch produce mastheads and rollover graphics. We'll also create customized PDF files using Adobe Acrobat Distiller 3.0.
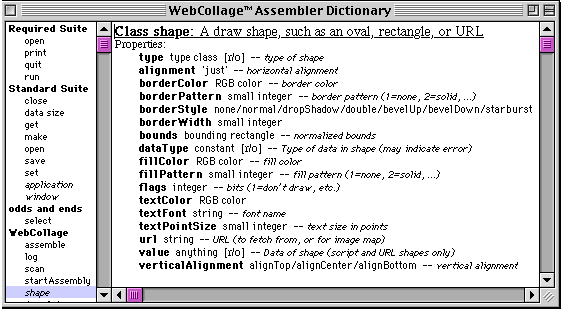
Creator2 supports the placement and export of TIFF, EPS, GIF, and JPEG files, along with advanced font and graphics capabilities, thanks to its use of the GX graphics libraries that formed the heart of Apple's QuickDraw GX. Creator2 does not require you to install QuickDraw GX. The GX library has been integrated with the application as a shared library file.
Everything is recordable and scriptable in Creator2. The application is also attachable, with its own script menu. Using the script menu, you can run a script from within the application. This way you can easily apply scripts to the current selection and continue working seamlessly. Figure w4.1 shows Creator2's script menu.
Scripting graphics
Fig. w4.1 Creator2's Script menu, showing many of the standard AppleScripts that the program ships with. Each script can executed immediately from within Creator2 simply by selecting it from the menu.
|
Scripting Creator2 All the scripts that follow were designed and tested for Creator2 1.1.2.Creator2 is published by Multi-Ad, Inc., who can be reached at http://www.multi-ad.com/. |
In this section, we'll experiment with recording actions in Creator2. Launch Creator2 and the Script Editor. Now bring the Script Editor to the front and follow the steps below to begin recording your graphic creations! Code w4.1 displays the script created by these actions. Figure w4.2 shows the final document that results from these steps.
To record your activities in Creator2:
Start recording in the Script Editor.
Open a new document in Creator2 without facing pages.
Draw a rectangle on the page.
Set the fill color to red and the line color to black.
Now rotate the rectangle, skew it, and flip it around a bit.
Code w4.1. This sample script is the result of recording actions in Creator2 with the Script Editor.
tell application "Multi-AdCreator2Å 1.1.2"
activate
make new document at
make new rectangle
select {element 1 of
set fill color of selection
select {element 1 of
set frame color of selection
set rotation of element
select {element 1 of
move selection of
set skew angle of
flip horizontally
set properties of
end tell
Fig. w4.2 Our sample document shows our original rectangle that we created in step 3, now contorted and warped by our actions in step 5.
With script recording, writing scripts gets easier. The task becomes editing recorded code rather than writing scripts from scratch. Code w4.2 is easy to make by borrowing lines from Code w4.1's recorded code. Here, we'll create graphical text and objects with precision and control. Figure w4.3 shows the results of running our script.
To create and export graphics and text in Creator2:
We begin by bringing Creator2 to the front and having it create a new letter-size document without facing pages or a default master spread.
Next, we create a freehand polygon path element with three points. We smooth one point to generate a Bezier curve by setting the point's smoothed property to true.
We then select the path element and set its fill color to red and frame color to none.
Now, we duplicate the path element with a ≠5 point offset in both the X and Y coordinates.
We make a text flow inside of a rectangle and move the insertion point to the beginning of the text flow.
Finally, we set the text of the flow to "Get" and change its font and color.
Code w4.2. This script creates a new document and draws some objects and text.
tell application "Multi-Ad
activate
make new document at
make new path element
select {element 1 of spread
set fill color of selection
set frame color of selection
duplicate selection of
select {element 1 of spread
set frame color of selection
set fill color of selection
make new rectangle
make new text flow at
select insertion point
set text selection of
select every character
set font of text selection of
set color of text selection
end tell
Fig. w4.3 After our script has run, we will have a new document that contains these 2 unusual looking polygonal shapes as well as the text we specified in step 6.
Once you've mastered the scripting of object creation and modification, batch production of graphic elements is the next natural step. This script (Code w4.3) produces a series of exported TIFF files at double resolution (144 dpi) based on the currently open file, which the script expect to contain at least two text elements. If you want to use these files on the Web, you'll need to subsequently batch convert and scale them in another program or with another script. Figure w4.4 shows a sample screen that might appear while the script is running. Make sure you create a sample masthead file with two text elements in it before running this script.
To batch produce repeating elements like mastheads:
We set a list to hold our title strings and a list to hold our subtitle strings.
We set a list to hold our title strings and a list to hold our subtitle strings.
Next, we bring Creator2 to the front and start a repeat loop through all the title items.
We select the text of our text flow for the title and set it to the text of the current item in our titles list.
We select the text of our text flow for the subtitle and set it to the text of the current item in our subtitles list.
Now we select all the objects on the page.
We set a variable to hold the file name for the current graphic.
Finally, we export a TIFF containing the current selection to our new file at double resolution (144 dpi).Code w4.3 This script batch produces masthead graphics.
Code w4.3. This script batch produces masthead graphics.
set myTitles to {"About Us",
"Company History", "Press
Room", "Products"}
set mySubtitles to {"Learn
more about us", "Read
about our amazing past",
"The latest news about us",
"Our products speak for
themselves"}
set myFolder to (choose
folder with prompt
"Folder to save images:")
tell application "Multi-Ad
Creator2 1.1.2"
     activate
     repeat with i from 1 to the
     number of items in myTitles
          select every character
          of text flow 2 of document 1
          set text selection of
          document 1 to (item i of
          myTitles)
          select every character
          of text flow 1 of document 1
          set text selection of
          document 1 to (item i of
          mySubtitles)
          select every element of
          spread 1 of document 1
          set myFile to myFolder
          & "masthead-" & i as text
          export TIFF selection of
          spread 1 of document 1
          saving in file myFile export
          depth use millions of colors
          export resolution use 144 dpi
     end repeat
end tell
Fig. w4.4 Once our script has run, you will have a document that might look something like this. The script changes the contents of the two text boxes and leaves all other objects alone.
Multi-state graphics are graphics whose appearance changes in different situations. Batch production of multi-state graphics like rollovers becomes easy with AppleScript. Rollover graphics are those images on the Web that change in response to a user's actions, like rolling over a button, hence the name. We can script the creation of all variations for a series of elements quickly and easily. Code w4. 4 produces a series of exported TIFF files at double resolution (144 dpi) based on a navigation button. If you want to use these files on the Web, you'll need to subsequently batch convert them in another program or with another script. Figure w4. 5 shows a sample screen that might appear while the script is running. Once your script has run, you'll need to batch convert the files for web use in another program.
To batch produce multi-state elements like rollover graphics:
We begin by setting our list of title text elements and color settings for the three different states we will produce variations for: normal, mouseover, and current. In Table w4. 1 you can see the variable names that we are setting for the colors in various states.
Now we prompt the user to select a folder to save the images into.
We bring Creator2 to the front and start our repeat loop through each of the items in the titles list.
Now, we set the text of our shadow text flow to the text of the current item in the titles list.
We select the text of our frontmost text flow.
We then set the text color of the frontmost text flow to the normal state color.
Finally, we set the text of the frontmost text flow.
We select the oval and set its fill color to the normal state color.
Now, we select every object on the page.
Here we set up our file name in the variable myFile.
Then we export of the current selection as a TIFF to our new file at 144 dpi.
Code w4.4. The script batch produces multi-state rollover graphics.
set myTitles to {"About Us",
"Company History", "Press
Room", "Products"}
set myNormTextColor
to "Blue"
set myOverTextColor
to "Green"
set myCurrTextColor
to "Red"
set myNormDotColor
to "White"
set myOverDotColor
to "Green"
set myCurrDotColor
to "Red"
set myFolder to (choose
folder with prompt "Folder
to save images:")
tell application "Multi-Ad
Creator2 1.1.2"
     activate
     repeat with i from
     1 to the number of
     items in myTitles
          select every character
          of text flow 1 of document 1
          set text selection of
          document 1 to item i of
          myTitles
          select every character
          of text flow 2 of document 1
          set color of text selection
          of document 1 to
          {class:tint info,
          color:myNormTextColor}
          set text selection of
          document 1 to item i of
          myTitles
          select {element 1 of
          spread 1 of document 1}
          set fill color of selection
          of spread 1 of document 1 to
          myNormDotColor
          select every element of
          spread 1 of document 1
          set myFile to myFolder
          & "button-" & amp;i &
          "-norm" as text
          export TIFF selection of
          spread 1 of document 1
          saving in file myFile
          export depth use millions
          of colors export resolution
          use 144 dpi
          select every character
          of text flow 2 of document 1
          set color of text selection
          of document 1 to {class:tint
          info, color:myOverTextColor}
          select {element 1 of spread
          1 of document 1}
          set fill color of selection
          of spread 1 of document 1 to
          myOverDotColor
          select every element of
          spread 1 of document 1
          set myFile to myFolder
          & "button-" & i &
          "-over" as text
          export TIFF selection
          of spread 1 of document 1
          saving in file myFile export
          depth use millions of colors
          export resolution use 144 dpi
          select every character
          of text flow 2 of
          document 1
          set color of text selection
          of document 1 to {class:tint
          info, color:myCurrTextColor}
          select {element 1 of spread
          1 of document 1}
          set fill color of selection
          of spread 1 of document 1 to
          myCurrDotColor
          select every element of
          spread 1 of document 1
          set myFile to myFolder
          & "button-" & i &
          "-curr" as text
          export TIFF selection of
          spread 1 of document 1
          saving in file myFile export
          depth use millions of colors
          export resolution use
          144 dpi
     end repeat
end tell
Fig. w4.5 Here we see a sample iteration of our rollover graphic as its being produced by our script. The colors of the 2 text objects and the graphic are set by our script, as well as the text contents of the 2 text objects.
This script (Code w4.5) modifies an open document in Creator2 by adding a text element to it, then exports the document temporarily as an EPS file. It then launches Acrobat Distiller to convert the EPS to a PDF. Finally, the script has the Finder delete the EPS file. Figure w4. 6 shows our document in Creator2 after the script has added the name text.
To create custom PDF files:
We begin by prompting the user for a person's name.
These lines ask Creator2 to make us a rectangle at the beginning of a new spread. We specify that the object is of the GX rectangle class (most graphic shape names are preceded by "GX" because Creator2 uses the GX library) and that it has no fill color or frame color, as well as telling Creator2 what coordinates to use.
We now make the rectangle hold a text flow, which is a container to hold lines of text, like a text box in Quark XPress.
We have to make sure we tell Creator2 where to put the insertion point, or we may end up editing just anywhere.
Now, we set the text of the text flow to the name entered by the user.
Then we set the new text's font to Palatino.
Now we create a new file name for the EPS file we're going to create.
Next we create a new file name for the PDF file we'll end up with.
Then we export the current page to an EPS file with the file name from step 7.
Now we have Acrobat Distiller convert the EPS file to a PDF file using the file name from step 8. We let Distiller have 10 minutes (600 seconds) to complete the PDF creation by using with timeout.
Finally, we have the Finder delete the EPS file, since all we want is the PDF version.
Code w4.5. This script adds text to a Creator2 document, then exports it as an EPS and converts it to a PDF file.
set myText to text
tell application "Multi-Ad
make new rectangle
make new text flow
select insertion point
set text selection of
select every character
set font of text selection
set myFileName to get
set myDesktop to (path
set myExportFile to
set myPDFFile to
export EPS current
end tell
tell application "Acrobat
with timeout of
open alias
end timeout
end tell
tell application "Finder"
delete file myExportFile
end tell

Fig. w4.6 Our sample document shows the text added by steps 2 through 6 of our script, in this case, "John Doe". The script adds this text to a pre-existing Creator2 document before making a PDF file.
|
Scripting Adobe Acrobat Distiller Adobe Acrobat Distiller 3.01 is published by Adobe Software, Inc., who can be reached at http://www.adobe.com/. |