Fig. 7.3 This particular script doesn't require any input from the visitor; the submit button (with the descriptive title) simply sets it in motion.
While a scalar is an individual piece of data, an array is a collection of pieces of data. While scalar variables begin with a dollar sign ($), array variables begin with an at sign (@). The idea is that the a in at will remind you of the a in array.
The elements in an array are automatically numbered for easy reference (Figure 7.1). For better or worse, the numbering starts with 0 and not 1. That means that the fifth element is numbered 4 - stay alert!
You've already learned how to enter a list of items into an array variable. In this chapter, you'll learn how to create arrays in other ways and to manipulate them once they're set up.
Note: Each of the example scripts on the pages that follow works in tandem with a form, created with HTML. Unfortunately, there just isn't enough room to show you the scripts, the HTML code for the form (which reveals the names of the fields), the input that our example visitor types into the fields on the form, and the result of the script, given that input. Since the aim of this book is to teach you Perl and CGI, I'll show you the script code and the result of the script. You'll usually be able to reconstruct what the HTML code and form looked like. And you can find the HTML--as well as Perl scripts--on this site.
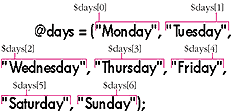
Figure 7.1 Each element in an array is automatically numbered, starting from 0. You can use the number - together with the array name and some square brackets - to identify, use, and modify individual elements of the array as if they were independent scalar variables.
The elements in an array are automatically numbered, starting with 0 (not 1!). You use the numbers, often called an array index, to grab and use a particular item in the array.
Tips
1  #!/usr/local/bin/perl
2
3  @days = qw(Sunday Monday Tuesday Wednesday Thursday Friday Saturday);
4
5 print "Content-type: text/html\n\n";
6 print "The first day of the week is $days[0]";
7
8 print "<P>The third day of the week is $days[2]";
| 3: | This line assigns the list of days of the week to the array @days. For more details on qw, consult Inputting arrays yourself on page 70. |
| 6: | The expression $days[0] references the first item in the list, that is, Sunday. Notice that the first item is numbered 0, the second item is numbered 1, and so on. |
| 8: | In this line, we get the third element of the array with $days[2] and print an explanatory statement around it. |
Fig. 7.2 Notice that when you access an individual member of the array, you use the dollar sign ($), not the at sign (@).
Fig. 7.3 This particular script doesn't require any input from the visitor; the submit button (with the descriptive title) simply sets it in motion.
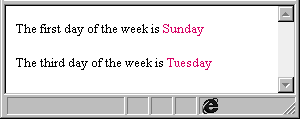
Fig. 7.4 It's true, this example is pretty boring since it always will give the same results. For a more interesting example of accessing individual elements of an array, check out the next page!
| 1 | #!/usr/local/bin/perl |
| 2 | |
| 3 | ($sec, $min, $hour, $mday, $mon, $year, $wday, $yday, $isdst) = localtime(time); |
| 4 | |
| 5 | @days = qw(Sunday Monday Tuesday Wednesday Thursday Friday Saturday); |
| 6 | @months = qw(January February March April May June July August September October November December); |
| 7 | |
| 8 | @catdays = qw(diumenge dilluns dimarts dimecres dijous divendres dissabte); |
| 9 | @catmonths = qw(Gener Febrer Març\; Abril Maig Juny Juliol Agost Setembre Octubre Novembre Desembre); |
| 10 | |
| 11 | print "Content-type: text/html\n\n"; |
| 12 | print "Today is $days[$wday], $months[$mon] $mday."; |
| 13 | print "<P> In Catalonia, they'd say: Avui é\;s $catdays[$wday], |
| 14 | $mday de $catmonths[$mon]."; |
| 3: | The time function gets the date from the system. Localtime converts the date into nine pieces, which this line assigns to the nine variables shown. |
| 5: | Lines 5-9 store initial values (days and months in both English and Catalan) in arrays (see page 70). |
| 12: | This line uses the $wday variable set in line 3 (by the system) to access the name of the current day of the week in the @days array. The $mon variable is used to access the name of the current month in the @months array. |
| 13: | This line uses the same $wday and $mon variables to access the Catalan arrays. |
Fig. 7.5 The $wday and $mon variables have values from 0 - 6 and 0 - 11, respectively. They work perfectly with the array element numbering system but may confuse you if you have trouble thinking of say, 2, as March (and not February).
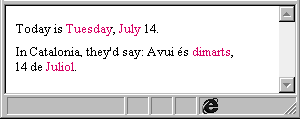
Fig. 7.6 It doesn't matter what's in the array (be it English or Catalan days and months, or a list of groceries or whatever), you can easily access each element that it contains.
When a visitor checks more than one checkbox or option in a menu, the form-parsing subroutine included in this book (and indeed most others) creates one scalar variable with several "answers" separated with commas. You use the split function to convert that scalar into an array.
Tips
| 1 | #!/usr/local/bin/perl |
| 2 | require "subparseform.lib"; |
| 3 | &Parse_Form; |
| 4 | |
| 5 | $class = $formdata{'class'}; |
| 6 | @classes = split(/,/, $class); |
| 7 | |
| 8 | print "Content-type: text/html\n\n"; |
| 9 | print "<H1>You chose:</H1><UL>"; |
| 10 | |
| 11 | foreach $item (@classes) { |
| 12 | print "<LI>$item"; |
| 13 | } |
| 14 | print "</UL>"; |
| 5: | As usual, this line copies the data from the form-parsing subroutine (see page 66) into a scalar variable. |
| 6: | The split function uses the comma (the first argument in the function) to decide where to divide the contents of the scalar variable $class into sections (see page 141). |
| 11: | We can now access individual items of the array using the foreach loop (see page 114). |
Fig. 7.7 The form-parsing subroutine merely puts both choices in a single scalar. The split function lets you divide them into individual elements of an array for separate processing.
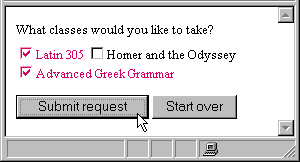
Fig. 7.8 This technique is important only if you have checkboxes or a menu in your form where your visitors can select more than one option.
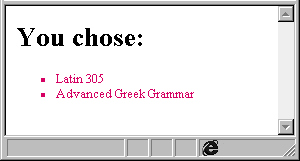
Fig. 7.9 Creating an array from a scalar makes it possible to treat each individual item separately. In this example, I've given them extra HTML formatting (the tags <H1>, <UL>, <LI>, etc.) to help them stand out. You wouldn't be able to create an HTML list out of a single scalar variable. For more details on outputting arrays as HTML lists, see page 185.
It seems strange, but if you operate on each member of an array, say in a foreach loop, the array is permanently changed. You can take advantage of this fact to modify the whole array at once.
Tips
| 1 | #!/usr/local/bin/perl |
| 2 | |
| 3 | require "subparseform.lib"; |
| 4 | &Parse_Form; |
| 5 | |
| 6 | @numbers = split(/,/, $formdata{'number'}); |
| 7 | print "Content-type: text/html\n\n"; |
| 8 | print "The numbers you entered were:"; |
| 9 | foreach $number (@numbers) { |
| 10 | print "<LI>$number"; |
| 11 | } |
| 12 | foreach $number(@numbers) { |
| 13 | $number = sqrt($number); |
| 14 | } |
| 15 | |
| 16 | print "<P>The square roots of those numbers are: "; |
| 17 | foreach $number(@numbers) { |
| 18 | print "<LI>$number"; |
| 19 | } |
| 6: | In this line, we combine lines 5 and 6 from Figure 7.7. |
| 8: | Lines 8 - 11 simply print each of the numbers the visitor entered. I've included it so that you can see what the original array contains. |
| 13: | Each time the $number variable is altered, the @numbers array is also permanently changed. At the end of this loop, the @numbers array no longer contains the original numbers, but rather the square roots of those numbers. |
| 16: | Lines 16 - 19 print out the new contents of the array. I've created a separate foreach loop so that the one under discussion (lines 12 - 14) is as simple and clear as possible. Nevertheless, the two foreach loops could be easily combined by putting line 18 after line 13. |
Figure 7.10 When you operate on a member of an array, the array itself is permanently altered.
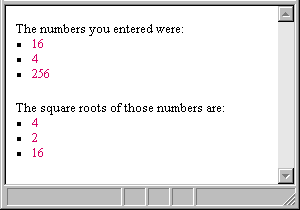
Fig. 7.11 The original array is printed out in the top part of the page. After modifying each element in the array, the new array contains completely different elements.
Once you or your visitor have entered an array, it's often useful to know how many elements the array contains. There are three ways to get the length of an array.
An array name prefaced with $# returns the index number of the last item in the array (see last tip on page 85). You can add 1 to this to get the number of elements in the array.
Type $#array + 1. The result of the expression is the number of elements (or length) of the array.
Tips
| 1 | #!/usr/local/bin/perl |
| 2 | |
| 3 | require "subparseform.lib"; |
| 4 | &Parse_Form; |
| 5 | |
| 6 | $class = $formdata{'class'}; |
| 7 | @classes = split(/,/, $class); |
| 8 | $amount = @classes; |
| 9 | |
| 10 | print "Content-type: text/html\n\n"; |
| 11 | |
| 12 | print "<H2>You chose $amount classes. They are:</H2><UL>"; |
| 13 | |
| 14 | foreach $item (@classes) { |
| 15 | print "<LI>$item"; |
| 16 | } |
| 17 | |
| 18 | print "</UL>"; |
| 8: | This line stores the length of the @classes array in the $amount variable. |
| 12: | This print statement uses the $amount variable to display how many classes the visitor has chosen (that is, how many elements are in the @classes array). |
Fig. 7.12 The easiest way to get the length of an array is to assign the array to a scalar variable.
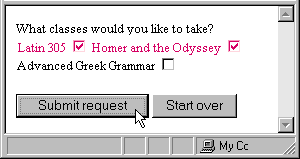
Fig. 7.13 The visitor chooses any number of classes...
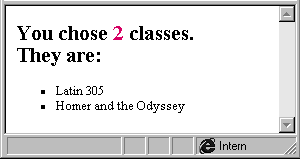
Fig. 7.14 ...and by counting the elements in the newly created array, you can determine how many classes they chose.
You can extract more than one item at a time from an array. This is called taking a slice. You can assign the slice to an array or use it in some other expression.
Tips
| 1 | #!/usr/local/bin/perl |
| 2 | |
| 3 | require "subparseform.lib"; |
| 4 | &Parse_Form; |
| 5 | |
| 6 | @days = qw(Sunday Monday Tuesday Wednesday Thursday Friday Saturday); |
| 7 | |
| 8 | @choice = split(/,/, $formdata{'choice'}; |
| 9 | |
| 10 | print "Content-type: text/html\n\n"; |
| 11 | |
| 12 | print "You chose @days[@choice]"; |
| 6: | The @days array is set to the English days of the week. |
| 8: | The @choice array contains the choices the visitor has entered in the form. |
| 12: | Since the fields' values are numbers, they can be easily used here to access the @days array. |
Fig. 7.15 If you wanted to format this example in the same way I did the one in Figure 7.9 on page 86, you could assign @days[@choice] to a third array and then use foreach to format and print out each item individually.
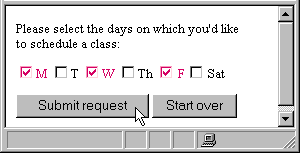
Fig. 7.16 The value of these checkboxes is not their name but rather their number. Monday is 1, Tuesday is 2, and so on.
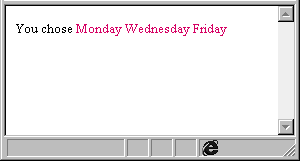
Fig. 7.17 In this example, the script grabs the elements numbered 1, 3, and 5 (corresponding to the values of the boxes checked) in the @days array and prints them out.
Once you've defined an array, you may need to add items to it. Perl has a special function for adding items to the beginning of an array.
Tips
| 1 | #!/usr/local/bin/perl |
| 2 | |
| 3 | require "subparseform.lib"; |
| 4 | &Parse_Form; |
| 5 | |
| 6 | @classes = ("Latin 305", "Advanced Greek Grammar"); |
| 7 | $newclass = $formdata{'newclass'}; |
| 8 | |
| 9 | unshift(@classes, $newclass); |
| 10 | |
| 11 | print "Content-type: text/html\n\n"; |
| 12 | |
| 13 | print "<H2>You added $newclass. Your complete list is now:</H2><UL>"; |
| 14 | |
| 15 | foreach $item (@classes) { |
| 16 | print "<LI>$item"; |
| 17 | } |
| 18 | print "</UL>"; |
| 6: | For simplicity, I've manually created the array here (see page 69). It would usually come from visitor input. |
| 7: | The $newclass variable gets data from the visitor through the form-parsing subroutine. |
| 9: | The unshift function adds the value of $newclass to the beginning of the @classes array. |
Fig. 7.18 You don't need to assign the result of the unshift function to another array. The array specified in the first argument is itself permanently modified.
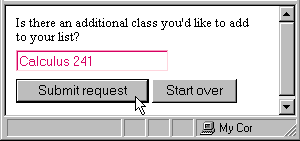
Fig. 7.19 The visitor adds the new class which will be stored in the $newclass variable.
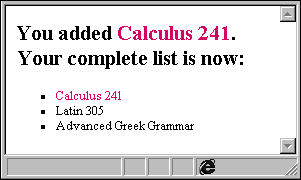
Fig. 7.20 If you use unshift to add an element to an array, the new element appears at the beginning of the array (cf. Figure 7.23).
You can also add items to the end of an existing array.
Tips
| 1 | #!/usr/local/bin/perl |
| 2 | |
| 3 | require "subparseform.lib"; |
| 4 | &Parse_Form; |
| 5 | |
| 6 | @classes = ("Latin 305", "Advanced Greek Grammar"); |
| 7 | $newclass = $formdata{'newclass'}; |
| 8 | |
| 9 | push(@classes, $newclass); |
| 10 | |
| 11 | print "Content-type: text/html\n\n"; |
| 12 | |
| 13 | print "<H2>You added $newclass. Your complete list is now:</H2><UL>"; |
| 14 | |
| 15 | foreach $item (@classes) { |
| 16 | print "<LI>$item"; |
| 17 | } |
| 18 | print "</UL>"; |
| 6: | For simplicity, I've manually created the array here (see page 70). It would usually come from visitor input. |
| 7: | The $newclass variable gets data from the visitor through the form-parsing subroutine. |
| 9: | The push function adds the value of $newclass to the end of the @classes array. |
Fig. 7.21 You don't need to assign the result of the push function to another array. The array specified in the first argument is itself permanently modified.

Fig. 7.22 Again, the visitor types the name of the new class and submits the data.
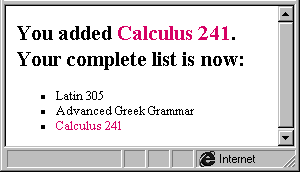
Fig. 7.23 The push function adds the new value to the end of the array (cf. Figure 7.20).
Sometimes you'll want to add the items from one array to another.
Tips
| 1 | #!/usr/local/bin/perl |
| 2 | |
| 3 | require "subparseform.lib"; |
| 4 | &Parse_Form; |
| 5 | |
| 6 | @classes = ("Latin 305", "Advanced Greek Grammar"); |
| 7 | $newclasses = $formdata{'newclasses'}; |
| 8 | @newclasses = split(/,/, $newclasses); |
| 9 | |
| 10 | @classes = (@classes, @newclasses); |
| 11 | |
| 12 | print "Content-type: text/html\n\n"; |
| 13 | |
| 14 | print "<H2>You added:</H2><UL>"; |
| 15 | foreach $item (@newclasses) { |
| 16 | print "<LI>$item"; |
| 17 | } |
| 18 | print "</UL>"; |
| 19 | print "<H2>Your complete list is now:</H2><UL>"; |
| 20 | foreach $item (@classes) { |
| 21 | print "<LI>$item"; |
| 22 | } |
| 23 | print "</UL>"; |
| 8: | The visitor's new input is stored in the @newclasses array. |
| 10: | This line combines elements from the @classes and @newclasses arrays into the @classes array. |
Fig. 7.24 The script now contains two foreach loops. The first goes through each element in the @newclasses array. The second gives the complete list of courses by iterating the elements of the newly combined @classes array.
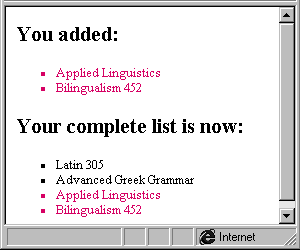
Fig. 7.25 The elements added from the second array now form part (at the end) of the original array.
You can eliminate one or more individual items from the beginning of an array using the shift function.
When you remove an item from an array, by default it disappears into the cyberether. If you're interested in using the removed item for another operation, you'll have to save it to a scalar variable.
| 1 | #!/usr/local/bin/perl |
| 2 | |
| 3 | require "subparseform.lib"; |
| 4 | &Parse_Form; |
| 5 | |
| 6 | @classes = ("Latin 305", "Advanced Greek Grammar", "Applied Linguistics", "Virgil and the Iliad"); |
| 7 | |
| 8 | $removed = shift(@classes); |
| 9 | |
| 10 | print "Content-type: text/html\n\n"; |
| 11 | print "<H2>You removed $removed. Your complete list is now:</H2><UL>"; |
| 12 | |
| 13 | foreach $item (@classes) { |
| 14 | print "<LI>$item"; |
| 15 | } |
| 16 | print "</UL>"; |
| 6: | Again, for simplicity's sake, I've created the base array manually. Hopefully, what the example lacks in usefulness, it makes up in clarity. |
| 8: | Two things are going on here. In the right-hand expression, the shift function removes the first element from the @classes array. Then the removed element is stored in the $removed variable. |
Fig. 7.26 The only reason I've stored the removed element in the $removed variable is so that I can print it out later. You don't need to store the result of the shift function for the array to be changed.
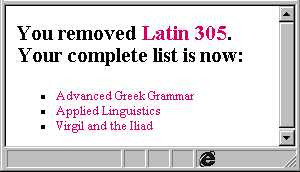
Fig. 7.27 You can print and use the removed element to give extra information to your visitor. Notice that the array no longer contains the removed element.
You can eliminate individual items from the end of an array using the pop function.
When you remove an item from an array, by default it disappears into the cyberether. If you're interested in using the removed item for another operation, you'll have to save it to a scalar variable.
| 1 | #!/usr/local/bin/perl |
| 2 | |
| 3 | require "subparseform.lib"; |
| 4 | &Parse_Form; |
| 5 | |
| 6 | @classes = ("Latin 305", "Advanced Greek Grammar", "Applied Linguistics", "Virgil and the Iliad"); |
| 7 | |
| 8 | $removed = pop(@classes); |
| 9 | |
| 10 | print "Content-type: text/html\n\n"; |
| 11 | print "<H2>You removed $removed. Your complete list is now:</H2><UL>"; |
| 12 | |
| 13 | foreach $item (@classes) { |
| 14 | print "<LI>$item"; |
| 15 | } |
| 16 | print "</UL>"; |
| 6: | Again, for simplicity's sake, I've created the base array manually. Hopefully, what the example lacks in usefulness, it makes up in clarity. |
| 8: | Two things are going on here. In the right-hand expression, the pop function removes the last element from the @classes array. Then the removed element is stored in the $removed variable. |
Fig. 7.28 The only reason I've stored the removed element in the $removed variable is so that I can print it out later. You don't need to store the result of the pop function for the array to be changed.
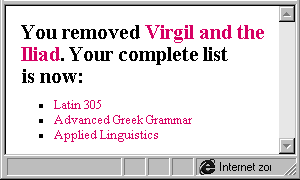
Fig. 7.29 Again, I've used the $removed_element variable so I can give visitors more information. Notice that the element no longer forms part of the array.
You can use the fact that array items are numbered to replace a particular item in an array.
Tips
| 1 | #!/usr/local/bin/perl |
| 2 | |
| 3 | require "subparseform.lib"; |
| 4 | &Parse_Form; |
| 5 | |
| 6 | @classes = ("Latin 305", "Advanced Greek Grammar", "Applied Linguistics", "Virgil and the Iliad"); |
| 7 | $newclass = $formdata{'newclass'}; |
| 8 | $ID = $formdata{'ID'}; |
| 9 | |
| 10 | print "Content-type: text/html\n\n"; |
| 11 | print "<H2>You replaced $classes[$ID] with $newclass. "; |
| 12 | |
| 13 | $classes[$ID] = $newclass; |
| 14 | |
| 15 | print "Your complete list is now: </H2><UL>"; |
| 16 | |
| 17 | foreach $item (@classes) { |
| 18 | print "<LI>$item"; |
| 19 | } |
| 20 | print "</UL>"; |
| 7: | The name of the new class is received from the visitor and stored in $newclass. |
| 8: | The number of the class to be removed is received and stored in $ID. |
| 11: | Before replacing the element in the array, this line takes advantage of the old information to tell the visitor what they're getting rid of. |
| 13: | The value of $ID determines which element of the @classes array is substituted with the value of $newclass. |
Fig. 7.30 Identifying an item in an array by its element number is the easiest way to replace it with an updated element.
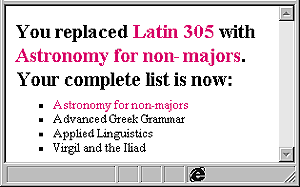
Fig. 7.31 Notice that the first time I reference classes[ID] (in line 11), the old value is printed. The second time, after the value has been changed in line 13, the new value is printed out (line 18).
You can replace several items in an array simultaneously by assigning an array with the new items to a slice of the array marking the items that need to be replaced.
Or type @numbers, where numbers is the name of the array that contains the index numbers that identify the desired items in the array referenced in step 1.
Or, type @replacement_array, where replacement_array is the name of the array that contains the items you wish to substitute for the ones referenced in step 3.
Tips
| 1 | #!/usr/local/bin/perl |
| 2 | |
| 3 | require "subparseform.lib"; |
| 4 | &Parse_Form; |
| 5 | |
| 6 | @classes = ("Latin 305", "Advanced Greek Grammar", "Applied Linguistics", "Virgil and the Iliad"); |
| 7 | @newclasses = split(/,/, $formdata{'newclass'}); |
| 8 | @IDs = split(/,/, $formdata{'ID'}); |
| 9 | |
| 10 | print "Content-type: text/html\n\n"; |
| 11 | print "<P><B>You replaced: </B>"; |
| 12 | |
| 13 | foreach $number (@IDs) { |
| 14 | $number--; |
| 15 | print "<LI>$classes[$number]"; |
| 16 | } |
| 17 | |
| 18 | print "<P><B>with:</B> "; |
| 19 | foreach $course (@newclasses) { |
| 20 | if ($course ne " ") { |
| 21 | print "<LI>$course"; |
| 22 | @newarray = (@newarray, $course); |
| 23 | } |
| 24 | } |
| 25 | |
| 26 | @classes[@IDs] = @newarray; |
| 27 | |
| 28 | print "<H2>Your complete list is now:</H2><UL>"; |
| 29 | foreach $item (@classes) { |
| 30 | print "<LI>$item"; |
| 31 | } |
| 32 | print "</UL>"; |
| 7: | Lines 7 and 8 receive, split, and store input from the visitor. |
| 13: | Lines 13-16 contain a foreach loop that reduces each ID number by 1 (so that it will match the class' array index) and then prints out the classes that should be removed. |
| 19: | The beginning of the foreach loop that goes through each element in @newclasses. |
| 20: | An interior if conditional checks to see if each element is not empty, and if not, prints the course name, and then adds it to a new array (that will only contain the non-empty elements of the @newclasses array). |
| 23: | Notice that each block needs its own closing curly bracket (lines 23 and 24). |
| 26: | This is the line that actually substitutes the chosen old classes and replaces them with the new ones. Notice I've used the @IDs array, which contains the index numbers, to identify the desired elements in @classes. |
| 29: | Now that the @classes array contains the updated list, we can use a foreach block to print out each element. |
Fig. 7.32 The ability to replace particular elements of an array with elements from another array makes arrays versatile and very powerful.
| <INPUT TYPE=checkbox NAME=ID VALUE="1">Latin 305 <INPUT TYPE="text" NAME="newclass" SIZE=30> <BR><INPUT TYPE=checkbox NAME=ID VALUE="2">Advanced Greek Grammar <INPUT TYPE="text" NAME="newclass" SIZE=30> <BR><INPUT TYPE=checkbox NAME=ID VALUE="3">Applied Linguistics <INPUT TYPE="text" NAME="newclass" SIZE=30> <BR><INPUT TYPE=checkbox NAME=ID VALUE="4">Virgil and the Iliad <INPUT TYPE="text" NAME="newclass" SIZE=30> |
Fig. 7.33 An excerpt from the HTML file used to create the form shows the set of checkboxes are named ID while each text field is named newclass. These names are used to identify the incoming data in lines 8 and 7 respectively of Figure 7.32 on page 96.
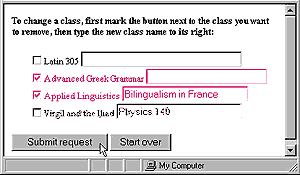
Fig. 7.34 By checking the box next to the old course, the ID is set to remove that item (and accept a new one). Typing in the new course creates the replacement element in the @newclasses array.
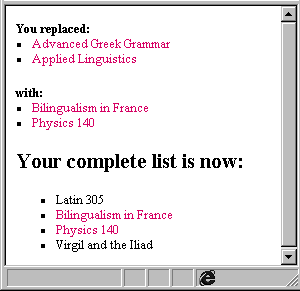
Fig. 7.35 The chosen old classes are replaced with the new ones. Printing out each stage of the script not only gives your visitor information but is also a good debugging tool (see page 216).
You can change an array so that the items it contains are sorted in alphabetical, or ASCII, order.
Or type sort {$b cmp $a}, to sort in reverse ASCII order.
Or type sort {$a <=> $b}, to sort numerically in ascending order.
Or type sort ($b <=> $a} to sort numerically in descending order.
Tips
| 1 | #!/usr/local/bin/perl |
| 2 | |
| 3 | require "subparseform.lib"; |
| 4 | &Parse_Form; |
| 5 | |
| 6 | $class = $formdata{'class'}; |
| 7 | @classes = split(/,/, $class); |
| 8 | |
| 9 | print "Content-type: text/html\n\n"; |
| 10 | |
| 11 | print "<H2>You chose:</H2><UL>"; |
| 12 | |
| 13 | @classes = sort (@classes); |
| 14 | |
| 15 | foreach $item (@classes) { |
| 16 | print "<LI>$item"; |
| 17 | } |
| 18 | |
| 19 | print "</UL>"; |
| 13: | This line rearranges the elements of the @classes array in alphabetical (ASCII) order, and then stores the result back into the @classes array. |
Fig. 7.36 The sort function puts items in ASCII order by default.

Fig. 7.37 The visitor chooses the classes they want to take...
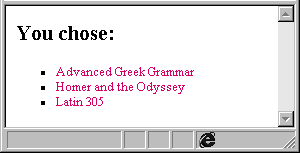
Fig. 7.38 ...and the script confirms the choices in alphabetical order (cf. Figure 7.9 on page 86).
You can completely reverse the order of the items in an array, putting the last item first, the second to last item second, and so on.
Tips
| 1 | #!/usr/local/bin/perl |
| 2 | |
| 3 | require "subparseform.lib"; |
| 4 | &Parse_Form; |
| 5 | |
| 6 | $class = $formdata{'class'}; |
| 7 | @classes = split(/,/, $class); |
| 8 | |
| 9 | print "Content-type: text/html\n\n"; |
| 10 | |
| 11 | print "<H2>You chose:</H2><UL>"; |
| 12 | |
| 13 | @classes = sort (@classes); |
| 14 | @classes = reverse (@classes); |
| 15 | |
| 16 | foreach $item (@classes) { |
| 17 | print "<LI>$item"; |
| 18 | } |
| 19 | |
| 20 | print "</UL>"; |
| 13: | This line rearranges the elements of the @classes array in alphabetical order, and then stores the result back into the @classes array. |
| 14: | This line reverses the order of the elements in the @classes array (now they'll be in descending alphabetical order), and stores the result back in the @classes array. |
Fig. 7.39 You have to store the result of the reverse function somewhere if you want to use it later in your script.
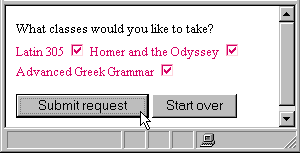
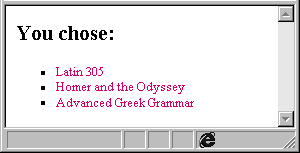
Fig. 7.41 This time the confirmation shows the classes in reverse alphabetical order (cf Figure 7.38 on page 98).