Animation with Scripting for Adobe Flash Professional CS5 Studio Techniques: Character Animation
From the book
From the book
From the book
Building a Character in Flash
Before rendering your character in Flash, consider how your character will need to move. Will your character be walking, running, flying, or falling at any point throughout the project? Optimization and efficiency are key elements for a web project that needs to load quickly and play smoothly. The more times an object can be reused, the more efficient the file will be.
After you import your sketch into Flash, you should consider how the character's features could best work as individual objects. This process depends ultimately on your style of animation and the style of your character. Efficient use of symbols will facilitate the production of cutout-style animation in Flash.
Working with Symbols
Symbols are the building blocks of Flash. You can convert anything you draw or import into a symbol, and there's a good reason to do so: When an object is converted into a symbol, it automatically becomes an item in the Flash document's Library. Every Flash document has its own Library from which you can drag a symbol onto the Stage. When you do so, the object on the Stage is referred to as an instance. No matter how many instances of a symbol reside on the Stage, Flash only needs to load the source symbol once. This is how Flash delivers smoothly streaming animations while maintaining small file sizes. It's extremely efficient to reuse symbols as many times as possible. You can also apply effects such as Scale, Tint, Alpha, and Brightness to instances and apply Motion Tweens in combination with one or more effects without increasing file size.
When you convert artwork to a symbol, you have a choice of three possible symbol behaviors:
- Movie Clip. Movie Clips are dynamic, which means they can be targeted with ActionScript, the Flash programming language. They can have any number of layers and frames, but their Timelines are independent of all other Timelines. Movie Clips can have Blend Modes and Filters applied to them to achieve sophisticated effects. You will utilize Movie Clips in Chapters 3 and 5 to create custom effects and behaviors. Movie Clips can also be created dynamically at runtime and can also act as a container for other objects, such as external images.
- Button. Buttons have four states: Over, Up, Down, and Hit. These are represented as keyframes in a button symbol's Timeline. You can place graphics in any of these states and then apply ActionScript to the instance of a button to add interactivity to your Flash movie.
- Graphic. Graphic symbols are similar to Movie Clips except that they are not dynamic and cannot be targeted with ActionScript. Like Movie Clips, Graphic symbols can have any number of frames and layers. Graphics are useful, because their Timelines can be manipulated via the Properties panel. The most important feature of Graphic symbols is that they will always be in sync with parent (Graphic) Timelines and the main Timeline. This feature becomes crucial when you are creating frame-based animations, which is why most animators use Graphic symbols for fixed-frame output formats (such as video). Unlike animation within Movie Clip Timelines, animation nested inside Graphic symbols can be seen when the playhead is moved back and forth along the Timeline within the Flash authoring environment. The only drawback to Graphic symbols is that they do not support Blend Modes or Filters.
In this chapter, you will focus primarily on building a character using Graphic symbols. You will apply a technique known as nesting to easily manipulate the character on the Timeline.
Nesting
The process of nesting involves placing a symbol instance inside another symbol's Timeline. This allows you to manipulate a symbol and all of its nested objects, or children, as a single object.
Flash animators and developers of all stripes lean heavily on the concept of nesting; thus, nesting will play a large role in the techniques covered in this chapter.
Here's a simple example of a character designed for cutout animation ( Figure 2.4).
)
Figure 2.4 This diagram shows a character with nested parts designed for cutout animation.
In Figure 2.4, image A shows the monster character as he will appear when the movie is rendered. Image B illustrates how the monster is broken into component parts. Image C shows how the component parts can be animated individually. Because all the parts are stored within a single symbol, the monster can be animated as a whole as well. The next section demonstrates the process of creating a character with nested parts.
Building the Driver Character
The driver character pictured in Figure 2.5 plays a small role in the Sausage Kong game introduced in Chapter 1. The driver appears after time has elapsed in the game, and he is only seen from the side while he is driving his truck and then when he is running across the Stage. Due to the character's limited movement, we only need to design a single view of the character.
)
Figure 2.5 Concept sketches of the driver character.
Working with the imported sketch
You'll use the sketch of the driver as a guide for your Flash artwork.
- Choose File > New, (under the General heading) select ActionScript 3.0 at the left, and click OK to create a new document (Figure 2.6 on the next page).
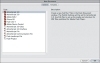
Figure 2.6 The New Document dialog box allows you to create a new blank document.
- Save the file as driver.fla.
- Choose File > Import > Import to Stage, locate the Chapter 2 /assets/driver_sketch.tiff file on the accompanying CD, and click Open.
- With the imported sketch selected, press the F8 key to convert the sketch to a Graphic symbol. Name the symbol sketch, and click OK.
- In the Position and Size area of the Properties panel, ensure that the chain link icon is unbroken so that width and height will be scaled proportionally, and change the W value to 550 (Figure 2.7).
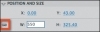
Figure 2.7 Ensure that the height and width values are locked as you scale the sketch instance.
- Center the sketch on the Stage (Figure 2.8).
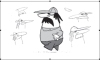
Figure 2.8 The sketch is now centered on Stage.
- In the Color Effect area of the Properties panel, select Alpha from the Style menu and set the Alpha value to 30% (Figure 2.9).

Figure 2.9 The Alpha value settings will render the sketch partially transparent.
- Rename the current layer sketch, lock the layer, and covert it to a guide by Ctrl-clicking/right-clicking and choosing Guide.
- Create a new layer named head above the sketch layer.
- Switch to the Brush tool and ensure that object drawing mode is turned off at the bottom of the toolbar. Using a black fill color, trace the outline of just the head shape. Make sure you overlap your drawing where the head meets the neckline of the body to avoid a gap appearing between them when you start animating later (Figure 2.10).
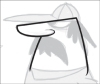
Figure 2.10 The top of the head is outlined to match the rough sketch underneath.
- Use the Selection tool and Properties panel to soften the black outline to a dark brownish tone (#BE984C), and use the Brush tool to close the neckline gap at the bottom with a line drawn using a lighter yellowish tone (#FFCC66) (Figure 2.11).
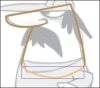
Figure 2.11 The neck and head graphic outline drawn using Flash's Brush tool.
- Use the Paint Bucket tool to fill in the head with the lighter tone (Figure 2.12).
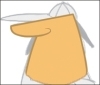
Figure 2.12 The completed head artwork.
- Select the entire head artwork and press F8 to bring up the Convert to Symbol dialog box. Name your Graphic symbol driver_head and click OK (Figure 2.13).
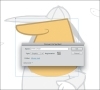
Figure 2.13 Convert the head to a Graphic symbol.
- Save your document.
)
)
)
)
)
)
)
)
The next step is to add the eye graphics.
Drawing the driver's eye
You'll create three different objects: the shadow of the eye socket, the white of the eye, and the pupil.
- In your driver.fla file, lock and hide your head layer, and create a new layer named eye.
- Switch to the Oval tool, select the darker fill color (#BE984C) with no stroke, and draw a circle (Figure 2.14).
Figure 2.14 The circle that will become the completed eye.
Because the top half of the driver's eye is designed in a way that it can't be seen, you'll cut the circle in half horizontally. Using the Selection tool, drag a marquee over the top half of the circle (Figure 2.15).
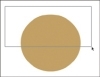
Figure 2.15 Use the Selection tool to select the top half of the circle.
When you release the Selection tool, the upper half of the circle will be selected (Figure 2.16).
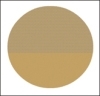
Figure 2.16 The partially selected circle will appear with small dots to indicate the selected area.
- Press the Delete key to remove the top half of the circle (Figure 2.17).

Figure 2.17 The resulting semicircle.
- Switch to the Free Transform tool, and rotate and scale the semicircle to fit the eye shape on the sketch (Figure 2.18).
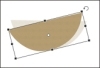
Figure 2.18 Use the Free Transform tool to rotate the semicircle.
- For the eyeball, copy the semicircle (Command+C/Ctrl+C) and paste a copy in place (Command+Shift+V/Ctrl+Shift+V). Scale down the new shape and replace the fill color with white (Figure 2.19).
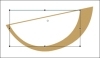
Figure 2.19 The eyeball shape is now in place.
- Use the Brush tool (or the Oval tool) with a black fill to add a pupil (Figure 2.20).

Figure 2.20 A pupil is added to the eye.
- Turn the head layer visibility on. Select the eye layer and group the eye parts together (Command+G/Ctrl+G). Use the Free Transform tool to position and rotate the eye to fit on the head (Figure 2.21).
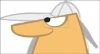
Figure 2.21 The completed eye is now in place.
)
)
)
)
)
)
)
)
Save your file, and let's get a cap on this fella!
Drawing the driver's hat
The hat is drawn in a manner similar to the eye. You'll start with basic shapes and then manipulate them into something more complex.
- Lock and hide all of your existing layers and create a new layer named hat.
- Use the Oval tool to draw a circle with a light blue fill (#58A3ED) and no stroke (Figure 2.22).

Figure 2.22 The initial circle created with the Oval tool for the character's hat.
- Use the Transform tool to squash the circle to a very thin oval (Figure 2.23).

Figure 2.23 The squashed shape will form the brim of the hat.
- Using the Selection tool, draw a marquee over the right half of the thin oval and press the Delete key (Figure 2.24).

Figure 2.24 The hat now has a flat right edge.
- Create a larger light blue circle, but this time select and delete the bottom half of the circle (Figure 2.25).

Figure 2.25 The second shape with a flat bottom edge.
- Use the Free Transform tool to stretch the current shape vertically (Figure 2.26).
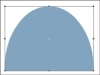
Figure 2.26 The semicircle stretched vertically using the Free Transform tool.
- Use the Selection tool to align the bottom edges and merge the two light blue shapes together. The end result should look like a hat with a brim (Figure 2.27).

Figure 2.27 The driver's hat with a brim.
- To add a two-tone color design to the hat, use the Rectangle tool to create a dark blue (#0066CC) rectangle inside the hat (Figure 2.28).

Figure 2.28 The first step in applying a two-tone color to the hat.
- Switch to the Selection tool and make sure the Snap feature is on in the toolbar (Figure 2.29).
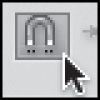
Figure 2.29 The Snap feature in the toolbar must be turned on.
- Using the Selection tool, drag each corner so that the bottom edges (Figure 2.30) and the top edges (Figure 2.31) of the shape snap to the edges of the hat.

Figure 2.30 Use the Selection tool to snap the color patch to the bottom and left edges of the hat.

Figure 2.31 Use the Selection tool to snap the top of the shape to the edge of the hat.
- Use the Paint Bucket tool to fill in the left edge (Figure 2.32).

Figure 2.32 You can use the Paint Bucket tool to fill in the final piece of the dark blue shape.
- Use the Selection tool to curve the right edge of the dark blue shape as if the hat were three-dimensional (Figure 2.33).

Figure 2.33 Use the Selection tool to curve the darker shape toward the edge of the hat.
- Repeat the last several steps (8–12) to create a second dark blue area at the right side of the hat (Figure 2.34).

Figure 2.34 A second dark blue area is added to the hat.
- To be consistent with the rest of the character's design style, use the Ink Bottle tool to add an extra dark blue (#004D9B) stroke to outline the entire hat (Figure 2.35).

Figure 2.35 The completed hat artwork.
- Select the entire hat, group it together (Command+G/Ctrl+G), unhide the sketch layer, and use the Free Transform tool to position and scale the hat so that it fits on the driver's head (Figure 2.36).
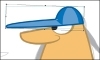
Figure 2.36 Use the Free Transform tool to make the hat appear as though it fits on the driver's head.
)
)
)
)
)
)
)
)
)
)
)
)
)
)
)
Looking good so far! It's time to add some facial hair.