Photoshop Tips Straight from the Studio
Like this article? We recommend
Like this article? We recommend
Like this article? We recommend
Here's your chance to follow former Adobe Creative Director Luanne Seymour Cohen into the studio as she takes you on a tour of some of the hottest tips and best shortcuts in Photoshop CS. If you love the best-selling Classroom In a Book series and are looking for the next step, look no further than our new Creative Studio series from Adobe Press!
Varying the brush size
To change brush sizes quickly as you paint, press the [ and ] (left and right bracket) keys. Press the [ key to reduce the size and the ] key to increase the brush size. The increment of change depends on the brush size. A brush size between 0 to 100 pixels will change by 10-pixel increments. A brush between 100 to 200 pixels will change by 25-pixel increments. A brush between 200 to 300 pixels will change by 50 pixels. A brush size between 300 to 2500 pixels will change by 100 pixels each time you use this shortcut.
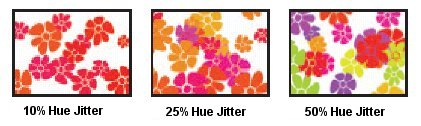
Controlling the Hue Jitter
To change the foliage color as you paint, select the Color Dynamics option for your brush. You can change colors by specifying a Hue Jitter percentage. First, select a foreground color from the Color palette. Then enter a value for the Hue Jitter percentage in the Color Dynamics section of the Brushes palette. The larger the percentage, the more the hue will change as you paint.
If you want to better visualize how Hue Jitter works, change the Color palette display to HSB Sliders using the palette menu. Then slide the H slider back and forth to see the hue change.
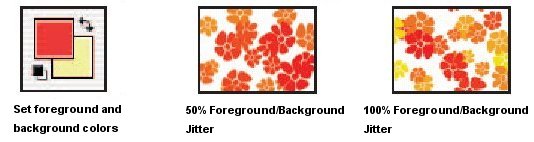
Controlling Hue Jitter color changes
A good way to control the color changes as you paint is to choose the two colors that will define the range of color change. First, select a foreground and background color. The foreground color will be the main color. The background color will mix into the foreground color according to the percentage you specify. Select a percentage for the Foreground/ Background Jitter. The higher the percentage, the more background color will be mixed into the foreground color as you paint.
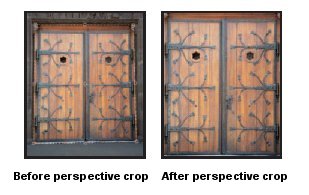
Removing perspective distortion with the Crop tool
You may want to remove a perspective distortion rather than introduce one. These distortions are common in photographs of buildings or other objects with rectangular planes that were photographed from an angle. You can use the Crop tool to correct the problem. Note that this correction only works on images that contain a rectangular object.
-
Select the Crop tool in the toolbox and roughly select the area to be cropped and corrected. The selection doesn’t have to be perfect because you will adjust it in step 3.
-
In the tool options bar, select the Perspective option.
-
Move the corners until they align with the edges of the object that you want to make rectangular. These edges will become perpendicular after the crop.
-
Press Return/Enter to complete the action. Notice that the edges of the cropping area are now perpendicular to the edge of the image.

Converting unit values on the fly
You don’t have to do the math to convert from pixels to points or from inches to centimeters, and you don’t have to change your preferences. Let Photoshop convert values for you. When you enter a value in the tool options bar, you can follow that number with any of several abbreviations for units of measurement. For example, if you know the height should be 2 inches and the width should be 150 pixels, you can enter “2 in” for height and “150 px” for width. Following are the abbreviations that Photoshop recognizes:
| Pixels | px, pixel | Millimeters | mm, millimeter |
| Inches | in, inch | Picas | picas |
| Centimeters | cm, centimeter | Percent | pct, percent, % |
Frequently used shortcuts
| Shortcut | Mac OS X keystrokes | Windows keystrokes |
| Repeating a task | ||
| Reselect last selection | Shift+Command+D | Shift+Ctrl+D |
| Use last Levels settings | Command+Option+L | Alt+Ctrl+L |
| Apply last filter | Command+F | Ctrl+F |
| Display last filter dialog box | Command+Option+F | Alt+Ctrl+F |
| Transform with copy | Command+Option+T | Alt+Ctrl+T |
| Transform again | Shift+Command+T | Shift+Ctrl+T |
| Transform again with copy | Shift+Command+Option+T | Shift+Alt+Ctrl+T |
| Speeding up painting | ||
| Fill with foreground color | Option+Delete | Alt+Backspace |
| Fill with background color | Command+Delete | Ctrl+Backspace |
| Get eyedropper while painting | Option | Alt |
| Select background color | Option+click a pixel | Alt+click a pixel |
| (eyedropper) | ||
| Select foreground color | Click an image pixel | Click an image pixel |
| (eyedropper) | ||
| Return to default colors | D key | D key |
| Switch fore- andbackground colors | X key | X key |
| Display Fill dialog box | Shift+Delete | Shift+Backspace |
| Decrease brush size | [ key (left bracket) | [ key |
| Increase brush size | ] key (right bracket) | ] key |
| Select previous/next brush size | , (comma) or . (period) | , (comma) or . (period) |
| Paint with straight line | Click-Shift-click | Click-Shift-click |
| Cycle through blending modes | Shift+ – (minus) or + (plus) | Shift+ – (minus) or + (plus) |
| Set opacity for paint tools | Any number key (e.g., 0 = 100%, 9 = 90%, etc.) | |
| Show/hide Brushes palette | F5 | F5 |
| Show/hide Color palette | F6 | F6 |
| Revert | F12 | F12 |
| Fill | Shift+F5 | Shift+F5 |
| Viewing images | ||
| Toggle between Standard and Quick Mask modes | Q | Q |
| Toggle between screen modes | F | F |
| Fit image in window | Double-click hand tool | Double-click hand tool |
| Magnify 100% | Double-click zoom tool | Double-click zoom tool |
| Switch to hand tool | Spacebar | Spacebar |
| Switch to zoom in tool | Command+spacebar | Ctrl+spacebar |
| Switch to zoom out tool | Option+spacebar | Alt+spacebar |
| Zoom in on specified image area | Command-drag over preview in Navigator palette | Ctrl-drag over preview in Navigator palette |
Shortcut: Zoom with an open dialog box
You can access the Zoom tool with the keyboard while a dialog box is open. This is handy when you want to compare the image with a preview proxy in a filter dialog box. Choose one of two methods:
-
Move the pointer outside of the dialog box and over the image. Press Command/Ctrl to convert the pointer to the Zoom tool for zooming in. Press Command/Ctrl+Option/Alt for zooming out.
-
Press Command/Ctrl+ – (minus key) to zoom out. Press Command/Ctrl+ = (equal sign) to zoom in.
| Create and name new layer | Option-click New Layer button | Alt-click New Layer button | ||
| Rename layer | Double-click the layer name | Double-click the layer name | ||
| Delete selected layer | Option-click Delete/Trash button | Alt-click Delete/Trash button | ||
| Create layer from a selection | Command+J | Ctrl+J | ||
| Move several layers at once | Link layers before using Move tool | Link layers before using Move tool | ||
| Show/hide just one layer | Option-click eye column of that layer | Alt-click eye column of that layer | ||
| Show/hide multiple layers | Drag through eye column | Drag through eye column | ||
| Center a layer dragged from another file | Press Shift while dragging layer into window | Press Shift while dragging layer into window | ||
| Masks(layer, vector, clipping) | ||||
| View layer mask | Option-click layer mask thumbnail | Alt-click layer mask thumbnail | ||
| Disable/enable vector mask | Option-click vector mask thumbnail | Alt-click vector mask thumbnail | ||
| Discard/apply a layer mask | Drag layer mask thumbnail to Trash button | Drag layer mask thumbnail to Trash button | ||
| Create layer mask from selection | Make selection; click Add Layer Mask button | Make selection; click Add Add Layer Mask button | ||
| Toggle between layer mask/composite image | Option-click layer mask thumbnail | Alt-click layer mask thumbnail | ||
| Toggle rubylith mode for layer mask on/off | \ (backslash) | \ (backslash) | ||
| Select layer’s transparency mask | Command-click layer thumbnail | Ctrl-click layer thumbnail | ||
Tool Shortcut Keys
| Tool | Shortcut key | Tool | Shortcut key | ||
| Marquee tools |
M
|
Gradient, paint bucket |
G
|
||
| Move tool |
V
|
Blur, sharpen, smudge |
R
|
||
| Lasso tools |
L
|
Dodge, burn, sponge |
O
|
||
| Magic wand |
W
|
Path selection tools |
A
|
||
| Crop tool |
C
|
Type tools |
T
|
||
| Slice tools |
K
|
Pen tools |
P
|
||
| Healing brush, patch tool |
J
|
Shape tools |
U
|
||
| Brush, pencil |
B
|
Notes, audio annotation |
N
|
||
| Clone stamp, pattern stamp |
S
|
Eyedropper, color sampler, measure tool |
I
|
||
| History brush, art history brush |
Y
|
Hand tool |
H
|
||
| Eraser, background eraser, magic eraser |
E
|
Zoom tool |
Z
|
||
Save 30%
Save 30% and enjoy free UPS ground shipping within the United States with the purchase of this book at peachpit.com. Just enter coupon code ET-Y4AA-MWBF when you get to our checkout page. This coupon code is an exclusive offer that may not be used in conjunction with any other coupon codes.