Setting Up a Project in Adobe Premiere Pro CS6
Note: This excerpt is from the forthcoming book Adobe Premiere Pro CS6 Classroom in a Book, ISBN 978-0-321-82247-5.
From the book
From the book
From the book
Lesson Overview
- Choosing project settings
- Choosing video rendering and playback settings
- Choosing video and audio display settings
- Choosing capture format settings
- Creating scratch disks
- Using sequence presets
- Customizing sequence settings
This lesson will take approximately 45 minutes.
Before you begin editing, you need to create a new project and choose some settings for your first sequence. If you’re not familiar with video and audio technology, all the options might be a little overwhelming. Luckily, Adobe Premiere Pro CS6 gives you easy shortcuts. Plus, the principles of video and sound reproduction are the same no matter what you’re creating.
It’s just a question of knowing what you want to do. To help you plan and manage your projects, this chapter contains quite a lot of information about formats and video technology. You may decide to revisit this chapter later, as your familiarity with Premiere Pro grows.
In practice, you are likely to make very few changes to the default settings, but it’s good to know what all the options mean.
Getting started
A Premiere Pro project file stores links to all the video and sound files—aka clips—used in your Premiere Pro project. A project file also has at least one sequence—that is, a series of clips that play, one after another, with special effects, titles, and sound, to form your completed creative work. You’ll choose which parts of your clips to use and in which order they’ll play. The beauty of editing with Premiere Pro is that you can change your mind about almost anything.
Remember that Premiere Pro project files have the file extension .prproj.
Note: Many of the terms used in Premiere Pro come from film editing, including the term clip. In traditional film editing, film editors cut a piece of celluloid with a clipper and then put the piece aside for use in the edit.
Video and audio clips in a sequence play in order as a completed edit.
Most often, starting a new Premiere Pro project is simple. You create a new project, choose a sequence preset, and get on with editing.
When you create a new project, Premiere Pro invites you to create a sequence. It’s important to understand how sequence settings change the way Premiere Pro plays your video and audio clips. You can change the settings selected by a preset if it is almost, but not exactly, what you want.
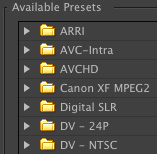
You need to know the kind of video and audio your camera records because your sequence settings will usually be based on your original source clips. To make it easier for you to choose the right settings, Premiere Pro sequence presets are named after different camera recording formats, so if you know the video format that your camera records, you’ll know what to choose.
Note: Presets preselect several settings, saving you time. You can use an existing sequence preset or create a new one for use next time.
In this lesson, you’ll learn how to create a new project and choose sequence settings that tell Premiere Pro how to play your clips. You’ll also learn about different kinds of audio tracks, what preview files are, and how to open projects created in Apple Final Cut Pro 7 and Avid Media Composer.
Setting up a project
Let’s begin by creating a new project.
1 Launch Premiere Pro. The Welcome screen appears.
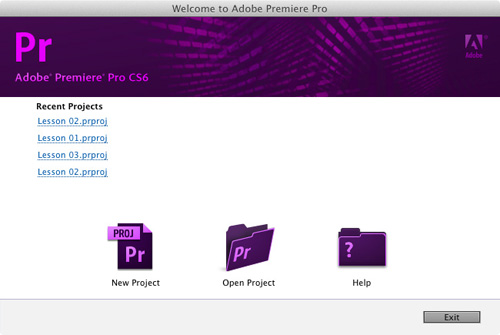
Recent Projects is a list of previously opened projects. If this is your first time launching Premiere Pro, it will be blank.
There are four buttons in this window:
• New Project: Opens the New Project dialog.
• Open Project: Lets you browse to an existing project file and open it to continue working on it.
• Help: Opens the online Help system. You’ll need to be connected to the Internet to access online Premiere Pro Help.
• Exit: Exits Premiere Pro.
2 Click New Project to open the New Project dialog.
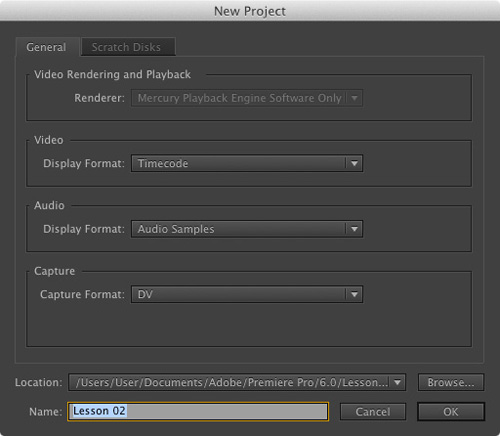
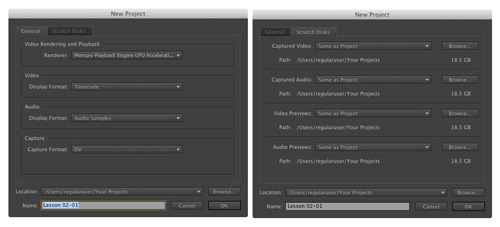
This dialog has two tabs: General and Scratch Disks. All of the settings in this dialog can be changed later. In most cases, you’ll want to leave them as they are. Let’s take a look at what they mean.
Note: You’ll notice that tabbed panels and dialogs appear a lot in Premiere Pro. They are a useful way of packing extra options into a smaller space.
Video rendering and playback settings
While working creatively with video clips in your sequences, it’s likely you’ll apply some visual effects. Some special effects can be played immediately, combining your original video with the effect and displaying the results as soon as you click Play. When this happens, it’s called real-time playback.
Real-time playback is desirable because it means you can watch the results of your creative choices right away. Many special effects in Premiere Pro are designed to be in real time.
If you use lots of effects or if you use effects that are not designed to be played in real time, your computer may not be able to display the results at the full frame rate. That is, Premiere Pro will attempt to display your video clips, combined with the special effects, but it will not show every single frame each second. When this happens, it is described as dropping frames.
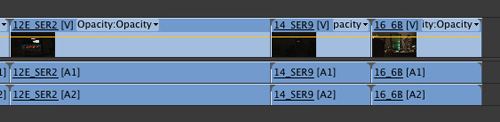
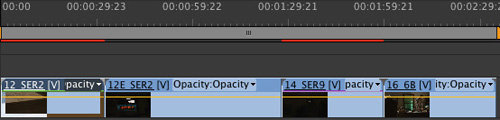
Premiere Pro displays colored lines along the top of the Timeline panel to tell you when extra work is required to play back your video.
Not seeing every frame when you play your sequence is OK! It won’t affect the final results. When you’re done editing and you output your finished sequence (more on that in Chapter 18, “Exporting Frames, Clips, and Sequences”), it’ll be full quality, with all the frames. However, it can make a difference to your editing experience and your ability to preview the effects you apply with confidence. There is a simple solution: rendering.
When you choose to render, Premiere Pro produces a new video file that looks exactly like the part of your sequence you have selected—known as the work area—with all the special effects applied. Every time that part of your sequence is played, Premiere Pro automatically, and invisibly, switches to the new video file and plays that instead. When that part of your sequence finishes, Premiere Pro invisibly switches back to playing the next clips in your sequence.
This means Premiere Pro can play back the results of your special effects at full quality, and at full frame rate, without your computer having to do any more work than playing a regular video file.
In practice, telling Premiere Pro to render is as simple as pressing a single key on your keyboard (the Enter key) or choosing an option in a menu.

What do rendering and real time actually mean?
Think of rendering as an artist’s rendering, where something is visualized, taking up paper and taking time. Imagine you have a piece of video that is too dark. You add a special effect to make it brighter, but your video-editing system is unable to both play the original video and make it brighter. In this situation, you’d have your system render the effect. When this happens, a new video file is created that looks like your original video combined with the special effect to make it brighter.
When the part of your sequence is played that contains the clip with the rendered effect, your system invisibly, and seamlessly, switches to playing the newly rendered video file instead. That file plays back like any other regular file. Although it looks like your original video with an effect on it, it’s actually just a simple video clip that plays back normally.
When the part of your sequence with the brightened clip is finished, your system invisibly, and seamlessly, switches back to playing your other original video files.
The downside with rendering is that it takes up extra space on your hard drive, and it takes time. It also means you are viewing a new video file, based on your original media, and that might introduce some loss of quality. The upside with rendering is that you can be confident your system will be able to play the results of your effect at full quality, with all the frames per second.
Real-time is...instant! When using a real-time special effect, your system plays the original video clip combined with the special effect right away, without waiting for it to render. The only downside with real-time performance is that the amount you can do without rendering depends on how powerful your system is. In the case of Premiere Pro, you can dramatically improve real-time performance by using the right graphics card (see “The Mercury Playback Engine”). Plus, you’ll need to use effects that are designed for real-time playback—and not all effects are.
If the Renderer menu is available, it means you have the right graphics hardware for GPU acceleration in your computer and it is installed correctly.
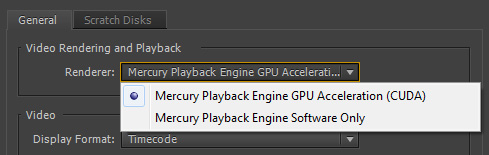
You’ll see two options:
• Mercury Playback Engine GPU Acceleration (CUDA): If you choose this option, Premiere Pro will send many playback tasks to the graphics hardware on your computer, giving you lots of real-time effects and easy playback of mixed formats in your sequences.
• Mercury Playback Engine Software Only: This is still a major advancement on non-real-time playback, giving you excellent performance that uses all of the available power in your computer. If you don’t have the right graphics hardware on your computer, only this option is available, and you won’t be able to click this menu.
You can achieve much better performance by choosing GPU Acceleration, if you have a compatible graphics card. It allows Premiere Pro to give some of the work of playing back video and applying visual effects to the GPU.
You will almost certainly want to choose the GPU option and benefit from the additional performance if you can.
Do so now, if the option is available.
The Mercury Playback EngineWith Premiere Pro CS5, Adobe introduced a playback engine called Mercury. The Mercury Playback Engine dramatically improved playback performance, making it faster and easier than ever to work with multiple video formats, multiple special effects, and multiple layers of video (for effects such as picture-in-picture).
The Mercury Playback Engine was enhanced with version CS5.5 and again with version CS6. It has three main features:
• Playback performance: The way Premiere Pro plays back video files was improved, especially for some of the types of video that are really difficult to play back. If you’re filming with a DSLR camera, for example, chances are your media is recorded using the H.264 codec, which is particularly hard to play back. With the new Mercury Playback Engine, you’ll find these files play back with ease.
• 64-bit and multithreading: Premiere Pro is a 64-bit application, which simply means it can use all of the random access memory (RAM) on your computer. This is particularly useful when you’re working with very high-resolution video. The Mercury Playback Engine is also multithreaded, which means it uses all of the CPU cores in your computer. The more powerful your computer is, the more performance you get in Premiere Pro.
• CUDA and Open CL support: If you have the right graphics card or an Apple MacBook Pro laptop with the right graphics hardware, Premiere Pro can delegate some of the work for playing back video to the graphics card, rather than putting the entire processing burden on the CPU in your computer. The result is even better performance and responsiveness when working with your sequences and lots of special effects that will play in real time.
For a list of supported graphics cards, see www.adobe.com/products/premiere/tech-specs.html.
Video/audio display format settings
The next two options tell Premiere Pro how to measure time for your video and audio clips.
In most cases, you’ll choose the default options: Timecode for video and Samples for Audio. These settings don’t change the way Premiere Pro plays video or audio clips, only the way time is measured.
About seconds and framesWhen a camera records video, it captures a series of still images of the action. If there are enough images captured each second, it looks like moving video when played back. Each picture is called a frame, and the number of frames each second is usually called frames per second (fps).
The frames per second will vary depending on your camera format and settings. It could be 23.976, 24, 25, 29.97, 50, or 59.94 frames per second. Some cameras allow you to choose between more than one frame rate, with different options for accompanying frame sizes.
Premiere Pro will play back video at all common frame rates.
Video display format
There are four options for Video Display Format. The correct choice for a given project largely depends on whether you are working with video or film as your source material.
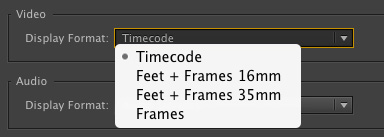
The choices are as follows:
• Timecode: This is the default option. Timecode is a universal standard for counting hours, minutes, seconds, and individual frames for video files or tape. The same system is used by cameras, professional video recorders, and nonlinear editing systems all around the world.
• Feet + Frames 16mm or Feet + Frames 35mm: If your source files are captured from film and you intend to give your editing decisions to a lab so they can cut the original negative to produce a finished film, you may want to use this standard method of measuring time. Rather than measuring time, it’s the number of feet plus the number of frames since the last foot. It’s a bit like feet and inches but with frames rather than inches. Because 16mm film and 35mm film have different-sized frames (and so different numbers of frames per foot), there is an option for each.
• Frames: This option simply counts the number of frames of video, starting at 0. This is sometimes used for animation projects and is another way that labs like to receive information about edits for a film-based project.
For this exercise, leave Video Display Format set to Timecode.
Audio display format
When playing audio files, time can be displayed as samples or milliseconds.
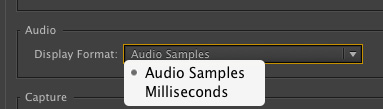
• Audio Samples: When digital audio is recorded, a sound sample is taken, as captured by the microphone, thousands of times a second. In the case of most professional video cameras, this happens 48,000 times per second. In Audio Samples mode, Premiere Pro will display time in your sequences as hours, minutes, seconds, and samples. The number of samples per second will depend on your sequence settings.
• Milliseconds: With this mode selected, Premiere Pro will display time in your sequences as hours, minutes, seconds, and thousandths of a second.
By default, Premiere Pro lets you zoom in to your sequences to view individual frames. However, you can easily switch to displaying your audio display format. This powerful feature lets you make the tiniest adjustments to your sound.
For this project, leave the Audio Display Format option set to Audio Samples.
Capture format settings
The Capture Format Settings menu tells Premiere Pro what format to use when recording video to your hard drive from videotape.

DV and HDV capture
Without additional third-party hardware, Premiere Pro can record from DV and HDV cameras using the FireWire connection on your computer, if it has one. FireWire is also known as IEEE 1394 and i.Link.
FireWire is a convenient connection for tape-based media because it uses just one cable to transmit video and sound information, device control (so your computer can tell the video deck to play, fast-forward, pause, and so on), and timecode.
Third-party hardware capture
Not all video decks use a FireWire connection, so you may need additional third-party hardware installed to be able to connect your video deck for capture.
If you have additional hardware, you should follow the directions provided by the manufacturer to install it. Most likely you’ll install software supplied with your hardware, and this will discover Premiere Pro is installed on your computer, automatically adding extra options to this menu (and others).
Follow the directions provided with your third-party equipment to configure new Premiere Pro projects.
For more information about video capture hardware and video formats supported by Premiere Pro, visit www.adobe.com/products/premiere/extend.html.
Ignore this setting for now because we will not be capturing from a tape deck in this exercise, and the setting can be changed at any time.
Note: The Mercury Playback Engine can share performance with video capture cards for monitoring thanks to Adobe Mercury Transmit—a new feature in CS6.
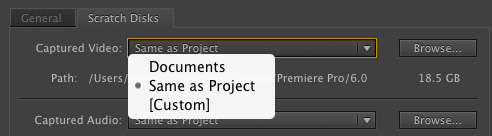
Scratch disks settings
Whenever Premiere Pro captures (records) from tapes or renders your special effects, new media files are created on your hard drive.
Scratch disks are the places these new files are stored. They can be separate disks, as the name suggests, or any file storage locations. Scratch disks can be created all in the same place or in separate locations, depending on your hardware and workflow requirements. If you’re working with really large files media files, you may get a performance boost by putting all of your scratch disks on different hard drives.
There are generally two approaches to storage for video editing:
• Project-based setup: All associated media files are stored with the project file in the same folder.
• System-based setup: Media files associated with multiple projects are saved to one central location, and the project file is saved to another.
Using a project-based setup
By default, Premiere Pro keeps any newly created media together with the project file (this is the Same as Project option). Keeping everything together this way makes finding associated files simple. You can stay even more organized by moving any media files you intend to import into your project into the same folder before you import them. When you’re finished with your project, you can remove everything from your system by deleting the folder your project file is stored in.
Using a system-based setup
Some editors prefer to have all of their media stored in a single location. Others choose to store their capture folders and preview folders in a different location from their project. This is a common choice in editing facilities where multiple editors share multiple editing systems, all connected to the same storage drives. It’s also common among editors who have one very fast hard drive for video media and a slower hard drive for everything else.
Typical drive setup and network-based storageAlthough all files types can coexist on a single hard drive, a typical editing system will have two hard drives: drive 1, dedicated to the operating system and programs, and drive 2 (often a faster drive), dedicated to footage items, including captured video and audio, video and audio previews, still images, and exported media.
Some storage systems use local computer networks to share storage between multiple systems. If this is the case for your Premiere Pro setup, check with your system administrators to make sure you have the right settings.
For this project, we recommend you leave your scratch disks all set to the default option: Same as Project.
1 Click in the Name: box and give your new project the name Lesson 02-01.
2 Click the Browse button; then browse to the Your Projects folder, located with the project files you copied to your computer hard drive for these lessons.
Note: When choosing a location for your project file, you might be able to choose a recently used location from the drop-down menu.
3 If your project is set up correctly, the General and Scratch Disks tabs in your New Project window should look identical to the screen shown here. If the settings match, click OK to create the project file.
Note: This project continues in the forthcoming book Adobe Premiere Pro CS6 Classroom in a Book, ISBN 978-0-321-82247-5