How to Rate and Tag Photos on the iPad Using Photosmith and PhotosInfoPro
- Rate and Tag Using Photosmith
- Rate and Tag Using PhotosInfoPro
- Rate and Tag Using Editing Apps
Read The iPad for Photographers: Master the Newest Tool in Your Camera Bag, Second Edition and thousands of other books and videos on Creative Edge. Start a free trial today.
This chapter is from the book
This chapter is from the book
This chapter is from the book
)
Even if I were to do nothing else with photos on my iPad, I would want to perform my first round of rating and keyword tagging. I’d much rather spend time in front of my computer editing the photos than sorting them, especially since rating and tagging can be done with the iPad during downtime like waiting for a flight, chilling out in a coffee shop, or sitting on the couch in the evening.
Actually making that possible, however, is a difficult task, which explains why there are only a few apps capable of doing it. The ones I’m focusing on are Photosmith and PhotosInfoPro, which let you rate and assign keyword tags to imported photos, and then export them with the metadata intact to your computer (including direct sync with Adobe Photoshop Lightroom in the case of Photosmith). Several image editing apps also now offer tools for rating and tagging.
Rate and Tag Using Photosmith
Apple introduced the iPad Camera Connection Kit at the same time as the original iPad. In the years since, we’ve seen all kinds of software innovations with Apple’s tablet, but surprisingly, being able to rate and tag photos hasn’t quite succeeded until now. It seems like a natural request: Take the images you imported onto the iPad; assign star rankings to weed out the undesirable shots and elevate the good ones; add important metadata such as keywords; and, lastly, bring the photos and all that data into a master photo library on the computer.

Photosmith
Photosmith, in my opinion, finally delivers those capabilities. When you’re shooting in the field, you can act on those photos instead of keeping them in cold storage. Back at the computer, that work flows smoothly into Photoshop Lightroom, so you don’t have hours of sorting ahead of you.
Import Photos
After you import photos into the iPad using a camera adapter or wireless device (as described in Chapter 2), you next need to bring them into Photosmith. To pull images from the iPad’s photo library, do the following:
- Tap the Import Photos button.
- Choose an album from your library at left to view its photos (4.1).
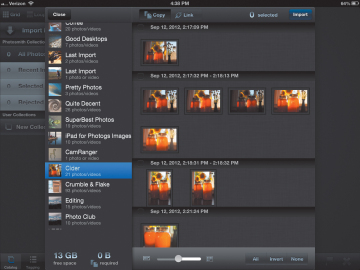
4.1 Importing photos into Photosmith
- Select the images you want to import. The checkbox above each group selects all shots in that group; you can drag the Smart Group slider to adjust the groups by their capture times. Or, tap the All, Invert, or None buttons to refine the selection.
- The default import setting is to copy files from the iOS library to Photosmith’s library, which is what I recommend. It occupies more of the iPad’s storage, but is more stable than choosing the alternative, which is to link to the files. If you’re running short on free space, delete the images using the Photos app after you’ve imported them into Photosmith.
- Tap the Import button to copy the photos to Photosmith’s library.
)
Photosmith can also import photos directly from an Eye-Fi card or from an FTP site. You’ll find the configuration options in the Dashboard pane.
Rate Photos
As you’ll learn in the pages ahead, Photosmith features several ways to organize and group your photos. But let’s start with the most likely first action: reviewing and rating the images you imported. The app supports ratings (1–5 stars) and color labels that track with those features in Lightroom. You can also mark photos that don’t make the cut as rejected.
To rate photos, do the following:
- Double-tap a thumbnail to expand the photo in Loupe view. You can also tap the Fullscreen button to hide the sidebar and review each photo larger. Pinch to zoom in or out to view more or less detail.
- Tap a star rating on the QuickTag bar to assign it to the photo (4.2). Or, if the shot isn’t salvageable, tap the Reject (X) button to mark it as rejected. (The photo will still be transferred to Lightroom if you sync it, but it will arrive marked as rejected.)
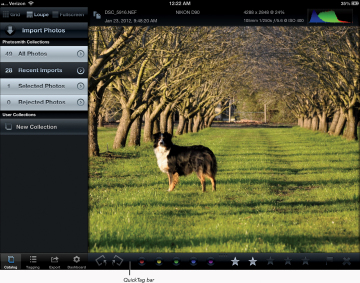
4.2 Rating a photo in Loupe view
- If you use colors to label your shots, tap one of the color buttons.
- Use the Rotate buttons to turn photos that arrived with incorrect orientation in 90 degree increments.
- Swipe left or right to switch to the next or previous photo.
- Continue until you’ve rated all the photos you want.
To return to Grid view, tap the Grid button; the photos are marked with stars to indicate their ratings (4.3).

4.3 Ratings and color assignments appear on thumbnails in Grid view.
)
)
The values of the stars are up to you. My approach is to rate anything that looks promising (which sometimes means, “Oh hey, that one’s in focus after all!”) as one star. Photos that strike me more creatively get two stars. On rare occasion I’ll assign three stars at this stage, but usually I reserve stars three through five for after I’ve edited the photos in Lightroom.
Rate multiple photos simultaneously
For an even faster initial review pass, you don’t need to enter the Loupe or Fullscreen views. Select the photos you want to rate or categorize in Grid view, and apply the information at once, like so:
- In Grid view, tap once on a photo to select it. Tap to select others.
- Tap the rating or color label in the QuickTag bar to apply it to each selected photo.
- To let go of your selections, you can tap each one again, but there’s a better way: Swipe up on the QuickTag bar and tap one of the selection buttons—All, Invert, or None (4.4).

4.4 The filter controls in the expanded QuickTab bar include buttons to select all thumbnails or none, or to invert the selection.
)
Assign Keywords
In the interests of speed and convenience when reviewing photos, one task that’s often ignored is assigning keywords to the images. On the computer, it’s a mundane but important task (especially if you’ve ever found yourself trying to find an old photo and ended up just scrolling through thousands of shots); on the iPad, it was darn near impossible to do until only recently.
Create or assign keywords
Bring up a photo in Loupe view or select one or more photos in Grid view, and then do the following:
- Tap the Tagging button in the sidebar.
- Tap the Keywords field to bring up the Keywords editor (4.5).
4.5 The Keywords controls
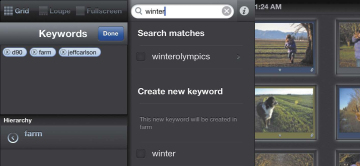
- To create a new keyword, tap the Search field and begin typing. As you do so, in addition to listing matches to existing terms, the text also appears under a Create New Keyword heading. Tap the tag that appears to add it to the selected photo or photos and to the keyword list.
- To assign an existing keyword, locate it in the list on the left and tap its button. You can also choose from the lists of Recent and Popular keywords that appear to the right.
To quickly locate a keyword, begin typing it in the Search field at the top of the screen.
- Tap Done when you’re finished.
)
Build keyword hierarchies
Keywording is a form of organization, and organization varies from person to person. While I prefer a single list of tags, you may be more comfortable with multiple levels of parent and children terms. Photosmith caters to both styles, letting you build keyword hierarchies that Lightroom understands, like so:
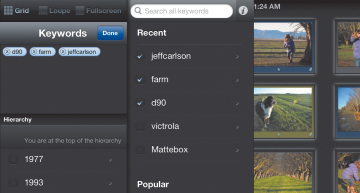
- With the Keywords editor open, tap the Detail (>) button to the right of any tag to set that tag as the parent.
- Type the name of the child keyword in the Search field. As the child keyword appears under the Create New Keyword section, Photosmith notes that it will belong to the parent tag (4.6).
4.6 Creating a new child keyword, “winter,” under “farm”
- Tap the new keyword to add it to the list and to the selected photo or photos.
)
Remove keywords
Suppose you mistype a keyword or apply it to a term by accident. To remove a keyword from those already applied to a photo, touch and hold it and then tap the Remove button (4.7, on the next page). Or, to just remove a keyword from the hierarchy, swipe left to right over it and tap Delete.
)
4.7 Removing a keyword from a photo
Edit Metadata
Keywords are essential for locating your images later and for assigning terms that can be found in photo-sharing services and commercial image catalogs, but you should also take advantage of other metadata while you’re processing your photos in Photosmith.
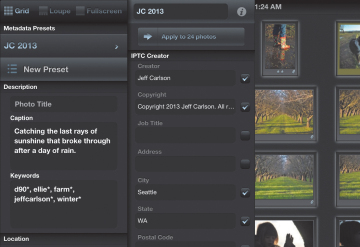
With one or more photos selected in your library, go to the Tagging panel of the sidebar and tap any field to enter text (4.8). The Photo Title and Caption fields, for example, are used to identify images on Flickr and other sites. The IPTC fields are also important, because they embed your contact information, copyright statement, and job-specific metadata into the image file.
)
4.8 Add metadata to multiple selected photos.
Create metadata presets
Unless you’re narcissistic and enjoy typing your name over and over, you don’t want to re-enter the same metadata for each photo. Create metadata presets that include all your information, and then apply them to your photos in batches.
- Select at least one photo in Grid view, or switch to Loupe view.
- In the Tagging menu, tap the New Preset button.
- In the drawer that appears, rename the preset at the top of the drawer, and fill in any other metadata fields you wish to save (4.9). For example, you may want a generic preset that includes your contact and copyright information, and an additional one that applies to a specific location or project.
4.9 Creating a metadata preset
)
To apply that metadata, do the following:
- In the Tagging menu, tap the name of the preset you created. The information appears in the drawer.
- Any fields you filled out before are selected automatically; if you want to omit one, tap the checkbox to the right of the field to deselect it.
- Tap the “Apply to X photos” button to tag the selected photos.
If you want to choose a different preset without applying anything, tap the preset’s name in the sidebar to hide its drawer.
You can edit a metadata preset at any time simply by updating the contents of the fields. However, the change isn’t retroactive—earlier photos tagged with that preset don’t gain the new information.
Filter Photos
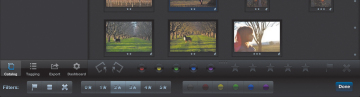
Now that you’ve rated and tagged the photos and applied metadata to them, you can take advantage of Photosmith’s filtering tools to customize which images appear based on all that information. Swipe up on the QuickTag bar to reveal the filtering options.
Filter by metadata
Here’s where that rating and tagging pays off on the iPad. To display photos that match certain criteria, do the following in Grid view:
- Swipe up on the QuickTag bar to reveal the filter options.
- Tap the Set Filters button to reveal more specific filter controls.
- Tap the criteria you wish to filter against (4.10). Selecting a star rating, for example, displays only images matching that rating. You can also filter by color labels and rejected status.
4.10 Using filters to view only photos marked with two or three stars
- Tap Done to apply the filters.
- To toggle filtering on and off, tap the checkbox to the left of the Set Filters button.
)
Change the sort order and criteria
Normally, photos appear in Grid view based on their capture date, with the newest additions at the bottom of the list. To change the order in which they appear, or to list them by import date, star rating, or color label, do the following:
- Swipe up on the QuickTag bar to reveal the filter options.
- To toggle the sort order between descending and ascending, tap the arrow at the left of the Sort button (4.11).

4.11 Swipe up on the QuickTag bar to reveal the filter options, including this button for changing the sort order.
- Tap the Sort button itself to reveal more sorting options.
- Tap the button for the sorting criterion you wish to use (4.12).

4.12 Tapping the Sort button reveals more sorting options.
- Tap Done to go back to the filter options.
)
)
Filter using Smart Groups
Here’s an issue I run into often when importing photos into Lightroom. The pictures on my memory cards tend to span several events, or even days if I haven’t been shooting regularly. Lightroom sees the photos as one big collection, regardless of their contents. If I want to split them out into groups—and more importantly, apply accurate metadata during import—I need to bring them over from the camera in several batches.
Photosmith’s Smart Groups feature enables you to view those photos in separate batches, adjusted on the fly using a simple slider control. Even if the photos cover one larger event, it’s likely they represent distinct experiences. For example, when I’m on vacation I don’t usually sit around and shoot in one place. I could be fly-fishing in the morning, sightseeing in town in the early afternoon, hiking later in the day, and waiting for the sunset at a scenic overlook in the evening. (Now I want to go on vacation!)
When I bring the photos I took during that day into the iPad, I get them all in one event based on the date they were shot. Even importing in batches doesn’t help, because I end up with just the iPad’s Last Imported and All Imported smart collections, not the groupings I prefer (and I can’t assign metadata anyway).
A better and faster workflow instead works like this:
- Import all the photos into the iPad.
- Import the photos into Photosmith. (This step also lets me cull the obviously poor shots.)
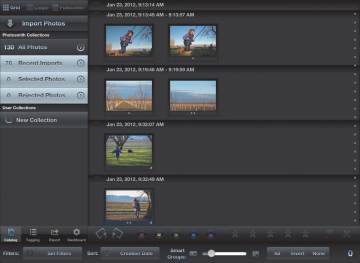
- Swipe up on the QuickTag bar to view the Smart Groups slider (4.13).
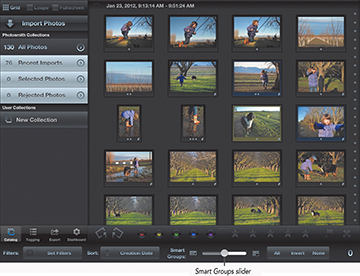
4.13 The Smart Groups slider at its default position
- Drag the slider to the left to break the library down into finer events (4.14). Or, to group more photos together, drag to the right.
4.14 Selecting a finer setting (drag to the left) breaks the shoot into groups.
)
)
This grouping gives you the opportunity to select ranges of photos by tapping the button to the left of the date stamps. Then you can apply ratings and keywords in batches that better match the grouping of real-life events.
Group Photos into Collections
I mentioned earlier that people organize photos in different ways—and that includes how they group photos. For some, having metadata in place is good enough to locate photos using filters and searches. Other people prefer to store images in albums, folders, or other types of digital shoeboxes. Photosmith’s collections scratch that itch, giving photos an address within the app where they can be easily found, versus being scattered throughout the larger library. (Collections also play an important part in syncing between the iPad and Lightroom, as I’ll discuss shortly.)
Follow these steps to add photos to a collection:
- Select the photos in your library that you want to include in a collection.
- If you need to create a collection from scratch, tap the New Collection button and give the collection a name.
To add the selected photos to the collection, take one of two actions:
- Drag one of the photos onto the collection’s name in the sidebar; all selected photos will accompany it.
- Tap the collection’s Detail (>) button to view its options in the sidebar drawer, and then tap the Add Selected Photos button (4.15).
4.15 Adding selected photos to a collection using the sidebar drawer
)
Deleting photos from a collection is just as easy: Select the photos you wish to remove, tap the collection’s Detail (>) button, and tap the Remove Selected Photos button. You can also delete a collection by tapping Remove Collection in the Detail options pane; the photos in the collection are not deleted from your library.
Sync with Photoshop Lightroom
And now we get to the whole point of using an app like Photosmith. Rating and tagging is helpful, but if you can’t transfer that metadata with your photos to Lightroom, all the work you put into it ends up being futile. Photosmith offers two methods to synchronize your images and data.
Photosmith publish service
Lightroom’s Publish Services panel lets you sync photos to your libraries on Flickr, Facebook, and others. Photosmith takes advantage of this conduit, enabling two-way synchronization between the iPad and the desktop. Download the free Photosmith plug-in at www.photosmithapp.com, and install it in Lightroom using the Plug-in Manager.
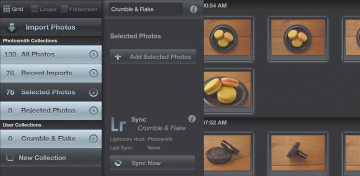
Any collections you create in Photosmith show up in Lightroom as well, and the photos and metadata remain in sync when you click the Publish button in Lightroom (4.16).
)
4.16 Collections appear in Lightroom (left) and in Photosmith (right).
Sync photos
To synchronize everything in Photosmith’s catalog, do the following:
- Make sure Photosmith is running on the iPad, Lightroom is running on your computer, and both devices are on the same network.
- In Photosmith, go to the Dashboard menu and tap the Lightroom button.
- Tap the Sync Now button to sync the catalog. The photos transfer to Lightroom, and any collections you’ve made are kept intact (4.17).
4.17 Sync all photos in your catalog.
)
Or, synchronize just a collection. I like this option when I am dealing with a specific project—a single photo shoot or location—and don’t want to transfer every new photo from the iPad to Lightroom. Tap the collection’s Detail (>) button and then tap the Sync Now button.
Apply Develop settings
Does your camera tend to capture everything with a slight color cast? Or perhaps you’ve hit upon a favorite combination of edits that reflect your photographic style. If you’ve saved those values as Develop module presets, you can apply them (or any of the built-in Lightroom ones) during the sync process. Since Lightroom is performing the edits, they’re non-destructive, so you can change or remove them within Lightroom at any point. Double-click the Photosmith publish service to bring up the Lightroom Publishing Manager, and expand the Photosmith -> Lightroom Image Options section. Then select the Develop Settings checkbox and choose the setting you want (4.18).
)
4.18 Apply During Import options
Apply a metadata preset
Earlier, I bemoaned the fact that Photosmith can’t save keyword tags in a metadata preset. With help from Lightroom, you can overcome that limitation by applying one of Lightroom’s metadata presets at import. If you’ve already created metadata presets in Lightroom, go to the Lightroom Publishing Manager, select the Metadata Preset checkbox, and then choose the preset you want. In the Action pop-up menu that appears, set how the data will be applied: Photosmith first, Lightroom first, just Photosmith, or just Lightroom.
Sync keywords
In addition to transferring the image files, Photosmith keeps Lightroom’s library of keywords up to date every time you sync. This option, also in the Lightroom Publishing Manager, gives you the option of syncing just the keywords applied to the current set of photos or syncing all keywords in the catalog (which happens more slowly).
Photosmith Plug-in Extras
If you’d prefer to transfer photos one-way from Photosmith to Lightroom, use the Plug-in Extras functionality:
In Lightroom, choose File > Plug-in Extras > Photosmith, and then choose one of the following options:
- Sync Keywords: Transfers only the keyword list.
- Sync Multiple Collections: Transfers one or more collections that you choose.
- Click the Sync Now (for keywords) or Sync Collections Now (for collections) button to perform the transfer.
- Click Close to exit the dialog.
Sync photos from Lightroom to Photosmith
Consider this alternate scenario: You didn’t get a chance to review your photos in Photosmith while you were out in the field, and you imported them into Lightroom directly from the camera. However, you’d still like to use Photosmith to review the shots, rather than accomplish the task while chained to your computer. The Photosmith plug-in can transfer JPEG versions of your photos (optimized for the iPad’s screen if you want, cutting down on storage space and transfer time). Rate and tag them there, and then sync the metadata back to Lightroom when you’re ready.
- In Lightroom, right-click the Photosmith publish service and choose Create User Collection.
- Enter a custom name for the collection in the dialog that appears (4.19).
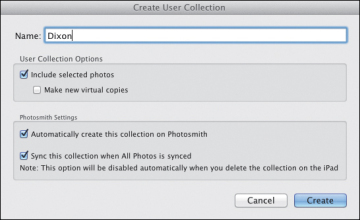
4.19 Create a user collection in Lightroom.
- Click the Create button. If Photosmith is running, an empty collection automatically appears.
- With the collection selected, click the Publish button. Or, in Photosmith, sync the catalog or just the collection. The images copy to the iPad.
)
After you mark the photos on the iPad, sync the collection or your entire library to update the changes in Lightroom. The same applies if you update a synced photo’s metadata in Lightroom: When you sync again, the last-updated version is retained on both devices.
Export to Photosmith
If those aren’t enough options, you can also set up Photosmith as an export target. In Lightroom, choose File > Export and then specify Photosmith from the Export To menu. You can specify the image format and size, and you can choose whether to sync keywords for the entire library (slower) or just the keywords in use by photos (faster). The export settings can also be set up as a preset for easier export later.
Export to Other Destinations
As you’d expect, you can share photos to Flickr and Facebook or attach them to outgoing email messages. And you can also copy photos to albums within the iOS photo library, which makes them accessible to other apps on the iPad. You’ll find these options in the Export menu.
However, I want to draw attention to three other export options that broaden the usefulness of Photosmith. Although the app was designed to work with Lightroom, you can still export tagged photos to your computer for later processing in other software.
Dropbox
If you’re on a robust Internet connection, copy images from Photosmith to Dropbox, which makes them automatically appear on any computer on which you’re running the online service.
- Select the photos you want to transfer.
- Tap the Export button at the bottom of the sidebar.
- Tap the Dropbox button to reveal the Export to Dropbox drawer (4.20).

4.20 Send photos to your Dropbox account.
- At the top of the drawer, choose which photos to send (such as “Send 5 selected photos”).
- Tap one of the upload size buttons (Med JPG, Large JPG, or Orig) if you want to resize the photos.
- If you want metadata saved in separate files alongside the image files, select the Create XMP Sidecar checkbox (more about this in a moment).
- Tap the Send Photos button to start copying.
)
XMP Export
When you’re working with JPEG images, additional metadata is written to the image file. But raw images are treated as sacred originals in Photosmith and not changed in any way. To associate metadata with the file, you can export an additional XMP (Extensible Media Platform) file that contains the information and rides alongside the image. So, a raw file named DSC_1234.NEF would have a sidecar file named DSC_1234.XMP that includes the metadata. When imported into most photo management software, the data is combined with the image.
Photosmith’s Dropbox option is capable of adding the XMP files during export. If you don’t use Dropbox, you can still access the metadata files by tapping the XMP Export button, exporting selected files, and then copying them from within iTunes or via FTP.
PhotoCopy
The PhotoCopy option lets you export photos and their metadata to other iOS apps that support the FileXchange method of sharing images between apps. With images selected, tap the Export Photos button and then choose the app to receive them.
Delete Photos
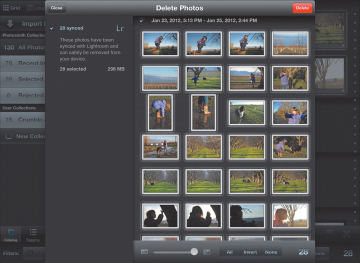
You’re bound to hit the ceiling of how many photos your iPad can store (even if you sprang for the 128 GB model), so you’ll want to delete photos from Photosmith. After you’ve processed your photos and transferred them to your computer, do the following to remove them:
- Select the photos to delete.
Touch and hold the Rejected button in the QuickTag bar to bring up the Delete Photos window.
Photosmith notes whether the images have been synced to Lightroom or not (to make sure you don’t accidentally delete images), and gives you the option of deselecting any shots you want to keep (4.21).
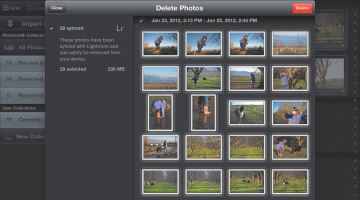
4.21 Deleting photos from the Photosmith library
- Tap the Delete button to remove the images. If you copied them originally from the iOS photo library, those originals still remain on the iPad. If you imported them into Photosmith as links, the links are removed.
)

Proxy JPEG Workflow