This chapter is from the book
This chapter is from the book
This chapter is from the book
Nesting Movie Clips
You've now created a movie clip with an orbiting electron. That's pretty exciting—but you need three paths with three electrons for the logo. The smart way to make this happen is to use nested movie clips. Here's how to make this work.
Click on Scene 1 in the tab under the timeline. Create a new empty movie clip (Insert > New Symbol) and call it 3 Orbits. Drag the Electron Orbit movie clip onto the stage and center it within the new movie clip. Create two new blank layers by clicking on the Insert Layer icon in the timeline.
Since we have the first Electron Orbit clip where we want it, all we need to do now is to duplicate the instance twice, and then rotate the second and third instance.
Click on the keyframe of the electron orbit layer on the timeline. Go to the Edit menu and choose Copy Frames. Now click on the first frame of each of the two new layers you've created and choose Edit > Paste Frames.
You should now have three identical instances of the electron orbit, positioned precisely on top of each other. Since we simply duplicated what was on each layer using the timeline to copy and paste, Flash will place each copy at the same X-Y position as the original. You could just drag additional instances from the timeline, but this way you've saved yourself the additional effort of aligning all three instances.
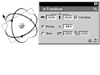
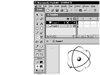
Click on the instance of the electron orbit in the first layer in the timeline. Open the Transform panel and set the rotation to 120 degrees. Press the Enter key. Click on the instance of the electron orbit in the second layer in the timeline. Set the rotation of this object to 240 degrees.
Now let's add the nucleus of the logotype.
Create a new layer in the timeline. Drag an instance of the Dot symbol from the Library panel onto the stage and center it under the crosshairs. Use the Transform panel or the free transform tool to resize the symbol as needed.
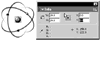
You've successfully accomplished (in Flash anyway) what thousands of scientists would give their electron microscopes to do—you've created a nucleus.
Double-click on each of the numbered layers and give each one a descriptive name.
Labeling the layers this way will help you keep track of the elements in your animation, even if you have to come back to this file after a long absence. There's an old saying in the software engineering field that "real programmers don't comment their code." Still and all, commenting code is the best way to ensure you can return to work on a file long after you've put it aside, without spending hours trying to figure out how it was set up. This is also really useful if you are just one of many people who will work on the same file. Labeling your layers is the graphic artist/animator equivalent of commenting code.
Once we get into ActionScript we'll be commenting code for real. At that point, you'll want to have developed good programming habits, because revisiting ActionScript code you've written without the benefit of coding comments is sort of like oral surgery without Novocain. So this will be good practice.
The bug portion of the logo is now done.
TIP
When graphic designers refer to a bug, they are talking about a graphic symbol used to represent a company or product. Some logos use them; others don't (a logo that is all text, for instance). Many times, a bug is used all alone; more often, it's used in conjunction with a text treatment as a logotype.
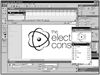
Click on Scene 1 in the tab list under the main toolbar. Drag the TEC-logo symbol from the Library onto the main stage. Double-click on the logo. Press Ctrl+B (Windows) or Command+B (Macintosh) to break it apart into several object groups.
Here you are using the original design for position, but you're breaking it up because ultimately you're only going to keep the text portion of the original.
Create a new layer and drag the 3 Orbits movie clip onto the main stage. Align the 3 Orbits movie clip so that it is directly over the original version of the bug.
Now all you have to do is to get rid of the original, static version of the bug.
Hide the new layer with the 3 Orbits movie clip.
In the timeline, click on the show/hide layer dot, directly under the eye icon, for the Dot layer. This hides the layer; the dot on the timeline will be replaced by a red X. This layer is now invisible.
Drag-select the bug on the main stage and delete it. Turn the first layer back on. Press Ctrl+Enter (Windows) or Command+Return (Mac).
This automatically creates a test SWF of your animated logo, so you can see all of your cast of characters performing their live act. After you've checked the SWF, close it, and you'll automatically return to editing the FLA file.
)
)
)
)
)
)