This chapter is from the book
This chapter is from the book
This chapter is from the book
Simulating Motion with Graphic Symbols
Sometimes, no matter how fast you can physically move a symbol across the screen, it's not fast enough. Personal computers can move objects across the screen only so fast. If you want to make objects appear to move faster than the computer can render changes on the screen, you have to make special versions of your graphics that look as though they are moving, even when they are standing still. We call this effect blurring because that's exactly the look we are going for. Think about a photograph where someone or something is moving faster than the shutter speed. What you'll see is the object slightly (or greatly) out of focus, along with a blurred trail behind the object.
There are two ways to achieve this effect in Flash. The first involves using gradients, and the second involves using an external image editing application such as Macromedia Fireworks or Adobe Photoshop. We'll try the gradient method first, and then, in a later chapter, we'll examine the second method. Along the way, we're going to create a reusable, versatile widget that you'll be able to use to blur almost anything.
Before we continue, now might be a good time to go to File > Save As and save your work under a new name. Just a suggestion. Still, don't say I didn't warn you.
Click on the Scene 1 tab. Delete anything you find on the main stage.
Since we've created everything in movie clips, you can now clear off the main stage for the next act. Don't worry—all your movie clips are safely stored in the Library.
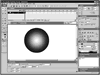
Create a large circle in the middle of the stage. Delete the line, leaving only the solid fill. Select the circle, and then click on the fill well in the Colors section of the toolbox. Select the first (black to white) radial gradient.
Gradients are nothing more than a special type of fill that changes gradually from one color to another. In this case, we're not actually going to change from one color to a second color, but instead we'll use only one color and make a transition from 100% opaque to 100% transparent. This allows us to create an object with "soft" edges. When you move an object with soft edges across the screen, the human eye automatically assumes that it is in fact an object with a "hard" edge that is moving too fast for the eye to see accurately. Essentially, your eyes see the object as blurred.
Now let's create that new gradient. To make the move from opaque to transparent, we'll mix two different Alpha (transparency) values for the same color.
Open the Color Mixer panel. Click on the white swatch under the gradient bar, and then click on the color well and change it to black.
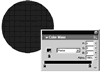
The small color swatches under the gradient bar indicate the colors used in the selected gradient. When you click on a swatch, the color well changes to the selected color.
Now you have what looks like a solid color, but it is actually a gradient from black to black. The Color Mixer panel displays the RGB values for the currently selected color (black) along with a fourth entry for Alpha. The Alpha value should be 100% for both swatches.
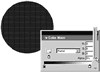
Change the Alpha value to 0%. Click outside the circle on the stage to see the effect of the change to the gradient scheme.
Click on the circle again. Change it to a new graphic symbol (F8 or Insert > Convert to Symbol) and name it Radial Gradient.
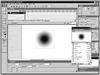
Shazam! Now you have a circle that fades from black to transparent. Congratulations—the hard part is over. The object you have just created is one of the more useful, multi-purpose widgets you'll ever make. (For those of you who aren't familiar with it, widget is a technical catchall term for Really Useful Object.) You'll find a thousand and one uses for this little object: it slices, dices, and makes julienne blurs in seconds. We will use this widget here and throughout the rest of the book, so keep it handy.
)
)
)
)