Building a Flash Video Simulation
- Introducing the Tutorial
- Preparing the File
- Creating the Pages
- Adding the Directions
- Animating the Cursor
- Scripting the Interactivity
This chapter is from the book
This chapter is from the book
This chapter is from the book
In this lesson we turn our attention to creating rich learning media in Macromedia Flash MX, which is ideal for creating learning media for several reasons:
Flash is a self-contained environment, so you don't have to worry about browser compatibility, standards compliance, file management, the difficulty in passing data between pages, or any other limitations of HTML environments.
While Flash requires a plug-in, well over 95 percent of users already have it. Those who don't can download it for free in less than two minutes, with a dial-up modem.
Flash is a robust multimedia tool, with a mature set of tools for creating complex animations and interactivity.
Flash's visual interface is easy to learn and use, enabling you to create interactive learning experiences quickly and easily.
) Interactive computer simulation videos are easy to make and effective learning tools.
Interactive computer simulation videos are easy to make and effective learning tools.
Flash, like most major multimedia authoring programs, gives you plenty of tools to create wonders—or shoot yourself in the foot. In this lesson, you will create a simple interactive video tutorial, with an emphasis on forming good authoring habits.
This lesson—and all of the Flash lessons—assumes that you are not a total stranger to the program. While the lessons are meant to be accessible and take little for granted, you should have at least worked through the Introduction to Flash MX tutorial (Help > Tutorials > Introduction to Flash MX) and have spent some time experimenting in the Flash environment, familiarizing yourself with the interface and major tools. You also should have a basic understanding of timelines, keyframes and frames, tweens, symbols, and the library. With even this little behind you, you are ready to create a media-rich learning asset.
What You Will Learn
In this lesson, you will:
Create an animated Flash video simulation
Structure a Flash movie
Animate a cursor, using motion tweening
Create simple user interactivity with a Flash button
APPROXIMATE TIME
This lesson takes approximately
1 1 / 2 hours to complete.
LESSON FILES
Media Files cursor_white.gif one.png two.png three.png four.png five.png six.png seven.png eight.png nine.png
Starting Files
Lesson05/Start/extension_start.fla
Completed Files
Lesson05/Complete/extension_complete.fla
Download all lesson files
Introducing the Turorial
In this lesson you will create an animated tutorial that teaches users how to install an extension into Macromedia Flash MX using the extension manager. Before you start building, take a moment to look at the final version of the file to get an idea of where you're headed.
Open extension_complete.fla, which is found in Lesson05's Complete folder.
Before you create any application, you should have a good idea of what the final version is going to look like. When following a tutorial in a book, you can look at the completed product. When creating your own project, you should have a storyboard, however informal. A storyboard is a sequence of pages (or rectangles drawn on paper representing the pages) with explanatory text. You should also have a list of anticipated assets—illustrations, text copy, photos, and so on.
The clearer your idea in advance, the better you'll set up your file. In Flash, this is critical. Once you are into development, if you need to make radical changes to the file structure—layers, the relationships among main and movie clip timelines, and so on—you might have to start over again.
Choose Control > Test Movie.
Flash has two native file types: FLA, for Flash movies that are in the Flash authoring environment, and SWF, for Flash movies playable in the Flash player. Choosing Control > Test Movie exports the FLA as a SWF file and opens it in the Flash player. This version of the movie is what the user will see.
Now that the file is open, work through the tutorial by watching the animation and reading the text and then pressing the Next button to continue through the movie.
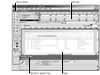
Look over the timeline for this movie, expanding the timeline pane if necessary.
You can learn a lot about a file just by looking at the timeline.
To begin with, in this movie you'll notice several columns of keyframes. Whenever keyframes appear in the same layer across many frames, you can be confident something important is happening in those frames.
In this particular file, the keyframes appear exclusively in these columns—all of the layers have keyframes in exactly the same spots. This structure reveals that the file is divided into clearly demarcated segments; to the user, these segments look like pages.
The blue areas with arrows in them signify motion tweens. Motion tweens are a form of automated animation.

Drag the playhead to view each of the frames in turn.
The playhead displays what is on the stage at any given time. Use it to navigate around your document while you are working on it.
As you drag, notice that aside from the first and last keyframes, each keyframe has a separate screenshot. The careful sequencing of screenshots creates the illusion that drives the simulation. To get this effect when building software simulations, you must carefully take a screenshot every time anything onscreen changes.
You may also notice that as you drag the playhead, the cursor on the stage moves around. That cursor is a part of a series of tweened animations. When you drag the playhead, tweened elements are previewed. Dragging the playhead is a convenient way to get a quick look at your animations.
With as much of the stage visible as possible, and with the playhead in frame 1, choose Control > Play to view the cursor animation in the authoring environment.
This method of testing runs the playhead through the frames at the designated frame rate, making it good at displaying animations. However, it disregards scripts, so it is a poor way to test the actual functionality of the movie. For that, you should use Control > Test Movie, as described above.
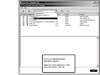
Look in the file's library (Window > Library).
Dozens of assets are grouped in several folders. Double-click a folder to toggle it open or closed. These are the pieces from which the movie is made. Though all these elements are stored in the library, they include several varieties of file, including graphic, button, and movie clip symbols, bitmaps, and sounds.
In addition to providing asset management capabilities, using the library also boosts productivity and decreases overall file size. To reuse the same element elsewhere in your movie, rather than re-creating it or hunting around for it to copy and paste, you can simply drag a new instance out of the library onto the stage. In addition, Flash tracks the elements in such a way that users have to download them only once. No matter how many times you reuse a given asset, as long as it is in the library, you'll have to download it only once. For example, this movie uses over 20 instances of the arrow cursor, but users will have to download the arrow cursor only once.
Explore the file as much as you want, and when you are finished, close the file.

)
)
)
)
)