This chapter is from the book
This chapter is from the book
This chapter is from the book
Preparing the File
Often, people are tempted to jump in and start developing a file. However, given the importance of file structure, you should spend a few minutes at the beginning of every project setting up a sensible layering scheme. In addition, you should import all of the assets that you think you'll need. You can update them later, if necessary, but it is hard to develop a file without assets.
Open extension_start.fla in Lesson05's Start folder, and save it locally under a different file name.
As you look over the start file, you'll notice that after the first frame, just about everything is missing.
With Layer2 selected, click the Insert Layer button three times to add three new layers to the timeline above the current two.
Multimedia files can get complex. Having a system that enables you—or a coworker—to locate assets quickly is a boon to productivity. In addition, spreading content across layers lets you modify frame attributes—such as adding a tweened animation—to some objects without affecting others.
As you add new layers, Flash autogenerates names for the layers.
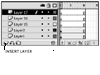
Double-click each layer's name to rename it. From top to bottom, the layer names should be as follows: frame actions, navigation, cursor, text, and screens and border.
Providing descriptive names makes it easier to work with the assets on these layers. Two of the layers, the newly-named text and screens and border layers, already have some content. The three new ones are still empty.
In the end, all of the screenshots will be on the bottom layer. On the text layer, explanations and directions will appear. The cursor layer will contain the cursor animation. The navigation layer will contain the Next button. The frame actions layer will contain the ActionScript needed for the movie.
Drag the text layer so it is stacked above the cursor layer.
The cursor is part of the simulation. It needs to be on its own layer so it can be animated. Without this change the text layer comes between the cursor and the screenshot, and spoils the effect of the simulation.

Choose File > Import to Library. Navigate to the assets folder in the Start folder, Shift-click to select all of the files, and click Open to import them into the document.
To use external files, you need to import them. The difference between File > Import and File > Import to Library is that with File > Import, the file(s) appear on the stage in the active frame of the active layer. With File > Import to Library, the files are added to the library, but not to the stage. No matter which option you choose, the file(s) will appear in the library.
Open the library, if necessary. Click the New Folder icon and name the new folder screenshots.
The library looks unkempt once the ten bitmap files have been imported. Organizing assets in folders makes it easy to access the desired asset quickly.

Drag each of the bitmap files, including the cursor and one_alpha.png, into the screenshots folder.
You can drag and drop symbols as much as you like. Flash always tracks them, so there is no risk of breaking a link between an instance and its symbol. When you are finished, you should have four folders with no files hanging outside them.
)
)
)