Color Management 101 for Digital Artists
Like this article? We recommend
Like this article? We recommend
Like this article? We recommend
As usual, you're working under a tight deadline. Your client is getting angrier by the minute because the graphic you produced for him doesn't look good in print, even though it looked fine on your monitor. Now time's running out and you're wracking your brain trying to figure out what went wrong. Here's what you can do to make sure it never happens again.
In 1993, Adobe, Agfa-Gevaert, Apple, Kodak, Microsoft, Sun Microsystems, and Taligent formed The International Color Consortium (ICC). The intent of this consortium of industry leaders was to develop a standardized, open, vendor-neutral, and cross-platform color management system. They succeeded, and the result of their collaboration was the development of the ICC profile specification. Now with over 70 members, the ICC proposes standards for creating cross-platform device profiles. In other words, the ICC works to get us consistent color output from the plethora of devices and computer systems on the market today, regardless of who manufactured it, the operating system being used, and what the device may be.
So why calibrate? It's pretty simple, if you think about it. With the huge variety of professional/industrial and consumer video cards, monitors, printers, scanners, and cameras available, there's an equally huge variation in output. Something as simple as replacing your ATi video card with one from Nvidia could cause things to look very different on your system, even though your monitor hasn't changed. Output can even vary across two monitors of the same make and model, as you may have noticed if you've got dual displays on your system, that are both plugged into a single video card. Printers can vary from one manufacturer to another, and even using generic ink or different types of paper in your printer can cause different results. To further complicate things, neither monitors nor printers can reproduce the entire range of colors visible to the human eye. CMYK is particularly troublesome because it has a different and smaller color reproduction range than the RGB system used on monitors. In case you're wondering, CMYK is the color model used for printing. The name stands for Cyan, Magenta, Yellow and blacK. The letter K in black is uses so that people don't confuse it with the B in Blue. RGB is the color model used by monitors, scanners and digital cameras, and RGB stands for Red, Green and Blue. RGB is additive while CMYK is subtractive. Add Red, Green and Blue to get White. Add Cyan, Magenta and Yellow to get Black (or Dark Brown).
Now we're going to explore color management and attempt to calibrate Photoshop, a monitor, printer, scanner, and even a digital camera, to ensure that the color output is as accurate with one another as possible, whether the device's color space is RGB or CMYK.First we'll create a color profile and bring data in through the digital camera and scanner, then display it on the monitor and then finally output it to a printer, all the while comparing, noting, and tweaking the results. By calibrating your monitor and creating an ICC profile, you're ensuring that your monitor isn't displaying too much of any particular color and that grays are as neutral as possible. You want to make sure that the colors in your images are being displayed accurately and consistently, and that they will continue to be so in the future.
)
Figure 1 A scanned photo of my daughters (I just wish Erin had kept her eyes open).
Getting Down to Business
The first thing to tackle is your monitor. If your monitor is out of calibration then every image you produce will be as well. Viewing your work through rose-colored glasses is not a good way to go in this case. You need to see things as they really are, or as close as you can get them anyway.
You've basically got two calibration options unless you choose to go with a third-party calibrator. Actually, you only have one if you discount the option of going with the default hardware setting on your printer, monitor, or scanner. (This is a no-brainer once you consider the fact that these devices have a wide range of factory default color settings.) So if you're on a PC you have the option of using Adobe Gamma, or on a Mac you can use the Display Calibrator Assistant, both included as part of their respective operating systems. The latter is the preferable option, considering the ICC based its specification on Apple's ColorSync profile format, although it's still not as accurate as using a color calibrator.
Adobe Gamma and Apple's Display Calibrator Assistant
If you're a PC user, you can use Adobe Gamma to roughly calibrate your monitor. I say "roughly" because like me, you're probably a human being and not a machine, which means you may have subconscious preferences for certain colors (my favorite is blue). For example, when I try to select a neutral gray square during the Gamma adjustment portion of Adobe Gamma's setup, I may very well go with a square that's slightly tinted with blue. If you do choose to go with Adobe Gamma, here's the best way to do it. It's best to adjust the lighting in your room to a setting that you usually work with. Overhead lighting is always a bad idea since it can cause screen glare, as can light from a nearby window, so it's best to leave your lights off and your blinds closed while you work in Photoshop.
With Windows, you'll do the following:
- Select Start --> Control Panel --> Adobe Gamma. From here you can choose either the Wizard or Control Panel. The Wizard is easier, and presents you with the same options as the default Control Panel, so let's go with that.
- Click Wizard at the bottom right of the dialog. It's a good idea to add a name in the Description: field so you can recognize your new profile when you go to load it in Photoshop later.
- Click Next. Set your monitor's contrast to maximum, as suggested. Then, adjust the brightness so that the smaller box, in the center of the black box, is as dark as possible while still remaining visible. Be sure to keep the surrounding white box as white as possible.
- Click Next and then select the phosphors for your monitor. (Mine's a Sony so I selected Trinitron.) You may need to refer to your monitor's manual or do an online search to be sure what your monitor uses.
- Click Next again to move to the Gamma setting section (shown in
Figure 2). Deselect "View Single Gamma Only" so that
you can view the gamma settings for each of your Red, Green, and Blue channels.
Use the sliders to adjust the gamma setting so that the center box
"fades" or blends into the surrounding box for each color. A useful
tip here is to squint at the boxes to make it easier to see solely the intensity
of the colors and not the lines surrounding each box. This makes it possible to
get a good match easily and quickly.
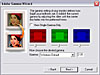
Figure 2 Setting Red, Green, and Blue Gamma.
- Set the desired gamma setting fly-out to match your operating system. Here we'll choose 2.20, the Windows Default. Make sure that you're happy with your adjustments.
- Click Next again. Here you'll set your hardware white point by clicking on the Measure button and selecting from the gray boxes I mentioned earlier. The idea here is to choose a neutral gray. After I adjusted the white point using the Measure button, Adobe Gamma chose 6500 k (daylight) for me. You may need to select "Same as Hardware" if your monitor is already adjusted to the correct white point measurement.
- Click Next again to move to the final step. Here you can select the Before and After radio buttons to see the difference between your original and adjusted monitor settings.
- Click the "Use as Default Monitor Profile" box and then select the
Finish button to save your settings. When you look at the white point boxes
shown in Figure 3, you'll notice that none of them is a
pure gray. That's one of the shortcomings of using Adobe Gamma to adjust
your monitor.
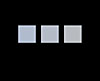
Figure 3 The gray boxes in Adobe Gamma's white point dialog are all slightly tinted.
)
)
On a Mac, you can also use either the Adobe Gamma, or the Display Calibrator Assistant. To use the Assistant on Mac OS X:
- Choose Apple --> System Preferences --> Displays --> Color.
- Click the Calibrate button and follow the steps. For further accuracy, you can use the DigitalColor Meter.
- Open it by selecting Applications --> Utilities --> DigitalColor Meter. Use it to sample the colors in your Photoshop Swatches palette and check them for accuracy.
Unfortunately, if you've got an LCD monitor, your options are kind of limited since Adobe Gamma wasn't designed to work with LCDs. This is where a 3rd party calibrator like the Spyder2Pro comes in.
Spyder2Pro Calibrator
I was quite impressed with my results using Adobe Gamma—until I saw the vastly different results I got using the Spyder2Pro. At first, I couldn't believe the difference and thought there must be something wrong. I assumed I had a faulty unit, and actually requested and received a replacement. When I got the exact same results with the second unit, I knew it was my perception that was faulty. Once I got over my shock, I decided to use the profiles I'd created with the Spyder for my LCD and CRT displays.
With the Spyder2Pro you can adjust gamma, color temperature (white point), and luminance, allowing for the best flesh tones and the purest grays. Opinions on how often to calibrate your monitor vary from as often as once per week to as little as once per month. Recalibration needs to happen because monitors drift out of calibration and color quality degrades with age, but, as a rule of thumb, calibrating every two weeks is probably adequate for most users.
Your workflow will vary a little, depending upon whether you're calibrating a CRT or an LCD monitor. Other factors include the kinds of controls your particular monitor has for adjusting its output.
With CRTs you might have RGB sliders, a Kelvin slider, or Kelvin presets for adjusting color. You can also adjust the gamma by selecting from a list of presets, entering a number of your own, or creating a custom gamma curve. You can set the white point to Native, select it from a list, or enter your own setting.
)
Figure 4 The Spyder2Pro doing its thing on a CRT monitor.
For LCDs, you might have brightness, contrast, and backlight controls, plus the previously mentioned controls such as RGB sliders, a Kelvin slider, or Kelvin presets for adjusting color.
Let's step through setting up both a CRT and LCD monitor. Note that we won't get into the advanced settings for the Spyder2Pro (such as measured luminance), because they're beyond the scope of this article.
For setting up a CRT monitor:
- Install the Spyder2Pro calibration software and enter your name and serial number. You should be greeted with a welcome screen that explains what will be adjusted as you work through the steps.
- Select Next to see a screen that cautions you to allow your monitor to warm up, turn off any screensavers and adjust the lighting in your room so that there's no overhead light hitting the screen. It also advises you to set your video display to at least 16-bit color, preferably 24-bit.
- Hit Next again to select your monitor (if you have two, otherwise it will just default to your main display).
- Move to the next screen to select your monitor type. My main display is a Sony CRT so I'll select CRT from the list.
- On the next screen, select your target gamma setting and white point. 2.2 and 6500k are the default settings, so you can either choose that setting or select 2.2-Native, which will use your monitor's current white point.
- On the next screen you'll select Visual as the Luminance Mode. You can also select Measured, but as I mentioned that's a more advanced topic that won't be covered here.
- Click Next to review your settings.
- Click Next again to identify the controls on your monitor. I have options to use all three types of controls, but my monitor defaults to a Kelvin Slider, so I'll go with that. However, if you go with Native, note that you may not see the Identify Controls screen.
- Click Next. This moves you to the white level setting screen. Like Adobe Gamma, this screen allows you to adjust your contrast to get the best white balance.
- Click Next. On this screen you'll set your brightness or black level manually. This is where Spyder's similarities to Adobe Gamma end.
- Click next to move to the next screen, which involves preparing the Spyder to calibrate your display. You'll need to remove the LCD baffle, which exposes the suction cups used to affix the Spyder to your CRT's screen.
- Click Continue to move to the next screen and place the Spyder according to the instructions.
- Click Continue again to start the calibration process. The Spyder will now do its thing, and take readings of your Red, Green, Blue, and Gray levels, as well as your white and black points. When it's finished, it will create a profile for your monitor and ask you to give the profile a name.
- Finally, it moves to a screen that warns you not to change your brightness or contrast settings, and gives you the option of quitting the program or calibrating another monitor.
We may as well calibrate the secondary monitor while we're at it. This one's an LCD so we'll indicate that on the monitor type list.
This particular monitor has Brightness and Contrast controls, so as we move to the Identify Controls list, I'll select their check boxes and move to the next screens where we'll adjust the White Luminance, then the Black Luminance.
- First, we need to identify the color controls, which in this case consist of RGB Sliders. With that checked, let's move to the next screen.
- Here, you'll learn the process for setting the monitor up to achieve a
proper color temperature (white point). You need to replace the LCD baffle at
this point to protect the display's surface, and then continue to the RGB
Levels screen where the Spyder takes Red, Green and Blue samples, reads the
white point, and then brings up an RGB Gain Control display to show you the
colors that need adjusting.
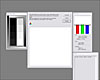
Figure 5 RGB Gain adjustment of an LCD monitor.
- Now you need to go into your LCD's setup and increase or decrease the RGB levels as indicated in the software's RGB Levels dialog. You may need to do this several times before you manage to get the colors within the allowable 0.5 difference range.
- Click the Update button to take a new reading and repeat until you've achieved the desired results, then click Continue.
- At this point the software reads the monitor's black point, red, green and blue samples, gray samples and verifies the color temperature. Once it's finished you're taken through the same steps you were for the CRT monitor, starting with Step 13 above.
- Give the profile a sensible name and then quit the program.
)
Windows can be funny and the profiles I created didn't show up in the Profile Chooser installed with the Spyder software. To fix this, if this happens to you:
- Right-click on your desktop.
- Choose Properties --> Settings and then choose the Advanced button.
- Click on the Color Management tab, choose Add and then select your profile from the list. Unfortunately, you can't assign a separate profile to your secondary monitor in the Display Settings unless it's connected to its own video card. You can, however, add the profile so that it appears in the Profile Chooser software's profile list.
- Click on your default monitor's profile.
- Control-click your secondary monitor's profile to select that as well, and then click Add, OK to dismiss the Color Management dialog. Hit OK again to dismiss the Display Properties dialog.
- Now you can open the Profile Chooser and select your profiles. A window
opens on each monitor and you can select the appropriate profile for each, but
you'll need to repeat this step to reset your secondary monitor's
profile every time you reboot Windows. It's kind of a pain, but worth it if
you want your monitors to appear properly calibrated. The advantage here is that
if you have two of the same monitor you can apply the same profile to both and
leave them.

Figure 6 A screen photo of the adjusted CRT, color-corrected to approximate the results.
)
Whether you've used Adobe Gamma, Display Calibrator Assistant, a Spyder, or other device to calibrate your monitor, you'll need to set up Photoshop in order to use the profile you created. Here's how you do it:
- Open Photoshop and choose Edit > Color Settings (Photoshop > Color Settings on a Mac).
- Choose Load RGB in the RGB: fly-out in the Working Spaces area within the dialog and select your profile from the list that appears.
A good profile name comes in handy here -- I called mine "1-SONY GDM-F520 March 18.icm" which indicates that it's monitor 1 and makes it easily recognizable by the date and monitor name. You can also opt to use a different working space in Photoshop, especially if you're creating Web graphics and images intended to be viewed on a monitor. But,if you want to print and maintain consistent color across multiple devices, then a custom profile is the way to go. Note that if you're going to use one of Photoshop's predefined profiles, choosing Web Graphic Defaults from the Settings fly-out will load the sRGB IEC61966-2.1 profile for the RGB working space. However, sRGB has a smaller gamut and may not print certain colors to your expectations.
Printer
Color management and printing is a little trickier. Monitors use the RGB color model and can display 16.7 million colors, but printers, on the other hand, use the CMYK color model, which can reproduce considerably fewer colors. In turn, each monitor or printer operates within a certain color space, which determines its gamut or color range.
The Spyder2Pro ships with DoctorPro software to help with printing, but unfortunately, I found the software to be more trouble than it's worth. Instead, I just stuck to using my custom profile and used the CMYK output, which I set to U.S. Web Uncoated v2. After some experimentation, I used File --> Print with Preview (shown in Figure 7), and loaded my printer's profile (an Epson Stylus Color 740) into the print space profile. I then set the Intent to Relative Colorimetric, which gave me even better results. Relative Colorimetric will shift the colors in your image that are outside your printer's gamut to the closest color within its gamut, with usually satisfactory results. It attempts to preserve as many of the original colors in your image as possible, and is the standard for North American and European printing. Make sure that "Show More Options" is checked so that you have access to these settings. You can also allow the printer to handle the color by selecting "Printer Color Management" under the Profile: list and then using the printer's properties settings under Print > Properties > Advanced and selecting the settings you want to use to print. However, using Photoshop's output settings along with a color profile created for your specific monitor will give you better results with less fiddling around. Just remember to set the paper type in your printer's properties so the printer distributes the ink properly. Plain paper will absorb more ink than coated paper or photo quality inkjet paper, so the printer needs to be told what you're printing on or your output will be off. I learned that the hard way when I printed a photo from a digital camera on photo quality inkjet paper and left the printer's paper setting at plain. As a result, subtle shadow areas came out as pure black. When I reprinted with the proper paper setting I could see the differences clearly, so these aren't just guidelines being offered by your printer—they're there for a reason!
)
Figure 7 The Print with Preview dialog set for optimum printing.
Viewing a proof of your image is a quick and reasonably accurate way of seeing how your image will look when printed. To view a proof:
- Select View --> Proof Setup --> Custom.
- Choose the profile you want to use from the fly-out list and set your intent to Relative Colorimetric or Perceptual. Photoshop will emulate the way your image will look when printed, usually with satisfactory results.
- If you're curious about which colors are outside of your printer's gamut, selecting View --> Gamut Warning will show you which colors need be shifted to fit your printer's working space. You can see an example of this in Figure 8.
- Once you've got your printer set up the way you want, do a test print.
If the test looks good, print a high quality copy and compare it to the original
version on your screen. It may take some trial and error but you should have
output from your printer that closely resembles your monitor's output.
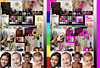
Figure 8 An image showing out of gamut areas.
)
Scanner
Setting up a scanner is a breeze compared to setting up your printer. A scanner can use the same ICC profile you created for your monitor, and then it's just a matter of tweaking the scanned images to ensure they match the profile you assigned. I found the scans from my Epson Perfection 1650 were lacking in tonal range, so I used Levels to adjust the highlight and shadow values by hand to get my scanned images looking the way I wanted. And, as an added bonus, they matched the printed output and the original photograph quite well.
)
Figure 9 The Levels dialog with corrected highlights and shadows
)
Figure 10 The printed image rescanned and adjusted to show the approximate results of printing from Photoshop with the appropriate profile.
Cameras
Cameras can define their own color profiles too. My Sony Cyber-Shot DSC-P73 uses the sRGB IEC61966-2.1 profile. Many professional photographers opt to use camera raw, a sort of "digital negative" that gives them much more control over their images since they're not processed in any way by the camera. That means they're free to work with the raw data and manipulate it however they please.
I found I had the best results when I imported the images from my camera and converted it to my current working space. Then, I applied Auto Color and Auto Levels to images taken indoors with the flash. Outdoor shots also required some tweaking, though not as much – usually just a quick application of Auto Color did the trick. Images with the default sRGB IEC61966-2.1 profile were also acceptable but looked even better with their colors and Levels adjusted.
)
Figure 11 An adjusted digital photo