- About iDisk
- Connecting to Your iDisk
- Moving Files
- Using the Public Folder
- About Storage Capacity
- Creating a Local iDisk Copy
This chapter is from the book
This chapter is from the book
This chapter is from the book
Connecting to Your iDisk
If you're using Mac OS X, there are a few different ways of connecting to your iDisk, depending on what version of Mac OS X you're running. If you're using Mac OS 9, you'll need additional software to connect to your iDisk (see the sidebar "When David Met Goliath," later in this chapter). Your iDisk uses a network protocol called WebDAV, which simply means that it uses some of the same kinds of connections you'd use to load a Web page in a browser. Since WebDAV is a cross-platform protocol, you can connect to your iDisk using a Mac running Mac OS X and Mac OS 9, as well as a Windows machine running Windows XP, Windows 2000, or Windows 98.
Mac OS 9 doesn't have WebDAV built in, so it can't by itself connect to an iDisk. Fortunately, there's a handy bit of Mac OS 9 software, called Goliath, that does the trick. Found at DAV & Goliath (www.webdav.org/goliath), this utility makes connecting to your iDisk a breeze.
Windows XP uses an Apple-created utility to connect to an iDisk; you can download it from your .Mac account. The utility is somewhat similar to Goliath, except that it requires more work to install. Windows 2000, however, has built-in support for connecting to WebDAV-based online storage accounts (much like Mac OS X), and it does not need Goliath to do the job.
To connect to iDisk using Mac OS X 10.3 or later
- From the Go menu, choose iDisk > My iDisk (Command-Shift-I) (
Figure 3.2
).
The Connect To iDisk dialog opens, asking for your .Mac member name and password (unless you've already entered that information in System Preferences, in which case your iDisk mounts automatically on your Desktop) ( Figure 3.3 ).
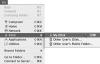
Figure 3.2 Since iDisk access is built into recent versions of Mac OS X, connecting to your iDisk is as easy as choosing Go > iDisk > My iDisk (Command-Shift-I).
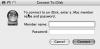
Figure 3.3 To connect to your iDisk (if you haven't entered your iDisk information in System Preferences), enter your .Mac member name and password, and click Connect.
- Enter your .Mac member name and password, and click Connect.
Your iDisk, which looks like a small globe with your .Mac member name underneath it, mounts on your Desktop, and you can use it like any other volume (
Figure 3.4
). The connection to your iDisk is maintained until you disconnect it or shut down your computer.
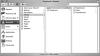
Figure 3.4 Once you've connected to your iDisk, you can use it as you would any other network volume. It shows up in the sidebar and on the Desktop, and you can browse it using any view—list, icon, or column.
)
)
)
When David Met Goliath
A third-party program called Goliath makes it possible for you to connect to your iDisk using Mac OS 9, which is handy if you haven't yet upgraded to Mac OS X.
To connect to your iDisk using Mac OS 9:
- Using a Web browser, go to www.webdav.org/goliath and download Goliath (
Figure 3.5
).
The software downloads to your hard drive in the form of a compressed file. You'll find it wherever your browser normally downloads files (often, that's on the Desktop).
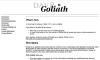
Figure 3.5 The cutely named homepage for Goliath contains links to Mac OS 9 and Mac OS X versions of the Goliath WebDAV application, as well as some valuable WebDAV information.
- Double-click the compressed Goliath file to decompress it using Allume Systems's Stuffit Expander.
A disk-image file appears on your Desktop, or wherever you normally download files (
Figure 3.6
).

Figure 3.6 When you decompress Goliath, a simple disk-image file appears on your Desktop.
- Mount the disk image by double-clicking it, and then copy Goliath to your Mac's Applications (Mac OS 9) folder.
- Double-click the Goliath program icon to run Goliath.
The New WebDAV Connection dialog opens and asks you to enter some WebDAV information (
Figure 3.7
).
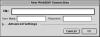
Figure 3.7 You can use this dialog to make a WebDAV connection, but Goliath has a better way to connect to an iDisk.
- Click Cancel—we'll be taking a different approach to connecting. The dialog closes.
- From the File menu, choose Open iDisk Connection (
Figure 3.8
).
The Open an iDisk Connection dialog opens ( Figure 3.9 ).
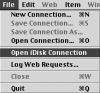
Figure 3.8 From the File menu, choose Open iDisk Connection to open a connection to your iDisk—using Goliath.

Figure 3.9 When you request a connection to an iDisk, you'll be asked for your .Mac member name and password.
- Enter your .Mac member name and password (
Figure 3.10
).
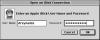
Figure 3.10 Type your .Mac member name in the User Name field and type your password in the Password field. Click OK.
- Click OK.
Your iDisk opens in a new Goliath window that looks significantly like a Finder window (
Figure 3.11
).
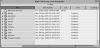
Figure 3.11 Once you've made your connection using Goliath, you're presented with an iDisk window that looks almost exactly like a Finder window.
)
)
)
)
)
)
)
Besides making it possible for Mac OS 9 machines to connect to an iDisk, Goliath is a slick utility developed to allow Mac OS 9 and Mac OS X users to take advantage of WebDAV online storage accounts in a friendly and Mac-like way. It's especially good for the following:
- It allows you to connect to other WebDAV-based online storage accounts, so if you have a WebDAV-based account in addition to your iDisk, you can use the same program to access them both.
- It works very well with high-latency connections (such as satellite Internet), so if regular iDisk performance in Mac OS X seems sluggish, try using Goliath as an alternative.
To connect to iDisk using Windows XP
- Using a Web browser, go to Apple's Download iDisk Utility page (www.mac.com/1/idiskutility_download.html) and download the iDisk Utility for Windows XP (iDiskUtility_ WindowsXP.zip) (
Figure 3.12
).
The file downloads to your hard drive, but it's compressed, so you'll need to decompress it before you can install it.
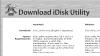
Figure 3.12 The iDisk Utility for Windows is available for download from the .Mac Web site.
- Unzip the iDisk Utility (
Figure 3.13
).
The iDisk Utility installer is decompressed, and a folder that contains it appears in the location where you normally download files, ready for installation ( Figure 3.14 ).

Figure 3.13 Once downloaded, the iDisk Utility for Windows appears in its compressed form.

Figure 3.14 The iDisk Utility for Windows, once uncompressed, resides in its own folder.
- Install iDisk Utility for Windows by double-clicking the iDisk Utility installer icon. The welcome pane opens.
- Read the welcome message and copyright warning, and then click Next (
Figure 3.15
).
The license agreement opens.
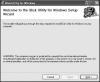
Figure 3.15 The first step when installing the iDisk Utility for Windows XP is to read the welcome and copyright warning message.
- After reading the license agreement, click the I Agree radio button and then click Next (
Figure 3.16
).
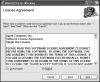
Figure 3.16 To proceed with the installation, read the license agreement and click the I Agree radio button.
- If the default installation location is acceptable, click Next (
Figure 3.17
).
The Confirm Installation pane opens.
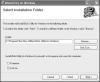
Figure 3.17 When installing the iDisk Utility for Windows, you're given a default installation location and the option to install it for everyone who uses the computer, or just for yourself. The default settings are fine for most people; feel free to change them if you need to.
- To begin the installation, click Next (
Figure 3.18
).
The Installing iDisk Utility for Windows pane opens, and a progress bar shows the installation of the software. It only takes a short time—under a minute—and you don't have to do anything during the process.
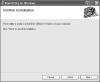
Figure 3.18 Click Next in the Confirm Installation pane to install the iDisk Utility for Windows XP.
- When the Installation Complete pane appears, click the Close button. The iDisk Utility for Windows XP has been installed and is ready to use.
- From the Start menu, choose All Programs > .Mac Utilities > iDisk Utility for Windows > iDisk Utility for Windows (
Figure 3.19
).
The iDisk Utility opens, and the iDisk Utility for XP login dialog opens ( Figure 3.20 ).
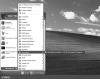
Figure 3.19 Choose Start > All Programs > .Mac Utilities > iDisk Utility for Windows > iDisk Utilty for Windows.
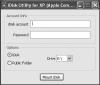
Figure 3.20 To connect to an iDisk using the iDisk Utility for Windows XP, you'll need to enter your .Mac member name in the "iDisk account" field, enter your password in the Password field, and choose the drive to which your iDisk gets mounted.
- In the "iDisk account" field, enter your .Mac member name.
- In the Password field, enter your .Mac password.
- Click the iDisk radio button to select it.
- From the Drive pop-up menu, choose a drive to which your iDisk gets mounted.
- Click the Mount iDisk button.
Your iDisk is mounted as a network volume (
Figure 3.21
).
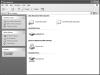
Figure 3.21 Once mounted, your iDisk appears like any other network drive in your My Computer window.
)
)
)
)
)
)
)
)
)
)
To connect using Windows 2000
- Double-click the My Computer icon.
The My Computer window opens (
Figure 3.22
).
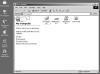
Figure 3.22 In Windows 2000, you'll need to open a new window to access the Tools menu. Here, we've chosen to do this from the My Computer window, but it can be done from just about any window, such as the My Documents window.
- From the Tools menu, choose Map Network Drive (
Figure 3.23
).
The Map Network Drive dialog opens.
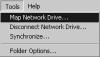
Figure 3.23 From the Tools menu in Windows 2000, choose Map Network Drive to connect to your iDisk.
- At the bottom of the dialog, click "Create a shortcut to a Web folder or FTP site" (
Figure 3.24
).
The Add Network Place Wizard dialog opens ( Figure 3.25 ).
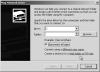
Figure 3.24 Near the bottom of the Map Network Drive dialog, click "Create a shortcut to a Web folder or FTP site."
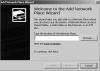
Figure 3.25 In the only field in this dialog, type your iDisk URL (which looks like http://idisk.mac.com/yourmembername, replacing yourmembername with your .Mac member name).
- In the field labeled "Type the location of the Network Place," type http://idisk.mac.com/yourmembername (replacing yourmembername with your .Mac member name) and click Next (
Figure 3.26
).
The Enter Network Password dialog opens.
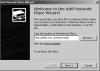
Figure 3.26 This is what a properly formed iDisk URL should look like. This one, of course, is the one I use to connect to my iDisk, so it won't work so well for you…
- In the "User name" and Password fields, enter your .Mac member name and password, and click OK (
Figure 3.27
).
The Add Network Place Wizard dialog opens, asking you to name your new Network Place ( Figure 3.28 )—Windows fills this in for you.

Figure 3.27 To set up the connection to your iDisk, you need to provide your .Mac member name and password in the "User name" and Password fields, respectively.
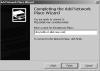
Figure 3.28 The final thing you need to do when creating your iDisk connection is to give it a name. This is the name that will appear under the icon in your My Network Places folder.
- If you don't like the Network Place name that Windows provided, type a new name for your Network Place (such as "My iDisk"), and click Finish.
Your iDisk opens in a new window (
Figure 3.29
).
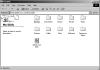
Figure 3.29 When you open your iDisk in Windows, it looks very much like any other storage device, complete with files and folders.
)
)
)
)
)
)
)
)