Making Photos Look Their Best
- Better Photos Through Cropping
- Straighten the Picture
- Quick Fix: One-Stop Image Correction
This chapter is from the book
This chapter is from the book
This chapter is from the book
Now that digital cameras are being used by most consumers, you can go to your favorite photo developer, plug your camera memory card into a kiosk, select your favorite shots, and—presto!—you have photographs. Although I can understand the appeal of popping in the media and receiving prints, I always want to fiddle with my photos a little (sometimes a lot) before I show them around. In this chapter, we'll discover how easy it is to make your photos look better before you share them, whether it is by email or by printing them.
There are only a few steps that are involved in making your photos look great, and while the steps are listed in their recommended order, it is not necessary to do them all—or any of them. After all, some pictures look perfect right out of the camera.
So, we'll begin with the first step—improving the composition.
Better Photos Through Cropping
Chapter 2 introduced the Crop tool and basic techniques for creating a good crop. Now that you know what it is, let's examine this important topic in more detail.
There are basically two reasons to crop a photo: To improve the composition of the subject in the photo and to change the aspect ratio to fit a standard photo size, if you plan to make prints of the photos. We'll begin by looking at how to crop for composition.
Cropping Controls What the Viewer Sees
To demonstrate how important cropping is in creating the overall visual impact of a photo, look at the original photo in Figure 3.1 . I took this photo when our friends celebrated their 25th wedding anniversary and renewed their wedding vows—with their nine children in attendance.
)
Figure 3.1 A typical wedding photo, right?
If I do a tight crop as shown in Figure 3.2 , the real subject becomes the young man who is embarrassed by the sight of mom and dad smooching.
)
Figure 3.2 Cropping changes the whole mood and subject of the photo.
Simple Rules of Composition
The rules for good composition apply to both taking the original photo and cropping it. You should either try to fill the frame with the subject ( Figure 3.3 ), or follow the "rule of thirds" (see the sidebar, "The Rule of Thirds").
)
Figure 3.3 Cropping the photo to fill the frame is an effective solution.
The advantage of filling the frame with your subject is that it's simple to do. Here is how it is done:
- Select the Crop tool—(C) or.

- Click and drag the tool over the area to be selected. The area to be removed appears dark (
Figure 3.4
).
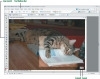
Figure 3.4 Click and drag the tool over the area to be selected.
- Adjust the handles to fine-tune the area to be cropped. You can move the entire crop selection marquee around the image by clicking inside the crop selection and dragging it to a new position.
- When the composition looks right, either double-click inside the cropped area or click the Commit check mark in the lower part of the image.
)
)
Making Photos Fit to Print
Most digital cameras create pictures with different ratios of height to width (called an aspect ratio) than traditional 35-mm film cameras. This difference determines what will and will not appear in a printed photo.
The dimensions of standard 35-mm film are 36 by 24 mm, which translates into an aspect ratio of 3:2. In contrast, typical digital camera sensors have an aspect ratio of 4:3. This means that your digital camera pictures are slightly taller or wider than those you take with your film camera. This affects what eventually ends up in your prints, and you should keep it in mind when cropping photos for printing. The loss isn't a lot, but this small loss can ruin a photo if the subject matter goes from edge to edge. Always try to leave a little space between the subject and the edge of your photos when taking your pictures to compensate for any edge loss when printing using standard photo sizes.
How to Crop to a Print Size
The aspect ratio of all 35-mm film is 3:2 and the aspect ratio of standard photo sizes is different for each size. Figures 3.5–3.8 shows what is lost from a digital photo when printed using a few popular photo sizes.
)
Figure 3.5 Original Photo of the U.S. Supreme Court during the Cherry Blossom Festival.
)
Figure 3.6 Photo cropped as a 4 x 6-inch print.
)
Figure 3.7 Photo cropped as a 5 x 7-inch print.
)
Figure 3.8 Same photo cropped as an 8 x 10-inch print.
If you know that the photo is going to be printed, you can set the Crop tool to the correct dimensions so the photo can be cropped to the correct aspect ratio. Here is how it is done:
- Open a photo and select the Crop tool (C).
- In the Crop Tool Options bar, select 4 x 6 in from the Aspect Ratio pull-down menu (
Figure 3.9
, next page).
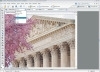
Figure 3.9 Select a standard photo size.
- Click and drag the Crop tool into the image. The aspect ratio of the tool is locked at the preset you selected. In my example (
Figure 3.10
, next page), I cropped out the lower portion of the columns.

Figure 3.10 Clicking Commit completes the cropping action.
- When you have the image cropped the way you like it, click the Commit check mark at the bottom right of the image. Your photo is ready to be printed as a 4 x 6 without unexpected loss of material at the edges.
)
)
Fast Facts About Cropping
Here are some quick facts and tips about using the Crop tool that you should know about.
- When you're finished using a preset crop setting, make it a habit to clear the Aspect Ratio setting by changing it to No Restriction in the Crop Tool Options bar. If you don't, the next time you use the Crop tool to make a freehand crop, you'll wonder why it doesn't work correctly.
- To flip the width and the height settings in the Options bar, click the Swap Height and Width icon.
- Pressing the Escape key clears the selected cropping area.
- You can move the marquee to another position in the image by placing the pointer inside the bounding box and dragging.
- You can change both the color and opacity of the crop shield (the cropped area surrounding the image) by changing the Crop tool preferences. Choose Edit, Preferences, Display & Cursors and specify a new Color and Opacity value in the Crop Tool area of the Preferences dialog (
Figure 3.11
). If you don't want to see a colored shield while cropping, deselect Use Shield.
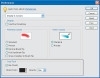
Figure 3.11 The Crop Tool preferences can be adjusted for the photo you are working on.
)