- Better Photos Through Cropping
- Straighten the Picture
- Quick Fix: One-Stop Image Correction
This chapter is from the book
This chapter is from the book
This chapter is from the book
Quick Fix: One-Stop Image Correction
The Editor contains two modes of operation—Standard Edit and Quick Fix.
Clicking the Quick Fix button in the Standard Edit mode switches over to the Quick Fix mode ( Figure 3.22 ), taking over the entire screen ( Figure 3.23 ). From here you can do just about everything related to image enhancement, including rotation, cropping, red-eye removal, and color and lighting adjustments. It even has Auto Smart Fix, which was introduced in Chapter 2. The Quick Fix mode takes sort of a Swiss Army knife approach to image correction and, like that famous knife, it has more features on it than you may ever use.
)
Figure 3.22 The Quick Fix and Standard Edit buttons are used to switch between editing modes.
)
Figure 3.23 The Quick Fix dialog.
The Quick Fix Layout
Most of the tools shown in Figure 3.23 are self-explanatory but there are a few that should be noted.
-
View. This feature allows you to select one of the four display views (
Figure 3.24
). The Before and After view is your best choice because you can see the changes being made. Make sure to use the orientation that matches your photo. If you choose otherwise, Elements makes the preview areas much smaller so they fit the chosen orientation, making them much harder to see.
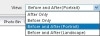
Figure 3.24 The View options for Quick Fix.
- Photo Bin. When more than one image is opened in Quick Fix the other pictures appear in the Photo Bin. Unlike the Photo Bin of the Standard Editor, you cannot minimize images in Quick Fix. See the sidebar "Taming the Wild Photo Bin" for information on how to use the Photo Bin in the Editor.
-
Reset. The Reset button clears all of the changes made to the image you are working on. There are two ways to make changes: either click one of the Auto buttons or change one of the slider adjustments and click the Commit icon. If you just want to undo one of the adjustments made with a slider, click the Cancel icon (
Figure 3.25
) Please note that the Commit and Cancel icons do not appear until a change has been made to one of the sliders. The Reset button remains dim until either a slider adjustment is made and the Commit icon is clicked, or an Auto button is clicked.
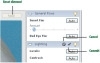
Figure 3.25 The Reset button and the Commit and Cancel icons.
)
)
Enhancing a Lifeless Photo
Many times I have taken a photo of something that really got my attention at the time I took the picture, but when I look at the image later, I am disappointed and question what ever prompted me to take the photo in the first place. Let's see how Elements can put some life back into a lifeless photo.
- From the Peachpit Press Web site, download the image Heron.jpg and open it in Elements.
- Click the Quick Fix button in the upper-right corner of the Editor.
- Change the View to Before and After (Portrait), and then choose Fit On Screen (Ctrl+0).
- Click at the point shown (
Figure 3.26
) in the Auto Fix section, and the image will immediately improve.
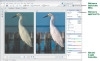
Figure 3.26 Using the Before and After (Portrait) view. Apply Smart Fix as shown.
- Click the Auto button in the Sharpen section, and the image is done.
)
If you click the Standard Edit button, you will return to the Standard Edit mode of the Editor. Notice that the adjustments applied in the Quick Fix mode now appear in the Undo History palette ( Figure 3.27 ). The before and after appears in Figure 3.28 .
)
Figure 3.27 Undo History reflects all of the changes made in Quick Fix.
)
Figure 3.28 Quick Fix quickly brings life to an otherwise dull photo.
Shedding Light on Dark Photos
Quick Fix can be used to recover underexposed photographs, like the one shown in Figure 3.29 . This type of problem is quite common. It is a bright sunny day which is producing a dark shadow on the model's face. As a result the outside area is properly exposed but the area under the hat is very dark. This exercise uses the photo Man_with_hat.jpg from the Peachpit Press Web site.
)
Figure 3.29 A hat on a sunny day hides the face in the shadows.
- Open Man_with_hat.jpg in Elements, and open Quick Fix.
- Move the Lighten Shadows slider to the position indicated in
Figure 3.30
. The man's face is now visible.
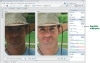
Figure 3.30 A heavy application of the Lighten Shadows command.
- Return to Standard Edit by clicking the Standard Edit button. The shadow is gone but portions of his face are still dark ( Figure 3.31 ). Select the Dodge tool and change the Tool Options setting as shown in Figure 3.32 (page 56). Lightly apply the Dodge tool to lighten his face.
)
)
Figure 3.31 Lighten Shadows commandThe face is lightened by Quick Fix but it still needs to have the darker portions of the face lightened.
)
Figure 3.32 The Dodge tool removes the last of the darkened areas.
Figure 3.33 shows the before and after of this photo.
)
Figure 3.33 Lighten Shadows has been applied in Quick Fix with great results.
Getting the Red Out
Red eye is a problem that occurs often in flash photos—even though your camera may have a red eye reduction feature (see the sidebar "What Causes Red Eye?"). It is a problem that can make even a sweet young girl ( Figure 3.34 ) look as if she is possessed.
)
Figure 3.34 A serious problem of red eye.
Fortunately, Adobe's newest incarnation of the Red Eye Removal tool in Elements makes the correction of red eye a very simple job, as you will discover in the next exercise. You will need to download the image Red_eye.jpg from the Peachpit Press Web page. The Red Eye Removal tool is available in both Quick Fix and Standard Edit mode.
- From the Standard Edit mode, open the photograph Red_eye.jpg.
- Select the Red Eye Removal tool (Y) in the Toolbox (
Figure 3.35
, next page).
Figure 3.35 The Auto Red Eye Removal tool.
- With the Options bar set to the default values (both are 50 percent), click on the red part of one eye. After a moment the red will be replaced with a much darker color. Repeat with the other eye. The red eye is gone ( Figure 3.36 , next page).
)
)
Figure 3.36 Auto Red Eye Removal tooltoolsAuto Red Eye RemovalRed eye removed in two strokes.
Sharpening—The Last Step
After you are happy with the color and other adjustments that you made to the photo, you should sharpen it. Here are a few things to know about sharpening photos:
- If the photo is out of focus, after you apply sharpening it will still be out of focus.
- Photoshop Elements (and Photoshop) offers several different types of sharpening. Make it a habit to use the Unsharp Mask (see the sidebar, "Unsharp Mask: Great Tool with a Weird Name"). The Auto setting for sharpening in Auto Fix uses the Unsharp Mask.
- Apply sharpening last, after you have performed other adjustments to your photos.
- If you are going to change the size of the image, don't apply sharpening until you have the image at its final size.
How Sharp Is Sharp Enough?
How much sharpening should you apply? It depends on what you are sharpening. If you are sharpening a portrait of a middle-aged person, sharpening will bring out all the details (wrinkles) in his or her face, so you wouldn't necessarily want too much, if any, sharpening. If you are applying sharpening to man-made objects, such as buildings or cars, you can get away with almost any amount. You know you have applied too much sharpening when lighter parts of the image begin to lose their details and become solid white. This phenomenon is called a blowout and should be avoided.
Another potential problem occurs when sharpening a scanned photograph, negative, or slide: sharpening emphasizes all the dust, hair, and other debris on the photo or scanner glass. Figure 3.37 shows part of a photograph scanned using a flatbed scanner. If you look close you can see the debris that was embedded in the print.
)
Figure 3.37 Scanned photo has a lot of debris on it.
This debris is especially noticeable if a photo has many dark areas, such as a dark suit or dress worn by someone in the photo. Applying too much sharpening to Figure 3.37 produces a snowstorm of junk ( Figure 3.38 ). (To demonstrate a point and create the image shown in Figure 3.38, I applied the Unsharp Mask at an insane setting—Radius of 6 at 200%.)
)
Figure 3.38 Over sharpening can make all of the junk on a photo stand out.
Sometimes even a moderate amount of sharpening can light up all the debris that you should have cleaned off the photograph or scanner before scanning.
Now that you know how to do the quick and slick photo fixups, the next chapter deals with the all-important topic of color and how to remove unwanted color casts, plus a lot of other color issues.