This chapter is from the book
This chapter is from the book
This chapter is from the book
#33 Defining Div Tags
Dreamweaver AP Divs allow designers to lay out pages using familiar tools, and Dreamweaver generates CSS code to match. A somewhat less-intuitive method of generating page layout with CSS in Dreamweaver CS3 is to define Div tags. The terminology is confusing: AP Div? Div tag? The difference is that AP Divs are easier to define, but do not permit as many formatting options as Div tags. Both are generated in the Dreamweaver Document window. Neither AP Divs nor Div tags require that you learn CSS coding—in both cases Dreamweaver CS3 generates code for you. But while AP Divs can be mainly defined and formatted using the Property inspector, more complex and powerful Div tags are managed in the CSS panel.
With Divs you can define many more attributes than with AP Divs. Like AP Divs, Divs can be positioned at absolute locations on a page, but they can also be positioned relative to other locations on a page, or they can float—position themselves in relation to other objects on the page. Like AP Divs, Divs can be sized, but you can also define spacing between them or padding within them, as you can with table cells.
In fact, you can apply an almost unlimited number of attribute combinations to Divs, including border color, thickness, and type. And these Div attributes are more predictable in different browsing environments.
In Dreamweaver, there are almost as many ways to generate and define a Div as there are possible attributes. The following set of steps provides a digestible approach that I use to teach students how to create Divs.
To create a Div and specify its position:
In a new document, select Insert > Layout Objects > Div Tag. The Insert Div Tag dialog appears.
The Insert Div Tag dialog itself does not help much with defining the positioning, size, or other attributes of the Div you want to create. But it does allow you to name it.
- In the ID field of the Insert Div Tag dialog (Figure 33a), enter an alphanumeric name (start with a letter; spaces are not allowed). Pick a name that will help you remember what this object is in case you create many Divs.
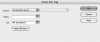
Figure 33a Naming a Div tag.
- Do not click OK yet. All you've done so far is establish an invisible, sizeless section on your page. Instead, click the New CSS Style button in the Insert Div Tag dialog. The New CSS Rule dialog opens. In the next set of steps, you will define CSS rules that apply to the Div you created.
- In the New CSS Rule dialog, leave the Selector Type radio button selection at Class, which is the default. Classes are highly flexible and can be applied to any element (including your Div). Select the This document only radio button. Then, in the Name field, enter a name (alphanumeric only) for the style. Then click OK (Figure 33b).
The CSS Rule Definition dialog opens when you click OK in the New CSS Rule dialog. Here is where you set up the class attributes that will be applied to your new Div.
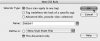
Figure 33b Naming a class with style attributes that will apply to a Div.
- In the CSS Rule Definition dialog, click the Positioning category. Here, you will choose which type of positioning to use when specifying the location of your Div, define the Div's size, and then define its location on or relative to other parts of the page (Figure 33c).
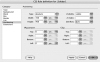
Figure 33c Defining the rules for the .Sidebar1 class, which will determine the positioning of a Div.
- From the Type pop-up menu, first choose a positioning type.
- Choosing "absolute" places the object at specific values from the upper-left corner of the page.
- Choosing "fixed" freezes the object on a page so that when a visitor scrolls up or down, the object stays in the same place.
- Choosing "relative" places the object relative to its position in the text flow of the page. If your cursor is at the top of a Web page, absolute and relative positioning have the same effect, but if your cursor is in the middle of some text, relative positioning places the object a defined distance to the left of and below the current cursor point.
- Choosing "static" places the Div container at its location in the text flow.
- Define the width and height of your Div container in the Width and Height fields. For example, a left navigation element might have a width of 100 pixels. Choose a unit of measurement from the pop-up menu next to each box (pixels are normally used for defining dimensions in Web design, and using pixels is the most reliable way to size objects).
- Define the position of your box in the Placement area. You can define location in pixels (or other units) either from the top or bottom of the page and either from the left or right edge of the page. For instance, a left-side navigation element might be defined as 0 (zero) pixels from the top of the page, and 0 pixels from the left edge of the page.
- The four Clip boxes work like masking in illustration programs. Clipping hides part of the outside of the content of a CSS positioning object. Usually you will not want to clip content.
- Visibility defines whether or not the Div is visible. By default, Divs are visible.
- The Z-index box defines how the Div will move in front of or behind other objects. Positioning objects with higher Z-index values appear on top of objects with lower Z-index values. If your positioning objects do not overlap, Z-index values are irrelevant.
- The Overflow pop-up menu defines how text that does not fit in the positioning object will appear in a browser. The Visible option displays all content, even if it doesn't fit in the Div. The Hidden option hides all content that does not fit in the Div. The Scroll option displays a scrollbar, so the Div looks like a miniature browser window, with its own scrollbar(s). And the Auto option leaves Div display up to the browsing environment of the user.
- Once you have defined the options in the Positioning category, you have defined the basic location and size of your object (Div). Use the Border category to apply borders to your object. Use the Box category to define buffer spacing between content and the box (Padding) or spacing between objects (Margin). Spacing is usually unnecessary with Divs, but allowing 6 pixels of padding is often a good way to keep the content of different Divs from bumping into each other.
- When you are finished defining options for your Div, click OK. You can enter content in your positioned Div by clicking inside it and typing, or inserting images (Figure 33d).
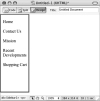
Figure 33d Inserting content into a positioned Div.
)
)
)
)