DeBabelizer is like a thousand blade Swiss Army knife: The tool you need is
in there, somewhere. But finding the equivalent of the miniature saw isn't always
easy. To put it kindly, DeBabelizer is not the friendliest program on the block.
It's deep and deeper, crammed to the gills with nested dialog boxes (Figure
i.1).
Exploring it can feel like going for a Sunday stroll and instead finding yourself
camping overnight in the wilderness. It's no wonder that many DeBabelizer users
only use a couple of its tools and never venture farther than that. That's where
this book comes in: It lets you quickly find your way through DeBabelizer's
somewhat intimidating interface to get straight to work. The learning curve
can be steep, even maddening at times, but you'll find the effort rewarded by
saving incredible amounts of time. (See How to use this book.)

Fig. i.1 DeBabelizer's penchant for dialog
boxes inside dialog boxes can be intimidating. The payoff once you learn the
program, however, is incredible time savings.
How to use this book
The key to this book, like all of Peachpit's Visual QuickStart Guides, is
that word visual. As much as possible, I've used illustrations with
succinct captions to explain DeBabelizer's major functions and options. Ideally,
you should be able to quickly find what you need by scanning the page tabs,
illustrations, and captions. Once you find a relevant topic, the text provides
the essential details and tips.
Whether you plunge in or skip around, the choice is yours. Just don't overwhelm
yourself with a learn-it-all-at once approach. Instead, focus on one tool and
learn it well. DeBabelizer's Batch Save features,
for example, will save you hours of work almost immediately. Where you start,
of course, depends on the work you do. Begin with tools that perform tasks with
which you're already familiar, then branch out from there.
This book covers DeBabelizer Pro 4.5 for Windows and DeBabelizer 3 for Macintosh.
While the two versions often look quite different, especially when working with
BatchLists and scripts, they function fairly similarly. The similarities and
differences between the two versions are important and this book is formatted
to highlight both. Menus or dialog boxes with slightly different names for each
version show the Windows name first, then the Mac: for example, Insert Comments/Script
Comments. When menus for both versions of the program appear in the same figure,
the Windows version takes the top or left spot and the Mac version runs on the
bottom or right. Windows-only text items and images are marked by a special
square bullet, while Mac-only features are noted by a special round bullet (Figure
i.2).

Fig. i.2 The icons for Windows-only items
(left) and Mac-only items (right).
|
Updates and feedback
For software patches, updates, and examples of how companies are using
DeBabelizer, drop by the web site of
Equilibrium, DeBabelizer's maker.
As you use the book, feel free to
send me your comments, suggestions on improving it, and stories of how
you use DeBabelizer. |
Not everything, but enough
DeBabelizer is such a deep, complex program that to cover every aspect of it
would require 1,500 pages, so by necessity, this book focuses on DeBabelizer's
most popular features. As a graphics sage might say, better to learn a hundred
tools well than remain intimidated by a thousand. And, like the cover says,
this book aims to get you up and running quickly.
So dig in. You'll quickly wonder how you ever worked without DeBabelizer.
Nolan Hester
The beauty of BatchLists
Batch processing, or batching, lets you quickly apply an action to multiple
images. The batch action can be simple, such as renaming a group of files, or
relatively complex, such as creating an animation from a series of still images.
The basic approach, however, remains the same: you assemble a group of images
and then apply an action to them. This chapter covers assembling images for
a BatchList. Batching Actions on page 205 covers what you can do with
a BatchList once you've assembled one.
The beauty of a DeBabelizer BatchLists is twofold. First, no matter what you
do to the BatchList itself, your original files are left alone and, so, remain
safe. Secondly, you can set the BatchList's order, which determines the order
of actions applied to it, independently of where the files reside or
how they're named.
While the BatchList can perform similar actions in DeBabelizer's Windows and
Mac versions, the Mac BatchList window is more elaborate with a variety of icons
and a preview window (Figure10.a).
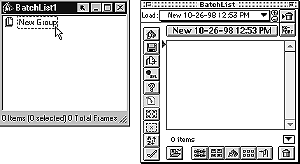
Fig. 10.a While the
BatchList can perform similar actions in DeBabelizer's Windows (left) and Mac
(right) versions, the Mac window is more elaborate with a variety of icons and
a preview window.
Creating and opening BatchLists
You can create a new BatchList from scratch or by taking an existing BatchList,
editing it, and then saving it under another name. The BatchList built from
scratch will contain no files. If you've already compiled a lengthy BatchList
of files and need to make only some minor changes to it, the renaming route
will save you some time.
| To create and save a BatchList
|
| 1. |
Choose File > New > BatchList (Windows) or Window > BatchList
(Mac) (Figure 10.1). You also can click  in the File Commands toolbar (Windows) or the main toolbar (Mac).
|
| 2. |
A new BatchList window will appear with a generic name (Windows)
or a name based on the date (Mac) (Figure 10.2). To give the BatchList
a distinctive name, choose File > Save (Windows) or click on its name
(Mac) (Figure 10.3). |
| 3. |
Type a new name for your BatchList into the dialog box and
click Save (Windows) or OK (Mac). The BatchList will appear
with its new name (Figure 10.4). |
Tips
 |
To rename a BatchList at any time, choose File > Save As (Windows)
or click on the BatchList name and the BatchList name dialog box reappears
(Mac). Once you've typed in a new name, click Save (Windows) or
OK (Mac).
|
|
To create a BatchList based on an existing BatchList, edit the existing
BatchList and then give it a new name by choosing File > Save As (Windows)
or clicking on the existing BatchList's name. Type in a new name, click
Save (Windows) or OK (Mac) and the new BatchList is created.
|
 |
Avoid cluttering your desktop with open images by passing your cursor
over any BatchList item: You'll see a preview of the image, cutting down
on the need to actually open a full-sized image.
|
01.gif)
Fig. 10.1 To create a BatchList, choose
File > New > BatchList (Windows) or Window > BatchList (Mac).
02.gif)
Fig. 10.2 A new BatchList window appears
with a generic name (Windows, left) or a name based on the date (Mac, right).
03.gif)
Fig. 10.3 To give a BatchList
a distinctive name, choose File > Save (Windows, left) or click on its name
(Mac, right).
04.gif)
Fig. 10.4 Once you save the new BatchList name, it appears in
the title bar (Windows, top) or the BatchList window (Mac, bottom).
 To create a BatchList from an animation or video
|
|
| 1. |
Open the animation or video and use its frame range arrows to select
which frames you want added to a BatchList (Figure 10.5).
|
| 2. |
Choose Tools > Create BatchList (Figure 10.6).
 If the BatchList toolbar is active, you also can click
 . .
|
| 3. |
When the Save As dialog box appears, choose a destination,
file format, and name for the new BatchList (Figure 10.7). DeBabelizer
will automatically add "Frame 00" to the first frame's name and extend it
for each subsequent frame (01, 02, etc.). |
| 4. |
Click Save and the animation will be used to generate
a new BatchList (Figure 10.8). |
Tip
|
Once you've converted an animation to a BatchList, you can apply any
DeBabelizer action to individual frames (such as palette correction) and
then generate a new animation from the BatchList. For details, see To
create an animation on page 52.
|
05.gif)
Fig. 10.5 Before you create a BatchList from an animation or video,
set the frame range using the arrows in the image's viewing window.
06.gif)
Fig. 10.6 To create a BatchList from an animation or video, choose
Tools > Create BatchList.
07.gif)
Fig. 10.7 When the Save As dialog box appears, choose a destination,
file format, and name for the new BatchList. DeBabelizer automatically adds
"Frame 00" to the first frame's name and extends it for subsequent frames.
08.gif)
Fig. 10.8
By using an animation to generate a new BatchList, you can batch edit the
frames and then save them as a new animation.
| To open an existing BatchList |
| 1. |
Choose File > Open > BatchList (Windows) or select the BatchList
you want from the BatchList window's pop-up menu (Mac) (images 10.9
and 10.10).
If
the File Commands toolbar is active, you also can click
 . .
|
| 2. |
On the Mac, the BatchList will open immediately. In Windows, the Open
BatchList dialog box will appear, showing only BatchList-type (.dbb) files.
Double-click on the BatchList you want or highlight it and click Open
(Figure 10.11).
|
09.gif)
Fig. 10.9 To open an existing BatchList, Choose File > Open
> BatchList.
10.gif)
Fig. 10.10 To open an existing BatchList, select the list
you want from the BatchList window's pop-up menu.
11.gif)
Fig. 10.11 When the Open BatchList dialog box appears, double-click
on the BatchList you want or highlight it and click Open.
Adding BatchList items
The ability to add and rearrange items within a BatchList - without actually
moving the original image files - lies at the heart of the BatchList's power.
There are several ways to add images to the BatchList: with a dialog box, an
ActionArrow, or various click-and-drag methods. The click-and-drag approach
is often quicker than using a dialog box (see Tips).
DeBabelizer also includes one very slick trick for Web workers: You can add
Web images that are embedded within an HTML file to a BatchList. See page 198.
This lets you quickly track down images on your Web site and then change them
with BatchList actions.
It can take some getting used to, but remember: When you delete an image from
a BatchList you do not delete the original image.
| To add items to a BatchList
|
|
| 1. |
Choose Batch > Add Files (Windows) or click  in the BatchList Commands toolbar (Windows) or the BatchList window (Mac)
(Figure 10.12).
in the BatchList Commands toolbar (Windows) or the BatchList window (Mac)
(Figure 10.12).
|
| 2. |
When the Add Files to BatchList dialog box appears, navigate
to the image(s) you want to add. Click on the desired image ( -click
to select multiple images) and then click Add to Batch (Windows)
or BatchList+ (Mac) (images 10.13 and 10.14). -click
to select multiple images) and then click Add to Batch (Windows)
or BatchList+ (Mac) (images 10.13 and 10.14). |
| 3. |
Once you're done selecting and adding images to the BatchList, click Done
(Windows) or Cancel (Mac). On the Mac, you can add all the images
in a folder to the BatchList by clicking All+. The selected images
will appear in the BatchList. (The dialog box's filter and preview features
work exactly as those in the Open dialog box. For details, see page 32.) |
Tips
 |
You can add images to the BatchList by clicking on their icons in any
system-level window and dragging them into the BatchList window (Figure
10.15).
|
|
The click-and-drag approach also can be used to add image icons from
a Windows Explorer window to the BatchList.
|
12.gif)
Fig. 10.12 To add items to a BatchList,
Choose Batch > Add Files or click the Add File icon in the BatchList Commands
toolbar (Windows, left) or the BatchList window (Mac, right).
13.gif)
Fig. 10.13 When
the Add Files to BatchList dialog box appears, click on the desired image (-click
to select multiple images) and then click Add to Batch.
14.gif)
Fig. 10.14 When the Add Files dialog box appears, click on the desired
image (-click
to select multiple images) and then click BatchList+.
15.gif)
Fig. 10.15 You can add images to the BatchList by dragging them
from any system window into the BatchList window.
16.gif)
Fig. 10.16 To add any open image or
frame, click the ActionArrow and drag it into the BatchList window.
17.gif)
Fig. 10.17 To copy items to another BatchList,
click and drag them from the original BatchList window.
18.gif)
Fig. 10.18 If you move an image out of its original folder after
adding it to the BatchList, DeBabelizer won't be able to find it. By passing
your cursor over the list, you'll see an alert about missing images.
| To add images to a BatchList from an HTML file |
| 1. |
Choose Batch > Add Files (Windows) or click
in the BatchList Commands toolbar (Windows) or the BatchList window (Mac)
(Figure 10.12).
|
| 2. |
When the Add Files to BatchList dialog box appears,
set the Files of type/Open File Type pop-up menu to All. |
| 3. |
Navigate to the desired folder, select the
image(s) you want (s-click to select
multiple images), and click Add to Batch
(Windows) or BatchList+ (Mac) (images
10.13 and 10.14). |
| 4. |
Once you're done selecting and adding images to the
BatchList, click Done (Windows) or Cancel (Mac). The HTML
file will appear in the BatchList with its referenced images listed below
its name. Once you've processed the images, you can replace the originals
on the Web site or save them to a new location.
|
Tip
|
You also can add images to a BatchList by clicking and dragging an HTML
file from a system-level window or from an Explorer window (Windows) (Figure
10.19).
|
19.gif)
Fig. 10.19
To build a BatchList from an HTML file, click and drag the file from
a system-level or Explorer window.
 To
add images to a BatchList from a Web site To
add images to a BatchList from a Web site |
1. |
Open a BatchList
and click  within
the BatchList window. When the dialog box appears, type in the URL that
you want to reach (Figure 10.20). within
the BatchList window. When the dialog box appears, type in the URL that
you want to reach (Figure 10.20).
|
| 2. |
Your Web browser
will launch and connect to the Web site. When the globe-like icon for
the site appears in the BatchList window,  -click
the icon. The BatchList window will list the URL for every image referenced
by the HTML file (Figure 10.21). -click
the icon. The BatchList window will list the URL for every image referenced
by the HTML file (Figure 10.21).
|
| 3. |
-click
on an image's page-like icon and DeBabelizer will retrieve it and display
its palette as well (Figure 10.22).
|
Tips
 |
If you're retrieving
Web images that use a variety of palettes, store each Web page's images
in its own BatchList. You can then combine or merge the various palettes
without generating a confusing mess of SuperPalettes. For more, see Modifying
Palettes on page 127 and Using SuperPalettes on page 155.
|
|
Assuming
you've created proper relative URLs, you also can use this method for
batching HTML files and Web images stored locally on your hard drive.
You can then use the BatchList to optimize any Web-bound images before
you post them on the Web itself.
|
20.gif)
Fig. 10.20 To
build a BatchList from a Web site's images, click the Add URL icon within the
BatchList window. When the dialog box appears, type in the URL you want to reach.
21.gif)
Fig. 10.21
When the globe-like icon for a site appears in the BatchList window,
-click it
and you'll see the URL for every image referenced by the HTML file.
22.gif)
Fig. 10.22
-click
on the image's page-like icon and DeBabelizer will retrieve the image and display
its palette as well.
Rearranging, sorting, and grouping BatchList items
The order of the images in any BatchList determines the order in which they
are processed, whether it's by a batch action or by a DeBabelizer script. Sorting
gives you another tool for changing the order of BatchList items.
Grouping, a Windows-only feature, offers a convenient way to rearrange images
within the BatchList by letting you quickly rearrange whole groups of images.
Adding items to and deleting them from a group uses the same steps as working
with regular BatchList items.
| To rearrange items in a BatchList |
 |
With the BatchList open, click on any image (-click
to select multiple images) and drag to where in the BatchList you want
the image to appear (Figure 10.23). Use the gray line (Windows)
or arrow (Mac) as a guide for positioning it in the order. Release the
mouse and the items will shift to exactly where the line or arrow appears
in the BatchList.
|
Tip
|
The click-and-drag method also can be used to rearrange groups
within the BatchList (Figure 10.24).
|
23.gif)
Fig. 10.23 To rearrange BatchList items,
click on any listing and drag it to a new spot in the BatchList.
24.gif)
Fig. 10.24 The click-and-drag method also can be used to
rearrange groups within the BatchList.
| To sort BatchList items |
|
With a BatchList open, right-click in the list and choose a sorting method
from the pop- up menu (Windows) or click Sort-icon in the BatchList
window (Mac) (Figure 10.25).
|
 Tips
Tips
25.gif)
Fig. 10.25
To rearrange BatchList items, click on any listing and drag it to
a new spot in the BatchList.
| To
create a BatchList group |
| 1. |
With a BatchList open, choose Batch > New Group (Figure 10.26).
If
the BatchList toolbar is active, you also can click  . .
|
| 2. |
When the group appears in the BatchList, right-click on it, choose Rename
from the pop-up menu, and type in a distinctive name (Figure 10.27).
|
Tips
|
To delete everything in the active BatchList, choose Batch > Delete
All. If the BatchList toolbar is active, you also can click  . .
|
|
You also can click on BatchList item(s) and drag them to the trash icon
(Figure 10.28).
|
|
If you accidentally delete a BatchList item, click
the BatchList window's  (Mac).
|
26.gif)
Fig. 10.26 To create a BatchList group, choose Batch > New
Group.
27.gif)
Fig. 10.27 To rename a group within a BatchList, right-click
on it, choose Rename from the pop-up menu, and type in a new name.
28.GIF)
Fig. 10.28 The click-and-drag method also can be used to delete
items from the BatchList.
| To
delete only the group items |
| 1. |
Open the BatchList containing the group items you want to delete (Figure
10.29).
|
| 2. |
Choose Batch > Delete All Items but Retain Groups (left, Figure
10.30). The items within each group are deleted while the group headings
remain (right, Figure 10.30).
|
| To
delete only group headings |
| 1. |
Open the BatchList containing the group
items you want to delete (Figure 10.29). |
| 2. |
Choose Batch > Delete All Groups but Retain Items (left, Figure
10.31). The group headings are deleted, not the items within the groups
(right, Figure 10.31).
If
the BatchList toolbar is active, you also can click  . .
|
29.gif)
Fig. 10.29
To delete a group or the items within the group, first open the BatchList.
30.gif)
Fig. 10.30 Choose Batch > Delete All Items but Retain
Groups (left) to delete only the items within each group (right).
31.gif)
Fig. 10.31 Choose Batch > Delete All Groups but Retain Items
(left) to delete only the group headings.
Deleting BatchLists
As you accumulate BatchLists over time, you'll probably want to remove BatchLists
you no longer need. The removal process is straightforward. Before you delete
a BatchList on the Mac, however, you have the option of saving it as a part
of a preferences file. You can use that same BatchList later by launching the
saved preferences file. For more on saving and launching preferences files,
see Setting DeBabelizer's Preferences on page 291.
| To delete a BatchList |
| 1. |
Open the folder containing the BatchList (Windows) or click the pop-up
menu within the BatchList window (Mac) and select the BatchList you want
to delete.
|
| 2. |
Choose File > Delete (Windows) or click  within the BatchList window. When the alert dialog box appears, make sure
you've selected the correct BatchList and click Yes (Windows) or
Delete (Mac) (images 12.32 and 12.33). The BatchList
will be deleted.
within the BatchList window. When the alert dialog box appears, make sure
you've selected the correct BatchList and click Yes (Windows) or
Delete (Mac) (images 12.32 and 12.33). The BatchList
will be deleted. |
32.gif)
Fig. 10.32 To delete an entire BatchList, choose File >
Delete and when the alert dialog box appears, click Yes.
33.gif)
 Fig. 10.33
To delete an entire BatchList, click
within the BatchList window and when the alert dialog box appears, click Delete.
Fig. 10.33
To delete an entire BatchList, click
within the BatchList window and when the alert dialog box appears, click Delete.