Setting HTML Preferences: Code Format
If you work somewhere that has a house HTML style guide, it's probably specific about things like indenting (or not), tag case (upper or lower), and how text is wrapped. In production groups, the interaction of individual coders' pages with the entire site and with vi and CVS has a lot to do with these standards. Even if you work for yourself, setting up these standards is a good idea.
To change Code Format preferences:
- From
the Document window menu bar, select Edit > Preferences. The Preferences
dialog box will appear.
- In
the Category box at the left of the dialog box, click on Code
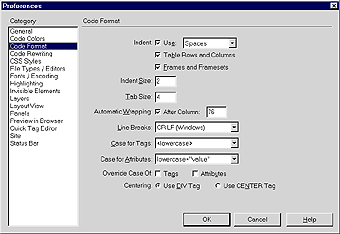
Format. That panel of the dialog box will appear (Figure 6).
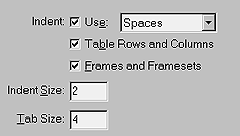
- Indenting (Figure 7): By default, Dreamweaver indents certain elements of HTML; the rows and cells in a table, for example. Not indenting may save some download time on very large pages.
- To turn off indenting altogether, Uncheck the Indenting text box.
- To use Spaces or Tabs for indent, select that option from the Use drop-down menu.
- Some production teams indent on frameset pages even if they don't do so anywhere else. (It makes working with nested framesets easier.) To turn on indenting specifically for Frames and Framesets, check that box.
- To set an indent size (the default is 2 spaces or 2 tabs), type a number in the Indent text box.
-
To set the tab size, since tabs in HTML are spaces, type a number
in the Tab text box.
- Wrapping
(Figure 8): To wrap within the Code inspector window automatically,
check the Automatic Wrapping checkbox. To turn off autowrapping,
uncheck it. (You can wrap individual pages differently in the
Code inspector itself.) The default column width for text-based
programs like vi and Telnet is usually 76 or 80 columns (a column
in this context is the number of monospace characters across a
window). To set a different width, type it in the After Column
text box.
- Line
Breaks (Figure 9): Line breaks are done differently on different
platforms. Since they're actually characters, a line-break character
may show up in Unix if a Mac or Windows line break is inserted.
If you work with pages that are checked in to a document management
system like CVS, be sure to check with your house style guide
or an engineer to verify your choices here. To set the format
for line breaks, select Windows, Macintosh, or Unix from the Line
Breaks drop-down menu.
- Tag
Case (Figure 10): Folks are especially picky about whether
tags and attributes are written in UPPERCASE or lowercase.
- To set the case for tags, select lowercase or UPPERCASE from the Case for Tags drop-down menu.
- To set the case for attributes (it can be the same or different), select lowercase or UPPERCASE from the Case for Attributes drop-down menu. (Attribute values are either lowercase, as in <TD ALIGN="center">, or case sensitive, as in link values.)
- To override the case, that is, to have Dreamweaver change tag and attribute case when reformatting code, check the appropriate box.
- To
set the default tag for centering text, click the <DIV>
or <CENTER>
radio button.
- When you're all set, you can move to the next section to edit more preferences; or you can click on OK to save your changes and close the Preferences dialog box.

Fig. 6
The Code Format panel of Dreamweaver's
Preferences dialog box.

Fig. 7 The
Indenting area of the Code Format Preferences.
![]()
Fig. 8 The
Wrapping area of the Code Format Preferences.

Fig. 9 The
Line Breaks drop-down menu in the Code Format Preferences.

Fig. 10 Select
your preferred case for tags and attributes.