Adobe After Effects CS4: Optimize the Pipeline
- Multiple Compositions, Multiple Projects
- Adjustment and Guide Layers
- Render Pipeline
- Project Optimization
- Conclusion
This chapter is from the book
This chapter is from the book
This chapter is from the book
)
- Build a system that even a fool can use and only a fool will want to use it.
- —George Bernard Shaw
Sometimes you take the attitude of a master chef—you know what can be prepped and considered “done” before the guests are in the restaurant and it’s time to assemble the piece de resistance. At other times, you’re more like a programmer, isolating and debugging elements of a project, even creating controlled tests to figure out how things are working. This chapter helps you artistically and technically, as if the two can be separated.
Once you
- Understand how to use multiple compositions
- Know when to precompose
- Know how to optimize rendering time
you may find the After Effects experience closer to what you might call “real-time.” Efficient rendering, however, depends on well-organized compositions and the ability to plan for bottlenecks and other complications.
Multiple Compositions, Multiple Projects
It’s easy to lose track of stuff when projects get complicated. This section demonstrates
- How and why to create a project template
- How to keep a complex, multiple-composition pipeline organized
- Shortcuts to help orient you quickly
These tips are especially useful if you’re someone who knows compositing well but find After Effects disorienting at times.
Project Templates
I’m always happiest with a project that is well organized, even if I’m the only one likely ever to work on it. Keeping the Project panel well organized and tidy can clarify your ability to think about the project itself.
Figure 4.1 shows a couple of typical project templates containing multiple compositions to create one final shot, although these could certainly be adapted for a group of similar shots or a sequence. When you need to return to a project over the course of days or weeks, this level of organization can be a lifesaver.
)
Figure 4.1 The template on the left is based on how a film shot might be generically organized, including numbering that reflects pipeline order and Output comps in two formats. The template on the right is the minimum I would use on any project; you need a folder for Source and one for Precomps to keep things tidy even if the main comp stays at the root level.
Here are some criteria to use when creating your own:
- Create folders to group specific types of elements, such as Source, Precomps, and Reference.
- Use numbering to reflect comp and sequence order so that it’s easy to see that order in the Project panel.
Create a unique Final Output comp that has the format and length of the final shot, particularly if the format is at all different from what you’re using to work (because it’s scaled, cropped, or uses a different frame rate or color profile).
Use guide layers and comments as needed to help artists set up the comp (Figure 4.2).
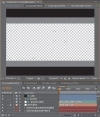
Figure 4.2 Here are a series of nonrendering guide layers to define action areas and color. Notice the new feature in CS4 that shows where this comp fits in a series of precomps; each of those buttons opens the corresponding comp.
- Organize Source folders for all footage, broken down as is most logical for your project.
)
The basic elements of a Master comp, source comps, and a render comp seem useful on a shot of just about any complexity, but the template can include a lot more than that: custom expressions, camera rigs, Color Management settings, and recurring effects setups.
Mini-Flowchart View
The Timeline is great for timing, but the bane of the Timeline is precomping. There are many times where there is no way around sending a set of layers into their own Timeline, yet most artists will do anything to avoid this step because it locks those layers and controls out of the main Timeline. In the past, precomping also made it harder simply to find where everything was; it is standard for an After Effects artist working on a complex comp to be left with the “where did I do that” feeling at one time or another.
That’s now less the case, thanks to CS4’s Mini-Flowchart, or Miniflow. You can access it via a button in the Timeline  , but you may have already discovered that simply tapping the Shift key with the Timeline forward enables it.
By default, the comp order is shown flowing right to left. The reason for this is probably that if you open subcomps from a master comp, the tabs open to the right; however, a convincing argument can and has been made to choose Flow Left to Right in the panel menu of the Mini Flowchart. Try it and see if you breathe a little sigh of relief.
Either direction, Miniflow is the best workflow addition to After Effects CS4. It shows only the nearest neighbor comps (Figure 4.3) but click on the flow arrows at either end and you navigate up or down one level in the hierarchy. Click on any arrows or items in between the ends and that level is brought forward.
)
Figure 4.3 Miniflow is a quietly revolutionary small new feature in After Effects CS4. It makes the process of navigating subcomps nearly effortless.
Miniflow does not display the entire compositing tree like Flowchart view does, but it’s much more useful. The most complicated it gets is in multiple one-to-many relationships, because you can only trace your way down one flow at a time, but that turns out not to be such a big deal. It’s much simpler to open a comp and see where it’s used than the previously existing alternatives.
More Ways to Manage Many Comps
Miniflow makes it even more possible to close all the Timelines when you’re done with a set of changes (Ctrl+Alt+W/Command+Option+W) and reopen only the ones you need, starting with the master comp.
The Lock icon  at the upper left of the Composition viewer lets you keep that Composition viewer forward while you open another Timeline. Typically, you would lock the master comp and double-click a nested comp to open its Timeline; as you make adjustments in that Timeline, you see their effect on the overall comp.
The Always Preview this View toggle  lets you instead work entirely in a precomp, but preview the result automatically in the master comp (if this is toggled in that comp) without having to switch to it. Use it if you’re only interested in how changes look in your final.
Ctrl+Alt+Shift+N (Cmd+Option+Shift+N) creates two Composition viewers side-by-side, and locks one of them, for any artist with ample screen real estate who wants the best of both worlds.
To locate comps in the Project panel, you can
Select an item in the Project panel; adjacent to its name by the thumbnail at the top of the panel is a small pulldown caret, along with the number of times, if any, the item is used in a comp (Figure 4.4).

Figure 4.4 Click the caret next to the total number of times an item is used to see a list of where it is used.
Context-click an item in the Project panel and choose Reveal in Composition; choose a composition and that comp is opened with the item selected (Figure 4.5).
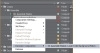
Figure 4.5 Context-click any item, and under Reveal in Composition, choose from a list, if applicable; that Timeline opens with the item selected.
Context-click a layer in the Timeline and choose Reveal Layer Source in Project to highlight the item in the Project panel (Figure 4.6).

Figure 4.6 Context-click any footage item in the Timeline and you can choose to reveal it either in the Project panel or in Flowchart view.
Context-click in the empty area of a Timeline and choose Reveal Composition in Project to highlight the comp in the Project panel (Figure 4.7).
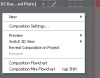
Figure 4.7 Find the empty area below the layers in the Timeline and context-click; you can reveal the current comp in the Project panel.
)
)
)
)
Precomping and Composition Nesting
Precomping is often regarded as the major downside of compositing in After Effects, because it obscures vital information from view. Artists will let a composition become completely unwieldy, with dozens of layers, rather than bite the bullet and precomp. Yet precomping is an effective way to solve problems and optimize a project, provided you plan things out a little.
Just to get our terms straight, precomping is the action of selecting a set of layers in a composition and assigning them to a new subcomp. Closely related to this is composition nesting, the action of placing one already created composition inside of another.
Typically, you precomp by selecting the layers of a composition that can and should be grouped together and choosing Precompose from the Layer menu (keyboard shortcut Ctrl+Shift+C/Cmd+Shift+C).
Two options are presented, the second one unavailable if multiple layers are selected: to leave attributes (effects, transforms, masks, paint, blending modes) in place or transfer them into the new composition.
Why Precomp?
Precomping prevents a composition from containing too many layers to be seen and managed in one Timeline, but it also allows you to do the following:
- Reuse a set of elements and manage them from one place.
- Fix render order problems, for example apply an effect first, then a mask.
- Organize your project; grouping elements that are interrelated is a good idea in a nodal application such as Nuke or Shake too, because it influences how you think about the composite.
- Consider an element or set of layers “done” (and even prerender them as proxies, as discussed later in this chapter).
If you’re already comfortable with the idea of precomping, focus on the last point. This chapter describes the advantages to finishing an element, if only for the time being, instead of always keeping options open. It’s a secret of most “real-time” compositing systems that they rely heavily on the equivalent of prerendered subcomps (they just don’t call them that).
Gotchas
Precomping several layers together can solve problems, but it can also create new ones. Common gotchas include
- You want some but not all properties to be precomped.
- It can be a pain to undo in order to restore precomped layers to the master composition.
- You must deal with the all-or-nothing behavior of blending modes and 3D layers, depending on the Collapse Transformations setting.
- It can be unclear how motion blur, frame blending, and collapsed transformation switches in the master composition affect nested comps.
- Layer timing (duration, In and Out points) and dimensions can become constraints.
If you recognize any of these problems and haven’t solved them, check out the following useful strategies.
Boundaries of Time and Space
Each composition in After Effects contains its own fixed timing and pixel dimensions, which a couple of strategies help navigate:
- Make source compositions longer than the shot is ever anticipated to be to avoid truncating timing.
Enable Collapse Transformations for the nested composition to ignore its boundaries (Figure 4.8).

Figure 4.8 The nested comp has a blue background and the leg of the letter “p” extends outside its boundaries (top); a simple quick-fix is to enable Collapse Transformations, and the boundaries of the nested comp are ignored (bottom).
)
These two simple rules will cover many situations, but Collapse Transformations has extra benefits and limitations of its own.
Collapse Transformations
Switches Affect Nested Comps is enabled by default in General Preferences. Enable frame blending or motion blur in a master composition and those switches are passed through to any nested composition. 3D position data and blending modes, on the other hand, are ignored if Collapse Transformations is not enabled (Figure 4.9). Enable it and it is as if the precomposed layers resided in the Master comp.
)
Figure 4.9 The highlighted switch has two roles (and two names): Collapse Transformations passes through blending modes and 3D positions from nested comps as if not precomped; Continuous Rasterization maintains vector source without rasterizing until final render and applies to source in formats such as Adobe Illustrator.
Collapse Transformations prevents the application of a blending mode on the collapsed layer. Apply any effect to the layer (even disable it) and After Effects must render the collapsed layer (making it what the Adobe developers call a parenthesized comp, one that has qualities of being both rendered and live). You can then apply a Blending mode, but 3D data is not passed through.
Thus if you want to collapse transformations but not 3D data, applying any effect—even one of the Expression Controls effects that don’t by themselves do anything—will parenthesize the comp. It’s a good trick to keep in your pocket.
Nested Time
After Effects is less rigid than most digital video applications when working with time. All compositions in a given project need not use the same frame rate, and as has been shown, you can change the frame rate of an existing composition on the fly, and keyframes retain placement relative to overall time.
With power comes responsibility, of course, so pay particular attention when you
- Import an image sequence.
- Create a new composition from scratch.
Embed a composition with a given frame rate into another with a different frame rate.
In the first two cases you’re just watching out for careless errors, but in the third, you might have reason to maintain different frame rates in subcomps, in which case you must set it deliberately on the Advanced tab of the Composition Settings dialog, or apply the Posterize Time effect set to the desired rate.
Advanced Composition Settings
In addition to the Motion Blur settings introduced in Chapter 2 and detailed in Chapter 8, Composition Settings: Advanced contains two Preserve toggles that influence how time and space are handled when the composition is nested into another.
Preserve Frame Rate maintains the frame rate of the composition wherever it goes—into another composition with a different frame rate or into the Render Queue with different frame rate settings. So if a simple animation cycle looks right at 4 frames per second (fps), it won’t be expanded across the higher frame rate but will preserve the look of 4 fps.
Preserve Resolution When Nested controls what is called concatenation. Typically, if an element is scaled down in a precomp and the entire composition is nested into another comp and scaled up, the two operations are treated as one, so that no data loss occurs via quantization. This is concatenation, and it’s usually a good thing. If the data in the subcomp is to appear pixilated, as if it were scaled up from a lower-resolution element, this toggle preserves the big pixel look.