Before I added the computer to my studio tools, I was making traditional prints and paintings. I especially liked building collagraph plates (see Figure 1) from paper cutouts and collage materials. I sealed the plates and then inked them with oil paint and etching ink wiping compound. Then I ran them through an etching press to transfer the ink to damp Rives BFK printmaking paper. Etching presses are expensive, so I began by working in a local Open Press location where artists could go to make prints.
Today, the CO2 laser I use to cut my shapes is available to artists in laser Open Studios or other service bureaus. Most trophy shops have lasers, so it's not hard to find a place that will cut vector files. For this project I used my own laser, but other artists can work at laser Open Studios available through Duganne Ateliers in Santa Monica, California.
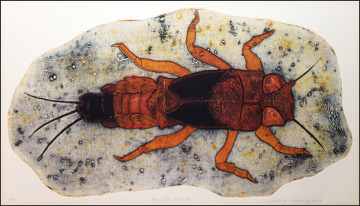
Figure 1 A cardboard collage plate is inked, placed on damp paper, and pulled through an etching press to create the impression.
Materials and Tools for This Project
For this tutorial, I used a Mac computer and Adobe Shape CC 2015. To follow along, you'll also need to collect some tools and materials, which are generally not expensive (see Figure 2). There are a few special supplies, however, such as the DASS WonderSauce Clear and White that I use to transfer the inkjet print to printmaking paper.
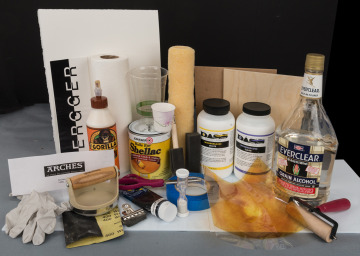
Figure 2 Most of the tools and supplies for this project are inexpensive and easy to find.
Materials
- Birch panel, ¼-inch thick
- Medex panel, ¼-inch thick (or a second birch panel)
- Image printed on DASS Premium transfer film
- Arches Platine, Berrger COT320, or Rives BFK printmaking paper
- Block printing inks
- DASS WonderSauce Clear
- DASS WonderSauce White
- Wood glue
- Blue painter's tape
- Shellac clear
- Everclear or denatured alcohol
- Small paper cup
- Plastic cup
- Paper towels
Tools
- Scissors
- Soft rubber brayer
- Baren for rubbing the inked paper
- One-minute hourglass or digital timer
- Sponge brush or foam strip and binder clip
- 400-grit sandpaper
- Protective gloves
- Hard, smooth work surface
- New 12-inch paint roller
Step 1: Make the Block for Printing the Shape
After receiving "Creative Jake" Weien's invitation to collaborate with him on this project, I joined his shared Adobe Creative Cloud folder and selected the image I would use for the woodblock print. (Part 1 of this series details how Jake used the free Adobe Shape mobile app to create the vector graphic.)
My training and education is in traditional printmaking and painting, and I thought the images Jake created with the Adobe Shape app on his iPad were perfect for creating woodblocks. The bold, simple designs are fast and fun to process, and they're easy to cut with my Universal Laser Systems cutter. In this half of the tutorial, I'll make the woodblock on the laser, but you could cut an equivalent by hand from adhesive craft foam like that shown in Figure 3, using an X-Acto knife.
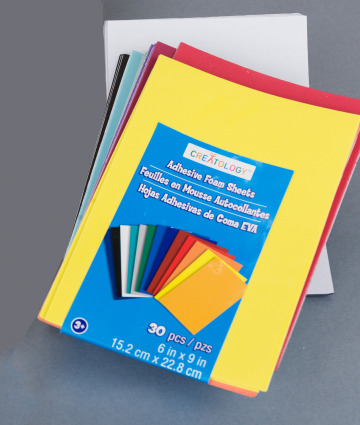
Figure 3 Craft foam sheets are easy to use for stamp prints.
Items in the shared library can be accessed from Photoshop CC or directly in Illustrator CC. I started in Photoshop because I wanted to clean up a few edges in the flower image Jake created.
Let's get started.
Connect to the Adobe Creative Cloud to access the shared image library where your graphic is stored (Window > Libraries), as shown in Figure 4. Open a new window in Photoshop, with a canvas size of 12 × 12.
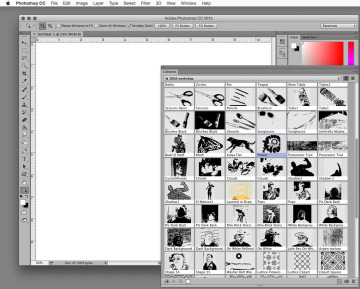
Figure 4 The simple bold floral shape is perfect for block printing.
I selected Jake's flower image and simply dragged it into the new canvas. Press Return or Enter to place the image, and then flatten the image layers using the flyout menu on the right (see Figure 5).
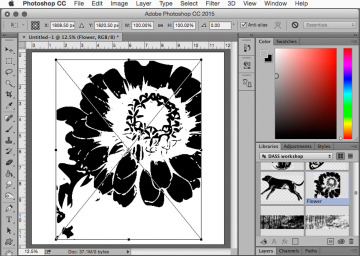
Figure 5 The image can be scaled to any size.
Using the lasso tool, I selected a few stray black shapes that I know will be too small for the cutting (see Figure 6). I filled those with white and then saved the file as a TIFF.
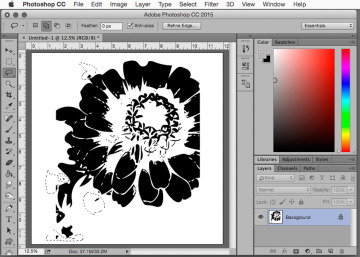
Figure 6 Use the lasso tool to select unwanted areas, and then fill then with white.
Now is the time to alter the image if you want more or less included in the cutout. Use the Magic Wand to select the white areas, as shown in Figure 7. To test what will be created when the cutting path is made for Adobe Illustrator, fill the selection with a color (see Figure 8). The cut shape needs to be fully selected as one piece; any stray whites left in the test image will not be included in the cutting path. Step back in history to remove the test fill color.
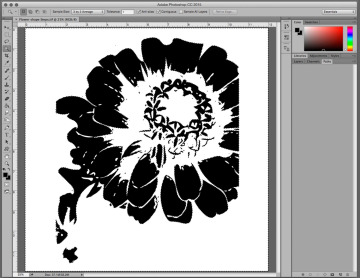
Figure 7 The selected white area is for the woodblock that will be inked and printed.
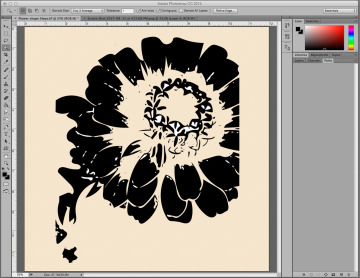
Figure 8 Bits of white show what will drop out along with the black.
With the selection active, click on the Path Selection Tool (see Figure 9). In the flyout menu, select Make Work Path (see Figure 10).
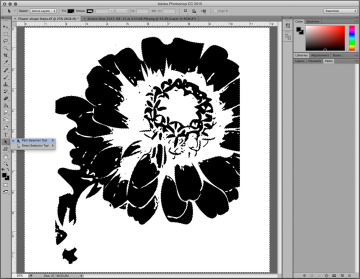
Figure 9 Use the path tool to select the edges that will be cut on the laser.
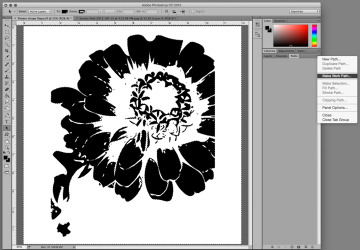
Figure 10 The work path will be copied and placed in the Illustrator file.
Click OK when the dialog displays the Tolerance setting as 2.0 pixels (see Figure 11). You'll see the path around the selection, as shown in Figure 12.
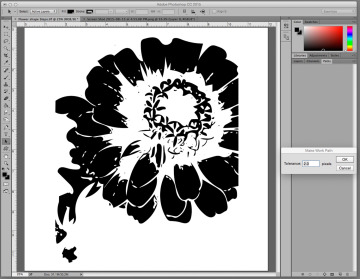
Figure 11 Specify a two-pixel tolerance.
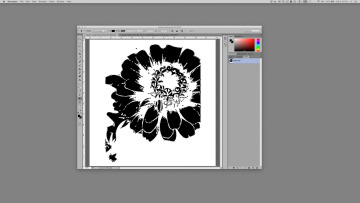
Figure 12 The path is ready to be copied into Illustrator.
Copy the selected path to the clipboard. Open a new document in Adobe Illustrator that is 18 inches high x 24 inches wide, which is the size of the Universal laser bed. Make sure it's Adobe RGB. Make a new swatch of RGB 255 red (see Figure 13). The Universal laser knows that anything in this color is a cut line. The red will be used to stroke the shape. When the image is selected with the selection tool, it will be highlighted in blue. After it's stroked with red and deselected, the outline will show in red.
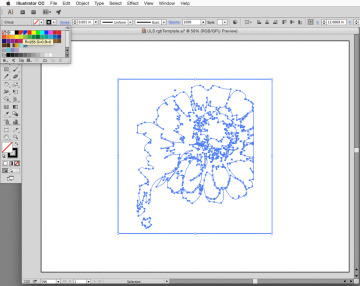
Figure 13 The selected image will be highlighted in blue before it's stroked.
Press Command-V to place the image in the document. In the paste options, select Compound Shape (Fully Editable), as shown in Figure 14.
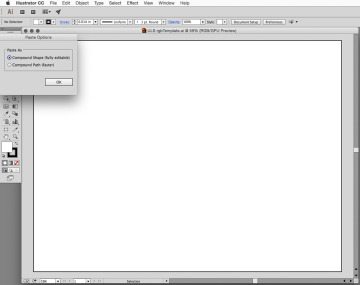
Figure 14 Make the shape editable.
Select Object > Expand (see Figure 15). In the Expand dialog, uncheck the Fill box, so that only the Object box is checked (see Figure 16). This setting will allow the shape to be stroked.
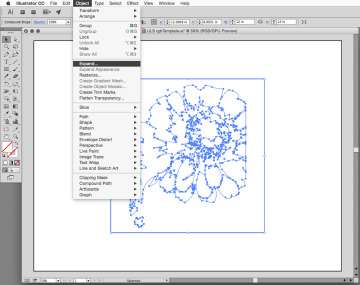
Figure 15 Expand the object.
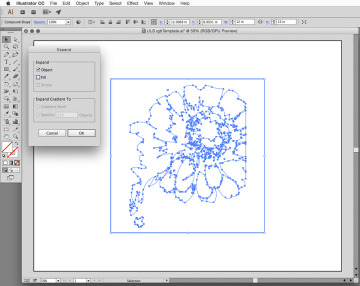
Figure 16 Only the object will be stroked.
Save the file with all options unchecked (see Figure 17).
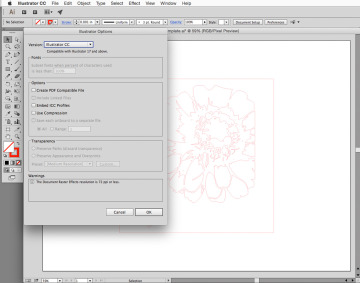
Figure 17 Perform a simple save.
Step 2: Cut the Print Block
Most likely you will take your wood and file to a vendor that will cut your shapes file. I have a Universal 60 Watt VersaLaser in my studio, and it's indispensable for many of the artworks I create. The software includes a materials database that makes it very easy to cut wood with the proper speed and power. For this project, I used .23-inch birch for the woodblock (see Figure 18).
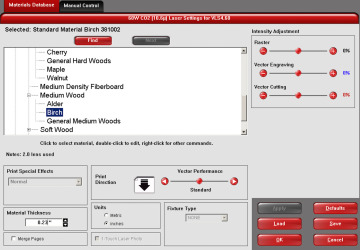
Figure 18 The materials database makes it easy to select the proper setting.
By clicking on the Manual Control tab shown in Figure 19, I can see the automatic settings for the red cutting lines. Settings in this panel can be slightly adjusted, which might be necessary for this example, because not all birch plywood has the same laminate.
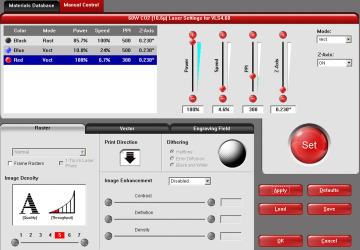
Figure 19 The red color is used for cutting shapes.
The laser cutting of the 8-inch x 8-inch flower shape (see Figure 20) took four minutes.
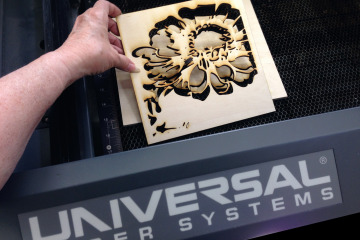
Figure 20 The laser took just three minutes to cut the birch.
I previously printed scanned images of a rust-soaked sheet of paper (see Figure 21) to use as the background for this block print.
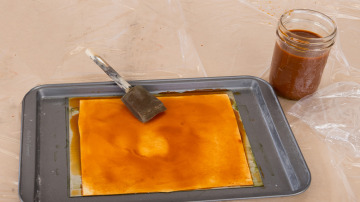
Figure 21 Rusty paper is easy to make for use as a texture for later scanning.
Step 3: Transfer the Print to Paper
A smooth hard surface is needed to do the image transfer that will be the base for the block print. I use a sheet of polypropylene, but any clean, smooth, hard surface will work. I start by taping the Arches Platine paper to my work surface with blue painter's tape. Then I wet the surface of the paper with DASS WonderSauce Clear transfer medium.
Using a paint roller, I slide the inkjet print, printed on DASS Premium transfer film, onto the wet paper (see Figure 22). After one minute, I carefully peel off the film from the paper.
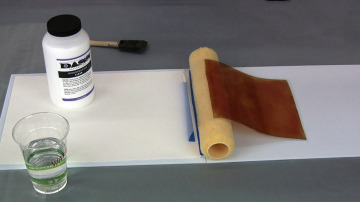
Figure 22 Use the paint roller to slide the inkjet print smoothly onto the wet paper.
After the print dries completely, it needs to be "de-slimed" to remove the inkjet coating that's left on the surface that moved with the ink. A hot hairdryer works well to dry the transferred image before I place it in water to remove the coating. Here's the technique: Place the dried transfer in a tray of water and rock the water tray for three minutes (see Figure 23). You will see the inkjet emulsion swell and slide off the image. Don't touch the image, or you may rub it off the paper. The blank area around the print can be rubbed a bit to loosen any emulsion. Hang the print with a clip from one corner to air-dry completely.
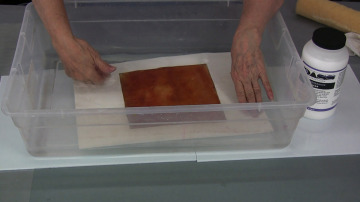
Figure 23 Wash the paper with cool water.
Step 4: Assemble the Woodblock
The laser-cut shape will need to be glued to a rigid board of the same size. I'll use a Medex panel for this purpose. I like this wood because it stays flat even when it gets wet.
Use a good wood glue, such as Gorilla Glue, to mount the shape cutout to the board (see Figure 24). Place a weight on the block and let the glue dry overnight.
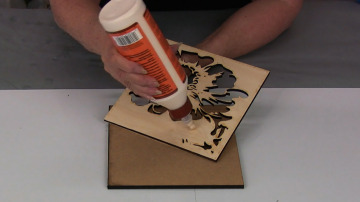
Figure 24 Any good wood glue will work to mount the panel.
The woodblock needs to be sealed with Shellac so the plate won't absorb water from the inks, or when the block is cleaned after pulling the print.
Dilute the clear Shellac 50:50 with grain alcohol. I like to use Everclear to thin the Shellac because Everclear is odorless. Both Everclear and denatured alcohol are grain alcohol, so you can use either one. Measure out equal amounts into a container, as shown in Figure 25.
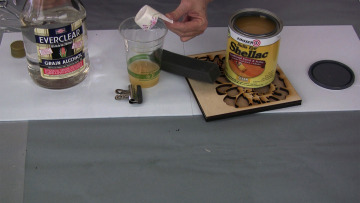
Figure 25 Thin the Shellac with grain alcohol.
I place a piece of foam sponge in a clip to spread the diluted Shellac on the board, as shown in Figure 26. Be sure to coat all four edges and the back. A second coat can be applied after an hour.
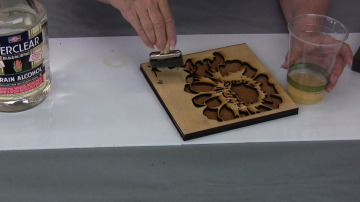
Figure 26 Soak the wood with the thinned Shellac.
The wood needs to be sanded very smooth so the ink can be applied evenly. Sand and round off the edges and the corners, using a 400-grit sandpaper, as shown in Figure 27. Brush or clean off all the sawdust.
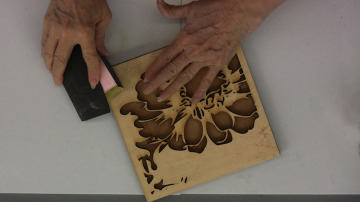
Figure 27 Smoothly sand the edges of the wood.
Step 5: Print the Woodblock
I'm using water-based block printing ink for this print, applied with a soft rubber brayer over the wood. Apply the ink in a thin, even layer, being careful not to let the ink drop into the cutout areas (see Figure 28).
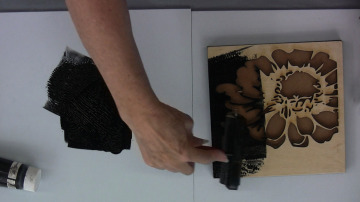
Figure 28 Use a soft rubber brayer to apply the ink.
Pick up the inked block by the edges and position it over the image transfer (see Figure 29). Press the woodblock firmly onto the paper. Carefully turn over the woodblock and the paper, so it can be burnished in the next step.
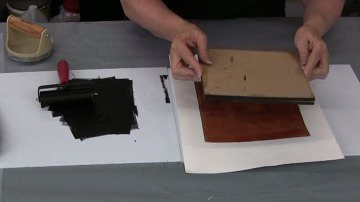
Figure 29 Carefully position the inked plate over the paper.
I use a rubbing baren to burnish the back of the paper, as shown in Figure 30. This technique pushes the ink into the paper fiber. Rub the baren across all the edges and the corners to press a plate mark into the paper, which adds to the hand-pulled print appearance.
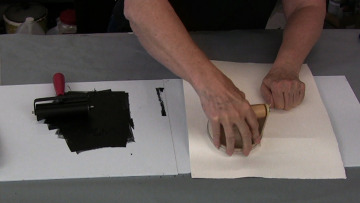
Figure 30 Use a baren to press the ink into the paper.
Start at one corner and slowly pull the paper off the plate (see Figure 31). Keep one finger on the opposite corner so the paper won't slip and pick up ink from the border around the print image.
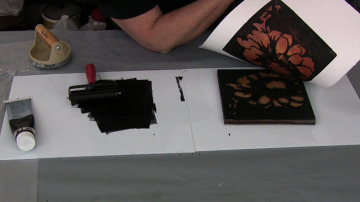
Figure 31 Carefully pull the paper off the plate.
The first print (shown in Figure 32) is called an artist proof. Once the proof is approved, the edition is printed to match the proof print.
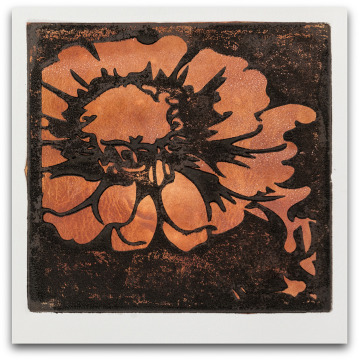
Figure 32 The ink adds a layer of physical texture to the image transfer.
Final Thoughts
This hybrid printmaking process merges inkjet image-transfer processes into the digital workflow, enabling the artist to add photographic images to hand-pulled prints in a way never before possible. All the products used here are water-based and non-toxic, which makes this hybrid process safe and easy to use for classrooms and professional studios alike.

