- Bring On the Art!
- Get Your Files Here
- Define the Chapter 4 Website
- Image File Formats for the Web
- PROJECT 4.1 Prototyping and Designing with Background Images
- PROJECT 4.2 Inserting and Editing Images
- PROJECT 4.3 Floating Images into Position
- PROJECT 4.4 Creating Structured Layouts with Images
- PROJECT 4.5 Styling the Header Area
- Challenge! Create Your Own Design with Photoshop
- Conclusion
This chapter is from the book
This chapter is from the book
This chapter is from the book
PROJECT 4.2 Inserting and Editing Images
 ACA Objective 1.2
- ACA Objective 2.4
- ACA Objective 2.6
- ACA Objective 4.2
 Video 4.2 Inserting and Editing Images
You accomplished a lot in the first project. You’ve gotten some important page elements all set using background images and CSS styling rules to style the content areas of the page. Did you take the Level Up challenge? If you did, your header should also have a nice background image applied to it.
Now it’s time to turn your attention to inserting images into the body of the page. Luckily for you, Chris has provided all sorts of images for you, and he’s even optimized them and set the file types of the images properly so you can jump right into inserting the images. In this project you’ll use the tools that Dreamweaver provides for working with images in a website, try the editing options that are available, and follow some recommended practices for modifying images.
From your review of the design comp and the instructions the client provided, you know you have a lot of images to insert into the page.
Insert an Image Using the Assets Panel
The Assets panel is a great tool for situations in which you have many available images and want to identify which ones to use.
If the Assets panel is not already open, select Window > Assets. By default, the panel appears in the same panel group as the Files and CSS Designer panels.
The Assets panel makes it easy to sort through all the images in your site and displays a preview of the images at the top of the panel. You can slide the divider up or down between the preview area and the alphabetical list of files to see a smaller or larger preview. Figure 4.12 shows the functional areas of this panel.
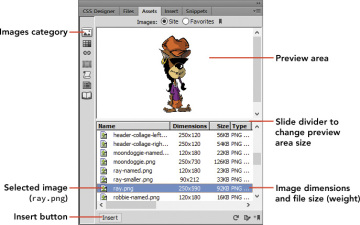
Figure 4.12 The Assets panel with the Images category selected
- Scroll through the images to locate ray.png, and select it.
- Place your cursor in front of Ray’s introduction to the site (My name is Ray…), and click the Insert button in the Assets panel to place ray.png onto the page.
)
Scale and Size an Image
As soon as the image displays on the page (Figure 4.13), you can tell that you have a big problem. This image is way too large.
)
Figure 4.13 The Property inspector tools for setting image dimensions
When an image is selected, you’ll see a small, square resize handle appear in the image’s lower-right corner. You can scale the image by holding down the Shift key while dragging this handle. Or you can click the lock icon in the Property inspector to lock the aspect ratio and keep the image set to the proper width and height dimensions as you drag.
Click the image, and drag the image’s resize handle to what you think will be the proper dimensions for this image.
As you resize the image, dimensions will change in the Property inspector. Make note of those dimensions.
When you resize or scale an image in this manner, you are changing the width and height that the browser will use to display the image. The image itself is not changed in any way, and most importantly, the file size of the image is the same as always. Placing a large image onto the page and then setting a smaller width and height is a waste of bandwidth. A smaller version of this image works better in this case.
Undo your changes to the image so it returns to its original size, or click the Reset to Original Size button in the Property inspector.
In the next steps, you’ll use a better method for editing an image that is too large for the page.
Duplicate and Edit an Image
Remember that smart designers never (ever!) destroy an original image. You might be tempted to open ray.png in Photoshop, change the image dimensions, save the file, and plunk the smaller version onto the page. But that kind of destructive process changes the file forever. You could never make the image larger again, and because you never really know how you might want to use this image in the future, it’s always better to keep the original file as it is and work from a duplicate of the file. The Adobe toolset makes this an easy process.
- Select the ray.png image, and press the Delete key to remove it from the page. You will not be using this file for this location.
- Click the Files panel, and expand the images folder.
Select ray.png. Right-click, and choose Edit > Duplicate from the context menu (Figure 4.14).
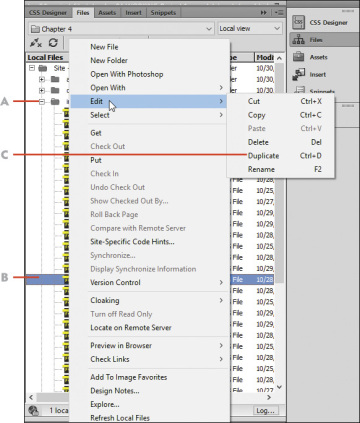
Figure 4.14 The Files panel allows you to duplicate files and perform other basic file operations.
A Expanded images folder
B ray.png selected
C Duplicate an existing file
Notice the other basic file operations you can perform from the Edit menu.
Anytime you duplicate a file in this way, Dreamweaver automatically appends the name with “– Copy.” In this case, Dreamweaver will create a file named ray - Copy.png, which you’ll see listed in the Files panel.
Click twice—but not too fast—on the file named ray – Copy.png. The filename is highlighted in blue. Change the name of the file to ray-smaller.png.
This is the file you will use in your design, leaving the original image of Ray as it is, safe and sound.
Drag the ray-smaller.png file from the Files panel, and drop it onto the page in front of the first sentence (“My name is Ray…”).
The image is at its original size, but now you can safely edit this image without harming the original.
- With the image still selected in the page, click the Edit button in the Property inspector to open Photoshop (or the default image editor you set in Preferences).
- Resize the image, and save the changes you make in your image editor. In Photoshop, you can resize the image by choosing Image > Image Size. Set the image width to 90 pixels, and save the file.
Return to Dreamweaver and note the appearance of the image. It’s still too big. The Property inspector still shows the original dimensions. To set the dimensions to the new, correct dimensions, click the Reset to Original Size button in the Property inspector (Figure 4.15).
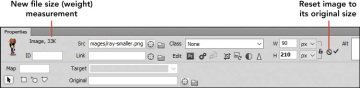
Figure 4.15 Resizing an image in a graphics editor like Photoshop reduces the file size of the image and saves on bandwidth.
)
)
Notice that the image is displayed at the dimensions you set when working in your image editor. Also note the new file size of this image as shown in the Property inspector: only 33 Kb. You saved almost 60 Kb of unnecessary data that doesn’t have to be downloaded by a site visitor. And you saved bandwidth and made a backup of the original client artwork all at the same time. Good job!
Dreamweaver’s Image Editing Tools
Dreamweaver includes tools in the Property inspector for editing images and performing small adjustments directly in Dreamweaver. But be warned! These tools make permanent changes to the image once you save the Dreamweaver page you’re working on.
Figure 4.16 shows the location of these tools in the Property inspector. You can try these out for yourself, but be sure to choose Edit > Undo after you make each change so the file you are using isn’t permanently altered.
- Crop Image displays a crop area. Use the crop area handles to set the size of the area to be cropped. Double-click to crop the image.
- Resample Image button is used when you have changed the dimensions of an image and you want to improve its picture quality at its new size and shape.
- Brightness and Contrast is used to make small changes to how dark or light an image is and how sharply the colors in the image are defined.
- Sharpen adjusts the focus of an image by changing the contrast of pixel edges in the image.
)
Figure 4.16 Image editing tools in Dreamweaver as seen in Design view
Round-Trip Editing with Photoshop
Recall that at the beginning of this project you were told that smart designers always work from an original source file from Photoshop or Fireworks and never take actions that will destroy an original. However, web designers in particular never know where their artwork might come from or in what format. You might, for example, have the freedom to work from an original composition that you create in Photoshop, using all your own art and photos to compose something entirely new. Photoshop has awesome tools that let you compose an entire page layout and design in one PSD file and then export the images and CSS values for use in a web design project.
Web designers also have to work in a setting like the one you see here, where the client has provided artwork and instructions on how they should be used. Once you find that you need to modify an image in any way—changing its size, adding text, or even making color corrections to a photograph—you should create a source file so you can have a backup on hand in a format that lets you go back and make additional changes.
Dreamweaver provides a way to do this by allowing you to make round-trip edits from a source Photoshop file. Let’s see how that works.
- From the Files panel, expand the source folder and locate the file named ronni-original.psd.
Drag the ronni-original.psd file onto the page at the end of the last bulleted sentence.
Dreamweaver will display the Image Optimization window, where you’ll choose the appropriate image format for the file. For this file, you’ll continue to use PNG24 as the format to be saved.
Click the drop-down arrow in the Preset field, and select the PNG24 option (Figure 4.17).
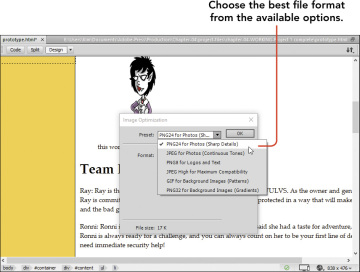
Figure 4.17 The Image Optimization window appears when you insert a PSD file in a page.
Click OK to set the format, and Dreamweaver will open an Explorer or Finder window so you can save the image into its web-ready format. Browse to the images folder inside the Chapter 4 site, and save the file as ronni-edited.png.
In the Property inspector, you’ll see that Dreamweaver is now tracking the path and filename of the source image used to create this version (Figure 4.18). The next time you click the Edit button, the PSD file will be opened in Photoshop and not the version that is on the page.
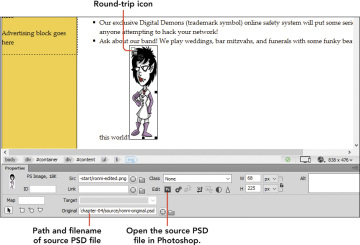
Figure 4.18 Source Photoshop files are tracked by Dreamweaver.
Now look at the image itself. You’ll see a small icon in the upper-left corner of the image that indicates this is a version of an image that came from a Photoshop source file and is available for round-trip editing.
Click the Edit button and the PSD file will open in Photoshop.
Let’s look at a quick demonstration of how round-trip editing works.
- In Photoshop, choose Image > Image Rotation > Flip Canvas Horizontal. The cartoon character will rotate to face right instead of left.
Save the PSD file, and return to Dreamweaver.
Everything looks the same. No worries. To see the change you made in Photoshop, you have to tell Dreamweaver to update the image.
Click the Update from Original button in the Property inspector (Figure 4.19).
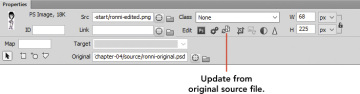
Figure 4.19 The Property inspector when working with a round-trip image
The character is now looking to the right, just as she is in the source file.
- Save the prototype.html file you’ve been working on. This project is complete.
)
)
)
You’ve just learned a lot about how images are inserted into web pages using Dreamweaver’s toolset. You’ve also seen how you can use Dreamweaver’s built-in image editing tools for making minor corrections to an image and how Dreamweaver and Photoshop can be used together in the recommended workflow, where the designer makes edits to a source PSD file that can be easily updated in Dreamweaver. And don’t forget to always back up your originals!