- Taking in the Big Picture
- Working Nondestructively
- Dust on Digital Camera Files
- Less Work, More Results
- Work Smart Not Hard
- Channel Extraction
- Removing Spots, Fungus, and Mold
- Managing Glare, Texture, Moiré, and Color Artifacts
- Closing Thoughts
This chapter is from the book
This chapter is from the book
This chapter is from the book
Managing Glare, Texture, Moiré, and Color Artifacts
Taming print texture, moiré, and color artifacts has caused many sleepless nights for restoration artists, retouchers, and graphic designers. The challenge is to reduce or eliminate these bothersome patterns while maintaining the important image information. Read on to learn how to reduce the problem before even opening the image in Photoshop, how to work with the Image Size dialog to remove moiré, and just as important, how to add grain texture back into the image to cover telltale restoration tracks.
Reducing Problems Before Restoration
The idea of always being able to fix things in Photoshop is not a good philosophy. It is best to take the time to get the best photo or scan possible to avoid additional work. This may involve changing angles, changing lighting, or removing an image from the wall or taking it out of a frame. Often Wayne will simply take an image outside and photograph it under natural light to avoid complications from studio lighting.
Reducing Glare
Images that are behind glass, not flat, or silvering do not lend themselves to being scanned. In these cases, we recommend photographing the image at an angle to avoid the glare and using either the transform tools or the Perspective Crop tool to correct the shooting at an angle.
Katrin was faced with the difficult task of trying to photograph a painting and had no control over its location or the lighting. Colin Wood provided her this idea for how to correct the annoying light reflection spot (FIGURE 5.54): photograph the image at an angle that doesn’t show the reflection, and then correct the non-square image using Perspective Crop tool (FIGURES 5.55 and 5.56).
)
FIGURE 5.54 Photographing this painting straight on resulted in distracting reflections. Taking the photo at an angle eliminated the glare, and then the picture was straightened with the Perspective Crop tool.
© KE
)
FIGURES 5.55 and 5.56
Once the image was open in Photoshop, Katrin selected the Perspective Crop tool, which is grouped with the Crop tool. She clicked each corner of the picture, starting with the upper-left corner, followed by the lower-left, lower-right, and upper-right corners. Then she fine-tuned the position of the perspective grid that appeared by selecting one of the handles and dragging it into position (FIGURE 5.57). Finally, she pressed Return/Enter to commit the perspective crop.
)
FIGURE 5.57 With the Perspective Crop tool active, the border of the non-square image is defined.
 TIP
TIP
To keep the softening of the image to a minimum, Katrin used the sneaky method of opening the raw file at twice the resolution needed. Before using the Perspective Crop tool, she sized the image down (Image > Image Size) by selecting Bicubic Sharper from the Resample menu in the Image Size dialog box.
Reducing Silver Mirroring
Silver was used in both film and prints. With time and less-than-optimal storage conditions, silver mirroring can appear as a bluish, shimmering cast in the darker areas of an image; it is especially visible when viewed at an angle.
![]() ch5_collegeportrait.jpg
ch5_collegeportrait.jpg
Scanning images like this with a flatbed scanner can be problematic, as the silver reflects the light directly back. Therefore, it is best to avoid capturing the silvering when the image is scanned or photographed. In this image, the silvering is very noticeable, especially in the darker areas; it was made more so when the light of the scanner bounced off it directly (FIGURE 5.58). By tilting to minimize the glare and by photographing the image rather than scanning it, Wayne was able to record a usable image (FIGURES 5.59 and 5.60).
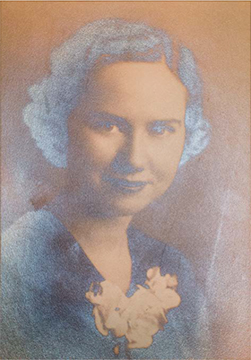
FIGURE 5.58 Silver showing through in images can be highly reflective, making scanning difficult.
© Palmer Family Archives
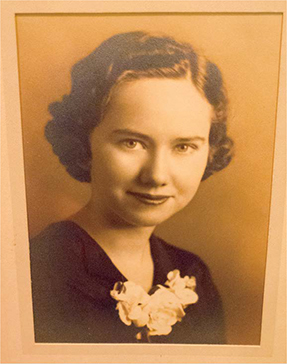
FIGURE 5.59 By photographing the image at an angle, the reflections are minimized.
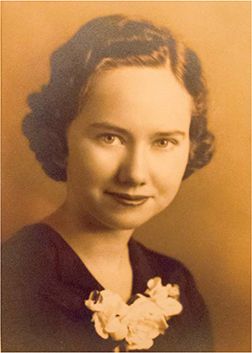
FIGURE 5.60 The image can be straightened in Photoshop.
To square the image back, Wayne used the following steps (FIGURE 5.61):
)
FIGURE 5.61 Using guides to help return the image back to square, and Warp mode to transform to the guides with real-time feedback
Press Cmd-J/Ctrl-J to duplicate the Background layer.
From the rulers (View > Rulers), drag horizontal and vertical guides over the image.
Choose Edit > Free Transform, and click the Warp icon (
 ) in the options bar to change to Warp mode.
Warp mode transforms in real time, giving feedback as to how much the image can be transformed without distortion.
Drag the corners or the control points to warp the image to the guides, and press Return/Enter to commit the warp.
Once the image is square, use the guides to crop.
If an image has already been digitized and the silvering effect is present, the reflections will often have a blue cast, as seen in FIGURE 5.62. This technique can be used to minimize the effect.
)
FIGURE 5.62 This image has already been scanned, so getting rid of the reflections through tilting the image is not an option.
© Hildenbrand Family Collection
![]() ch5_silvered_children.jpg
ch5_silvered_children.jpg
Choose Select > Color Range and choose Blues from the Select menu. Click OK to create an active selection, and click OK once more if a warning message appears (FIGURE 5.63).
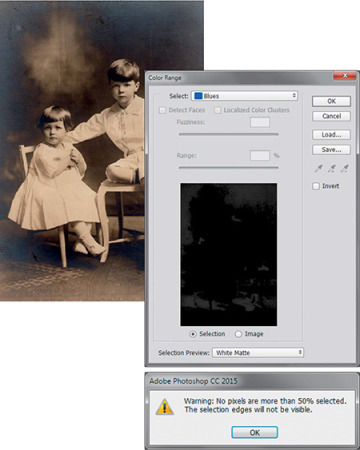
FIGURE 5.63 Use Color Range set to Blues to select the blue reflections.
TIPIf choosing Blues from the Color Range menu does not work, try manually selecting the affected areas with the Sampled Colors option.
Add a Levels adjustment layer. Don’t make any tonal changes, but change the blending mode to Difference to darken the blue reflection (FIGURE 5.64).
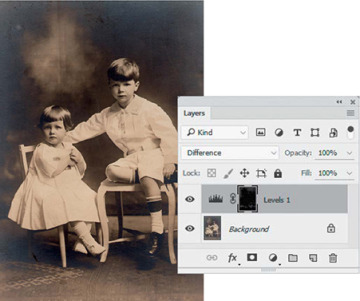
FIGURE 5.64 An adjustment layer with the blending mode set to Difference tones down some of the blue reflections.
The type of adjustment layer used is not important, as you are only using the blending mode.
Some of the blue has been removed. Duplicate the adjustment layer by pressing Cmd-J/Ctrl-J, which removes more blue. Repeat several times until as much blue is removed as possible without making the dark areas of the image look blotchy (FIGURE 5.65).
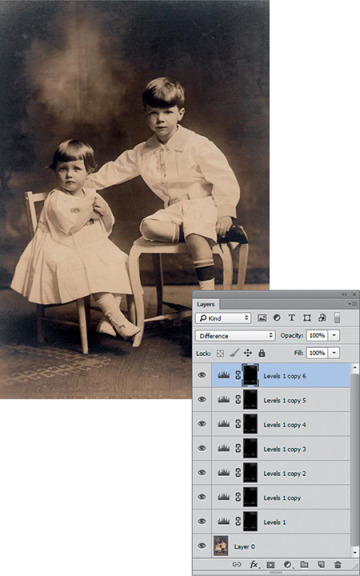
FIGURE 5.65 Duplicating the adjustment layer several more times greatly reduces the amount of the silver blue effect.
)
)
)
As with all restoration work, individual results will vary. In some images, the silvering can be completely eliminated with this method.
Reducing Paper Texture and Print Patterns
In years past it was common to print photographs on textured papers with linen, stipple, hatch, or pebble surfaces. As pleasing as these textures were to the original print, the textures are very problematic when it comes to scanning or photographing the prints. When the image is captured by either method the texture will also be captured and can be distracting. The smaller the original print, the greater the problem because the paper texture is larger relative to the image information. When dealing with textured prints, the Surface Blur filter can help.
The senior portrait example featured here is a realistically hand-colored black and white photograph that is sadly marred by the pattern of the paper (FIGURE 5.66).
)
FIGURE 5.66 This colorized portrait has a distracting pattern in it from being printed on textured paper.
© Palmer Family Archives
![]() ch5_seniorportrait.jpg
ch5_seniorportrait.jpg
Choose Filter > Convert for Smart Filter to convert the Background layer to a Smart Object.
Choose Filter > Blur > Surface Blur, set the Radius to 6 and the Threshold to 16, and click OK.
The Radius controls the range of pixels that is effected by the filter where it spots tonal differences. The Threshold puts a break on the filter, by not affecting any pixels with a tonal difference less than the set value.
The pattern is minimized while keeping the blurring to a minimum. Using the controls is a delicate balancing act between removing the unwanted pattern, dust, or distractions and obliterating important details (FIGURE 5.67).
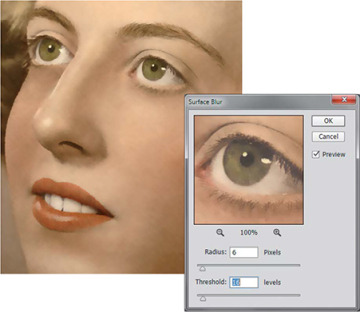
FIGURE 5.67 The texture can be minimized by applying the Surface Blur filter.
To control where the pattern removal takes place, take advantage of the Smart Filter mask to conceal the surface blur of essential image areas.
To bring back essential image information, click the Smart Filter mask. With a soft-edged black brush, paint over the eyes and the edge of the mouth to conceal the surface blur effect (FIGURE 5.68).
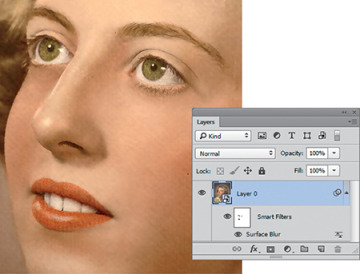
FIGURE 5.68 Masking the important areas returns sharpness to the key areas.
)
)
The result shows how well the paper texture is reduced, and the essential parts of the face still look sharp (FIGURE 5.69).
)
FIGURE 5.69 The pattern has been minimized, with with her eyes and mouth kept sharp.
Reducing Offset Moiré
A magazine or newspaper image consists of tiny little dots that create the illusion of a continuous-tone photograph. These images look sharp from a distance but not so much when enlarged. The de-screening option in a scanner’s software is the best way to get rid of the dot patterns as addressed in Chapter 1. If that is not an option, use this process to downsize the image, and then use Photoshop’s interpolation process to generate new information to minimize the dot pattern.
![]() ch5_horse.jpg
ch5_horse.jpg
In this image from a printed calendar (FIGURE 5.70), notice the pattern from commercial offset printing and note that the picture does not hold a lot of detail, even when zooming in. However, the pattern can be reduced or eliminated by removing the space between the dots and having Photoshop fill in the space by replicating the remaining information.
)
FIGURE 5.70 This image from a printed calendar shows the signs of being screened. When viewed through a loupe, the dot pattern is more noticeable.
© Pamela J. Herrington
Press Cmd-–/Ctrl-– to zoom out until the pattern is no longer visible on the screen, which should be about 50%. Depending on your monitor, the zoom level may vary. Take note of the zoom level that is listed on the document tab.
Choose Image > Image Size and change the unit of measurement for Width and Height to Percent. Select Resample and choose Automatic from the menu. Change the percentage to 50, and Click OK (FIGURE 5.71).
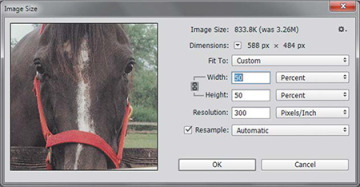
FIGURE 5.71 Reducing the file size by the same amount at which the pattern is not viewable on the screen runs the dots together.
© Pamela J. Herrington
 NOTE
NOTEThe selected downsize percentage is based on the zoom level at which the pattern is no longer visible onscreen.
Choose Image > Image Size again, select Resample, and change the Width and Height percentage to 200 to size the image back up to the original size. Click OK.
Photoshop will resize the image to its former dimensions and the image interpolation will create new information, getting rid of the visible pattern that was present (FIGURE 5.72).
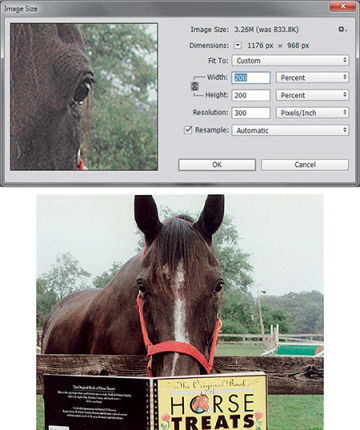
FIGURE 5.72 Returning the file to its original size through interpolation, the pattern is minimized.
© Pamela J. Herrington
TIPDownsizing and upsizing an image can also be used to hide dust.
)
)
Reducing Digital Camera Noise
In the days of film, visible grain was for some a negative side of high-speed films or underexposed images. Unfortunately, this characteristic has carried over to the digital age and is called noise. When a camera’s ISO setting is increased, the signal the camera sensor receives is boosted, creating two possible types of noise that are often visible in the darker sections of the image: luminance noise, which can give an image a gritty look like film grain, and chrominance noise, which shows up as colors that do not match the surrounding colors.
When recording images as JPEGs, the camera decides how to handle the noise and will probably produce an image that is less pleasing than what can be achieved with raw processing. Most point-and-shoot cameras, including smartphones, do not offer raw capture options and instead use JPEG. This is when the Reduce Noise filter can be useful.
![]() ch5_backstage_guitars.jpg
ch5_backstage_guitars.jpg
Zoom in to 100% or 200% and inspect the bodies of the guitars, observing the chromatic digital noise caused by shooting in low light and at a high ISO (FIGURE 5.73).
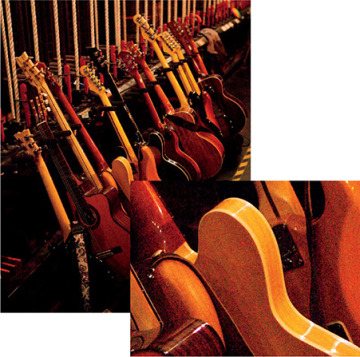
FIGURE 5.73 At first glance, the noise in this image is not noticeable. On closer inspection, the noise is very distracting.
© WP
Choose Filter > Convert for Smart Filters.
The Reduce Noise filter is a processor-intensive filter, so it can be helpful to determine the best settings on a smaller section of the image.
Using the Rectangular Marquee tool, select a small area of the image that clearly shows the noise.
Choose Filter > Noise > Reduce Noise, and drag all the sliders to the left.
As with most Photoshop noise reduction filters, finding the best settings—those that create the best balance of noise reduction while maintaining image information—requires experimentation and observation.
Drag the Strength slider to 8 to reduce the size of the noise. The color of the noise is still noticeable. Drag the Reduce Color Noise slider to 50%. Drag the Preserve Details and Sharpen Details sliders to 5% to bring back a bit of sharpness (FIGURE 5.74).
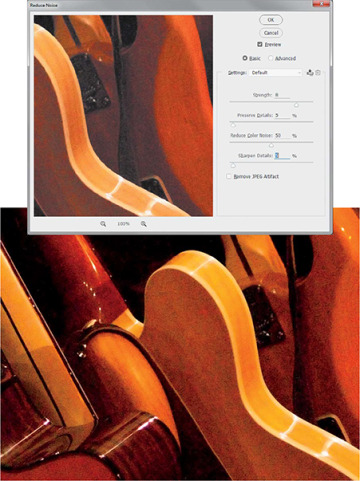
FIGURE 5.74 This after view inside the Reduce Noise filter shows how much noise can be reduced by finding a balance of settings.
Click OK to apply the settings to the small area selected, press Cmd-Z/Ctrl-Z to undo the effect, and press Cmd-D/Ctrl-D to deselect the selection.
Press Cmd-F/Ctrl-F to apply the last-used filter to the entire file. Be patient, as this filter often takes a bit longer than others to process.
)
)
NOISE AND RAW FILES
An advantage of recording raw is that the amount of noise can be controlled before the image is processed. This image of the New York skyline late in the day is plagued with noise from being shot at a high ISO. A close-up view of the cloud shows the extent of the noise (FIGURE 5.75).
)
By making adjustments in the Details tab in ACR, the noise can be dramatically reduced (FIGURE 5.76) and becomes the starting point for editing the image in Photoshop.
)
FIGURE 5.76 Using the Noise Reduction options of ACR can minimize the noise.
Returning Image Texture
No matter what technique is used to remove dust from an image, maintaining the grain or noise pattern can be challenging. Overzealous cloning and healing can disrupt the original grain or noise patterns, giving the image an uneven look. So after an entire chapter of providing methods of removing texture and noise from pictures, here is a nondestructive method to put noise or film grain back in (FIGURES 5.77 and 5.78).
)
FIGURES 5.77 and 5.78
Open the spot_repair.psd image you retouched and saved earlier in this chapter, zoom in, and observe how certain spots of the image show no grain; they look smooth, unlike the rest of the picture.
Create a new layer above the topmost layer and set the blending mode to Overlay.
Choose Edit > Fill, select 50% Gray from the Contents menu, set the blending mode to Normal, set Opacity to 100%, and click OK. The layer is now filled with 50% gray.
Choose Layer > Smart Objects > Convert to Smart Object, to convert the layer to a Smart Object.
Choose Filter > Noise > Add Noise. Drag the Amount slider until the noise size matches the grain in the image. Set Distribution to Uniform, and select the Monochromatic option. Click OK (FIGURE 5.79).

FIGURE 5.79 Simulated grain can be added back with the Add Noise filter.
To fully match the grain in the retouched photo, you might need to apply some blur to the noise you’ve just added.
Choose Filter >Blur > Gaussian Blur. Drag the slider to remove sharp edges on the newly created grain to match the existing grain. Click OK (FIGURE 5.80).
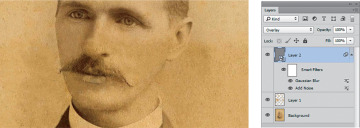
FIGURE 5.80 To reduce the sharpness of the grain, apply the Gaussian Blur filter.
)
)
)
)
By applying the Noise filter as a Smart Filter, you can return and tweak your grain to be the best match possible, and if you do not want to apply the grain to the entire image, use the masking options within the Smart Filters to refine grain creation.
TIP
If the grain is too strong or appears overpowering, use the Opacity slider in the Layers panel to lower the intensity of the grain.