
- Width Tool And Stroke Profiles
- The Expanded Stroke Panel
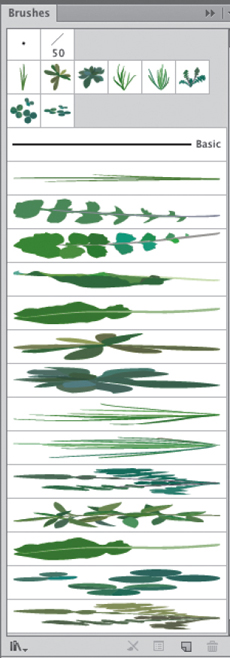
- Brushes
- Symbols
- Dynamic Symbols, & New Raster Brushes in CC
- Stroke Variance
- Gallery: MCKIBILLO (AKA Josh McKible)
- Brushes & Washes
- Gallery: Stephen Klema’s Students: Jillian Winkel, Stephanie Pernal, Amber Loukoumis, Jeffrey Martin, Nicole Dzienis, Tamara Morrison
- Gallery: Sharon Steuer
- Painting Inside
- Painterly Portraits
- Gallery: Greg Geisler
- Pattern Brushes
- Gallery: Donal Jolley
- Brush Corners
- Gallery: Lisa Jackmore
This chapter is from the book
This chapter is from the book
This chapter is from the book
Gallery: Donal Jolley
)

This sampler by Donal Jolley, using his 6D Art Pen, demonstrates the tremendous variety you get from brushes that ship with Illustrator. When you add a Wacom pressure-sensitive pen and tablet to these out-of-the-box brushes, you can introduce even more variety into your strokes; the standard Grip Pen registers pressure, tilt, and bearing, and the optional, more sensitive Art Pens (6D Art for Intuos3, or Art Pen for Intuos4) add the ability to vary each stroke with rotation. The bristle brush responds particularly well to the Art Pens, adding a new dimension to painting. You can manually transform some of your strokes (but not those made with the calligraphic, scatter, or bristle brushes) by modifying its profile with the Width tool (such as Spikey above) and then saving that profile to apply to other strokes.
Gallery: Moses Tan
)
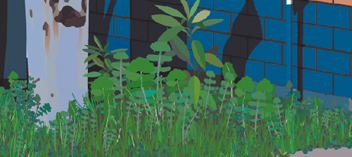
Moses Tan recreated astonishing detail and captured a precise likeness of his photographic reference using mostly meticulously-drawn filled paths, but he used custom art and scatter brushes for some of the intricate details (such as the weeded area shown across, right). He preferred to use scatter brushes for the small-sized growth and art brushes for the larger foliage. To make an art or scatter brush he first drew a weed object, then dragged it into the Brushes panel and in the New Brush Options, selected Art Brush or Scatter Brush (several are shown at right). For art brushes he specified the stroke direction (either top to bottom or left to right) so when he drew a brushstroke, the foliage was oriented correctly. He kept the other parameters at the default settings. For the scatter brushes he varied options for each weed (size, spacing, scatter, and rotation). For scatter brushes he used Page for “Rotation relative to,” and to preserve the original artwork colors in all his brushes, he used a Colorization of None. To paint with a brush he would select the Paintbrush tool, a scatter or art brush, and draw paths to easily form the weeded detail in his drawing.
Gallery: Nobuko Miyamoto/Yukio Miyamoto
)
)
Making these intricate beaded necklaces at first glance would seem impossibly difficult, but once they carefully construct each gem, with the use of pattern brushes, the necklace virtually draws itself. Nobuko Miyamoto designed the necklace and created the bead elements (details above right) with a mixture of blended and solid filled objects. She paid careful attention to the ends of the bead to ensure that when each bead lined up with the next one there would be a seamless connection between them. Yukio Miyamoto then transformed Nobuko’s designs into brushes. To make the chained ends, he selected the chain object and dragged a copy (Shift-Option/Shift-Alt) to the other side of the bead. With the chain selected, he chose the Reflect tool and clicked above and below the chain to reflect the chain vertically. He selected and grouped each bead, and then in some cases he put the beads in pairs and then grouped a pair of beads. For each bead or pair of beads Yukio clicked the New Brush icon at the bottom of the Brushes panel, selected New Pattern Brush, and clicked OK. In the Pattern Brush Options dialog, he kept the Colorization method as None, and then under Fit he chose Stretch to Fit. To make the necklace, Nobuko drew a path with the Paintbrush tool and selected the desired bead pattern brush in the Brushes panel to apply the brush. Now with the bead as a pattern brush, the necklace can be easily adjusted to any length or path.
Gallery: Aaron McGarry
)
For this urban portrait Aaron McGarry relied heavily upon Illustrator’s Symbol Libraries and Symbols panel. He made his own panel containing only the symbols he needed using Window> Symbol Libraries> User Defined. He saved as a symbol any detail that he would need to repeat so he could easily access and apply that element. To build the roof tiles in the background building, McGarry made one tile and filled it with a solid color. He then made two duplicates and filled each with a different color. He separately dragged and dropped each into the Symbols panel, named it, and clicked OK. He was then able to quickly drag alternating tiles from the panel to lay the roof, giving it a natural look. To create the red plumbing in the foreground, he also used many duplicated parts, such as the nuts and bolts holding the assembly together, that he had saved as symbols (see detail above right). McGarry took full advantage of Illustrator’s Symbol libraries to create the greenery and curb area around the pipes. He used grass, leaves, and rocks found in the libraries accessed from the Symbol Libraries icon in the Symbols panel. To create a perspective point of view he modified some of the symbols; for instance, he used Effect> Distort & Transform to turn Rock symbols into paved concrete. He also created the oil stains on the road by modifying a Dot Pattern symbol from Illustrator’s library. For the dirt on the vehicle, he drew a path around its lower side and then enabled the Draw Inside drawing mode. Using the Symbol Sprayer tool he sprayed the sand symbol within the path along the vehicle’s side. Lastly, he selected the path and reduced the opacity.
Gallery: Lisa Jackmore
)
Lisa Jackmore decided to use her photo of a hand-painted decoration with asymmetries as the basis for a pattern brush. It would be impossible to match all of the castle fragments perfectly (figure a), so in Photoshop she used the Clone Stamp tool to remove most of the castle motifs, leaving only the one complete castle. After cropping the image, Jackmore opened it in Illustrator, rotated it and then dragged it into the Brushes panel to create a pattern brush. In Pattern Brush Options she chose Auto-Centered Corner Tile, which formed the pattern well but resulted in a distorted auto-generated corner (figure b). To generate a smooth corner, Jackmore went back to Photoshop and used the Clone Stamp Tool—this time completely removing the castle—then used this altered version to make a new pattern (figure c). To replace the distorted corner in her castle brush with the new smooth corner, Jackmore first duplicated the castle brush by dragging it to the New Brush icon in the Brushes panel. Next, setting her Brushes panel view to Thumbnail, she selected the pattern brush without the castle and then dragged it to the artboard to reveal the artwork that makes up each of the tiles. To replace the distorted corner with the smooth one, she used the Direct Selection tool to marquee the artwork that formed the smooth corner. Holding Option/Alt, she then dragged the selected art into the Brushes panel, and when the new smooth corner was directly on top of the distorted castle tile in the duplicate, she saw a + icon and released the cursor (figure d). In Pattern Brush Options she clicked OK, and the result was a new pattern brush with the smooth corner tile with subtle, small variations where some quatrefoils met at the corners. Find the link to her CreativePro article with more details about her process, at wowartist.com.
Gallery: Gustavo Del Vechio
)
)
For his PDF booklet, Illustrator CC. O que há de novo? (translated as Illustrator CC: What´s new?), artist and author Gustavo Del Vechio created a pattern brush that would demonstrate the various options available with the new auto-generated corners in Illustrator CC. He’s very kindly sharing with us his clear diagrams and explanation of the way corner tiles are formed from the side tile. Note that in Pattern Brush Options, Show Auto Generated Corner Tiles is enabled by default, so if you don’t see them in the list of corner tiles, make sure that’s still enabled. There are a few basic strategies that Illustrator uses to calculate corners for you, and combines them in various combinations. These include stretching your pattern (like an art brush), copying and then overlaying extensions of the patterns, and finally, making cuts or “slicing” parts of the pattern in various ways, deleting the extraneous bits. These auto-generated tiles will fit with the side tile, but don’t forget to look at your choices for both the Outer Corner and the Inner Corner, found on either side of your side tile in the Pattern Brush dialog, to make sure you have corners that both fit well and look good. See the following pages for a closer look at auto-corner options.
Gallery: Gustavo Del Vechio
)
Auto-Centered tiles are formed by the side tile stretching along the path like an art brush and forcing it to make a 90° turn at the corner. Any extraneous portion of the pattern gets trimmed to make a smooth join, but the side tile itself isn’t cut apart.
)
Auto-Between uses two copies of the side tile, one in a vertical orientation, the other turned horizontally by 90°, manipulated to fit the geometric shape that represents one half of the corner. Illustrator cuts each at the upper-left corner at a 45° angle and then joins them together along that cut. You’ll notice distortions when the side tile isn’t square; the more rectangular the area, the more distortion will occur. If the objects are round, the level of distortion in the tile is even more obvious. For example, a composition with straight lines (above, top) looks less distorted than one using ellipses (directly above).
Gallery: Gustavo Del Vechio
)
Auto-Sliced also uses two copies of the side tile. Illustrator again orients one side tile vertically and one horizontally and then finds the center of the tile. It next makes a cut at a 45° angle, top left to bottom right, through the center of each copy. After deleting the top portion of the vertical tile and the left portion of the horizontal tile, it joins the copies along the cut to form the corner tile.
)
Auto-Overlap uses two copies of the side tile, one oriented vertically and one horizontally, to align the tiles on their center points. It then removes any excess that extends above or to the left of the tiles. The two remaining sections still overlap at their center, but the tile is cut along the overlap edge, the hidden portion is deleted, and the two parts are joined into the corner tile.