- Working with metadata
- Photo filtering and searches
- Extra tips for advanced users
This chapter is from the book
This chapter is from the book
This chapter is from the book
Extra tips for advanced users
Audio file playback
It was thanks to Ian Lyons that I discovered this little gem. Lightroom will recognize and play back any audio sidecar file that is associated with a photo. The following steps show you how this would work using a Canon EOS 1Ds MkII camera.
)
- If your camera has the facility to record audio notes, you can do so as you review the pictures that have just been shot. The method will vary from camera to camera, but with this camera you press the record button and speak into the microphone on the back.
- After importing the files to Lightroom, if there are audio sidecars present, they will appear as a metadata item just below Metadata Status. All you have to do is click the action button next to the Audio filename to play back the audio annotation.
)
GPS metadata and linking to Google Earth
If you have GPS metadata embedded in an image file, Lightroom will let you link directly to Google Maps and locate exactly where that photograph had been taken. But in order to pull off this trick you will need to find a way to embed GPS metadata in your image capture files. This is not as difficult as you might imagine, since there are now several GPS devices capable of capturing the GPS coordinates at the time of capture and then synchronizing the GPS data with your capture images via post-processing software. For example, according to John Nack's blog, Jobo AG™ has announced photoGPS, a $149 device that sits in the hot shoe (i.e., the mounting point for a flash) of a digital SLR. Post-processing software synchronizes data captured by the device with the corresponding images. In the following steps, I have used a set of images with embedded GPS metadata, kindly provided by Ian Lyons to demonstrate how Lightroom can use such metadata to link to Google Maps. By the way, you can see more of Ian's photographs taken around the Falklands and Antarctica on his Computer Darkroom Web site.
)
- Here is a Library view of Ian's photographs showing a selection of images shot around the Falklands and South Georgia islands.
- In this Loupe view mode I have focused on one of the photographs. You can see that if I roll the mouse over the arrow alongside the GPS metadata item, a tooltip dialog displays Map Location.
- Click the arrow next to the GPS metadata and (providing you have a live Internet connection) this will take you directly to Google Maps, pinpointing exactly where the photograph was taken. If Google Maps will allow you to, you will often be able to zoom in further, to get a closer look at the location where the photograph was taken.
- If you happen to have the Google Earth program installed on your computer, you can also copy and paste the GPS coordinates and use the more extensive navigation tools to explore the scene where the photograph was taken. In this example I tilted the view to a ground-level view of the site where Ian took his photograph.
)
)
)
How to embed GPS metadata in a photo
OK, now that I have shown you how GPS metadata can be useful, let's see how you can capture and embed GPS metadata in a series of photos. Lightroom does not have any mechanism that will allow you to import or edit GPS metadata. In fact, it will only display the GPS field in the EXIF Metadata panel if GPS metadata is actually present in the catalog image files. The following steps show how I was able to import the GPX data from a Sony GPSCS1KA unit (see Figure 4.82) and merge the data with the camera captured images. This tiny Sony™ device can record the GPS coordinates of wherever the unit is, once every 15 seconds and save the GPS time-stamped waypoints as part of a log. When you get back to the computer you need to launch the LoadMytracks™ program described here to read and convert the log file and then launch the GPSPhotoLinker™ program to merge the GPS data with the camera files before importing them into Lightroom. Now you don't have to carry out the GPS data merge at this point. If you are in a hurry, you can import the photos first and locate the GPX log file and the photos folder later. But in my experience it seemed to work well to carry out the GPS data merge first and import the files from the card after.
)
Figure 4.82 The Sony™ GPSCS1KA is a small, lightweight device that can be used to record GPS coordinates that can be read by appropriate software. It's easily carried around in a camera bag or attached to a strap.
)
- I connected the Sony™ GPS device via the USB cable that came with the unit. If you open up the device folders and take a look inside, you can see the GPX data log file. This can be deleted manually later once all the log data has been successfully copied.
- I used a freeware program called LoadMyTracks to read the log file from the Sony™ GPS device and save it as a GPX data file. You will want to go to the top menu to choose the device model type that matches the connected device (in this case, NMEA was the correct one to select). I wanted to export the data in a GPX format and when I clicked the Acquire button, this opened the Save dialog shown here, where I chose a folder location to save the GPX file to. You will note in the Save dialog that there is an option to automatically open the GPSPhotoLinker software after the GPX export had been successful.
- So providing you have GPSPhotoLinker already installed, this will launch the program. In the top bar you can see the main buttons. You have Files, which will let you inspect which GPX logs have been added so far. The Load Tracks button lets you add new GPX logs, and the Load Photos button lets you load photos that you want to add data to. We'll be looking at these features in the next few steps.
- I began by clicking the Load Tracks button and navigated to the GPX file that I had just saved out of LoadMyTracks.
- I then clicked the Load Photos button to locate the capture files that were shot at the same time that the GPS data was recorded.
- Having loaded the GPX log and the photos I was ready to click the Batch mode tab button to combine the GPX data with the relevant photos. There are some Linking options to consider here that will determine how the GPS waypoints are to be interpreted. Here I kept things simple and instructed GPSPhotoLinker to link to the nearest recorded point. All I had to do then was to click "Batch save to photos" and GPXPhotoLinker wrote the GPS metadata to the correct EXIF metadata field. Ian Lyons points out that it is best not to save or overwrite the City, State, and Country data. This is because if the shots have been taken in remote areas, most software will tend to hunt down the nearest biggest city (which could be many miles away). Figure 4.83 shows the dialog that opens when you click Save Options.
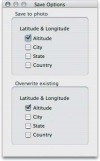
Figure 4.83 If you click the Save Options button in GPS PhotoLinker, you can choose among these additional options when saving.
)
)
)
)
)
)