- #31 Selecting Path Segments and Paths
- #32 Defining, Selecting, and Isolating Groups
- #33 Selecting, Editing, and Aligning Anchors
- #34 Selecting Similar Objects
- #35 Editing with the Bounding Box
- #36 Duplicating
- #37 Scaling
- #38 Rotating
- #39 Shearing (Skewing)
- #40 Distorting with Envelopes
- #41 Using Pathfinders
#35 Editing with the Bounding Box
You can quickly and easily resize, reshape, and rotate any object (or group of objects) using that object's bounding box. If the bounding box is not displayed, you can make it visible by choosing View > Show Bounding Box. With the bounding box turned on, a rectangular frame appears around selected objects, displaying four corner handles and four side handles (Figure 35a).

Figure 35a Displaying a bounding box for a selected object.
You can quickly rescale any selected object by dragging on a bounding box handle. Resizing an object with the bounding box expands or contracts the object using the selected handle (Figure 35b).

Figure 35b Resizing an object with the bounding box.
Hold down the Shift key as you rescale to maintain the original height-to-width ratio. Hold down the Option/Alt key as you resize using a bounding box to make the center point instead of a bounding box handle serve as the anchor.
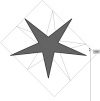
Moving the Selection tool near an anchor in a bounding box turns the Selection tool into a rotation tool. Hold down the Shift key as you rotate to constrain rotation to 45-degree angle increments (Figure 35c).

Figure 35c Rotating a star using the bounding box.